Table of Contents
Advertisement
Quick Links
Advertisement
Table of Contents

Summary of Contents for IBT morph lock
- Page 1 Installation and Setup Guide for the Prosthetist...
- Page 2 All rights reserved. morph lock is a trademark of Infinite Biomedical Technologies, LLC. morph lock is part of the morph2 product family. This document provides information for the prosthetist who will be installing morph lock. FCC ID: O7Q-MORPH2 IC: 21990-MORPH2...
- Page 3 INSTALLATION AND SETUP GUIDE FOR THE PROSTHETIST Thank you for choosing morph lock to help your prosthesis user gain more control of his or her prosthesis. Whether you’re retrofitting morph lock into an existing prosthesis or you’re building a new prosthesis from the ground up, this guide will familiarize you with morph lock functionality and installation.
-
Page 4: Table Of Contents
Before you Begin �������������������������������������������8 Batteries and Electrodes �����������������������������������9 Installation without a Wrist ������������������������������ 10 Installation with a Wrist ���������������������������������� 13 5. Test morph lock ������������������������������������������ 17 6. Using Tags ����������������������������������������������� 18 7. Troubleshooting ������������������������������������������ 21 8. Maintaining morph lock ����������������������������������� 23 Preventative Inspection ����������������������������������... -
Page 5: Meet Morph Lock
EMG electrode input on and off. It works with RFID tags. Each tag is programmed with a lock command. When morph lock detects a tag near the prosthesis, morph lock pauses EMG input to the hand, thereby freezing the hand in place. -
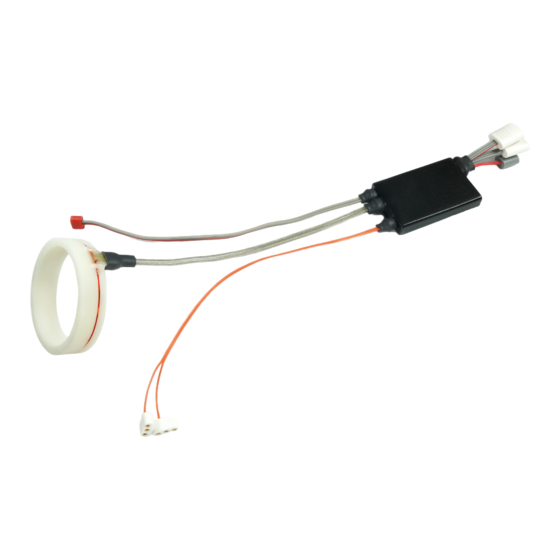
Page 6: Component Description
Tags are small objects that store the lock command. When morph lock comes close to a tag, morph lock wirelessly reads the tag and interrupts the EMG signal to the hand. For more details on the tags and how to incorporate... -
Page 7: Specifications
specifications Temperature range (use) -10°C to +50°C (14°F to 122°F) Temperature range -20°C to +65°C (-4°F to 149°F) (transport/storage) Humidity range (use) 45% - 75% Humidity range 15% - 93% (storage/transport) Atmospheric pressure range 860 hPa - 1060 hPa Input voltage 7.4V Maximum Output Current Compatible battery... -
Page 8: Installation
• Ottobock wrist (10S17) with MyoRotronic (13E205) • ProWrist (5010056). If using ProWrist, also need: Motion Control Battery Adapter Cable (3010461). WARNING: Do not place morph lock in a carbon fiber prosthesis. morph lock cannot detect tags through carbon fiber. -
Page 9: Batteries And Electrodes
WARNING: Turn the battery OFF before plugging in any cables. Do not attempt to connect the battery or electrodes in a way that is not specified. This could cause permanent damage to morph lock, the battery or electrodes. morph lock... -
Page 10: Installation Without A Wrist
Now that your electrodes and battery are connected, insert morph lock through the proximal end of the prosthesis (i.e. end opposite of the lamination collar). WARNING: Do not place morph lock in a carbon fiber prosthesis. morph lock cannot detect tags through carbon fiber. - Page 11 Wires WARNING: Ensure the battery is OFF before plugging in any cables. Do not attempt to connect the morph lock output cables in a way that is not specified. This could cause permanent damage to the hand and morph lock.
- Page 12 Insert the coaxial plug into the lamination collar coupling piece and seal it in place using the small o-ring. Insert the coupling piece into the laminiation collar and secure it with the large o-ring.
-
Page 13: Installation With A Wrist
INSTALLATION WITH A WRIST morph lock is compatible with both the Motion Control ProWrist (P/N 5010056) and the Ottobock Wrist (10S17) with MyoRotronic (13E205). If using ProWrist, you will also need the Motion Control Battery Adapter Cable (P/N: 3010461). Ottobock Wrist (10S17) with... - Page 14 WARNING: Ensure the battery is OFF before plugging in any cables. Do not attempt to connect the morph lock output cables in a way that is not specified. This could cause permanent damage to the hand, wrist and morph lock.
- Page 15 Antenna cable should extend into the prosthesis. Use a small amount of adhesive (i.e. glue) to secure the antenna to the lamination collar. Pull the morph lock output wires through the hole in the lamination collar.
- Page 16 Plug the morph lock blue cable into the ProWrist 9-pin Connector for Input Device Plug the morph lock red power cable into the ProWrist 4 pin Power Cable. NOTE: for the power cable, use the Motion Control Battery Adapter Cable (P/N: 3010461).
-
Page 17: Test Morph Lock
If the signals are reversed (i.e. close electrode opens the hand), connect to the hand’s software and switch the EMG signals. Approach a tag to the wrist area of the prosthesis where the morph lock antenna resides. morph lock will vibrate twice to indicate that it has detected the tag and locked the hand. -
Page 18: Using Tags
(1-3”) than smaller tags (<1”). TAG VIBRATION PATTERNS Everytime it detects a tag, morph lock vibrates to notify the user that it has read the tag. morph lock creates different vibration patterns depending on the mode it enters. This feedback can be very helpful for the user to know the status of the prosthesis. - Page 19 TAG PLACEMENT Tags can be placed virtually anywhere. The user can place them in an environment (i.e. kitchen, office) or carry them (i.e. in wallet, pants pocket). We explore some strategic tag locations in this section. Kitchen: • Tag on the cabinet door to lock prosthesis after grabbing a plate from the cabinet.
- Page 20 • Only use tags sold by IBT: There are several variations of tags on the market. morph lock only works with a specific type of tag provided by IBT. Contact IBT if you need additional tags.
-
Page 21: Troubleshooting
Try placing your finger in the inner socket to feel the vibration there. If the hand does not move, morph lock and the hand are not receiving power. It is possible that the power cable got disconnected during installation. - Page 22 If after approaching a tag, the hand no longer responds to EMG, morph lock detected the tag, but the vibration may be too subtle to feel. Please note that the vibration may be easier to detect while wearing the prosthesis.
-
Page 23: Maintaining Morph Lock
No additional inspection is required or advised. MAINTENANCE No regular maintenance is required for morph lock. If you need to replace the battery or electrodes, simply unplug the battery or electrodes from the morph lock input connectors. Follow the instructions in Section 4 to plug in the new electrode or battery. -
Page 24: Safety And Warnings
Battery use warning: morph lock must be powered by a FlexCell battery system from IBT. We have conducted safety testing to confirm compatibility between morph lock and FlexCell batteries. - Page 25 The testing was performed for typical levels of radiation, but there is a chance that the device is exposed to a concentrated level. If the product is in a high electromagnetic field, such as near an MRI, the device may need to be moved out of this area to function properly.
- Page 26 notes...
- Page 27 notes...
Need help?
Do you have a question about the morph lock and is the answer not in the manual?
Questions and answers