Table of Contents
Advertisement
Quick Links
1
APPLICATION ................................................................................... 3
2
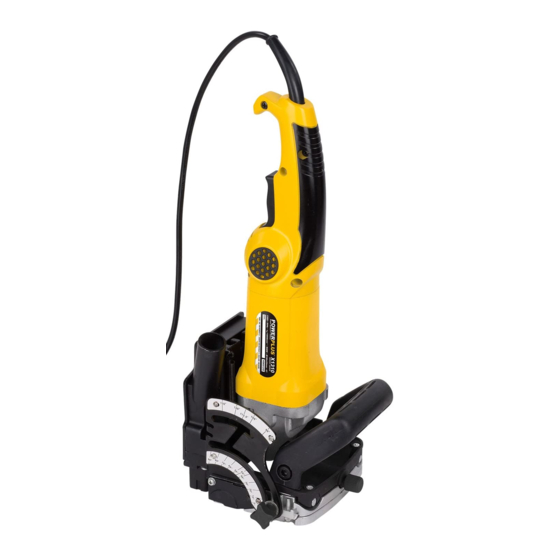
DESCRIPTION (FIG A) ...................................................................... 3
3
PACKAGE CONTENT LIST .............................................................. 3
4
SYMBOLS .......................................................................................... 3
5
GENERAL POWER TOOL SAFETY WARNINGS ............................ 3
5.1
Work area .................................................................................................................. 4
5.2
Electrical safety ......................................................................................................... 4
5.3
Personal safety ......................................................................................................... 4
5.4
Power tool use and care ........................................................................................... 5
5.5
Service ....................................................................................................................... 5
6
SPECIFIC SAFETY WARNINGS ....................................................... 5
7
ADJUSTMENTS ................................................................................. 6
7.1
Adjusting the cutting depth ...................................................................................... 6
7.2
Adjusting the cutting angle ...................................................................................... 6
7.3
Adjusting the height.................................................................................................. 6
7.4
Checking the cutting depth ...................................................................................... 6
7.5
Setting the cutting depth .......................................................................................... 6
8
ASSEMBLY ........................................................................................ 6
8.1
Mounting saw blade .................................................................................................. 6
8.2
Mounting dust bag .................................................................................................... 7
8.3
Attaching the plate protection .................................................................................. 7
9
OPERATION ...................................................................................... 7
9.1
Switching on and off. ................................................................................................ 7
9.2
Marking the workpieces. ........................................................................................... 7
9.3
Positioning of the machine ....................................................................................... 7
9.4
Large workpieces: ..................................................................................................... 7
9.5
Small workpieces. ..................................................................................................... 7
9.6
Sawing grooves......................................................................................................... 7
9.7
Joining the workpieces ............................................................................................. 8
10
CLEANING AND MAINTENANCE .................................................... 8
10.1
Cleaning ..................................................................................................................... 8
Copyright © 2021 VARO
POWX1310
P a g e
| 1
EN
www.varo.com
Advertisement
Table of Contents

Summary of Contents for VARO POWERPLUS POWX1310
-
Page 1: Table Of Contents
Positioning of the machine ..................7 Large workpieces: ..................... 7 Small workpieces...................... 7 Sawing grooves......................7 Joining the workpieces ..................... 8 CLEANING AND MAINTENANCE ............ 8 10.1 Cleaning ........................8 Copyright © 2021 VARO www.varo.com P a g e... - Page 2 POWX1310 TECHNICAL DATA ................8 NOISE ....................8 SERVICE DEPARTMENT ..............9 STORAGE ..................9 WARRANTY ..................9 ENVIRONMENT ................10 DECLARATION OF CONFORMITY ..........10 Copyright © 2021 VARO www.varo.com P a g e...
-
Page 3: Application
Read manual before use or damage to the tool. In accordance with essential Class II - The machine is double safety standards of applicable insulated; Earthing wire is European directives therefore not necessary. Copyright © 2021 VARO www.varo.com P a g e... -
Page 4: Work Area
Remove any adjusting key or wrench before turning the power tool on. A wrench or a key left attached to a rotating part of the power tool may result in personal injury. Copyright © 2021 VARO www.varo.com P a g e... -
Page 5: Power Tool Use And Care
When working with the machine always hold the machine firmly with both hands and provide for secure distance. Persons under 16 years of age are not permitted to operate this machine. Copyright © 2021 VARO www.varo.com P a g e... -
Page 6: Adjustments
Loosen your screws and open the top of the base plate Press the spindle lock and turn the spindle until it engages in the lock. Keep the spindle lock pressed during this procedure. Copyright © 2021 VARO www.varo.com P a g e... -
Page 7: Mounting Dust Bag
Position the machine (see positioning of the machine) Hold the machine with both hands and switch the machine on. Push the motor base carefully forward as far as possible. Copyright © 2021 VARO www.varo.com P a g e... -
Page 8: Joining The Workpieces
Acoustic pressure level LpA 89 dB(A) Acoustic power level LwA 100 dB(A) ATTENTION! Wear hearing protection when sound pressure is over 85 dB(A). aw (Vibration) 5,1 m/s² K = 1.5 m/s² Copyright © 2021 VARO www.varo.com P a g e... -
Page 9: Service Department
Your purchase receipt must be kept as proof of date of purchase. Your appliance must be returned undismantled to your dealer in an acceptably clean state, (in its original blow-moulded case if applicable to the unit), accompanied by proof of purchase. Copyright © 2021 VARO www.varo.com P a g e... -
Page 10: Environment
EN55014-1 : 2017 EN55014-2 : 2015 EN61000-3-2 : 2014 EN61000-3-3 : 2013 Keeper of the Technical Documentation : Philippe Vankerkhove, VARO – Vic. Van Rompuy N.V. The undersigned acts on behalf of the company CEO, Philippe Vankerkhove Regulatory Affairs – Compliance Manager 20/01/2021, Lier - Belgium Copyright ©...
Need help?
Do you have a question about the POWERPLUS POWX1310 and is the answer not in the manual?
Questions and answers