Table of Contents
Advertisement
Quick Links
Advertisement
Table of Contents

Related Manuals for Soniclear Evo 4

Summary of Contents for Soniclear Evo 4
- Page 1 Evo 4 Loopback Kit OPERATION GUIDE...
- Page 2 About This Manual This manual covers the installation and usage of the Evo 4 Loopback Kit for use with the SoniClear digital recording software product and communications software products. Revision Date: 2/8/21 Printed in the United States. © Copyright 2021 Trio Systems LLC All rights reserved.
-
Page 3: Table Of Contents
Loading and Saving Presets ........................ 9 Evo 4 Loopback Settings ........................11 Audio Loopback Cable ........................12 SoniClear Software Configuration for Evo 4 ..................13 Recording Options Tab - Sound Quality ................... 13 Hardware Tab – Audio Device Selection ..................13 Advanced Recording Options ...................... -
Page 4: Evo 4 Operation
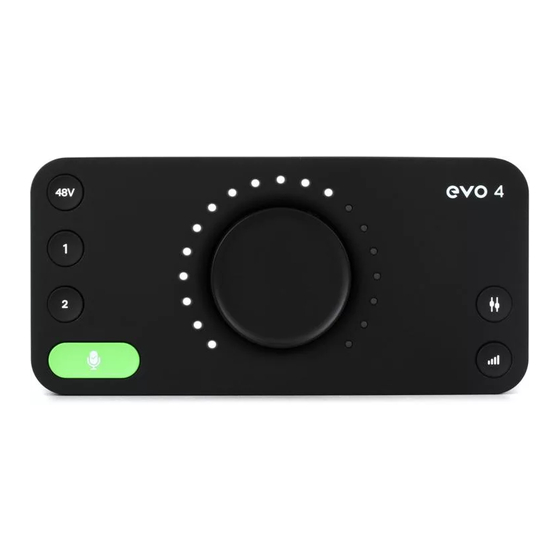
The microphone has a very directional pickup pattern, so it does not need to be right in front of your mouth. You will be heard clearly without needing to lean in to the microphone. All of the features of the Evo 4 are adjusted using the buttons and single large knob on the top of the control box: You will normally only need to use the volume knob to adjust the playback level on the headphones. -
Page 5: Additional Usage Notes
1. In normal use only the control button for adjusting the headphone level will need to be used. The other buttons on the Evo 4 should not be pressed. For example, the “48V” button in the upper left corner should always be on (illuminated red). Pressing the control buttons may result in the settings being incorrect. - Page 6 Select “Show EVO Control” to display the Evo 4 control panel: Click on the File/Open pulldown menu selection to open the Load Mixer window:...
- Page 7 Select the SoniClear setting shown there and click the Load button to reset the Evo 4 to the default values. Note that it may appear that the Load button is disabled when it is in fact working. Hovering the mouse...
-
Page 8: Evo 4 Loopback Kit Installation
USB Interface The Audient Evo 4 interface requires a USB 2.0 or USB 3.0 connection. The Evo 4 should be connected directly to a port on the computer or a manufacturer supplied docking station. Connecting it to a USB hub may result in unreliable operation. -
Page 9: Evo 4 Software Installation
The file providing the needed presets is available for download from the SoniClear website: https://download.soniclear.com/evo-presets. After downloading the preset file, right click on the Evo 4 control panel icon in system tray and select “Show Evo Control”:... - Page 10 This will display the mixer with the default settings provided with the drivers: Click on the File/Open pulldown menu selection. This opens the Load Mixer window:...
-
Page 11: Evo 4 Loopback Settings
“loop back” audio from the computer back into another program in the computer. In this case, the Zoom or softphone audio is sent to the Evo 4 device, and then sent back to SoniClear to be recorded using the “Loopback Device” provided by the Evo 4 drivers. -
Page 12: Audio Loopback Cable
Audio Loopback Cable The Evo 4 kit includes a hardware audio cable for looping audio back from the computer into Channel 2 of the mixer. The purpose of this cable is to allow other programs on the computer to play audio into the teleconference software and be recorded in SoniClear. -
Page 13: Soniclear Software Configuration For Evo 4
USB jack on the computer at some point in time. Once the Default Recording Device field has been set, the Evo 4 must be plugged into the same USB jack on the computer each time it is used. -
Page 14: Playback Device Selection
Default Speaker Device Selection This is the sound card that will be used for playback. To listen to SoniClear playback through the Evo 4 headphone jack, select “Main Output 1/2 (Audient EVO)”. Removable Recording Device The “Use Removable Device If Present”... - Page 15 Monitor Delay Monitor Delay should be set to the default of 3 seconds. Force Recording at 44.1KHz. This field should be set to Unchecked.
- Page 16 The included hardware cable sends this readback audio from the computer headphone jack into Channel 2 of the Evo 4 interface. Monitoring of audio for this application must be done using a separate headphone device (not included with this kit).
- Page 17 Monitor Delay Monitor Delay should be set to the default of 3 seconds. Force Recording at 44.1KHz. This field should be set to Unchecked.
-
Page 18: Communication Software Configuration For Evo 4
“Loopback L (Audient EVO4)”. Playback Software Configuration for Evo 4 The Evo 4 Kit includes the ability to play back audio from software programs on the computer. With this configuration the audio being played back can be heard by the conference call participants and on the Evo kit monitoring headphone.
Need help?
Do you have a question about the Evo 4 and is the answer not in the manual?
Questions and answers