Table of Contents
Advertisement
Quick Links
Advertisement
Table of Contents

Related Manuals for Telemotive AG Remote Control Touch

Summary of Contents for Telemotive AG Remote Control Touch
- Page 1 Remote Control Touch User Guide Version 2.3.1 / 10.03.2016...
-
Page 2: Table Of Contents
Installation ........................ 12 5.4.1 Cable connection ..................... 12 5.4.2 Telemotive System Client ................13 Connecting the Remote Control Touch with a data logger ........15 5.5.1 Configure the network settings ................ 15 5.5.2 Activating Telemotive System Link (TSL) ............16 Resetting the network settings .................. - Page 3 Remote Control Touch Datum: 10.03.2016 Seite 3 von 57 User Guide Adjusting backlight ....................36 7.2.1 Automatic adjustment ..................36 7.2.2 Manual adjustment ..................37 Adjusting volume ...................... 37 Changing application ....................37 Changing tab sheet ....................38 Opening and closing side menu ................38 Playing voice note ....................
-
Page 4: License Agreement
The software is a copyright property of the Telemotive AG. The program or parts of it may not be further licensed to third parts, rented, sold or be further marketed in any form without explicit writ- ten approval by Telemotive AG. -
Page 5: Product Liability
The burden of proof is with the customer. The Telemotive AG does ensure the legal warranty according to German law. Except for warran- ties expressly set forth in this agreement, any and all products are delivered “as is” and the pro- ducer makes and the customer receives no additional express or implied warranties. -
Page 6: Overview
Datum: 10.03.2016 Seite 6 von 57 User Guide Overview This user guide describes the administration of the Remote Control Touch, the surface of the installed software and its operation. ® ® The configuration of the Remote Control Touch was only tested with Microsoft Windows This document refers to blue PiraT Mini firmware version 02.03.01 and the Telemotive Sys-... -
Page 7: System Requirements
The software client is needed to configure the device and later to download or convert the rec- orded data. Further manuals Beside this user guide the Telemotive AG offers the main manuals for the client as well as for the different data logger generations in its ServiceCenter at https://sc.telemotive.de/bluepirat. User manual for the Telemotive System Client https://sc.telemotive.de/4/uploads/media/TelemotiveSystemClient_UserManual.pdf... -
Page 8: Remote Control Touch
This chapter describes the position and function of the Remote Control Touch components, the Remote Control Touch accessories and the installation of hard- and software. The Remote Control Touch is the remote control and external display device for the blue PiraT Mini and blue PiraT2 data loggers or a TSL network. -
Page 9: Side View, From The Right
Remote Control Touch Datum: 10.03.2016 Seite 9 von 57 User Guide 5.1.2 Side view, from the right 8-pol LEMO socket Gbit Ethernet (RJ45) Gbit Ethernet (RJ45) Figure 5.2: Side view, from the right with components 5.1.3 Rear side Mini USB 2.0 4-pol audio jack plug stereo out/microphone (3.5 mm) OMTP... -
Page 10: Functionality Of Components
Observe therefore the points described in chap- ter 8 Maintenance provisions and safety regulations. 5.2.1 Ports The ports are used to connect the Remote Control Touch, for example with the power supply (see section 5.4.1). Connection with …... -
Page 11: Leds
The microphone is used to record voice notes on triggers. The voice recording is audible up to a vehicle speed of 130 km/h. 5.2.7 Touchscreen The screen is used to operate the Remote Control Touch. Only use the tip of the finger to oper- ate it. The brightness is adjustable. Accessories The Remote Control Touch is supplied with an Ethernet cable (length: ~ 6 m) and a power cable with LEMO connector to banana plug (length: ~ 6 m). -
Page 12: Installation
Then the Remote Control Touch can be used in standalone mode. In order to make full use of all functions of the Remote Control Touch, a connection to at least one blue PiraT data logger is required. This creates a Telemotive System Link (TSL). -
Page 13: Telemotive System Client
Seite 13 von 57 User Guide with the Remote Control Touch in order for the Remote Control Touch to recognize them. The client computer can be connected to a free Ethernet port of the TSL chain. Figure 5.5: TSL network with one bPMini, one Remote Control Touch and one bP2 (e.g.) Index 5.4.2 Telemotive System Client... - Page 14 Remote Control Touch Datum: 10.03.2016 Seite 14 von 57 User Guide Figure 5.6: TSL Client Portal Note: Your network connection must be set to “Obtain IP address automatically”. Click [Download], to download the Telemotive System Client directly from the device.
-
Page 15: Connecting The Remote Control Touch With A Data Logger
Connecting the Remote Control Touch with a data logger 5.5.1 Configure the network settings The Remote Control Touch and a data logger are configured as DHCP-Server by default. They both got the IP address 192.168.0.233. There are three different ways to connect this two de- vices. -
Page 16: Activating Telemotive System Link (Tsl)
Remote Control Touch Datum: 10.03.2016 Seite 16 von 57 User Guide Figure 5.9: Viewing the devices in the client 5.5.2 Activating Telemotive System Link (TSL) To use the RCT, you have to activate TSL at both devices. You can activate it by clicking [TSL active] like you can see in the following picture. -
Page 17: Resetting The Network Settings
Press and hold the home button for about 20 sec. until the state LED is blinking 2 times. State-LED is blinking 2 times Active-LED is lightning green. Remote Control Touch loads the default configuration. Tipp on [Accept]. The warning popup disappears. Active-LED is blinking green. -
Page 18: Surface
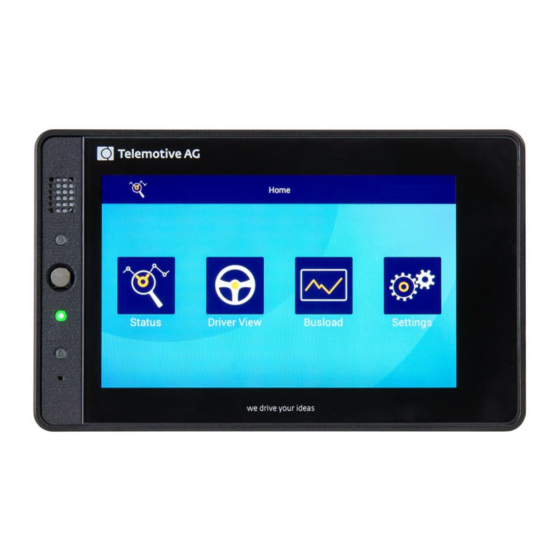
This chapter describes the application setup and the layout of the individual views as well as the displays contained. The Remote Control Touch software is very user-friendly thanks to its graphic surface and the clear outline. Figure 6.1 shows the outline of the application in <Home> view and four applications. The appli- cation views contain minimum one tab. -
Page 19: Layout Of The Views
Remote Control Touch Datum: 10.03.2016 Seite 19 von 57 User Guide Layout of the views All views consist of a window and a dark blue frame. As the window contents vary depending on the view, they are described in more detail in the following sections of this chapter. -
Page 20: Tab Bar
Driver View Management of the functionkeys, markers and voice notes Busload Display of all available buses and their channels Settings Adjustment of backlight and volume of the Remote Control Touch Table 6.1: Application overview Figure 6.3: Home view Index RCTouch_UserGuide_V2.3.1.doc... -
Page 21: Tab Sheets
the tab sheet [Overview] and the tab sheet of the Remote Control Touch with the name assigned in the Telemotive System Client. If more devices in a TSL network are cable-connected with the Remote Control Touch, each device is assigned a tab sheet named after it. -
Page 22: Device Name N
Each device listed on the tab sheet [Overview] can be viewed separately on the respectively named tab sheet. The window of these tab sheets, with the exception of the Remote Control Touch window, con- tains the following displays: Device name... -
Page 23: Markerlist
Remote Control Touch Datum: 10.03.2016 Seite 23 von 57 User Guide 6.3.4 Markerlist The window of the tab sheet [Markerlist] contains two buttons on the left and a list of set mark- ers on the right. The markers are sorted by index and indicate date and time of the setting. A trigger that was set using the [Record] button contains a voice note. -
Page 24: Most150
Remote Control Touch Datum: 10.03.2016 Seite 24 von 57 User Guide 6.3.6 MOST150 Each connected logger that receives MOST150 messages generates its own tab sheet [MOST150] with the following displays: Logger name Message Bus load Messages category per second Figure 6.9: Tab sheet “MOST150”... -
Page 25: Gps
Remote Control Touch Datum: 10.03.2016 Seite 25 von 57 User Guide 6.3.7 GPS Each connected logger that receives GPS data generates its own tab sheet [GPS] with the fol- lowing displays: Latitude Longitude Altitude above sea level Course/direction Speed Figure 6.11: Tab sheet “GPS”... -
Page 26: General
(left) or increased (right). [Intern] button Remote Control Touch internal hardware is actuated. Acoustic signals are played back through the speaker and recorded through the microphone (see section 5.1.1). [Extern] button External hardware of the connected accessories is actuated. -
Page 27: Displays
User Guide Displays The displays of the Remote Control Touch are similar to those of the data loggers. An overview to their meanings is provided in the following table. You can find the view that contains the dis- play via the cross reference in the column “See”. - Page 28 Remote Control Touch Datum: 10.03.2016 Seite 28 von 57 User Guide The device status may display the following messages: Message Form Meaning Data recording ERROR red flashing device in error mode jeopardized FWUPDATE dark blue flashing logger firmware is updated...
-
Page 29: Other Views
Other views Other views include: views that appear due to the configuration of a connected logger, views that can only be closed via the Remote Control Touch and/or views that appear outside the application. 6.5.1 AlertDialog Precondition... -
Page 30: Launcher
User Guide 6.5.3 Launcher Precondition none Timing Remote Control Touch is switched on. (before the application) Options close popup Figure 6.15: Launcher view Within the view “Launcher” a safety message in a popup appears after a short time (see section 8.3). -
Page 31: Rc Monitor
Remote Control Touch Datum: 10.03.2016 Seite 31 von 57 User Guide 6.5.4 RC Monitor Precondition Optional Remote Control Monitor license is installed. An application is open. Timing Complex trigger configured to the <Action> [Display Remote Control Mon- itor] is actuated. (see section 7.11) -
Page 32: Rc Text
Figure 6.18: Window “RC Text” 6.5.6 Standby Precondition none Timing Remote Control Touch is switched off or not used for an extended period. (after the application) Options none Figure 6.19: Standby view To exit the standby mode, press the Home button or tap on the screen. -
Page 33: Restrictions In Standalone Mode
Seite 33 von 57 User Guide Restrictions in standalone mode 6.6.1 Remote Control Touch applications In standalone mode the Remote Control Touch is not connected to any data logger. Some func- tions are therefore not available. The application Status remains unaffected. - Page 34 Remote Control Touch Datum: 10.03.2016 Seite 34 von 57 User Guide In standalone mode the following applications are available: 4. Open configuration 5. Update firmware 6. Open bug report Figure 6.21: Tab “Network Logger” in standalone mode The applications [Update firmware]...
- Page 35 Remote Control Touch Datum: 10.03.2016 Seite 35 von 57 User Guide Figure 6.22: Configuration trees: Standalone mode (left) – TSL (right) Find more information about components of the configuration tree in the User manual for the Telemotive System Client, chapters 8 and 11.
-
Page 36: Operation
Tap on the desired functionkey that was previously assigned with a “complex trigger”, see sec- tion 7.11. The Remote Control Touch responds according to the <Action> that was set in the configuration for the <Event> [Key Stroke] using a functionkey as <Key>. Index... -
Page 37: Manual Adjustment
Note: A tone is produced to simulate the newly set volume. If you set the volume to “Volume: 0%”, the Remote Control Touch is mute. Its acoustic signals are inaudible. Navigate to the tab sheet [General] in the application Settings. -
Page 38: Changing Tab Sheet
Remote Control Touch Datum: 10.03.2016 Seite 38 von 57 User Guide Changing tab sheet To reach other tab sheets within an application, tap in the tab bar on the tab of the desired tab sheet. Selected tab sheet appears. -
Page 39: Scrolling Through Applications
Remote Control Touch Datum: 10.03.2016 Seite 39 von 57 User Guide If you tap on a second button while the voice note is played, the playback is stopped and the second voice note is played. If you want to stop playing the voice note prematurely, tap on the button again. -
Page 40: Scrolling Through Tab Sheet
Remote Control Touch Datum: 10.03.2016 Seite 40 von 57 User Guide 7.10 Scrolling through tab sheet If the window exceeds the height of the tab sheet, you have the option to scroll. Swipe the tab sheet vertically: upwards Window is scrolled down. - Page 41 Remote Control Touch Datum: 10.03.2016 Seite 41 von 57 User Guide Note: Triggers are configured per device. Events only trigger actions on the source device. TSL-wide events are not supported. Double-click on [Add Trigger… (…)]. New trigger is generated and displayed in the configuration tree (e.g., Trigger #1).
- Page 42 Remote Control Touch Datum: 10.03.2016 Seite 42 von 57 User Guide Configuration is transferred to the logger. Note: If you select [Key Stroke] as the <Event> using a functionkey as <Key>, the trigger ap- pears on the tab sheet [Functionkeys] on the selected functionkey with the specified name for the trigger.
-
Page 43: Setting Triggers
Remote Control Touch Datum: 10.03.2016 Seite 43 von 57 User Guide 7.12 Setting triggers Navigate to a tab sheet in the application Driver View. 7.12.1 Trigger with voice note Note: The quality of the recording and playback is dependent on the settings of <Speaker> and <Microphone>... -
Page 44: Trigger Without Voice Note
Remote Control Touch Datum: 10.03.2016 Seite 44 von 57 User Guide Figure 7.11: Voice note recording stops Index 7.12.2 Trigger without voice note Note: Setting a trigger without voice note is confirmed acoustically. If you do not hear an acoustic signal, increase the volume (see section 7.3). -
Page 45: Switching The Device Off
Press and hold the Home button until the Active LED pulses green. Active LED pulses green. View “Standby” appears on the screen. The Remote Control Touch is switched off when: the view “Standby” disappears and the Active LED goes out. -
Page 46: Updating Firmware
Under <New firmware> click on [Open]. Dialog opens. Index Select the desired firmware. Click on [Open]. Note: For the Remote Control Touch you need the same firmware as for the blue PiraT Mini. Figure 7.14: Opening firmware-packet RCTouch_UserGuide_V2.3.1.doc... - Page 47 Remote Control Touch Datum: 10.03.2016 Seite 47 von 57 User Guide Selected firmware appears in the display field. Figure 7.15: Valid firmware-packet Note: If you select an invalid firmware-packet, the following notice message appears and the [Update firmware…] button remains inactive.
- Page 48 Remote Control Touch Datum: 10.03.2016 Seite 48 von 57 User Guide Figure 7.18: Advancing firmware update The firmware is updated when: the view “FW-Update” disappears, the State LED goes out and the [Close] button is active. Index...
-
Page 49: Maintenance Provisions And Safety Regulations
Remote Control Touch Datum: 10.03.2016 Seite 49 von 57 User Guide Maintenance provisions and safety regulations Note according to standard EN55011:2009 The device is used in an industrial environment. Due to the occurring, conducted as well as ra- diated disturbances it possibly can be difficult to ensure electromagnetic compatibility in other environments. -
Page 50: Mechanical Action
Remote Control Touch Datum: 10.03.2016 Seite 50 von 57 User Guide 8.1.4 Mechanical action Altitude: - 300 to + 5500 m Shaking at 2 ms sine half-wave 300 G (10 – 50 Hz) Vibration sine wave 2.5 G (50 – 2000 Hz) (200 –... -
Page 51: Proper Operation
Datum: 10.03.2016 Seite 51 von 57 User Guide Proper operation The Remote Control Touch must exclusively be operated with the Telemotive AG appli- cation. The application is only compatible with Telemotive System Client. Connection with third-party devices is at your own risk. -
Page 52: Data Sheet
Remote Control Touch Datum: 10.03.2016 Seite 52 von 57 User Guide Data sheet General data Supply voltage 13.8 V Power unit voltage 5 to 30 V (the logger requires > 7 V at system startup) Supply voltage reverse-connect protection Short circuit proof Operating current (typ.) -
Page 53: Abbreviations
Remote Control Touch Datum: 10.03.2016 Seite 53 von 57 User Guide Abbreviations Abbreviation Meaning blue PiraT Processing Information Recording Analyzing Tool blue PiraT blue PiraT2 bP2 HW2.x blue PiraT2 Hardware 2.x bPMini blue PiraT Mini Telemotive System Link Telemotive System Client... -
Page 54: List Of Figures
Figure 5.3: Rear side view with components ................9 Figure 5.4: Power cable with LEMO connector to banana plug..........12 Figure 5.5: TSL network with one bPMini, one Remote Control Touch and one bP2 (e.g.) ..13 Figure 5.6: TSL Client Portal ....................14 Figure 5.7: Shortcut to Telemotive System Client .............. - Page 55 Remote Control Touch Datum: 10.03.2016 Seite 55 von 57 User Guide RCTouch_UserGuide_V2.3.1.doc...
-
Page 56: List Of Tables
Remote Control Touch Datum: 10.03.2016 Seite 56 von 57 User Guide List of tables Table 5.1: Available connections ....................10 Table 5.2: LED behavior ......................11 Table 6.1: Application overview ....................20 Table 6.2: Operating elements of the tab sheet “General” ............26 Table 6.3: Displays overview .................... -
Page 57: User Guide Seite 3 Von
Remote Control Touch Datum: 10.03.2016 User Guide Seite 57 von 57 Contact Telemotive AG Office München Frankfurter Ring 115a 80807 München Tel.: +49 89 357186-0 Fax.: +49 89 357186-520 E-Mail: info@telemotive.de Web: www.telemotive.de Sales Tel.: +49 89 357186-550 Fax.: +49 89 357186-520 E-Mail: sales@telemotive.de...
Need help?
Do you have a question about the Remote Control Touch and is the answer not in the manual?
Questions and answers