Rippton MOBULA User Manual
Smart fishing drone
Hide thumbs
Also See for MOBULA:
- Installation and user instructions manual (67 pages) ,
- User manual (60 pages) ,
- Quick start manual (11 pages)

Subscribe to Our Youtube Channel
Related Manuals for Rippton MOBULA


Summary of Contents for Rippton MOBULA
- Page 1 MOBULA FISHING DRONE INSTRUCTION KIT USER MANUAL SAFETY INSTRCTIONS RIPPTON APP...
- Page 2 MOBULA SMART FISHING DRONE User Manual For MOBULA V1.1 Download the Rippton App Search for “Rippton” on the Google Play Store, Samsung Galaxy Apps or App Store to install the app on your mobile device or scan this QR code.
- Page 3 Trademark Rippton has made every effort to supply trademark information about company names, products and services mentioned in this manual. Trademarks shown below were derived from various sources. All trademarks are the property of their respective owners. General Notice: Some product names used in this manual are used for identification...
-
Page 4: Table Of Contents
4.13. Cast Fishing Line Via Controller ..............41 4.14. Control The Camera Via Controller ............... 43 4.15. Check The Battery Level Of The MOBULA And The Controller....43 4.16. What To Do In Emergency And Exceptional Situations ........ 44... - Page 5 4.17. Remaining Fly Distance Table ..............45 5. Maintenance ............... 46 5.1. Taking Care Of The MOBULA ..............46 5.2. Replacing The MOBULA Smart Battery ............47 5.3. Charging The MOBULA Smart Battery ............47 5.4. Charging The Controller ................49 5.5.
-
Page 6: Preface
The Rippton MOBULA Smart Fishing Drone should only be used by people with experience of flying drones. Users without any drone-piloting experience should practice more than 20 hours in a wide and empty space, before using the MOBULA for sea fishing. 1.2. Conventions Used In This Manual... -
Page 7: Read, Understand And Retain Instructions
Warning indicates a hazard with a medium level of risk which, if not avoided, could result in serious injury. Caution indicates a hazard with a low level of risk which, if not avoided, could result in minor or moderate injury. Notice indicates information considered important, but not hazard-related. -
Page 8: Obtaining Documentation And Information
This is the English language version of the user manual. Manuals in other languages are available upon request. 1.5.4. Documentation feedback If you are reading Rippton product documentation on the internet, any comments can be submitted on the support website. Comments can also be sent to support@rippton.com. We appreciate your comments. -
Page 9: Description Of The Product
• Use in No-Fly Zones. • Use as a toy. The MOBULA must not be used by children under 14 year of age. The product is not a toy. • Use in or near rough water and extreme weather conditions, such as strong winds (greater than 35 km/h), rain, snow or fog. -
Page 10: Process Overview
2.2. Process Overview The MOBULA is a drone for professional fishing purposes. It consists of a drone (with built-in camera to spot fish and berley/fishing line release devices), a controller with LCD screen, mobile device clamp. Amongst the most important features is the Return to Home (RTH) function and the berley/fishing line release function. -
Page 11: Technical Data
Spectrum Wireless MOBULA Remote Controller LCD Screen 5.5 inches Operating Frequency 2400~2483.5 Mhz Max Transmission Distance 2 km (Unobstructed, Free of Interference) MOBULA Smart Battery Capacity 10,000 mAh LI – PO Battery Type * Recommend keep the MOBULA within sight... -
Page 12: Product Compliance
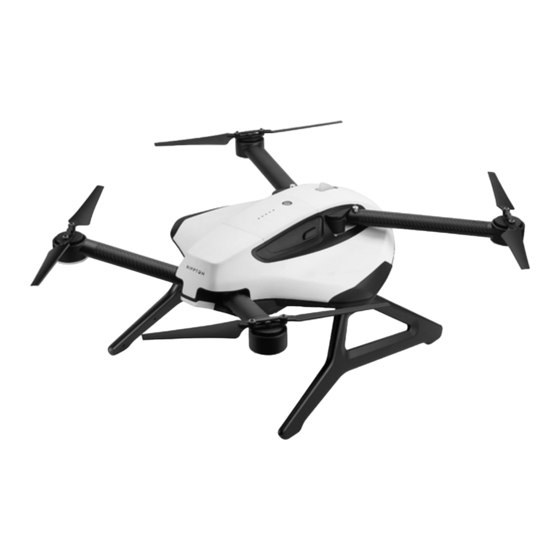
2.4. Product Compliance This product complies with all relevant Australia & New Zealand Directives. 2.5. Product Components MOBULA Smart Fishing Drone MOBULA Remote Controller... - Page 13 2.5.1. MOBULA Figure 1...
- Page 14 Propeller Rear Arm Unlock Button Motor Tail Status Indicator Foldable Antenna Rear LED Indicator Landing Gear Unlock Button MOBULA Smart Battery Rear LED Indicator Battery Level Indicator Foldable Antenna Battery Power Button Winder (Optional) Top Status Indicator Berley Release Device...
- Page 15 2.5.2. Controller Figure 3 Figure 4...
- Page 16 Item Function Controller Power Button Turns controller on/off Joystick The right joystick controls the MOBULA to fly forward, backward, left and right (correspondingly push the stick up, down, left and right) The left joystick controls the MOBULA to rise vertically, descend vertically, left rotate...
-
Page 17: Explanation Of Auditory And Visual Signals
2.6. Explanation Of Auditory And Visual Signals 2.6.1. MOBULA Signal Meaning 2 x Front LED Indicator Green flashing MOBULA is on the ground and ready for take off Constant green light MOBULA unlocked or flying 2 x Rear LED Indicator Red flashing... - Page 18 2.6.2. Remote Controller Signal Meaning Power Button Flash under press, then Controller in ON position lights off. With short beeping. Return-to-Home Button Green light flashing with Return-to- Home (RTH) activated. constantly beeping. MOBULA will automatically return.
-
Page 19: Preparation And Installation
3. Preparation And Installation • Handle, lift, carry and transport the product with great care to prevent it from being damaged. 3.1. Unpacking The MOBULA And Checking The Contents Make sure the packaging contains the following items:... -
Page 20: Conditions Before Assembling The Mobula
2 x sets Counter-Clockwise Propellers 3.2. Conditions Before Assembling The MOBULA 3.2.1. Make sure you have downloaded and installed the Rippton App from the Google Play Store, Samsung Galaxy Apps or App Store. Register as a Rippton App member. 3.2.2. Make sure that the MOBULA smart battery and controller are fully charged. -
Page 21: Install The Landing Gear
3.3. Install The Landing Gear 3.3.1. Take out the MOBULA and the landing gear. Insert the landing gear to the MOBULA till you hear a “click”. NOTICE The two landing gear parts are different. Make sure the landing gear’s unlock button facing the outside 3.3.2. - Page 22 3.3.4. Press one of the front arm unlock button. Unfold the arm in position and release the button. Move forward and backward few times to ensure it’s locked properly. Repeat to the other front arm. 3.3.5. Press one of the rear arm unlock button. Unfold the arm in position and release the button.
- Page 23 3.3.6. Tighten the propellers with the two screws. 3.3.7. Unfold the propellers.
- Page 24 NOTICE The CW propellers should be placed at the arm tagged with CW signals. The CCW propellers should be placed at the arm tagged with CCW signals. The below illustration indicates the CCW propellers.
-
Page 25: Preparation Of The Controller
3.4. Preparation Of The Controller 3.4.1. Put the antennas into the vertical position. 3.4.2. Attach the mobile device clamp. 3.4.3. Unfold the handle. Fasten the two nuts. -
Page 26: Attach Mobile Device To The Clamp
3.4.4. Put your mobile device on the mobile device clamp. NOTICE Make sure you only use a device with a 5G Wi-Fi connection. 3.5. Attach Mobile Device To The Clamp: 3.5.1. Press the unlock button on the mobile device clamp. The upper part of the mobile device clamp folds out. -
Page 27: Attach Tablet To The Clamp
3.6. Attach Tablet To The Clamp 3.6.1. Press the unlock button on the mobile device clamp. The upper part of the mobile device clamp folds out. 3.6.2. Put your tablet on the mobile device clamp. Move the upper part of the mobile device clamp downward to secure the tablet. -
Page 28: Operation/Use
4. Operation/Use 4.1. Check Before Using The MOBULA 4.1.1. Minimum space needed • Ensure there are no people or any other obstacles within a range of 20 meters before you start flying in order to avoid possible injury or damage. -
Page 29: Starting The Controller
4.3.1. Short press and long press the controller power button to turn on the controller. The controller will beep when turned on. Once MOBULA is well connected with the controller there will be MOBULA camera live image on the LCD screen and the first indicator on the controller turns green and lights constantly. -
Page 30: Connecting The Mobula With Your Mobile Device
4.4. Connecting The MOBULA With Your Mobile Device 4.4.1. Search for the MOBULA’s Wi-Fi signal in the settings of your mobile device. Make a connection. The format of MOBULA’s Wi-Fi name is IN-XXXXXX, and the original password is 12345678. 4.4.2. Enter the App’s home page. -
Page 31: Calibrate The Compass And Imu
When you fly at a new place. • When the MOBULA has not been used for more than one month. DO NOT calibrate the compass in the presence of a strong magnetic interference, such as magnetite, parking structures, and steel reinforcements underground. - Page 32 4.5.1. Choose an outdoor open area to carry out the calibration procedures. 4.5.2. Open the Rippton App. Tap Set then Common Settings. Wait until status indicators start flashing green. Then tap Calibrate.
- Page 33 4.5.3. After tapping Calibrate, status indicators will start blue-red flashing. Wait till status indicators start blue-yellow flashing, hold the MOBULA horizontally and rotate anticlockwise or clockwise till the light changes from blue–yellow flashing to blue-red flashing.
- Page 34 4.5.4. Wait until status indicators start green-red flashing. Then hold the MOBULA vertically (with nose downwards). Wait until status indicators start blue-yellow flashing, rotate anticlockwise or clockwise till the light changes to blue flashing.
- Page 35 4.5.5. Place the MOBULA on the ground, wait until indicator changes from blue flashing to green flashing. MOBULA Indicator Status of Horizontal Calibration: Calibration MOBULA GPS Signal Horizontal Horizontal Process Turned On Received Calibration Calibration Ready Completed Color Green or Blue...
- Page 36 4.5.7. The status indicators will start red-blue flashing. When the IMU calibration is completed, indicators start green flashing. Notice: IMU calibration is only required after crash or repair.
-
Page 37: Preflight Check List
Notice If the fishing line release device payload exceeds 2.5kg, check if the fishing line release device can still unlock. Lift the MOBULA up to the chest and release the fishing line, if the device could not unlock, reduce the payload weight. -
Page 38: Flying The Mobula Via Controller
4.8. Flying The MOBULA Via Controller 4.8.1. Put the flight mode switch into GPS mode. Notice Recommend keep to the flight mode in GPS mode all the time. Manual mode is for professional drone pilot only. -
Page 39: Controlling The Mobula
4.8.2. Push the left joystick to the lower right corner to unlock the MOBULA and hold until propellers start rotating, slowly push the left joystick to the center and the MOBULA is ready to take off. 4.8.3. Push the left joystick upwards gently to take off the MOBULA. Control both joysticks during flight. -
Page 40: Return & Land The Mobula Manually Via Controller
• Push the right joystick left to fly left and right to fly right. MOBULA will hover if the right stick is centered. • Push the left joystick to the lower right to unlock the MOBULA. -
Page 41: Cast Fishing Line Via Controller
Fishing line release device is placed at the middle of the MOBULA 4.13.1. Spread the MOBULA propellers and align it parallel to the ground, lift the nose of MOBULA up and let the MOBULA stand on the back part of the landing gear and rear arms. - Page 42 4.13.3. Attach the fishing line. Notice distance between the fishing line bait MOBULA should be less than 30 cm. 4.13.4. Push the metal stick into original position. And push the fishing line release stick forwards to lock the device.
-
Page 43: Control The Camera Via Controller
4.13.5. Fly the MOBULA to the desired fishing spot and pull the fishing line release stick backwards to cast the fishing line. Notice Two berley release devices can only lock/unlock via Rippton app 4.14. Control The Camera Via Controller 4.14.1. Live image will be showed on the LCD screen on the controller. Control the camera’s angle (0°to 90°) with the camera setting dial on the controller. -
Page 44: What To Do In Emergency And Exceptional Situations
And Exceptional Situations What to do in case of a crash 4.16.1. Open the Rippton App. If the MOBULA has crashed, the status indicators will show a fast yellow flashing, GPS function and the alarm light (visible up to 1km) will be activated. -
Page 45: Remaining Fly Distance Table
4.17. Remaining Fly Distance Table... -
Page 46: Maintenance
Take out the MOBULA smart battery and wipe the MOBULA with a damp cloth after each use and wipe MOBULA till it’s completely dry. Do not rinse the controller with water, but wipe it with a soft, clean, damp cloth. -
Page 47: Replacing The Mobula Smart Battery
5.2. Replacing The MOBULA Smart Battery 5.2.1. Press the battery unlock buttons. Remove the battery. 5.2.2. Load the newly charged battery. 5.3. Charging The MOBULA Smart Battery • Only charge the battery with the provided battery charger. • Connect all cables first before charging. - Page 48 NOTICE Make sure you only charge the battery when the temperature is between 10° C and 45° C. The charger will stop charging if the temperature is not within this range. The battery charging time is approx. two to three hours. When the MOBULA smart battery is fully charged: •...
-
Page 49: Charging The Controller
NOTICE Make sure to charge the battery when the temperature is between 10° C and 45° C. The charger will stop charging if the temperature is not within this range. Do not use the charger to charge laptop/desktop, this charger is for MOBULA remote controller only. -
Page 50: Troubleshooting And Repair
6. Troubleshooting And Repair 6.1. Identify And Solve Problems Error Cause Solution Product does not start Empty battery Charge the batteries Motors are not functioning Empty battery Charge the batteries Propeller malfunction Broken propeller Replace the propeller 6.2. Replacing The Propellers To replace the propeller: 6.2.1. - Page 51 6.2.2. Replace the propeller. NOTICE The CW propellers should be placed on the arm labeled CW signals. The CCW propellers should be placed on the arm labeled CCW signals. The below illustration indicates the CW and CCW propeller positions.
-
Page 52: Disposal
7. Disposal 7.1. Disposal Of Electronic Components The symbol on the product, the accessories and packaging indicates that this device must not be treated as unsorted municipal waste but must be collected separately. Dispose of the device via a collection point for the recycling of waste electrical and electronic equipment if you live within the EU and in other European countries that operate separate collection systems for waste electrical and electronic equipment. -
Page 53: Appendix I - Supplied Accessories, Consumables And Spare Parts
7.4. Appendix I – Supplied Accessories, Consumables And Spare Parts Spare/replacement parts Name Article Number Propeller RIP-MOB-001 Landing Gear RIP-MOB-002 Remote Controller RIP-MOB-003 Controller Charger RIP-MOB-004 MOBULA Smart Battery RIP-MOB-BA-001 MOBULA Smart Battery Charger RIP-MOB-BA-002 MOBULA Smart Battery Charging Cable RIP-MOB-BA-003 Mobile Device Clamp RIP-MOB-BA-005... -
Page 54: Fcc Compliance
8. FCC Compliance 8.1. FCC Compliance This equipment has been tested and found to comply with the limits for a Class B digital device, pursuant to Part 15 of the FCC Rules. These limits are designed to provide reasonable protection against harmful interference in a residential installation. This equipment generates, uses and can radiate radio frequency energy and, if not installed and used in accordance with the instructions, may cause harmful interference to radio communications. -
Page 55: Fcc Rf Radiation Exposure Statement Caution
8.3. FCC RF Radiation Exposure Statement Caution To maintain compliance with the FCC’s RF exposure guidelines, place the product at the least 20cm from nearby persons. 8.4. FCC RF Exposure Information (SAR) This device meets the government's requirements for exposure to radio waves. This device is designed and manufactured not to exceed the emission limits for exposure to radio frequency (RF) energy set by the Federal Communications Commission of the U.S. - Page 56 Room 810, Shanshan Plaza, NO. 777 Middle Rili Road, Yinzhou District, Ningbo City, Zhejiang Province, China Email: support@rippton.com Tel: +86 574 87139648 Zip Code: 315000...
- Page 57 MOBULA SMART FISHING DRONE Quick Start Guide V1..2 Download the Rippton App Search for “Rippton” on the Google Play Store, Samsung Galaxy Apps or App Store to install the app on your mobile device or scan this QR code.
- Page 58 Together with the use of the Rippton app, MOBULA can fly to any fishing point within a distance of 1.5 km away from you by tapping the GPS map shown on the screen of your mobile device, and be able to save all the fishing points it once arrived at.
- Page 59 Propeller Rear Arm Unlock Button Motor Tail Status Indicator Foldable Antenna Rear LED Indicator Landing Gear Unlock Button MOBULA Smart Battery Rear LED Indicator Battery Level Indicator Foldable Antenna Battery Power Button Winder (Optional) Top Status Indicator Berley Release Device...
- Page 60 Remote Controller The remote controller of MOBULA allows the user to operate his/her aircraft up to 1.5 km, with the buttons and dials for camera tilt, real-time monitoring and fishing line casting. Controller Power Button Controller Battery Level Indicator Joystick...
- Page 61 Controls • Using remote controller for operation. Installation Of The MOBULA Insert the landing gears to the MOBULA till Press the battery unlock button and insert the battery. you hear a “click”. Make sure the unlock button face outside.
- Page 62 Press one of the front arm unlock button and unfold the arm, repeat to the other front arm. And then unfold the rear arms. Identify the propellers Install the propellers to the arms, and tighten the propellers with the two CW = Clockwise Propeller;...
- Page 63 Unfold the four propellers. The definitive installment positions of propellers are indicated as above. Preparation Of The Remote Controller Unfold the antennas Attach the mobile device clamp...
- Page 64 Put your mobile device on the mobile device clamp. Move the upper part of the mobile device clamp downward to secure the mobile device Connect The MOBULA To Your Mobile Device Enter app’s home page. Tap Fishing Search MOBULA Wi-Fi.
- Page 65 Rippton App Function Notice Certain functions may not available at Android version app.
- Page 66 • The battery charging time is approx. two to three hours. More detail about MOBULA Preface, Description of the Product, Preparation and Installation, Operation/Use, Maintenance, Troubleshooting and Repair, Disposal information etc., Please see User Manual. To watch the video of installation, app For more information about Rippton, operation process, compass &...
- Page 67 Away from crowds. MOBULA Remote Controller LCD Screen 5.5 inches Operating Frequency 2400~2483.5 Mhz Max Transmission Distance 2 km (Unobstructed, Free of Interference) MOBULA Smart Battery Capacity 10,000 mAh LI – PO Battery Type * Recommend keep the MOBULA within sight...
- Page 68 MOBULA SMART FISHING DRONE Safety Instruction V1.1...
- Page 69 • Ensure to load and use the latest version of Rippton app with an iOS 9 (or later) or Android 8.0 (or later) device and above to assist control of the MOBULA.
- Page 70 Ensure to keep connecting the MOBULA with the mobile device and monitor the battery capacity from the Rippton App’s interface during the flight. • Ensure to take off the MOBULA at the flat ground. If take off the MOBULA at the boat, ensure the boat are relatively steady. •...
- Page 71 • Do not reversely connect the positive and negative terminals of the battery. • Do not use the battery to fly the MOBULA when the battery level is lower than 20%. • Do not put the battery into any kind of liquid. Do not leave the battery out in the rain or near a source of moisture.
- Page 72 • Use the battery at temperatures between -10° C and 60° C. 5. Regulations And Flight Restrictions • Do not fly the product near or inside No-Fly Zones specified by local laws and regulations, including airports, borders between two sovereign countries or regions, major cities or regions and etc., which will be subject to continuous change.
- Page 73 • Ensure to charge the battery to 40%-60% capacity for long term storage. • Ensure to take the battery out of the MOBULA after each use. 7. Battery Disposal • Ensure to dispose the battery ONLY after a complete discharge.
- Page 74 Failure to observe this information can result in injury or equipment damage. Copyright © 2018 by Rippton. All rights reserved. No part of this publication may be reproduced, distributed, or transmitted in any form or by any means, including photocopying, recording, or other electronic or mechanical methods, without the prior written permission of the publisher.
- Page 75 Room 810, Shanshan Plaza, NO. 777 Middle Rili Road, Yinzhou District, Ningbo City, Zhejiang Province, China Email: support@rippton.com Tel: +86 574 87139648 Zip Code: 315000...
- Page 76 MOBULA SMART FISHING DRONE User Manual For Rippton App V1.0...
- Page 77 Download the Rippton App Search for “Rippton” on the Google Play Store, Samsung Galaxy Apps or App Store to install the app on your mobile device or scan this QR code. 1. Rippton App Interface 1.1. Rippton App Interface Notice Certain functions may not be available at Android version app.
- Page 78 2. Preparation 2.1. Starting Both MOBULA And Controller 2.1.1. Short press and long press the battery power button until LED indicator, status indicator is on and MOBULA beeping. 2.1.2. Unfold MOBULA’s antenna.
- Page 79 2.1.3. Short press and long press the controller power button to turn on the controller. The controller will beep when turned on. Once MOBULA is well connected with the controller there will be MOBULA camera live image on the LCD screen and the first indicator on the controller turns green and lights constantly.
- Page 80 2.2.4. Tap Enter to complete the connection.
- Page 81 3. Operation 3.1. Fly The MOBULA Via Rippton App 3.1.1. Tap to take off the MOBULA.
- Page 82 3.2. Hover The MOBULA Via Rippton App 3.2.1. Tap to hover the MOBULA at current position.
- Page 83 3.3. Land The MOBULA Via Rippton App 3.3.1. Tap to land the MOBULA. Notice After tapping, the MOBULA will descend at the current location. BE AWARE of the landing location.
- Page 84 3.4. Return The MOBULA Via Rippton App 3.4.1. Tap to activate Return-to-Home function.
- Page 85 3.5. Attach Fishing Line Via Rippton App 3.5.1. Spread the MOBULA propellers and align it parallel to the ground, lift the MOBULA nose up and let the MOBULA stand on the back part of the landing gear and two rear arms.
- Page 86 Notice The distance between the fishing line bait and the MOBULA should be less than 30 cm. 3.5.4. Push the metal stick into original position. And Tap again to lock the device. Notice Icon in white means the device is locked...
- Page 87 3.7. Attach Berley Via Rippton App 3.7.1. Spread the MOBULA propellers and align it parallel to the ground, lift the MOBULA nose up and let the MOBULA stand on the back part of the landing gear and two rear arms.
- Page 88 3.7.3. Attach the berley. 3.7.4. Tap again to lock the devices.
- Page 89 Notice Each berley release device’s max payload is approx.1.25kg. Make sure you attach an equal amount of berley payload on each side to keep the MOBULA balanced. The total payload should not exceed 2.5kg. Ensure to attach a suitable ball bearing swivel between berley and the release device to avoid tangling with the fishing line 3.8.
- Page 90 3.9.2. Pin your desired casting point within the green area. Tap Dropped Pin. And then tap CONFIRM. 3.9.3. MOBULA will take off, cast fishing line and fly back to home point automatically. 3.10. Cast Berley Via Rippton App...
- Page 91 3.10.2. Pin your desired casting point within the green area. Tap Dropped Pin. And then tap CONFIRM. 3.10.3. MOBULA will take off, cast berley and fly back to the home point automatically.
- Page 92 3.11. Interrupt Executing Mission. To stop any ongoing automatic mission, switch the control stick to manual mode and switch back to GPS mode. Mission will be interrupted and MOBULA will hover at the current position. And user can control the MOBULA via controller.
Need help?
Do you have a question about the MOBULA and is the answer not in the manual?
Questions and answers