
Related Manuals for Schwing SP ROCK

Summary of Contents for Schwing SP ROCK
- Page 1 SERVICE REPAIR INSTRUCTIONS FOR THE SP ROCK VALVE DOCUMENT #98330783 5900 Centerville Road REV. 10/25/14 St.Paul, MN 55127 Tel 651-429-0999 Fax 651-429-3464 www.schwing.com...
-
Page 3: Safety Instruction
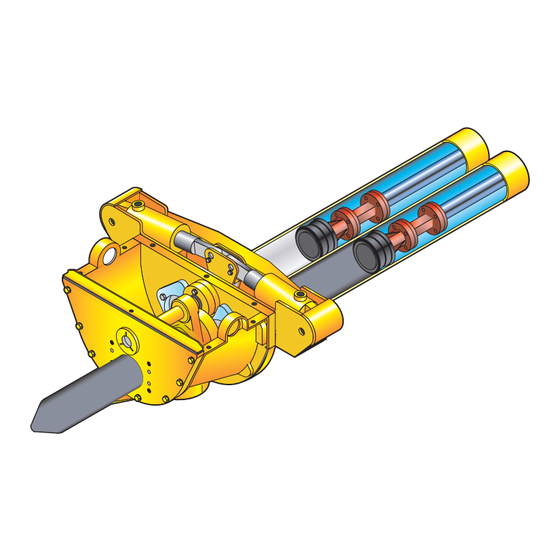
Small Rock Valve Small Rock Valve Safety Instruction When performing maintenance on Schwing Equipment, the safety regulations must be followed. The observation of these regulations is the responsibility of the maintenance personnel. The following are some supplementary rec- ommendations. WARNING READ FIRST! 1. - Page 4 Small Rock Valve Rock Valve Parts Identification and Clearance Specifications Rock Housing Spectacle or Inlet Plate Cutting Ring Rock Valve Bushing Seal Cover Kidney Seal Kidney or Outlet Plate Pressure Spring Setting Disc Tension Nut Cording must be to outside when installed Locking Washer Locking...
- Page 5 Small Rock Valve Small Rock Valve Lubrication Points Use a grease gun with the recommended grease listed in the chart below. Locate the grease points, clean the grease fitting before filling it, and inject grease until you see old grease displaced by the new grease. Lubricate the grease points at 8 hour intervals and whenever the machine work is completed for the day.
- Page 6 Small Rock Valve Lengthening the Service Life of the Spectacle Plate and Cutting Ring Conditioned by outside influences (material Friction Friction and variations), as well as by differing work strains stone crushing on partial sections, the cutting ring and the housing lining wear out unequally.
- Page 7 Small Rock Valve Check for the gap at several points along the Cutting Ring circumference, and always turn the Cutting Ring in the same direction. It is only necessary to loosen the Securing Bolts Rotate the Cutting Ring 90˚ clockwise of the Housing Cover approximately 10mm (.3937”) in order to release the Pressure Spring and turn the Cutting Ring.
- Page 8 Small Rock Valve Rebuilding the Rock Valve Remove the Locking Bolt from the Tension Locking Bolt Nut. 2. Loosen the Tension Nut. NOTE: It’s ok to remove the Tension Nut with a wrench, but it must never be tightened more than hand tight Tension Nut 3.
- Page 9 Small Rock Valve 5. Install the alignment rods • SAI Part #30309007 Alignment Rod 6. Slide the rear housing cover back slightly. 7. Center Rock Valve using a pry bar, so the lever is straight up. 8. Remove the Locking Bolt for the Cylinder Pin on the Slewing Yoke 9.
- Page 10 Small Rock Valve 11. Remove 12mm bolt and lever disk from Rock shaft 12. Remove slew lever. 12 x 30 Bolt Disk Slew Lever 13. Using a lifting device, slide Rock Valve out of bushing and place on a work surface. 14.
- Page 11 Small Rock Valve 15. Remove the Seal Cover from the Rock Slew- ing Shaft and remove the O-ring. Seal Cover 16. Remove the O-ring from the groove of the Rock shaft bushing on the Rear Cover Hous- ing. O-Ring 70x8 17.
- Page 12 Small Rock Valve 20. Remove the two bolts attaching the Specta- cle Plate to the Front Cover. Counter Sunk Bolts 21. Carefully remove the Spectacle Plate from the Rock Housing. Spectacle Plate 22. Remove the four, 20 mm bolts from the out- lect delivery pipe.
- Page 13 Small Rock Valve 25. Reassemble the Rock Valve assembly in the reverse order that it was disassembled. Slide the cover back in place. NOTE: Upon reassembly, generously grease the Kidney Seal, Kidney Plate, Cutting Ring and the Spectacle Plate. This is important, because after you have assembled the Rock and done some necessary adjustment, you are going to have to shift the Rock several times...
- Page 14 Small Rock Valve Mounting a New Pressure Spring If the Pressure Spring has to be replaced, remove the old spring and clean the vacant area Inlet Housing Lining thoroughly to clear it of concrete residue. If dust Cutting Ring and residue is ignored, the new spring cannot be Rock Valve installed correctly, and the flow of concrete could pull it out of the groove.
- Page 15 Small Rock Valve Determining Wear on the Kidney Seal & Housing Lining - Outlet Side Replace the kidney seal if any of the following Spring installed conditions exist: • A considerable formation of cracks are found in the areas marked by arrows. This problem is very rare.
- Page 16 Small Rock Valve Replacement of Cutting ring and Kidney seal Locking Bolt CAUTION! Under no circumstances should you allow the kidney seal to be run with a dry hopper. This will destroy the kidney seal and is the primary cause of premature wear encountered at the outlet side of the Rock Valve.
- Page 17 Small Rock Valve 5. Install the Alignment Rods • SAI Part #30309007. Alignment Rod 6. Slide the rear housing cover back slightly. 7. Remove the Kidney Seal for inspection, and replace it if necessary. See the previous sec- tion of this manual entitled Determining Wear on the Kidney Seal and Housing Lin- ing--Outlet Side for reference.
- Page 18 Small Rock Valve 9. Slide the Rock Valve back about 1.5 inches, and carefully remove the cutting ring. NOTE: If you are going to turn the Cutting Ring, you only have to move the Rock back far enough to allow you to loosen the ring and turn it 90 degrees.
- Page 19 Small Rock Valve NOTE: Check to make sure that the proper clearance is obtained between the Rock Valve and the Cutting Ring and between the Rock Valve and the Kidney Plate. If the Rock com- ponents are worn, the dimensions may be 1.5 - .2.0mm larger that specified.
- Page 20 (i.e., articulated bearings, shifting cylinder (internal), or Rock slewing lever may need adjustment). Please call the Schwing Service Department at (651) 429-0999 with any questions regarding this matter. Slewing Yoke Timing...
Need help?
Do you have a question about the SP ROCK and is the answer not in the manual?
Questions and answers