Advertisement
Quick Links
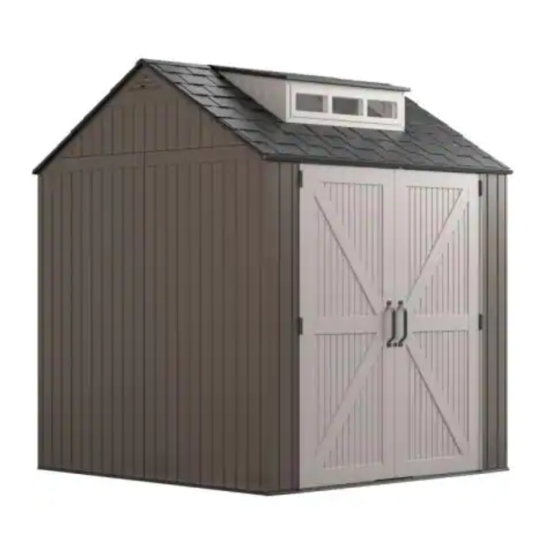
7 x 7 STORAGE SHED
Assembly Instructions
COBERTIZO DE ALMACENAMIENTO DE 7 X 7 PIES
Instrucciones de armado
REMISE DE 2,1 M X 2,1 M
Instructions d'assemblage
2P39
86 in
218.44 cm
100.5 in
255.27 cm
85.5 in
85.06 cm
84.25 in
85.06 cm
Thank you for purchasing this Rubbermaid
storage shed. This dependable product was designed to look great outdoors and help keep your yard
®
organized. We want your experience to be a good one. Please read these instructions thoroughly before assembling the storage shed.
Gracias por adquirir esta cobertizo de almacenamiento Rubbermaid
. Este producto confiable ha sido diseñado para verse bien al aire libre y mantener su patio
®
organizado. Queremos que tenga una buena experiencia. Por favor lea atentamente estas instrucciones antes de ensambler el cobertizo de almacenamiento.
Merci d'avoir acheté cet abri de rangement Rubbermaid
. Ce produit fiable a été conçu pour avoir une belle apparence à l'extérieur et vous aider à garder votre
®
cour en ordre. Veuillez lire attentivement ces instructions avant de construire l'abri.
2134611
Advertisement

Summary of Contents for Rubbermaid 7 x 7 STORAGE SHED
- Page 1 We want your experience to be a good one. Please read these instructions thoroughly before assembling the storage shed. Gracias por adquirir esta cobertizo de almacenamiento Rubbermaid . Este producto confiable ha sido diseñado para verse bien al aire libre y mantener su patio ®...
- Page 2 Consumer Service Department needs to be built on a solid, level surface. A can accurately and quickly assist you. concrete or a treated-wood Rubbermaid Consumer Service Department ® platform is recommended. 1-888-895-2110 3.
- Page 3 être construit sur une surface solide que notre service aux consommateurs puisse vous aider et plane. Une dalle en béton, un patio ou une plate- adéquatement. forme en bois traité est recommandée. Rubbermaid Consumer Service Department ® 3. Emplacement – Lorsque vous déterminez 1-888-895-2110 l'emplacement de l'abri dans votre jardin, assurez- www.Rubbermaid.com...
- Page 4 A - 1 B - 1 H4 Front Floor H4 Back Floor H4 Piso delantero H4 Piso trasero H4 Plancher avant H4 Plancher arrière C - 1 D - 1 H4 Sidewall A H4 Left Front Wall H4 Pared lateral A H4 Pared delantera izquierda H4 Mur latéral A H4 Mur avant gauche...
- Page 5 L - 1 M - 1 H4 Left Roof-NS H4 Right Roof-NS H4 Techo izquierdo-NS H4 Techo Derecho-NS H4 Toit, section de gauche-NS H4 Toit, section de droite-NS N - 1 P - 1 H4 Dormer Front Wall H4 Dormer Left Wall H4 Buhardilla de la pared frontal H4 Pared izquierda de la buhardilla H4 Lucarne, mur avant...
- Page 6 S-1 - 1 S-2 - 2 H4 Door Header H4 Door Support H4 Viga de la puerta H4 Soporte para puertas H4 Support de porte H4 Linteau de porte S-3 - 2 S-4 - 1 H4 Side-Wall Support H4 Back-Wall Support H4 Soporte de pared lateral H4 Soporte de pared trasera H4 Support mural latéral...
- Page 7 HB - 4 BB - 2 H4 Door Hinge Bracket Barrel Bolt H4 Soporte de la bisagra de la puerta Cerradura de perno de barril H4 Ferrure de charnière Verrou cylindrique de porte WP-1 - 14 WP-2 - 2 H4 Wall Connector Pin H4 Dormer Wall Pin H4 Pasador del conector de pared H4 Pasador de pared de la buhardilla...
- Page 8 F-1 - 66 F-2 - 8 #14 x ¾” Tapping Screw ¼”-20 x 1.375” Hex Bolt Tornillo aterrajador de ¾’’ x 14 Tornillo hexagonal de ¼’’ x 20 x 1,375’’ Vis taraudeuse no 14, 19 mm Boulon hexagonal, 6 mm-20 (¾...
- Page 10 84-1/4" 4-1/8" 76" 4-1/8" 3-1/2" 38" 38" 42-1/8" 85-1/2" 74-5/8" 32-1/2" 7-3/8" 21-3/16" 20-5/8" 30-5/8" 126-1/16"...
- Page 11 F-1 9 DO NOT overtighten screws! ¡NO ajuste los tornillos en exceso! ÉVITEZ de trop serrer les boulons!
- Page 12 “ALIGN” “ALINEAR” “ALIGNER” “CLICK” “CLICK” “CLIC”...
- Page 13 Continued Continuación Suite “ALIGN” “ALINEAR” “ALIGNER” “CLICK” “CLICK” “CLIC”...
- Page 14 “ALIGN” “ALINEAR” “ALIGNER” “CLICK” “CLICK” “CLIC”...
- Page 15 Continued Continuación Suite “ALIGN” “ALINEAR” “ALIGNER” “CLICK” “CLICK” “CLIC”...
- Page 16 S-3 1 WP-1 4 WP-1 WP-1 WP-1 WP-1...
- Page 17 “ALIGN” “ALINEAR” “ALIGNER” “CLICK” “CLICK” “CLIC”...
- Page 18 Continued Continuación Suite “ALIGN” “ALINEAR” “ALIGNER” “CLICK” “CLICK” “CLIC”...
- Page 19 S-4 1 WP-1 4 WP-1 WP-1 WP-1 WP-1...
- Page 20 “ALIGN” “ALINEAR” “ALIGNER” “CLICK” “CLICK” “CLIC”...
- Page 21 Continued Continuación Suite “ALIGN” “ALINEAR” “ALIGNER” “CLICK” “CLICK” “CLIC”...
- Page 22 S-3 1 WP-1 4 WP-1 WP-1 WP-1...
- Page 24 F-1 4 WP-1 1 Continued Continuación Suite WP-1 WP-1 REPEAT REPETIR WP-1 RÉPÉTER...
- Page 26 F-1 4 WP-1 1 Continued WP-1 Continuación Suite WP-1 WP-1 REPEAT REPETIR RÉPÉTER WP-1...
- Page 27 F-2 4 S-5 2...
- Page 28 F-2 4 F-3 4 S-9 8 S-6 2 REPEAT REPETIR RÉPÉTER...
- Page 29 Continued Continuación Suite REPEAT REPETIR RÉPÉTER...
- Page 30 F-5 4 S-8 2...
- Page 31 F-7 2 D or G D or G D or G...
- Page 33 S-1 1 F-3 4 S - 1 L E F T S - 1 L E F T...
- Page 34 RP-3 5 F-5 5 Continued Continuación Suite RP-3 RP-3...
- Page 36 RP-2 1 RP-4 1 RP-5 1 F-5 2 F-1 4 Continued Continuación Suite RP-5 RP-4 RP-2 SNAP ENCAJE ASSISTANCE RP-2 RP-4 RP-5...
- Page 38 RP-2 1 RP-4 1 RP-5 1 F-5 2 F-1 4 Continued Continuación Suite RP-5 RP-4 RP-2 SNAP ENCAJE ASSISTANCE RP-4 RP-2 RP-5...
- Page 39 DW 3 DWG 3 F-1 27 START AT TOP CENTER COMIENCE EN EL CENTRO EN LA PARTE SUPERIOR COMMENCER AU CENTRE EN HAUT REPEAT REPETIR RÉPÉTER F-1 x 9...
- Page 40 WP-2 2 F-5 2 Continued Continuación Suite WP-2 WP-2 WP-2...
- Page 42 F-1 6 Continued Continuación Suite...
- Page 44 RP-1 6 Continued Continuación Suite RP-1 x 6 SNAP ENCAJE ASSISTANCE...
- Page 45 RP-2 3 F-5 2 RP-1 4 Continued Continuación Suite RP-2 RP-2 RP-2 RP-2 RP-1 RP-1 RP-1 RP-1 RP-1 SNAP ENCAJE ASSISTANCE...
- Page 46 F-1 2 Continued Continuación Suite...
- Page 47 BB 2 F-4 8...
- Page 48 S-2 1 Continued Continuación Suite...
- Page 49 DH 1 LH 1 F-6 2 F-3 2 Continued Continuación Suite...
- Page 50 HB 2 Continued Continuación Suite...
- Page 51 S-2 1...
- Page 52 DH 1 LH 1 F-6 2 F-3 2 Continued Continuación Suite...
- Page 53 HB 2 Continued Continuación Suite...
- Page 54 F-1 6...
- Page 55 F-1 6 Continued Continuación Suite...
- Page 56 Visite www.rubbermaid.com/sheds para información y consejos útiles. Para registrar este producto, visite www.rubbermaid.com/registration. Necesitará el número de modelo de cuatro caracteres, que se encuentra en la primera página de las instrucciones de montaje arriba de la imagen del producto, y la fecha de compra para completar el registro.
Need help?
Do you have a question about the 7 x 7 STORAGE SHED and is the answer not in the manual?
Questions and answers
what size does the slab need to be under the shed