Table of Contents
Advertisement
Available languages
Available languages
Quick Links
Advertisement
Chapters
Table of Contents

Summary of Contents for NewAge Products 80671
- Page 1 KITCHEN STORAGE ACCESSORIES INSTALLATION GUIDE ATTENTION: Is your Storage Accessory damaged? STOP Need help or spare parts? For fastest service, contact NewAge Products at 1-877-306-8930; or support@newageproducts.com. Do not return to the retailer. IM-HKC.02A-01 REV 1.1...
-
Page 2: Table Of Contents
Index Product Inspection Tools Needed Maintenance and Care Installing the Pull out 50L bin Installing the Magic Corner Installing the Iron Board Installing the 18”, 24”, 36” Pants Display Rack Installing the 18” and 24” Closet Rod on Cabinet Walls Installing the 18”... -
Page 3: Product Inspection
Product Inspection • Check to see all parts are received as per the order placed. • Contact NewAge Products at 1-877-306-8930; for any missing parts. • Inspect the products for any damages before starting the installation. • Go through the installation instructions carefully before starting the installation. -
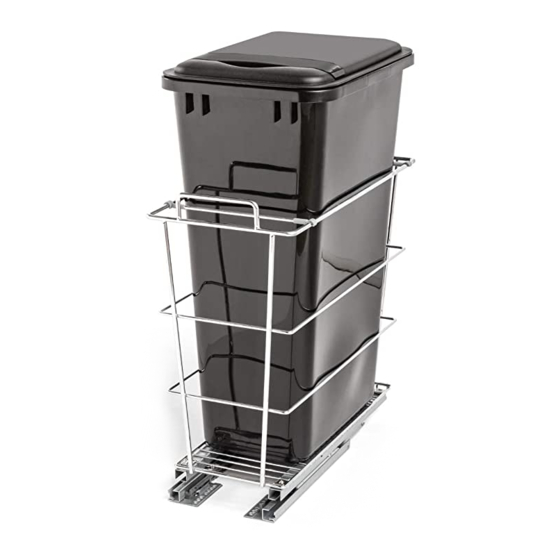
Page 4: Installing The Pull Out 50L Bin
Installing the Pull out 50L bin Place the template on the bottom of the Tools and parts needed. cabinet and align it to the front and side of the cabinet. Drill Bit 3/16” #2 Philips Head Pencil Screw Driver Cordless Drill Level #2 Philips Bit (optional) - Page 5 Installing the Pull out 50L bin Insert the metal basket assembly and align the bracket holes to the drilled holes in the cabinet. Using a screwdriver or cordless drill fasten the basket assembly using eight M5x16mm screws included with the basket assembly. Make sure the cross posts are installed on the basket assembly as shown in the image (A).
-
Page 6: Installing The Magic Corner
Installing the Magic Corner Place the template on the bottom of the Tools and parts needed. cabinet and align it to the front and side of the cabinet. Drill Bit 3/16” #2 Philips Head Pencil Screw Driver Cordless Drill Level #2 Philips Bit (optional) M5 x 8 mm... - Page 7 Installing the Magic Corner Insert the sliding base and align the Slide the top frame and attach the handles bracket holes to the drilled holes in the using two M4x8mm screws. Attach cabinet. Using a screwdriver or cordless bottom brackets (B) to the top frame using drill fasten the basket assembly using the eight M5x8 screws included with the eight M5x16 screws included with the...
-
Page 8: Installing The Iron Board
Installing the Iron Board Place the Iron board at desired position on Tools and parts needed. the cabinet shelf. Ensure shelf is leveled Drill Bit 3/16” #2 Philips Head Pencil Screw Driver Cordless Drill Level #2 Philips Bit (optional) M5 x 16mm Melamine Screw Slide the iron board out from the frame. - Page 9 Installing the Iron Board Place the iron board, slide out and fasten the iron board to shelf using Slide the ironing board in to finish the eight M5x16mm screws included in the installation. assembly.
-
Page 10: Installing The 18", 24", 36" Pants Display Rack
Installing the 18”, 24”, 36” Pants Display Rack Draw a horizontal line on the cabinet walls Tools and parts needed. at desired height (L). Drill Bit 3/16” #2 Philips Head Pencil Screw Driver Cordless Drill Level #2 Philips Bit (optional) M5 x 16mm Melamine Screw Insert the side mounted slide and align... - Page 11 Installing the 18”, 24”, 36” Pants Display Rack Insert the slide and align the holes with the drilled holes on the cabinet. Using a Drill holes at the marked locations using power drill or screw driver fasten the side 3/16 mm drill bit. mounting slide to the cabinet using four M5x16mm Screws.
-
Page 12: Installing The 18" And 24" Closet Rod On Cabinet Walls
Installing the 18” and 24” Closet Rod on Cabinet Walls Draw a horizontal line on both walls of the cabinet at distance X from top and Tools and parts needed. vertical line at distance Y from the back. Put the bracket on wall and mark holes. Drill Bit 3/16”... - Page 13 Installing the 18” and 24” Closet Rod on Cabinet Walls Align the closet rod and bracket to the holes marked on the opposite cabinet Fix the other bracket to the closet rod. wall. Fasten the bracket to cabinet wall using two 5x26mm screws.
-
Page 14: Installing The 18" And 24"Closet Rod On Cabinet Shelf
Installing the 18” and 24”Closet Rod on Cabinet Shelf Draw a centre line on the shelf and mark two holes at a distance of 16.25 in for 18” Tools and parts needed. closet rod and 22.25 in for 24” closet rod from the centre on both sides. - Page 15 Installing the 18” and 24”Closet Rod on Cabinet Shelf Insert the closet rod and align the top holes with the drilled holes on shelf. Fasten the closet rod to shelf using two 4x20mm screws.
-
Page 16: Installing The 18", 24", 36" Pull Out Hamper Basket
Installing the 18”, 24”, 36” Pull out Hamper Basket Draw a horizontal line on the cabinet walls Tools and parts needed. at desired height (L). Drill Bit 3/16” #2 Philips Head Pencil Screw Driver Cordless Drill Level #2 Philips Bit (optional) M5 x 16mm Melamine Screw... - Page 17 Installing the 18”, 24”, 36” Pull out Hamper Basket Insert the slide and align the holes with the drilled holes on the cabinet. Using a Drill holes at the marked locations using power drill or screw driver fasten the side 3/16 mm drill bit.
- Page 18 Installing the 18”, 24”, 36” Pull out Hamper Basket Open the velcro of the clothing bag on four sides, install wire frame under the folds and fold back the velcro over the wire frame. Connect the plastic holders to with the wire frame as shown in the image.
-
Page 19: Installing The Under Sink Organizer
Installing the Under Sink Organizer Place the template on the bottom panel of cabinet, aligning it to desired location Tools and parts needed. using template arrows. Drill Bit 3/16” #2 Philips Head Pencil Screw Driver Cordless Drill Level #2 Philips Bit (optional) M5 x 16mm M4 x 6mm... - Page 20 Installing the Under Sink Organizer Install rails aligning with the pre marked holes using eight M5x16mm screws. Slide the centre frame assembly onto the rails by pushing it under the clips at back of the slides as shown in (A). Secure front portion of the frame to the rails using two M4x6mm screws as shown in (B).
- Page 21 Installing the Under Sink Organizer Install baskets using the locking clips as shown below.
-
Page 22: Installing The 12" And 18" Double Pull-Out Basket
Installing the 12” and 18” Double Pull-out Basket Place the template on the bottom panel of cabinet, aligning it to desired location Parts required using template arrows. Drill Bit 3/16” #2 Philips Head Pencil Screw Driver M5 x 16mm Cordless Drill Level #2 Philips Bit Melamine Screw... - Page 23 Installing the 12” and 18” Double Pull-out Basket Using a screwdriver or cordless drill fasten Insert the metal basket assembly and align the Basket assembly using the eight the bracket holes to the drilled holes in M5x16mm screws included with the the cabinet basket assembly.
-
Page 24: Installing The 18", 24", 36" Pull-Out Basket
Installing the 18”, 24”, 36” Pull-out Basket Place the template on the side wall of the Parts and tools required cabinet, aligning it to the top and front using template arrows. Drill Bit 3/16” #2 Philips Head Pencil Screw Driver M5 x 16mm Cordless Drill Level... - Page 25 Installing the 18”, 24”, 36” Pull-out Basket Using a screwdriver or cordless drill fasten the Basket assembly using the eight M5x16mm screws included with the basket assembly.
-
Page 26: Year Limited Warranty
WHAT IS COVERED When this product is installed, operated and maintained according to the instructions attached to or furnished with the product, NewAge Products Inc. will replace the defective product or parts if the part fails as a result of defective materials or workmanship for the warranty duration from the purchase date of the product. - Page 27 L’accessoire de rangement est-il en- dommagé? STOP Vous avez besoin d’assistance ou de pièces de rechange? Pour obtenir un service plus rapide, contactez NewAge Products au 1 877 306-8930; ou écrivez à support@newageproducts.com. Ne retournez pas ce produit au détaillant. IM-HKC.02A-01 REV 1.1...
- Page 28 Index Inspection du produit Outils requis Entretien et soins Installation de la poubelle de 50 L coulissante Installation du coin magique Installation de la planche à repasser Installation du support à pantalon de 18, 24 ou 36 po Installation d’une tringle de garde-robe de 18 et 24 po sur les parois d’une armoire Installation de la tringle de garde-robe de 18 et 24 po sur une tablette d’armoire Installation du panier à...
-
Page 29: Inspection Du Produit
Inspection du produit • Assurez-vous d’avoir reçu toutes les pièces conformément à la commande que vous avez passée. • S’il manque des pièces, contactez NewAge Products au 1 877 306-8930. • Avant de commencer l’installation, inspectez les produits pour y déceler tout dommage. •... -
Page 30: Installation De La Poubelle De 50 L Coulissante
Installation de la poubelle de 50 L coulissante Placez le gabarit sur la base de l’armoire Outils et pièces nécessaires. et alignez-le avec l’avant et le côté de l’armoire. Drill Bit 3/16” #2 Philips Head Pencil Screw Driver Cordless Drill Level #2 Philips Bit (optional) M5 x 16mm... - Page 31 Installation de la poubelle de 50 L coulissante Insérez l’assemblage du panier métallique et alignez les trous du support avec les trous percés dans l’armoire. À l’aide d’un tournevis ou d’une perceuse sans fil, fixez l’assemblage du panier à l’aide de huit vis M5x16 mm comprises avec l’assemblage. Assurez-vous que les montants transversaux sont installés sur l’assemblage de panier, comme illustré...
-
Page 32: Installation Du Coin Magique
Installation du coin magique Placez le gabarit sur la base de l’armoire Outils et pièces nécessaires. et alignez-le avec l’avant et le côté de l’armoire. Drill Bit 3/16” #2 Philips Head Pencil Screw Driver Cordless Drill Level #2 Philips Bit (optional) M5 x 8 mm M5 x 16mm... - Page 33 Installation du coin magique Insérez la base coulissante et alignez les Faites glisser le bâti supérieur et fixez les trous du support avec les trous percés poignées à l’aide de deux vis M4x8 mm. dans l’armoire. À l’aide d’un tournevis ou Fixez les supports inférieurs (B) sur le d’une perceuse sans fil, fixez l’assemblage bâti supérieur à...
-
Page 34: Installation De La Planche À Repasser
Installation de la planche à repasser Placez la planche à repasser à la position Outils et pièces nécessaires. souhaitée sur la tablette d’armoire. Drill Bit 3/16” #2 Philips Head Pencil Screw Driver Cordless Drill Level #2 Philips Bit (optional) M5 x 16mm Melamine Screw Faites glisser la planche à... - Page 35 Installation de la planche à repasser Positionnez la planche à repasser, faites glisser et fixez la planche à repasser sur Faites glisser la planche à repasser pour la tablette à l’aide de huit vis M5x16 mm terminer l’installation. comprises dans l’assemblage.
-
Page 36: Installation Du Support À Pantalon De 18, 24 Ou 36 Po
Installation du support à pantalon de 18, 24 ou 36 po Tracez une ligne horizontale sur les parois Outils et pièces nécessaires. d’armoire à la hauteur souhaitée (L). Drill Bit 3/16” #2 Philips Head Pencil Screw Driver Cordless Drill Level #2 Philips Bit (optional) M5 x 16mm Melamine Screw... - Page 37 Installation du support à pantalon de 18, 24 ou 36 po Insérez la glissière et alignez les trous avec les trous percés dans l’armoire. À l’aide Percez les trous aux emplacements d’une perceuse ou d’un tournevis, fixez la marqués en utilisant un foret de 3/16 mm. glissière latérale sur l’armoire avec quatre vis de M5x16 mm.
-
Page 38: Installation D'une Tringle De Garde-Robe De 18 Et 24 Po Sur Les Parois D'une Armoire
Installation d’une tringle de garde-robe de 18 et 24 po sur les parois d’une armoire Tracez une ligne horizontale sur les deux parois de l’armoire à une distance X du Outils et pièces nécessaires. haut et une ligne verticale à une distance Y de l’arrière. - Page 39 Installation d’une tringle de garde-robe de 18 et 24 po sur les parois d’une armoire Alignez la tringle de garde-robe et le Fixez l’autre support sur la tringle de support sur les trous marqués sur la paroi garde-robe. d’armoire opposée. Fixez le support à la paroi de l’armoire avec deux vis de 5x26 mm.
-
Page 40: Installation De La Tringle De Garde-Robe De 18 Et 24 Po Sur Une Tablette D'armoire
Installation de la tringle de garde-robe de 18 et 24 po sur une tablette d’armoire Tracez une ligne centrale sur la tablette et marquez deux trous à une distance de Outils et pièces nécessaires. 16,25 po pour la tringle de 18 po et de 22,25 po pour la tringle de 24 po à... - Page 41 Installation de la tringle de garde-robe de 18 et 24 po sur une tablette d’armoire Insérez la tringle de garde-robe et alignez les trous supérieurs avec les trous percés dans la tablette. Fixez la tringle d’armoire sur la tablette en utilisant deux vis 4x20 mm.
- Page 42 Installation du panier à linge coulissant de 18, 24 ou 36 po Tracez une ligne horizontale sur les parois Outils et pièces nécessaires. d’armoire à la hauteur souhaitée (L). Drill Bit 3/16” #2 Philips Head Pencil Screw Driver Cordless Drill Level #2 Philips Bit (optional) M5 x 16mm...
-
Page 43: Installation Du Panier À Linge Coulissant De 18, 24 Ou 36 Po
Installation du panier à linge coulissant de 18, 24 ou 36 po Insérez la glissière et alignez les trous avec les trous percés dans l’armoire. À l’aide Percez les trous aux emplacements d’une perceuse ou d’un tournevis, fixez la marqués en utilisant un foret de 3/16 mm. glissière latérale sur l’armoire avec quatre vis de M5x16 mm. - Page 44 Installation du panier à linge coulissant de 18, 24 ou 36 po Ouvrez la fermeture autoagrippante du sac à linge des quatre côtés, installez le bâti métallique sous les plis et repliez la fermeture autoagrippante sur le bâti métallique. Posez les supports en plastique sur le bâti métallique, comme illustré...
-
Page 45: Installation D'un Ensemble De Rangement Sous Évier
Installation d’un ensemble de rangement sous évier Positionnez le gabarit sur le panneau inférieur de l’armoire en l’alignant à Outils et pièces nécessaires. l’endroit souhaité en utilisant les flèches du gabarit. Drill Bit 3/16” #2 Philips Head Pencil Screw Driver Cordless Drill Level #2 Philips Bit... - Page 46 Installation de l’ensemble de rangement sous évier Installez les rails avec huit vis M5x16 mm en les alignant avec les trous marqués préalablement. Faites glisser l’assemblage de bâti central dans les rails en le poussant sous les attaches à l’arrière des glissières, comme illustré dans (A). Fixez la partie avant du bâti sur les rails en utilisant deux vis M4x6 mm, comme illustré...
- Page 47 Installation de l’ensemble de rangement sous évier Installez les paniers à l’aide des attaches de verrouillage, comme illustré ci-dessous.
-
Page 48: Installation Du Panier Coulissant Double De 12 Et 18 Po
Installation du panier coulissant double de 12 et 18 po Positionnez le gabarit sur le panneau inférieur de l’armoire en l’alignant à l’endroit souhaité en utilisant les flèches Pièces requises du gabarit. Drill Bit 3/16” #2 Philips Head Pencil Screw Driver M5 x 16mm Cordless Drill Level... - Page 49 Installation du panier coulissant double de 12 et 18 po À l’aide d’un tournevis ou d’une perceuse Insérez l’assemblage du panier métallique sans fil, fixez l’assemblage du panier à et alignez les trous du support avec les l’aide de huit vis M5x16 mm comprises trous percés dans l’armoire avec l’assemblage de panier.
-
Page 50: Installation D'un Panier Coulissant De 18, 24 Ou 36 Po
Installation d’un panier coulissant de 18, 24 ou 36 po Positionnez le gabarit sur la paroi latérale Pièces et outils requis de l’armoire en l’alignant sur le haut et l’avant en utilisant les flèches du gabarit. Drill Bit 3/16” #2 Philips Head Pencil Screw Driver M5 x 16mm... -
Page 51: Installation D'un Panier Coulissant De 18, 24 Ou 36 Po
Installation d’un panier coulissant de 18, 24 ou 36 po À l’aide d’un tournevis ou d’une perceuse sans fil, fixez l’assemblage du panier à l’aide de huit vis M5x16 mm comprises avec l’assemblage de panier. -
Page 52: Garantie Limitée De 5 Ans
Pendant la durée de la garantie à compter de la date d'achat, lorsque ce produit est installé, utilisé et entretenu conformément aux instructions fournies, NewAge Products Inc. remplacera les pièces ou le produit défectueux, si le bris provient d'un défaut de matériau ou de fabrication.
Need help?
Do you have a question about the 80671 and is the answer not in the manual?
Questions and answers