Advertisement
Quick Links
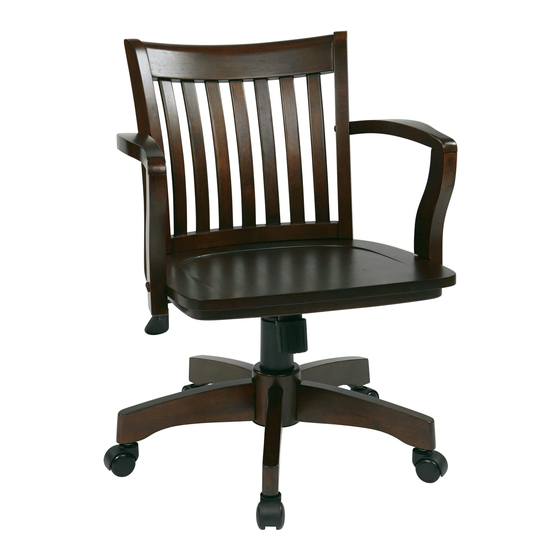
DELUXE BANQUIERS CHAISE EN BOIS
7
10,14
8R
6
10,14
11,14
DÉTAIL B
1
2
Enlever toutes les pièces du carton, séparer par des numéros d'article indiqués sur la liste des pièces, et vérifier les quantités de partie.
ÉTAPE 1 Pour sécuriser les roulettes (2), placez une support en bois au centre de la roulette, en vous servant d'un maillet en caoutchouc (non fourni), tapez sur la
pièce en bois jusqu'à ce que vous entendiez ou sentiez la roulette s'encliqueter en position. (VOIR LE DÉTAIL A). Insérer le vérin pneumatique (3) dans la base (1), et
glisser le soufflet (4) sur le vérin pneumatique (3).
ÉTAPE 2 Attacher le dossier (7) au siège (6) en utilisant trois vis allen longues (11). SERRER COMPLÈTEMENT LES QUATRE VIS. (VOIR LE DÉTAIL A).
Couvrir les trous avec trois boutons en bois (14).
ÉTAPE 3 Attacher la plaque du siège (5) au siège (6) avec la flèche orientée vers l'avant du fauteuil en utilisant quatre rondelles plates (12), quatre rondelles (13) et
quatre vis allen courtes (9). SERRER COMPLÈTEMENT LES QUATRE VIS.
ÉTAPE 4 Aligner les trous dans les Bras (8L et 8R) sur les trous dans le dossier (7) et siège (6), fixer les Bras (8L et 8R) à l'aide de trois vis allen moyennes (10) pour
chaque Bras (8), SERRER COMPLÈTEMENT LES QUATRE VIS. Couvrir les trous avec trois boutons en bois (14) pour chaque Bras (8).
ÉTAPE 5 Placer la plaque du siège (5) sur l'arbre du vérin pneumatique (3) et pousser vers le bas.
ATTENTION : VÉRIFIER QUE TOUS LES VIS SONT INSTALLÉS ET BIEN SERRÉS AVANT DE L'UTILISER.
105 / 108
INSTRUCTIONS DE MONTAGE
maillet en caoutchouc
10,14
8L
support en bois
10,14
base
DÉTAIL A
5
9,13,12
4
PIÈCE
1. Base . . . . . . . . . . . . . . . . . . . . . . . . . . . . . . .1
2. Roulettes . . . . . . . . . . . . . . . . . . . . . . . . . . .5
3. Vérin pneumatique. . . . . . . . . . . . . . . . . . . .1
4. Soufflet . . . . . . . . . . . . . . . . . . . . . . . . . . . . .1
3
5. Plaque de siège . . . . . . . . . . . . . . . . . . . . .1
6. Siège . . . . . . . . . . . . . . . . . . . . . . . . . . . . . .1
7. Dossier . . . . . . . . . . . . . . . . . . . . . . . . . . . . .1
8. Bras (8L et 8R) . . . . . . . . . . . . . . . . . . . . . .2
9. Vis allen courtes . . . . . . . . . . . . . . . . . . . . .4
10. Vis allen moyenne . . . . . . . . . . . . . . . . . . .6
11. Vis allen longues . . . . . . . . . . . . . . . . . . . .3
12. Rondelles plates . . . . . . . . . . . . . . . . . . . .4
13. Ronelles . . . . . . . . . . . . . . . . . . . . . . . . . . .4
14. Boutons en bois . . . . . . . . . . . . . . . . . . . . .9
15. Support en bois . . . . . . . . . . . . . . . . . . . . .1
16. Clé allen (not montrée) . . . . . . . . . . . . . . .1
1
roulette
QTÉ
LIMITED WARRANTY
OSP Designs Warrants, to the original purchaser its products to be free from defects in material and workmanship for a period of 90 days. Defects
and damage from misuse, abuse, negligence, alteration, accident, vandalism, rusting, acts of nature or any other event beyond the control of OSP
Designs is not covered. The warranty does not cover cosmetic damage that may result from normal use. Liability for incidental or consequential
damages is excluded. The user assumes all risk of injury resulting from use of this product. This warranty gives you specific legal rights, and you
may also have other rights which vary from state to state.
To make a warranty claim, contact Customer Service, provide model number, sales receipt and description of the problem. It is the customer's
responsibility to prepay freight on any components returned to the factory. OSP Designs will pay return freight on components covered under
terms of warranty.
Our quality standards are among the highest in the industry. Sometimes, no matter how hard we try, there are times when hardware is missing.
Our Parts Department will do everything possible to promptly remedy the problem. Contact us via email parts@officestar.net, by Fax
1-909-930-5629, or toll free parts number 1-800-950-7262, Monday through Friday 8:00 a.m. - 5:00 p.m. Pacific Time. OSP Designs P.O. Box
3520 Ontario, California 91761 USA
© Office Star Products octobre 2017
105 / 108
DELUXE WOOD BANKERS CHAIR
OPERATING INSTRUCTIONS
FEATURES
• HEIGHT ADJUSTMENT
• LOCKING TILT ADJUSTMENT
2
NOTE: Be careful not to loosen back tilt adjustment knob
completely.
105
WARNING
1. Do not use this product unless all screws and bolts are
2. Check that all screws and bolts are tight every three months or
1
2
3. Dispose of packing material properly. Do not use plastic cover
4. Do not use this product as a stepladder.
5. Use this product for its intended purpose only.
6. Secure Wood Caps (14) as they may be a choking hazard for
7. Intended for residential use only.
108
To raise seat remove pressure from seat and lift lever (1). To
lower seat height sit on chair and lift lever (1).
For individual comfort, this chair has been equipped with an
adjustment that will allow the user to change the tension of
the tilting feature. Turn knob (2) clockwise to increase tension
and counter-clockwise to decrease or ease the tension. To
lock return chair to the upright position and push lever (1) in.
To unlock pull lever (1) out.
securely tightened.
as needed.
as head covering. It may cause suffocation.
small children.
Advertisement

Related Manuals for OSP Designs 105


Summary of Contents for OSP Designs 105
- Page 1 12. Rondelles plates ....4 OSP Designs Warrants, to the original purchaser its products to be free from defects in material and workmanship for a period of 90 days. Defects 13.
- Page 2 10. Medium Allen Screws ....6 OSP Designs garantit à l’acheteur original que ses produits sont exempts de vices de matériaux et de fabrication pendant une période de 90 11.
Need help?
Do you have a question about the 105 and is the answer not in the manual?
Questions and answers