
Summary of Contents for Opus OP2
- Page 1 2021 USER MANUAL OPUS CAMPER usa M . E V A N . O P U S A D V E N T U R E A D D I C T . M A Y 2 0 2 1...
-
Page 2: Table Of Contents
Find links to your user 12. Control Panel manual, photos, videos and acessories. 13. OPUS® Quick Set-Up Guide 14. Setting Up your OPUS® Camper 18. Packing Down your OPUS® Camper 20. AIR Tent Design Warranty Activation: 22. About your KITCHEN... - Page 3 We recommend that you keep this Owner’s Manual with your camper as a reference guide for when you are out on your adventures. If you need a digital copy of this manual please contact us at OPUS Camper USA and we would be happy to provide you with one.
-
Page 4: My Opus Camper
DRY WEIGHT CARGO CAPACITY TIRE SIZE COLD TIRE PRESSURE This information can be found on the tire sticker of your OP2 dealership of purchase WARRANTY ACTIVATION Follow this code to activate your OPUS warranty. For specific details regarding your warranty see pages 47 & 48... - Page 5 VIN: VEHICLE IDENTIFICATION Every OPUS® has a Vehicle Identification Number (VIN). The VIN Plate can be found on the exterior of your OPUS® to the left of the door. We recommend making a note of your VIN in the template as shown.
-
Page 6: Dimensions
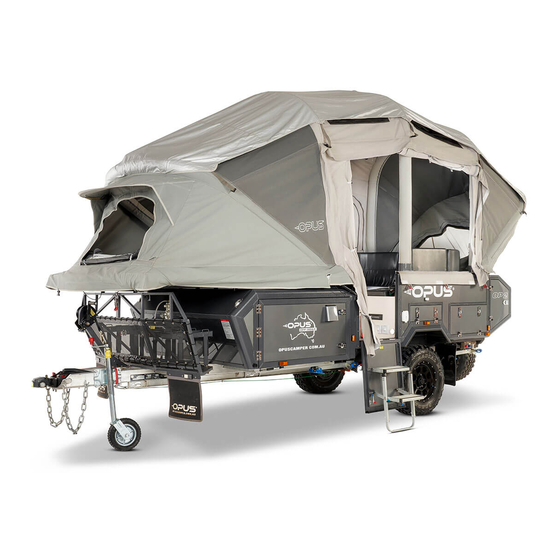
OP2 SPECIFICATION BUILD Color OPUS Orange, OPUS Blue, Metallic Grey, Matte Black, ARMY Green Body Work Baked Enamel Finish Box Material Main body aluminum tube & composite panel exterior; fully hot-dip galvanized chassis with draw-bar Dimensions (Lid Closed) 18’2’’ (including spare wheel) x 6’7’’ x 4’9’’... - Page 7 INTERIOR FEATURES Seating Sectional Leatherette Cushions Table Adjustable height fold-away table Storage Under-bench storage compartments Bathroom Optional porta potti cassette toilet Heating (optional) 16,000 BTU TRUMA propane furnace Sleeping 1 RV Queen Bed, seating area converts to second bed. ELECTRICAL Batteries 2 x 100ah 12v AGM Batteries Shore Power...
- Page 8 OP2 dimensions 6’7’’ 4’9’’ SHOWER DIMENSIONS 7 ft 5’7” 5’7”...
- Page 9 18’2’’ (including spare wheel) 21’4’’ (with tent inflated) 11’6’’...
- Page 10 Hook arms fit over trailer-side pin arms. NOTE securing pin through holes in hook arms and locking pin to hold it in place WATCH THE VIDEO! Watch this HOW-TO video on everything you need to know about towing your OP2. Watch detailed instructions on using your Lock’n’Roll hitch, brakes, safety chains, tongue jack and brake adjustments.
-
Page 11: Wheels & Brakes
TOWING The driver of the tow vehicle must ensure that their Driving License is valid for towing the OPUS® Camper. It is highly recommended, particularly if you are not experienced in towing that you adhere to any applicable laws for the state in which you are driving. Many guides are available from leading associations and should be studied before you embark. -
Page 12: Control Panel
• Amp Meter – This shows how many Amps you are currently using. The 2. AIR COMPRESSOR POWER OPUS® has 2 x 100ah AGM batteries. This gives you 100 usable amps for 3. AIR INFLATION BUTTON off-site power. •... - Page 13 We strongly recommend you review the OPUS® Off-Road User Manual thoroughly before setting up you OPUS® Off-Road Camper for the first time. For information about setting up your kitchen, shower and other accessories, please see the...
- Page 14 OP2 SET-UP STEP 1 PREPARE TO DEPLOY YOUR CAMPER • Once you have positioned your OPUS® in the desired location, engage the handbrake. • Raise or lower the tongue jack wheel to level your OPUS® length ways. • Remove all items from the Cargo Rack.
- Page 15 Secure the lid to the stone guard frame with the latch and secure with the retaining pin. • At this stage walk around the OPUS® and inspect the tent to ensure that the canvas is properly located within the alu- minum channels and that no part of the tent is caught or snagged.
- Page 16 • Depending on the terrain, you may need to adjust each corner to level the OPUS® to achieve a good level. • While your tent is inflating you can use this time to set up your kitchen.
- Page 17 Should you need to switch off the compressor for any reason whilst the tent is inflating, this should be done using the main power switch. • Please note that the Air OPUS switch is not a 2-way on/off switch (meaning that pressing this twice will not turn the compressor off).
- Page 18 OP2 PACK-DOWN STEP 1 PACK DOWN THE INTERIOR • After stowing your personal items, close all both layers of all windows, making sure no water, dirt or debris is trapped between the layers. • Ensure mattresses are secure using the straps provided •...
- Page 19 STEP 4 STOW YOUR KITCHEN • Disconnect your water & gas quick connects from the kitchen as well as the 12v kitchen light. • Ensure the water hoses are stowed in the drawer and that the drawers are closed on the catches properly. •...
-
Page 20: Air Tent Design
AIR TENT DESIGN Your OP2 AIR tent is made of 9 connected AIR beams in the main tent (and 9 beams in the annex if you choose that addition). The tent is inflated by the compressor that is mounted in the cabinet to the right of the door. The hose from the AIR compressor is threaded up through the cabinetry to the main AIR tent inlet valve. - Page 21 Should you identify a leak in your air beam or valve, please use the following map and contact OPUS HQ for a replacement beam. For field repairs, you can use the patch kit included with your OP2. We also recommend keeping the isolation valves closed until the air beam is replaced to help prevent tent collapse.
- Page 22 • LED Light: Position the flexible light to the desired position. Plug the power cord for this light into the small 12v socket on the exterior of the OP2. Ensure that the *Lights* switch is turned on so that the socket is receiving power. Be sure to disconnect the light from the outlet BEFORE sliding away your kitchen.
-
Page 23: About Your Fridge
We have also compiled a few quick tips that are OPUS-specific: • Your Fridge can be run on either 120v or 12v however we have designed the OP2 so that only 12v is supplied to the fridge compartment to enable the most energy efficient usage. -
Page 24: Gas System
Thread the gas hose through the aperture under the kitchen and connect to the gas quick connect on the side of the OP2. Turn on the gas tap on the gas quick connect on the side of the OP2 by turning 90°... - Page 25 Danger! Always ensure that the gas cylinder retaining straps are fitted whenever a gas cylinder is installed in the front locker compartment, even when the opus® is stationary. Important! Please consult the opus team before completing any repair work on the gas system: the propane system installed includes a 2-stage regulator. The regulator must always be installed with the vent facing downwards.
-
Page 26: Propane Heater - Truma
STEP 2: Turn the temperature all the way down to the left STEP 3: Wait for the propane heater & fan to cycle off STEP 4: When packing down the OPUS, turn the heater switch on the control panel off and turn the red key off and remove. - Page 27 The OP2 comes with a built-in shower tent with a connecting hot water shower. Using the Eccotemp and Seago water pump, the OP2 is able to pump both cold and hot water to the kitchen and shower. Following the below steps secure your shower tent to the main tent.
-
Page 28: Water System
POTABLE WATER The OP2 is fitted with 30 gallons of water in two potable water tanks (1x 20gl tank in the back, 1x 12gl tank in the front), one mounted in front of the axle and one behind. Each tank has its own lockable fill point located on the driver-side and identified by a blue water faucet icon. Your water tanks are each connected to the 12v water pump which can be switched on via the main control panel. - Page 29 • Use the supplied blue water hose with male quick-connect fittings on each end. • Connect one side to the middle quick connect on the side of the OPUS and the other side to the water quick connect fitting on the kitchen, accessible when the kitchen is fully extended.
-
Page 30: Electrical System
12V SAFE OPERATING PROCEDURES The OP2 has two 100ah deep cycle marine batteries installed as well as a fully automatic battery charge controller. You will need to charge your batteries for at least 24hrs prior to each trip using a 120v shore power connection to ensure that they are fully charged. - Page 31 12V Power - cont The OP2® has many 12v outlets that are a combination of standard 12v sockets, mini 12v sockets and USB sockets. There are also a range of 12v features included with the OPUS, all controlled by the main control panel, the locations of which are listed below. All switches have their own resettable breaker located above the switches.
- Page 32 OP2 OPTIONS / FEATURES OPUS AIR CANOPY ZAMP 140 WT SOLAR PANEL rhino roof rack bars op2 shower tent BIKE RACK CARRIERS ENDURO REMOTE TRAILER MOVER OPUS AIR ANNEX LED LIGHTS: ANNEX/CANOPY DIMMABLE LED LIGHTS - TENT nemesis wheel lock...
-
Page 33: Additional Bed Set-Up Guide
ADDITIONAL BED SET-UP LOUNGE SEATING MOVED TO CREATE ADDITIONAL BED The seating area inside the OPUS® can be reconfigured to provide an additional bed. BOLSTERS STEP 1 Firstly, position the table top in the position shown above to form the base section of the additional bed. -
Page 34: Air Canopy Set-Up
Install the Cross Filling Tube… by unscrewing the top of the black valve, pushing the gray tube on to the valve and then threading the top of the black valve over the tube and twisting it on. Thread the end of the Cross Filling Tube through the silver loop hole in the OPUS side wall. - Page 35 STEP 8 Ensure both quick-release valves are closed on the canopy legs and all 5 on your OPUS main tent then press the AIR compressor button on the control panel and wait for the canopy to inflate. STEP 9 Keep an eye out for obstructions and when the canopy is starting to form, feel free to help guide the air beams to assist an easy flow of air through them and form final canopy structure.
-
Page 36: Air Annex Set-Up
Our recommendation is to then stand between the OPUS and the annex and start zipping at the door side, walking backwards between the OPUS and the annex as you close the zip. This will assist in locating both the Cross Filling Tube that you installed on the main OPUS tent as well as the receiving valve on the annex-side about... - Page 37 Open the valve on the annex-side. Finish zipping the annex to the side of the OPUS and fold the Velcro flap over the zip. STEP 8 Ensure all 7 quick-release valves are closed on the annex and all 5 on your OPUS main tent then press the AIR compressor button on the control panel and wait for the annex to inflate.
- Page 38 FIRE EXTINGUISHER—located inside and to the right of the door. EMERGENCY EXITS - Are shown on the below floorplan. They are 1) The main OPUS door; 2) Out of the front bed-end tent by zipping open the inner-tent window and then opening the zip along the the BOTTOM of the main tent (see image); 3) Out of the rear bed using the...
-
Page 39: Care & Maintenance
It is, of course unavoidable at times that you will have to pack down your OPUS® when the canvas is wet. It is very important that the OPUS® is opened up to dry off as soon as possible and should be done within 24 hours. - Page 40 If you are in the field and can locate the source of the leak, you may be able to use the patch kit provided to patch the leak as a short-term fix in the same way that you would patch a bicyle tire. When you return home, contact OPUS HQ or your dealership and use the AIR Beam map in this manual to order your replacement AIR beam.
- Page 41 Disconnect the faulty beam from the AIR transfer hoses connecting it to the rest of the tent. Make sure the isolation valves are in the closed position on both sides of the AIR transfer hose. Unscrew the front part of the isolation valve until you can slide it along the grey hose.
- Page 42 In order to ensure you get the most out of your OP2 and that warranty claims may be processed in a swift and timely manner, we ask that our customers adhere to the following guidelines: Regular and proper maintenance of your OP2, including but not limited to the steps outlined in this user manual.
- Page 43 • It is strongly advised that you use a storage cover for your OP2 if it is to be stored in an uncovered location. The OPUS storage cover provided with your camper is engineered for the OP2 specficially to ensure all features are protected. The storage cover is advised for an extended period of storage to keep your camper in pristine condition.
- Page 44 Check the lights and fittings and ensure they are functioning correctly. Check the brakes are in good working order The chassis/running gear and the gas installation of your OP2 camper should be checked on an annual basis by a qualified service center.
- Page 45 The servicing schedule may be affected by your usage amount and operating conditions. Discuss your intended use and servicing timetable with your dealership to find the optimum schedule for your OP2. It is always better to attend to or catch small problems early or before they occur rather than allowing problems to become larger or impact other systems or areas of your trailer.
-
Page 46: Inside Your Op2
INSIDE YOUR OP2 Lock’n’roll (VEHICLE SIDE) BED LID Winch spare Propane Regulator op2 shower tent WHEEL CHALKS shore power extention MANUAL AIR PUMP MANUAL CRANK FOR STABILIZER PATCH kIT FOR TENT EXTRA KITCHEN SUPPORT LEG Drill bit adapter exterior led light SHOP OPUS ACCESSORIES Shop multiple options for cover, power, shade, security and gear to take you further off-grid. - Page 47 FEATURES KITCHEN ARB FRIDGE ANNEX INTERIOR SHOWER TENT SHOWER TENT TENT FRONT PULLED UP AVAILABLE IN GREEN FULLY ENCLOSED Shower tent LIGHT UP AT NIGHT beach ready...
-
Page 48: Warranty
• OPUS® shall not be liable, (in part or whole) for any warranties, either express or implied, made by agents or resellers on behalf of OPUS® without the knowledge or express written permission of OPUS®. Such unauthorized claims shall be the responsibility of the... - Page 49 FINAL OPPORTUNITY TO REMEDY. OPUS® reserves the right to change the parts and design of its recreational vehicle from time to time without notice and with no obligation to maintain spare parts or make corresponding changes in its products previously manufactured.
-
Page 50: Troubleshooting
troubleshooting water tanks - troubleshooting Issue: Water pump is running when all faucets & valves are closed Troubleshoot: Leak in the system. Identify leaking fitting and attempt to tighten the fitting (usually hand-tight should be sufficient without the need for a wrench which could potentially over-tighten and damage the system. If still leaking, dis- connect and check for debris or degrading within the fitting. -
Page 51: Resources
WARRANTY Register your warranty online at: https://www.opuscamper.us/warranty-claims/ ONLINE OWNER’S MANUAL Download a digital copy of the OP2 Owner’s Manual to have on hand at all times: https://www.opuscamper.us/2-SLEEPER ONLINE OWNER’S GROUPS Join the OPUS online community where you can ask other owner’s for tips and advice and share trips and memories with other OPUS owners. - Page 52 2021 OWNER’S MANUAL manufactured by opus camper in california T O U G H L U X U R Y Contact: Address: 1.925.215.7315 1850 Loveridge Rd. info@opuscamper.us Pittsburg, CA 94565...
Need help?
Do you have a question about the OP2 and is the answer not in the manual?
Questions and answers