Table of Contents

Summary of Contents for Kebby Power Crimp
- Page 1 Power Crimper KEBBY INDUSTRIES & Accessories Setup and Operation Manual KEBBY INDUSTRIES 4075 Kilburn Ave., Rockford, IL 61101 U.S.A. Phone: 815-963-1466 • Fax: 815-962-3490 Email: sales@kebbyindustries.com www.kebbyindustries.com...
-
Page 3: Table Of Contents
ASSEMBLY ACCESSORY LIST ....................6 KEBBY POWER CRIMP AND ACCESSORIES ............7 ASSEMBLY INSTRUCTIONS ................... 8 ASSEMBLE POWER CRIMP TO CRIMP STAND ............ 10 POWER CRIMP HEAD INSTALLATION ..............12 SETUP AND OPERATING CRIMP SET-UP AND OPERATING INSTRUCTIONS ..........13 CAP REMOVAL SET-UP AND OPERATING INSTRUCTIONS ......... -
Page 4: Introduction And Safety
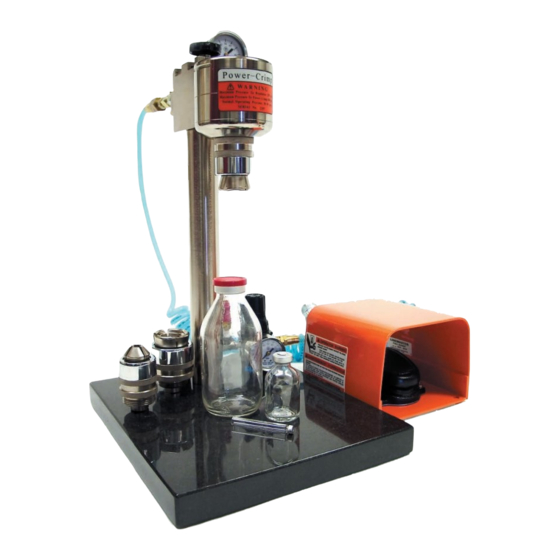
Kebby Industries is very well-known for the high quality of all their crimping and de-capping tools. The Power Crimp is no different. The quality of the Power Crimp is easily seen in the top grade fittings, high quality regulator assembly, stainless steel hose, and the corrosion-resistant finish. -
Page 5: Safety Precautions
CAUTION THIS SIGN IS USED WHEN DANGEROUS STORED ENERGY MAY BE PRESENT. THIS WILL REQUIRE ADDED CAUTION AND A WELL THOUGHT OUT PLAN BEFORE REPAIR BEGINS. BE PREPARED TO CHECK OR HAVE CHECKED ANY PRESSURIZED LINES. STORED ENERGY KEBBY INDUSTRIES... -
Page 6: Safety Recommendations
13. Never overload the unit. This is potentially dangerous to both the operator and the unit. 14. When returning to the unit after an absence, always check the setup. The equipment may have been used and not replaced correctly. 15. Never operate unit while any personnel are near hazardous areas. KEBBY INDUSTRIES... -
Page 7: Cautions And Warnings
This unit complies with the Occupational Safety and Health Act of 1970 standards where the requirements are specific. The balance of the standards are complied with as interpreted by Kebby Industries. Since these standards are continually evolving, and since they are subject to considerable interpretation by a third party, Kebby Industries cannot guarantee or warrant compliance with the provisions or standards of O.S.H.A. -
Page 8: Accessory List
P/N A10011 P/N A10012 Stainless Steel Base Model P/N A10010-1 Verification Gauge Assembly Lubricating Grease Inter-Changeable Crimping and P/N A10013 P/N A10024 Decapping Heads available for a wide variety of cap sizes and styles from 7.5mm to 32mm. KEBBY INDUSTRIES... -
Page 9: Assembly
ASSEMBLY KEBBY POWER CRIMP AND ACCESSORIES FIGURE 1-1 KEBBY POWER CRIMP AND ACCESSORIES NUMBER PART NUMBER DESCRIPTION A10001 POWER CRIMP POWER CRIMP HOSE ASSEMBLY A10007 POLYURETHANE SELF-STORING HOSE ASSEMBLY A10008 POLYURETHANE STRAIGHT HOSE ASSEMBLY A10009 BRAIDED STAINLESS STEEL HOSE ASSEMBLY... -
Page 10: Assembly Instructions
The following chapter will guide you through the assembly. FIGURE 1-2 STEP 1: Connect the Power Crimp Hose Assembly to the Power Crimp as follows: Step #1: Install the hose fitting onto the Power Crimp adapter. Step #2: Place a 1/2” open-end wrench on the adapter of the Kebby Power Crimp. - Page 11 ASSEMBLY STEP 2: Connect the Power Crimp Hose Assembly to the Gauge I Regulator. FIGURE 1-3 STEP 3: Attach main supply air (less than 36% relative humidity @ 60 degrees F) to the Gauge/Regulator. WARNING DO NOT EXCEED 250 PSI.
-
Page 12: Assemble Power Crimp To Crimp Stand
Crimp Stand Assembly. STEP 3: Swing the hinged cover open on the Crimp Stand Assembly. STEP 4: Align the Power Crimp with the Crimp Stand and slide the Power Crimp down and into the Crimp Stand Assembly. STEP 5: Hold the Power Crimp in place and swing the hinged cover closed. - Page 13 NOTE: Do not over tighten the fitting. Minimum pressure is needed to secure the fitting. STEP 8: Connect the Power Crimp Hose fitting to the quick disconnect of the Foot Pedal Assembly. STEP 9: Connect the Supply Hose to the quick disconnect fitting on the Foot Pedal Assembly.
-
Page 14: Power Crimp Head Installation
NOTE: Do not over tighten the Power Head. Minimum pressure is needed to secure the Power Head. FIGURE 1-7 WARNING WHEN INSTALLING OR REMOVING POWER CRIMP HEAD, SET AIR PRESSURE TO 0 PSI. KEBBY INDUSTRIES... -
Page 15: Crimp Set-Up And Operating Instructions
If an indentation begins to appear on the side of the seal being crimped, cleaning and lubricating of the jaws will usually correct the problem. In order to use your Kebby Power Crimp correctly and obtain the best crimp, use the following steps: STEP 1: Set the air pressure to zero psi. -
Page 16: Cap Removal Set-Up And Operating Instructions
Cap will be destroyed during removal procedure. In order to use your new Kebby Power Crimp correctly for cap removal, use the following steps: STEP 1: Set the air pressure to zero psi. Turn the regulator adjustment knob (Figure 1-5) counter clockwise to decrease the air pressure to zero psi. -
Page 17: Maintenance
The information contained in this chapter, when used along with the machine drawings provided by Kebby Industries, will simplify the care and handling of the machine and help you obtain maximum benefits from your new machine. -
Page 18: Machine Cleaning
This category involves an area that, if not cleaned, will gradually deteriorate machine performance. • Power Crimp • Gauge/Regulator Assembly • Power Crimp Hose Assemblies • Supply Air Hose Assembly • Foot Pedal Assembly • Power Crimp Stand Assembly PNEUMATIC SYSTEM Preventive maintenance of the pneumatic system requires a clean, dry (less than 36% relative humidity @ 60 degrees F) shop compressed air supply. -
Page 19: Pneumatic System Preventive Maintenance
This destruction occurs over an extended period of time, and results in the gradual deterioration of the system efficiency. NOTE: SHOP AIR SYSTEM FILTER MAINTENANCE IS THE BEST MEANS OF LIMITING THE DESTRUCTION AND CONTAMINATION BY SOLIDS AND WATER IN THE PNEUMATIC SYSTEM. KEBBY INDUSTRIES... - Page 20 KEBBY INDUSTRIES 4075 Kilburn Ave., Rockford, IL 61101 U.S.A. Phone: 815-963-1466 • Fax: 815-962-3490 Email: sales@kebbyindustries.com www.kebbyindustries.com...
