Advertisement
Quick Links
Advertisement

Subscribe to Our Youtube Channel
Summary of Contents for Clover Book
-
Page 2: Video Magnifier
REV1.7 CLOVER BOOK VIDEO MAGNIFIER... - Page 3 User Guide...
- Page 4 Contents The table of contents is empty because you aren’t using the paragraph styles set to appear in...
-
Page 5: Quick Start
Overview Thank you for purchasing Clover Book/Clover Book Lite! Clover Book (Lite) is a 12.5-inch portable video magnifier which can satisfy all the daily requirements and work across 3 main market segments of home, work and education for the low vision people. - Page 6 The built-in OCR engine (available only in Clover Book) will auto recognize the context of various language with user-preferred page size, and speak aloud with natural voice generated by TTS engine, providing reading and auditory enjoyment.
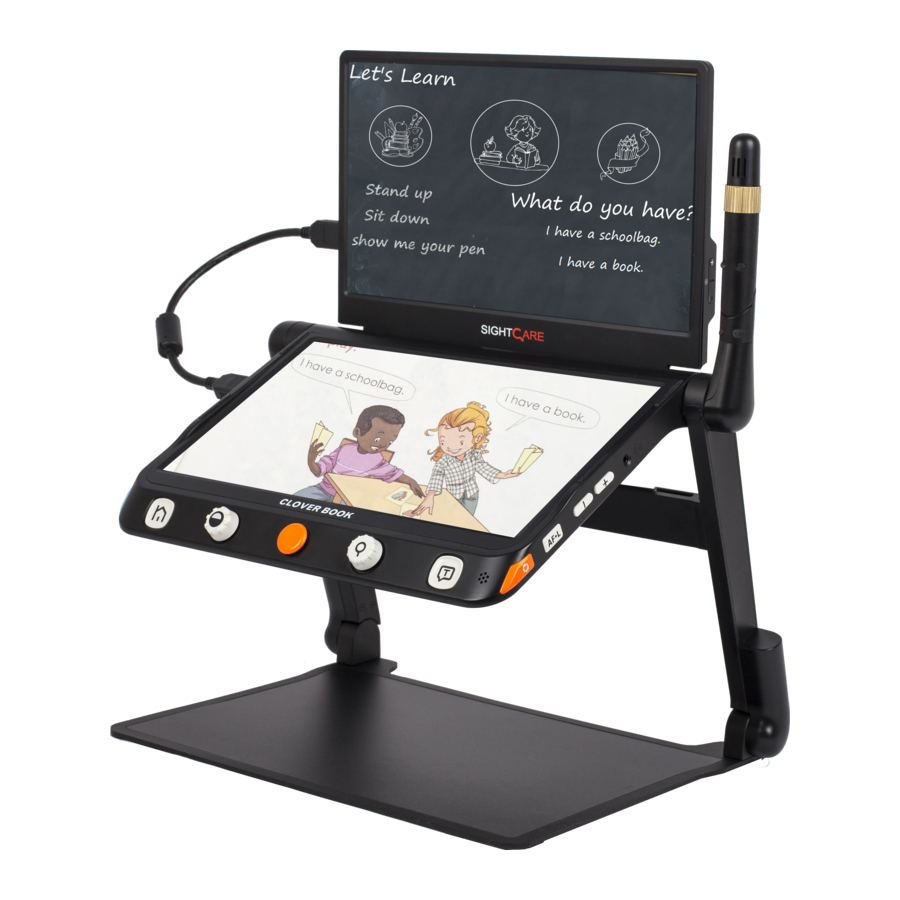
- Page 7 1. LCD Screen 2. Home/Exit Button 3. Enhanced Color Button 4. Joystick 5. Zoom Button 6. Speech/Enter Button 7. Tray 8. Power Button 9.DC Port 10. HDMI In Port 11. HDMI Out Port 12. USB Port 13. SD card Slot 14.
- Page 8 21. Speaker 22. Lifting Handle 23. Battery Slot 24. Unlock Button 25. LED Lights 26. Main Camera 27. Camera Stick 28. Position Knob 29. Distance Camera Note: Item 27&28&29 is only available for the device you purchased with the built-in distance camera option. Accessories User Manual Power Adapter...
- Page 9 Step 1 Place the device on a flat surface, press the tray to make the device stable and pull up the handle at the same time Step 2 Keep pressing the tray and unfold the arms to a suitable angle. Step 3 Unfold the display panel to a comfortable reading height.
- Page 10 the shield to the back side of the device as the picture shows. Battery Charging Connect the supplied power cable to the unit’s charging port, then connect the power adapter into an AC outlet to start charging. Power LED ❑ Charging when the unit is off, the power LED will be green and auto turn off when fully charged.
-
Page 11: Operation
Press the Unlock Button on the back side and the battery will be released. Take the battery out and insert a new one. Operation Clover Book (Lite) has different configurations because touch screen, built-in distance camera and OCR function are optional to satisfy various requirements. According to the device version that you purchased, please refer to the corresponding operation. - Page 12 and Power Off ! . Touch the icon (or slide the Joystick! choose and Speech/Enter button! or ! to confirm) Note: No operation for 3 seconds will auto get into the highlighted mode. ❑ In the Sleeping Mode, short press the Power button! to wake the device.
- Page 13 In the Magnifier Application, short press the Home/Exit Button! or slide from the bottom screen to pop up the Quick Control Bar. ❑ Apply the tap gesture to choose the icon below (or use the Joystick! ❑ Finger slide (or rotate the Zoom button! ) to increase/ decrease the brightness.
- Page 14 ❑ Press down the Enhanced Color button! and turn the Zoom button! at the same time to pop up the Contrast Control Bar. ❑ Use the slide gesture or turn the Zoom button! to change the contrast color of background and foreground. ❑...
- Page 15 Image Freeze Freezing a live image can be useful for the moving objects. Further magnification as well as enhanced color change is still available in this mode. Press Freeze button! to lock/unlock the image. For the locked image with increased magnification, you can use the gesture or the Joystick! to navigate around freely.
- Page 16 Note: The Voice Record function can be turned off in the Settings Menu. When the saved images reach to the maximum capacity (2 GB, Memory Full icon appears), you will need to delete some pictures first in Playback mode before the next successful saving. Line and Mask Press the Locate button! to switch among different Reading...
- Page 17 Joystick! left/right to narrow/enlarge the distance between the masks. ● Vertical mask ❑ Press and hold the Locate button! and slide the Joystick! left/right to change the position of the masks;slide the Joystick! up/down to enlarge/narrow the distance between the masks. Location Function When in a higher zoom level, sometimes you may be lost and confused about which paragraph of the paper you are reading...
- Page 18 Toggling System (Depends on the configuration) The Switch button! has different functions depending on which configuration you choose for the Clover Book (Lite). The device without the distance camera: press the Switch button to quickly get into the picture gallery.
- Page 19 Display case. ■ Viewing Mode toggling The device with the distance camera: press the Switch button! toggle between 2 viewing modes or 4 viewing modes (Split screen is only available on the Clover Book). Distance/Mirror View Near View Horizontal Split Screen...
- Page 20 ■ Split Screen Control (Optional) Split screen can show images of the Near View and Distance/ Mirror view at the same time in the display panel. ❑ Press and hold the Locate button! and push the Joystick! change the viewing size of two images. ❑...
- Page 21 When images are captured by two cameras, tap the screen corner twice to toggle between the main screen and the external screen (or press the Home/Exit button! to pop up the quick Control bar or press and hold the Switch button! and push the Joystick! ).
- Page 22 Mode. Besides, long press the Switch button! in Near View Mode to get into the Full Page Reading Mode quickly. ❑ Tap the Snapshot icon! or press the Freeze button! capture the full page image. ❑ Press the Home/Exit button! to pop up the control bar, and the image rotation can be applied by tap the icon! (or press...
- Page 23 As soon as the recognition procedure finishes, the TTS Control Bar(default) appears at the bottom of the screen. ❑ Touch and Slide the Speech Speed Bar! to adjust the reading speed. ❑ Press the Zoom button! to quickly back to the original size if the content is enlarged.
- Page 24 Single-selection ! ❑ Tap the Play icon! (or press the Speech button! ) to start reading the highlighted section. ❑ Tap the Pause icon! (or press the Speech button! to pause the reading. ❑ When paused, tap one section you are interested in will highlight the chosen section.
- Page 25 ❑ Tap Picture icon! to get into Text Mode when segmentation enabled. Only the highlighted/chosen content will be transformed into text and showed. Previous icon! / Next icon are available in Single-selection. Tap them can jump to the previous/next section (already divided in Picture Mode). ❑...
- Page 26 the specific picture/document first and then tap the Transfer icon ! (or press the Freeze button! ) to start. ❑ Long tap the Transfer icon! (or long press the Enter/Speech button! or ! ) for 3 seconds, all the picture/document will be chosen and transferred to the external SD card.
- Page 27 ❑ Tap to highlight the thumb picture and tap it again (or press the Speech/Enter button! ) to playback the picture. The thumb picture with the voice label can play the recorded voice by tapping the Voice icon on the top-right side (or press down the Zoom button).
- Page 28 the Speech/Enter button! ) to delete or tap the Exit icon (or press the Home/Exit button! ) to cancel. Open Document The documents are the text saved from TTS mode. ❑ If the text is stored with its original picture from TTS mode, the text in the thumb gallery can be shown as the picture format.
- Page 29 ❑ Tap the Exit icon ! to exit to the document gallery. ❑ When in the gallery, the transfer and deletion can be applied to the documents. And the operations are the same as above in the Open Picture. Settings Menus Get into the Setting menus from the Home Page.
- Page 30 ◆ Vibration provides an option of screen vibration feedback. ◆ Speech Guide provides an option of human voice prompts as the operation/status hints. Voice Setting Page ❑ Gender Voice provides options of man voice and female voice. The factory default is female voice. ❑...
-
Page 31: Troubleshooting
HDMI Input Connect an external camera to the unit which will show the image that the camera captures. The internal distance camera will be bypassed. Hardware Reset When the unit is hung or can’t be turned off normally, press the Power! and Voice Up Button! and Voice Down Button... -
Page 32: Specification
❑ The image does not change • If the unit enter the freeze mode or playback mode, the image may not change • Restart the unit • Hardware Reset ❑ Smudges or blemishes on the screen • Adjust brightness • Clean the LCD screen and camera ❑... - Page 33 Contrast: Contrast adjustable in Enhanced Color mode ● ● Panning: Live panning; freeze/stored image panning ● Snapshot: Image Storage and Playback, Storage capacity: approximately 2GB ● Locate: Line / Mask function; Text relocation / Find function Audio: Button / menu / speech voice control ●...
Need help?
Do you have a question about the Book and is the answer not in the manual?
Questions and answers