Table of Contents
Advertisement
Available languages
Available languages
Quick Links
Advertisement
Chapters
Table of Contents

Subscribe to Our Youtube Channel
Related Manuals for Cafe CTW900M

Summary of Contents for Cafe CTW900M
- Page 1 Owner’s Manual...
-
Page 2: Table Of Contents
Owner’s Manual & Installation Instructions Electric Warming Drawer Model: CTW900M and CTW900P Contents Safety Information .......3 Installation Instructions . - Page 3 THANK YOU FOR MAKING CAFÉ A PART OF YOUR HOME. We take pride in the craftsmanship, innovation and design that goes into every Café product, and we think you will too. Among other things, registration of your appliance ensures that we can deliver important product information and warranty details when you need them.
-
Page 4: Safety Information
IMPORTANT SAFETY INFORMATION READ ALL INSTRUCTIONS BEFORE USING THE APPLIANCE Read all safety instructions before using the product. Failure to follow these instructions may result WARNING in fire, electrical shock, serious injury or death. WARNING IMPORTANT SAFETY NOTICE All warming drawers can tip and injury could result if not properly installed. To prevent accidental tipping of the warming drawer, attach it to the wall with an anti-tip brace as described in the Installation Instructions. - Page 5 IMPORTANT SAFETY INFORMATION READ ALL INSTRUCTIONS BEFORE USING THE APPLIANCE KEEP FLAMMABLE MATERIALS AWAY FROM THE WARMING DRAWER WARNING Failure to do so may result in fire or personal injury. a warming drawer, including paper, plastic, pot materials accumulate in or near the warming holders, linens, wall coverings, curtains, drapes and drawer.
-
Page 6: Features
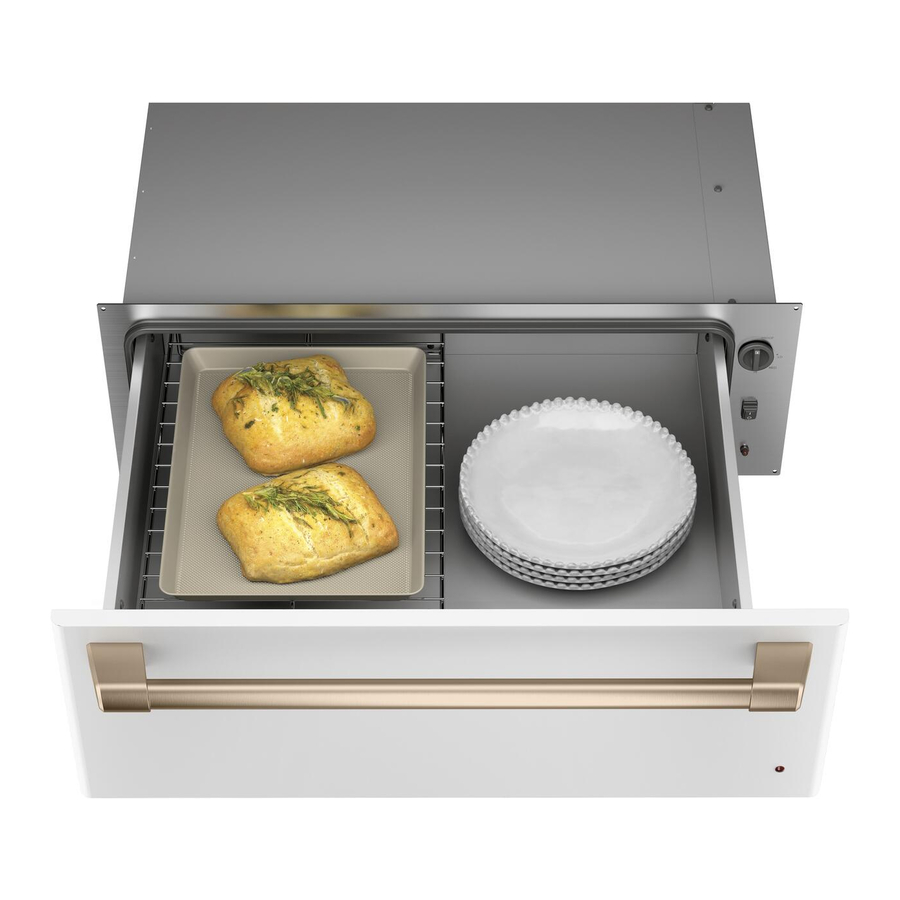
Features Warming Drawer Moisture Selector (on back of panel) Rating Plate The warming drawer will keep hot, cooked foods at serving temperature. Always start with hot food. Do not use to heat cold food other than proofing yeast dough, crisping crackers, chips or dry cereal. Control Knob The warming drawer controls are hidden with the drawer Turn the control knob to the desired setting. -
Page 7: Operating Tips
Operating Tips Rack Double stacking items with the rack in position. When Using The Warming Drawer Do not line the warming drawer with aluminum foil. thermostat setting and cover some of the cooked food items. 8 minutes MED 15 minutes transferred to a heat-safe serving dish. - Page 8 Operating Tips To Proof Yeast Bread Dough Yeast dough can be proofed in the warming drawer. LOW then immediately back to PROOF. to double the dough size. Cover with a cloth. needed. The dough should remain in the drawer until it has doubled in size and a slight depression remains when the surface is touched gently with a finger.
- Page 9 Operating Tips Temperature Selection Chart for Moist Foods To keep several different foods hot, set the temperature Moisture to the food needing the highest setting. Place the items Food Type Control Setting Selector Setting needing the highest setting on the bottom of the drawer and items needing less heat on the rack.
-
Page 10: Cleaning The Warming Drawer
Cleaning The Warming Drawer Painted Or Enameled Surfaces Rack Clean the rack with detergent and water. After cleaning, rinse the rack with clean water and dry with a clean cloth. Stainless Steel Do not use a steel wool pad; it will scratch the surface. Cleanser™... -
Page 11: Installation Instructions
Installation Warming Drawer Instructions CTW900M and CTW900P If you have questions visit our website at: cafeappliances.com BEFORE YOU BEGIN MATERIALS YOU WILL NEED Read these instructions completely and carefully. IMPORTANT – Save these instructions for local inspector’s use. 2 x 4 or 2 x 2 lumber for runners and brace IMPORTANT –... - Page 12 Installation Instructions IMPORTANT SAFETY INSTRUCTIONS GROUNDING INSTRUCTIONS IMPORTANT—(Please read carefully) FOR PERSONAL SAFETY, THIS APPLIANCE MUST BE PROPERLY GROUNDED. This warming drawer must be supplied with 120V, Recessed 60Hz, and connected to an individual, properly receptacle 7" grounded branch circuit, and protected by a 15 or max.
- Page 13 Installation Instructions PREPARING CABINET: BELOW A COUNTERTOP Electrical outlet Install 2x4 or Electrical outlet 42" flush with side of 2x2 anti-tip block max. from right side ” Cabinet top cabinet 7" max. against rear cabinet 25" wall 9” from floor to bottom of block Install a solid barrier below 7"...
- Page 14 Installation Instructions PREPARING CABINET: BELOW WALL OVENS INSTALLATION BELOW A SINGLE OVEN ” Min. NOTE: Additional clearance between cutouts may be required. Check to be sure that oven supports above the warming drawer location do not obstruct the 2x2 or 2x4 required interior 23 ”...
- Page 15 150 lbs. FLUSHMOUNT INSTALLATION PREPARATION (for CTW900M models only) PREPARE THE INTERIOR Cut and install side cleats: Install onto the cabinet floor between the side cleats,...
- Page 16 Installation Instructions INSTALLING ANTI-TIP BRACE WARNING Install 2x4 or 2x2 anti-tip ANTI-TIP PRECAUTIONS: brace against rear The anti-tip brace must be installed to prevent the cabinet wall 9" from floor to bottom of brace drawer from tipping forward when opened and loaded. Failure to do so could result in personal injury.
-
Page 17: Troubleshooting Tips
Troubleshooting tips ... Save time and money! Review the charts on the following pages first and you may not need to schedule service. Problem Possible Cause What To Do Warming drawer will A fuse in your home may be blown or the circuit Replace the fuse or reset the circuit breaker. -
Page 18: Limited Warranty
Café Electric Warming Drawer Limited Warranty cafeappliances.com All warranty service is provided by our Factory Service Centers, or an authorized service technician. To schedule service online, visit us at cafeappliances.com/service. Please have your serial number and your model number available when scheduling service. - Page 19 Notes 49-2000685 Rev. 1...
-
Page 20: Accessories
Refer to the Consumer Support page for phone numbers and website information. The following products and more are available: Accessories 30” Cafe Pro Custom Handle kits Parts Wire Rack Cleaning Supplies CitruShine™ Stainless Steel Wipes Stainless Steel Appliance Cleaner 49-2000685 Rev. -
Page 21: Consumer Support
Consumer Support Café Website Have a question or need assistance with your appliance? Try the Café website 24 hours a day, any day of the year! You can also shop for more great Café products and take advantage of all our on-line support services designed for cafeappliances.com Register Your Appliance Register your new appliance on-line at your convenience! Timely product registration will allow for enhanced... - Page 22 Manual del Propietario y Instalación Cajón para Calentar Eléctrico Modelos: CTW900M and CTW900P Contenido Información de Seguridad ......3 Instrucciones de instalación .
- Page 23 GRACIAS POR HACER QUE CAFÉ SEA PARTE DE SU HOGAR. Sentimos orgullo por el nivel de arte, innovación y diseño de cada uno de los electrodomésticos de Café, y creemos que usted también. Entre otras cosas, el registro de su electrodoméstico asegura que podamos entregarle información importante del producto y detalles de la garantía cuando los necesite.
- Page 24 INFORMACIÓN IMPORTANTE DE SEGURIDAD LEA TODAS LAS INSTRUCCIONES ANTES DE USAR Lea todas las instrucciones antes de usar el producto. Si no se siguen estas instrucciones se ADVERTENCIA podrán producir incendios, descargas eléctricas, lesiones graves o la muerte. ADVERTENCIA AVISO IMPORTANTE DE SEGURIDAD Todos los cajones para calentar se pueden volcar y producirse lesiones si no se instalan de forma correcta.
- Page 25 INFORMACIÓN IMPORTANTE DE SEGURIDAD LEA TODAS LAS INSTRUCCIONES ANTES DE USAR MANTENGA LOS MATERIALES INFLAMABLES ALEJADOS DEL ADVERTENCIA CAJÓN PARA CALENTAR Si esto no se cumple, se podrán sufrir lesiones personales graves o incendios. superficies calientes, ocasionando quemaduras cerca de un cajón para calentar, incluyendo papel, graves.
-
Page 26: Funciones
Funciones No todas las funciones corresponden a todos los modelos. El aspecto puede variar. Cajón para Calentar Selector de Humedad (en la parte trasera del panel) Perilla de Control Interruptor Luz de Señal en ON (Encendida) Placa de Especificaciones Técnicas Lentes del Visor de la Luz de Señal en ON (Encendida) -
Page 27: Consejos De Funcionamiento
Consejos de Funcionamiento Estante ítems. Apilamiento doble de los ítems con el estante en su posición. Al Usar el Cajón para Calentar No alinee el cajón para calentar con el papel de aluminio. usar una configuración de termostato más alta y cubrir algunos de los ítems de comida cocinados. - Page 28 Consejos de Funcionamiento La masa con levadura se podrá leudar en el cajón para calentar. La masa con levadura se podrá leudar en el cajón para calentar. y luego inmediatamente de nuevo a PROOF (Leudar). recipiente lo suficientemente grande como para duplicar el tamaño de la masa.
- Page 29 Consejos de Funcionamiento Cuadro de Selección de Temperatura para Comidas Húmedas Para mantener calientes varios tipos de comidas diferentes, Configuración programe la temperatura en la configuración para comidas que Tipo de Configuración del Selector de necesitan el grado más alto. Coloque los ítems que necesiten Comida del Control Humedad...
-
Page 30: Limpieza Del Cajón Para Calentar
Limpieza del Cajón para Calentar Asegúrese que todos los controles estén en la posición OFF (Apagado) y que todas las superficies estén frías antes de limpiar cualquier parte del cajón para calentar. Superficies Pintadas o Esmaltadas Estante Limpie el estante con detergente y agua. Luego de la limpieza, enjuague el estante con agua limpia y seque con una tela limpia. -
Page 31: Instrucciones De Instalación
Instrucciones Cajón para Calentar de instalación CTW900M and CTW900P Ante cualquier otra consulta, visite nuestro sitio web en: cafeappliances.com. ANTES DE COMENZAR MATERIALES NECESARIOS Lea estas instrucciones en su totalidad y atentamente. IMPORTANTE – Conserve estas instrucciones para uso del inspector local. - Page 32 Instrucciones de instalación INSTRUCCIONES IMPORTANTES DE SEGURIDAD INSTRUCCIONES DE CONEXIÓN A TIERRA IMPORTANTE – (Lea detenidamente) PARA SU SEGURIDAD PERSONAL, ESTE Receptáculo empotrado de 7” ELECTRODOMÉSTICO DEBERÁ ESTAR de máx. desde la ADECUADAMENTE CONECTADO A TIERRA. parte trasera del lado derecho Este cajón para calentar deberá...
- Page 33 Instrucciones de instalación PREPARACIÓN DEL GABINETE. DEBAJO DE UNA MESADA Tomacorriente de un Tomacorriente Parte superior del Instale el bloque anti máx. de 42” desde el nivelado con el lateral gabinete a 1 ½” volcaduras de 2x4 o lado derecho del gabinete a un 2x2 contra la pared del máx.
- Page 34 Instrucciones de instalación PREPARACIÓN DEL GABINETE: HORNOS DEBAJO DE LAS PAREDES INSTALACIÓN DEBAJO DE UN HORNO SIMPLE Mín. de 23 ½” NOTA: Se podrá requerir aberturas adicionales entre los espacios libres. Asegúrese de que los soportes del horno que están por encima de la ubicación del Bloque anti cajón para calentar no obstruyan la profundidad volcaduras de 2x2 o...
- Page 35 150 libras. PREPARACIÓN PARA LA INSTALACIÓN CON MONTAJE NIVELADO (para modelos CTW900M únicamente) PREPARE EL INTERIOR Corte e instale los ristreles laterales: Realice la instalación sobre el piso del gabinete entre los dos ristreles laterales, empuje completamente hacia atrás contra...
- Page 36 Instrucciones de instalación INSTALACIÓN DEL SOPORTE ANTI VOLCADURAS ADVERTENCIA Instale la abrazadera anti PRECAUCIONES ANTI volcaduras de 2x4 o 2x2 contra VOLCADURAS: la pared del gabinete trasero, a 9" desde el piso hasta la parte Se deberá instalar la abrazadera anti volcaduras para evitar inferior de la abrazadera.
-
Page 37: Consejos Para La Solución De Problemas
Consejos para la Solución de Problemas... Antes de solicitar el servicio técnico ¡Ahorre tiempo y dinero! Primero revise los cuadros que aparecen en las siguientes páginas y es posible que no necesite solicitar reparaciones. Problema Causa Posible Qué Hacer El cajón para calentar Es posible que haya un fusible quemado en su Reemplace el fusible o reinicie el disyuntor. -
Page 38: Garantía Limitada
Garantía Limitada del Cajón para Calentar Eléctrico Café cafeappliances.com Todo el servicio de garantía es provisto por nuestros Centros de Servicio de Fabricación, o un técnico de servicio autorizado. Para programar una visita del servicio técnico a través de Internet, visítenos en cafeappliances.com/service. Tenga listo el número de serie y número de modelo cuando programe el servicio. - Page 39 Notas 49-2000685 Rev. 1...
-
Page 40: Accesorios
Estos y otros productos están disponibles: Piezas Kit del Panel a Medida de 30” de Ancho Kits de Manijas a medida Cafe Pro de 30" Piezas Estante con Rejilla Suministros de Limpieza Limpiadores de Acero Inoxidable CitriShine Limpiador para Electrodomésticos de Acero Inoxidable... -
Page 41: Soporte Para El Consumidor
Soporte para el Consumidor Sitio Web de Café ¿Desea realizar una consulta o necesita ayuda con su electrodoméstico? ¡Intente a través del sitio web de Café las 24 horas cafeappliances.com Registre su Electrodoméstico una mejor comunicación y un servicio más puntual de acuerdo con los términos de su garantía, en caso de surgir la necesidad. También puede enviar una carta en la tarjeta de inscripción preimpresa que se incluye con el material embalado.
Need help?
Do you have a question about the CTW900M and is the answer not in the manual?
Questions and answers