
Subscribe to Our Youtube Channel
Summary of Contents for Adafruit AirLift Shield ESP32
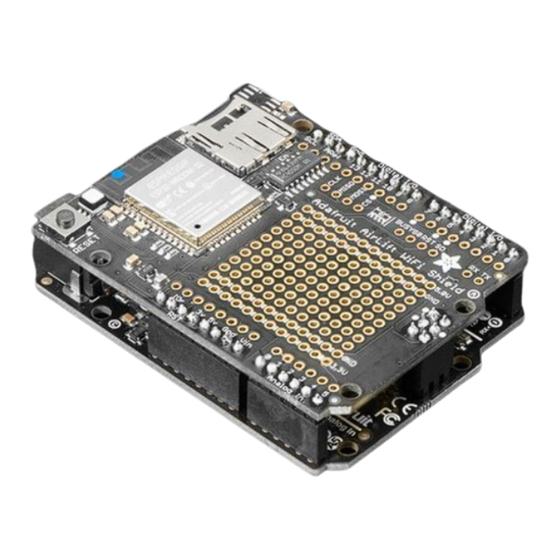
- Page 1 Adafruit AirLift Shield - ESP32 WiFi Co-Processor Created by Brent Rubell Last updated on 2021-03-29 01:04:51 PM EDT...
- Page 2 CircuitPython BLE UART Example Adafruit AirLift ESP32 Shield Wiring Update the AirLift Firmware Install CircuitPython Libraries Install the Adafruit Bluefruit LE Connect App Copy and Adjust the Example Program Talk to the AirLift via the Bluefruit LE Connect App Arduino WiFi...
- Page 3 Burning nina-fw with esptool Verifying the Upgraded Firmware Version Arduino CircuitPython Downloads Files Schematic Fab Print © Adafruit Industries https://learn.adafruit.com/adafruit-airlift-shield-esp32-wifi-co-processor Page 3 of 56...
- Page 4 Overview Give your Arduino project a lift with the Adafruit AirLift Shield (https://adafru.it/F6v) - a shield that lets you use the powerful ESP32 as a WiFi or BLE co-processor. You probably have your favorite Arduino- compatible (like the Metro M4 (https://adafru.it/A5S)
- Page 5 WiFi module and SD library at the same time, they don't have enough RAM. Again, we recommend an M0 or M4 chipset for use with Arduino, M4 for CircuitPython! © Adafruit Industries https://learn.adafruit.com/adafruit-airlift-shield-esp32-wifi-co-processor Page 5 of 56...
- Page 6 RAM so we don't recommend them - use the Metro M0, M4 or similar, for best results! For CircuitPython use, a Metro M4 works best - the M0 series does not have enough RAM in CircuitPython. © Adafruit Industries https://learn.adafruit.com/adafruit-airlift-shield-esp32-wifi-co-processor Page 6 of 56...
- Page 7 The firmware on board is a slight variant of the Arduino WiFiNINA core, which works great! (https://adafru.it/E7O) At this time connection to Enterprise WiFi is not yet supported. © Adafruit Industries https://learn.adafruit.com/adafruit-airlift-shield-esp32-wifi-co-processor Page 7 of 56...
-
Page 8: Power Pins
3V - this is the output from the 3.3V regulator. The regulator can supply 500mA peak but half of that is drawn by the ESP32, and it's a fairly power-hungry chip. 5V - This is the input to the regulator © Adafruit Industries https://learn.adafruit.com/adafruit-airlift-shield-esp32-wifi-co-processor Page 8 of 56... - Page 9 3.3V or 5V microcontroller boards. By default the 2x3 pin ICSP header on the right hand side is where the SPI signals are found. ESP32 Control Pins © Adafruit Industries https://learn.adafruit.com/adafruit-airlift-shield-esp32-wifi-co-processor Page 9 of 56...
-
Page 10: Sd Card Interface
It can be re-assigned to any pin by cutting the trace underneath the board and rewiring. If the SD card is not used, the SD pin can be used for any other purpose LEDs © Adafruit Industries https://learn.adafruit.com/adafruit-airlift-shield-esp32-wifi-co-processor Page 10 of 56... -
Page 11: Prototyping Area
ESP32's pins 26 (Red), 25 (Green), and 27 (Blue). Prototyping Area We have a big grid of prototyping holes and power rails if you want to make some custom circuitry! © Adafruit Industries https://learn.adafruit.com/adafruit-airlift-shield-esp32-wifi-co-processor Page 11 of 56... - Page 12 If you want to stack a shield on top, do not perform this step as it is not possible to uninstall the headers once soldered in! Skip down to the bottom for the stacking tutorial © Adafruit Industries https://learn.adafruit.com/adafruit-airlift-shield-esp32-wifi-co-processor Page 12 of 56...
- Page 13 Arduino. Place the assembled shield on top of the header-ed Arduino so that all of the short parts of the header are sticking through the outer set of pads © Adafruit Industries https://learn.adafruit.com/adafruit-airlift-shield-esp32-wifi-co-processor Page 13 of 56...
- Page 14 Solder each one of the pins into the shield to make a secure connection © Adafruit Industries https://learn.adafruit.com/adafruit-airlift-shield-esp32-wifi-co-processor Page 14 of 56...
- Page 15 That's it! Now you can install the 2x3 header © Adafruit Industries https://learn.adafruit.com/adafruit-airlift-shield-esp32-wifi-co-processor Page 15 of 56...
- Page 16 Stack Alert! If you want to stack a shield on top of the WiFi Shield, you'll want to pick up some stacking headers and use those instead of the plain header shown here! © Adafruit Industries https://learn.adafruit.com/adafruit-airlift-shield-esp32-wifi-co-processor Page 16 of 56...
- Page 17 Tack one pin of each header, to get them set in place before more soldering. If the headers go crooked you can re-heat the one pin while re-positioning to straighten them up © Adafruit Industries https://learn.adafruit.com/adafruit-airlift-shield-esp32-wifi-co-processor Page 17 of 56...
- Page 18 Once you've tacked and straightened all the headers, go back and solder the remaining pins for each header. © Adafruit Industries https://learn.adafruit.com/adafruit-airlift-shield-esp32-wifi-co-processor Page 18 of 56...
- Page 19 Insert the 2x3 stacking header as shown. Solder into place. © Adafruit Industries https://learn.adafruit.com/adafruit-airlift-shield-esp32-wifi-co-processor Page 19 of 56...
- Page 20 © Adafruit Industries https://learn.adafruit.com/adafruit-airlift-shield-esp32-wifi-co-processor Page 20 of 56...
- Page 21 CircuitPython WiFi It's easy to use the Adafruit AirLift breakout with CircuitPython and the Adafruit CircuitPython ESP32SPI (https://adafru.it/DWV) module. This module allows you to easily add WiFi to your project. The ESP32SPI library requires a microcontroller with ~128KB of RAM or more. The SAMD21 will not work.
- Page 22 Next you'll need to install the necessary libraries to use the hardware--carefully follow the steps to find and install these libraries from Adafruit's CircuitPython library bundle (https://adafru.it/uap). Our CircuitPython starter guide has a great page on how to install the library bundle (https://adafru.it/ABU).
- Page 23 Once you've succeeded, continue onto the next page! If you can read the Firmware and MAC address but fails on scanning SSIDs, check your power supply, you may be running out of juice to the ESP32 and it's resetting © Adafruit Industries https://learn.adafruit.com/adafruit-airlift-shield-esp32-wifi-co-processor Page 23 of 56...
- Page 24 Connect to WiFi OK now you have your secrets setup - you can connect to the Internet using the ESP32SPI and the Requests modules. First make sure you are running the latest version of Adafruit CircuitPython (https://adafru.it/Amd) for your board.
- Page 25 (https://adafru.it/Awz) so you are at the CircuitPython >>> prompt. Into your folder. Once that's done, load up the following example using Mu or your favorite editor: # SPDX-FileCopyrightText: 2019 ladyada for Adafruit Industries # SPDX-License-Identifier: MIT import board import busio...
- Page 26 AP, retrying: ", e) continue print("Connected to", str(esp.ssid, "utf-8"), "\tRSSI:", esp.rssi) print("My IP address is", esp.pretty_ip(esp.ip_address)) print( "IP lookup adafruit.com: %s" % esp.pretty_ip(esp.get_host_by_name("adafruit.com")) print("Ping google.com: %d ms" % esp.ping("google.com")) # esp._debug = True print("Fetching text from", TEXT_URL) r = requests.get(TEXT_URL) print("-"...
- Page 27 [hex(i) for i in esp.MAC_address]) Performs a scan of all access points it can see and prints out the name and signal strength: © Adafruit Industries https://learn.adafruit.com/adafruit-airlift-shield-esp32-wifi-co-processor Page 27 of 56...
- Page 28 "crafting" them and provides helpful methods for parsing the response from the server. Here's an example of using Requests to perform GET and POST requests to a server. # SPDX-FileCopyrightText: 2021 ladyada for Adafruit Industries # SPDX-License-Identifier: MIT...
- Page 29 "utf-8"), "\tRSSI:", esp.rssi) # Initialize a requests object with a socket and esp32spi interface socket.set_interface(esp) requests.set_socket(socket, esp) TEXT_URL = "http://wifitest.adafruit.com/testwifi/index.html" JSON_GET_URL = "http://httpbin.org/get" JSON_POST_URL = "http://httpbin.org/post" print("Fetching text from %s" % TEXT_URL) response = requests.get(TEXT_URL) print("-" * 40) print("Text Response: ", response.text)
- Page 30 = DigitalInOut(board.D9) esp32_ready = DigitalInOut(board.D10) esp32_reset = DigitalInOut(board.D5) HTTP GET with Requests The code makes a HTTP GET request to Adafruit's WiFi testing website http://wifitest.adafruit.com/testwifi/index.html (https://adafru.it/FpZ). . We're also going to save the response from the server To do this, we'll pass the URL into requests.get()
- Page 31 # Parse out the 'data' key from json_resp dict. print("Data received from server:", json_resp['data']) print('-'*40) response.close() You can also post json-formatted data to a server by passing data into the method. json requests.post © Adafruit Industries https://learn.adafruit.com/adafruit-airlift-shield-esp32-wifi-co-processor Page 31 of 56...
- Page 32 Want to send custom HTTP headers, parse the response as raw bytes, or handle a response's http status code in your CircuitPython code? We've written an example to show advanced usage of the requests module below. # SPDX-FileCopyrightText: 2021 ladyada for Adafruit Industries # SPDX-License-Identifier: MIT import board...
-
Page 33: Wifi Manager
ESP32 if it gets into a bad state, etc. Here's a more advanced example that shows the WiFi manager and also how to POST data with some extra headers: # SPDX-FileCopyrightText: 2019 ladyada for Adafruit Industries # SPDX-License-Identifier: MIT import time... - Page 34 Note, you'll need to add a some additional information to your secrets file so that the code can query the Adafruit IO API: aio_username aio_key You can go to your adafruit.io View AIO Key link to get those two values and add them to the secrets file, which will now look something like this: © Adafruit Industries https://learn.adafruit.com/adafruit-airlift-shield-esp32-wifi-co-processor...
- Page 35 (https://adafru.it/f5k) test We can then have a simple loop for posting data to Adafruit IO without having to deal with connecting or initializing the hardware! Take a look at your test feed on Adafruit.io and you'll see the value increase each time the CircuitPython board posts data to it! ©...
- Page 36 Adafruit AirLift ESP32 Shield Wiring If you have an Adafruit AirLift ESP32 Shield, you will need to solder three jumpers closed on the bottom side of the board to enable BLE. The rest of the ESP32 pins you need are already jumpered to certain shield pins.
- Page 37 Install the Adafruit Bluefruit LE Connect App The Adafruit Bluefruit LE Connect iOS and Android apps allow you to connect to BLE peripherals that provide a over-the-air "UART" service. Follow the instructions in the Bluefruit LE Connect Guide (https://adafru.it/Eg5)
- Page 38 Start the Bluefruit LE Connect App on your phone or tablet. You should see a CIRCUITPY device available to connect to. Tap the Connect button (1): You'll then see a list of Bluefruit Connect functions ("modules"). Choose the UART module (2): © Adafruit Industries https://learn.adafruit.com/adafruit-airlift-shield-esp32-wifi-co-processor Page 38 of 56...
- Page 39 On the UART module page, you can type a string and press Send (3). You'll see that string entered, and then see it echoed back (echoing is in gray). © Adafruit Industries https://learn.adafruit.com/adafruit-airlift-shield-esp32-wifi-co-processor Page 39 of 56...
- Page 40 © Adafruit Industries https://learn.adafruit.com/adafruit-airlift-shield-esp32-wifi-co-processor Page 40 of 56...
-
Page 41: First Test
You can use an AirLift with Arduino. Unlike CircuitPython, it work work with just about any Arduino board, even a classic Arduino UNO. However, if you want to use libraries like Adafruit IO Arduino, ArduinoJSON, or add sensors and SD card, you'll really want an ATSAMD21 (Cortex M0) or ATSAMD51 (Cortex M4), both of which have plenty or RAM. - Page 42 (https://adafru.it/EVv) If you don't see this, you may have the wrong WiFiNINA library installed. Uninstall it and re-install the Adafruit one as above. Arduino Microcontroller Pin Definition Next, you'll need to need to modify the pin definition above for the AirLift Shield. Replace the...
- Page 43 Now that you have your wiring checked, time to connect to the Internet! Open up the WiFiWebClient example (https://adafru.it/EVx) Open up the secondary tab, arduino_secrets.h. This is where you will store private data like the SSID/password to your network. © Adafruit Industries https://learn.adafruit.com/adafruit-airlift-shield-esp32-wifi-co-processor Page 43 of 56...
- Page 44 Many servers today do not allow non-SSL connectivity. Lucky for you the ESP32 has a great TLS/SSL stack so you can have that all taken care of for you. Here's an example of a secure WiFi connection: © Adafruit Industries https://learn.adafruit.com/adafruit-airlift-shield-esp32-wifi-co-processor...
- Page 45 (https://adafru.it/EVA) Note we use instead of to require an SSL connection! WiFiSSLClient client; WiFiClient client; © Adafruit Industries https://learn.adafruit.com/adafruit-airlift-shield-esp32-wifi-co-processor Page 45 of 56...
- Page 46 (which can then be re-directed to a display of some sort) First up, use the Library manager to install ArduinoJSON (https://adafru.it/Evo). Then load the example JSONdemo © Adafruit Industries https://learn.adafruit.com/adafruit-airlift-shield-esp32-wifi-co-processor Page 46 of 56...
- Page 47 WiFi.setPins(SPIWIFI_SS, like so: SPIWIFI_ACK, ESP32_RESETN, ESP32_GPIO0, &SPIWIFI); // check for the WiFi module: WiFi.setPins(SPIWIFI_SS, SPIWIFI_ACK, ESP32_RESETN, ESP32_GPIO0, &SPIWIFI); while (WiFi.status() == WL_NO_MODULE) { Serial.println("Communication with WiFi module failed!"); // don't continue delay(1000); © Adafruit Industries https://learn.adafruit.com/adafruit-airlift-shield-esp32-wifi-co-processor Page 47 of 56...
- Page 48 External AirLift boards have three optional ESP32 control pins which are not connected by default: ESPGPIO0 ESPRX ESPTX Make sure to solder each of these pads together. You will not be able to upload firmware to your ESP32 if they are not connected. © Adafruit Industries https://learn.adafruit.com/adafruit-airlift-shield-esp32-wifi-co-processor Page 48 of 56...
- Page 49 TRINKETBOOT BOOT The board is now in bootloader mode. Now find the UF2 file you downloaded. Drag that file to the BOOT drive on your computer in your operating system file manager/finder. © Adafruit Industries https://learn.adafruit.com/adafruit-airlift-shield-esp32-wifi-co-processor Page 49 of 56...
- Page 50 You'll be turning your Arduino board into a USB to Serial converter. To do this, you'll need a special Arduino sketch named SerialESPPassthrough.ino and an Arduino-compatible board with Native USB support such as the Adafruit Metro M4. You will also need to make the following connections between the board and the AirLift Breakout:...
- Page 51 // Not connected #define NEOPIXEL_PIN #endif #if defined(ADAFRUIT_PYPORTAL) #define PIN_NEOPIXEL #elif defined(ADAFRUIT_METRO_M4_AIRLIFT_LITE) #define PIN_NEOPIXEL #endif Adafruit_NeoPixel pixel = Adafruit_NeoPixel(1, PIN_NEOPIXEL, NEO_GRB + NEO_KHZ800); void setup() { Serial.begin(baud); pixel.begin(); pixel.setPixelColor(0, 10, 10, 10); pixel.show(); © Adafruit Industries https://learn.adafruit.com/adafruit-airlift-shield-esp32-wifi-co-processor Page 51 of 56...
- Page 52 After uploading, the board should enumerate USB and appear as a COM or Serial port on your computer. Make a note of the serial port by checking the Device Manager (Windows) or typing in (Mac or Linux) in a terminal /dev/cu* /dev/tty* © Adafruit Industries https://learn.adafruit.com/adafruit-airlift-shield-esp32-wifi-co-processor Page 52 of 56...
- Page 53 The command should detect the ESP32 and will take a minute or two to upload the firmware. If ESPTool doesn't detect the ESP32 , make sure you've uploaded the correct .UF2 file to the bootloader and are using the correct serial port. © Adafruit Industries https://learn.adafruit.com/adafruit-airlift-shield-esp32-wifi-co-processor Page 53 of 56...
- Page 54 To verify the new ESP32 WiFi firmware version is correct, follow the Connect to WiFi step in this guide (https://adafru.it/Eao) and come back here when you've successfully ran the code. The REPL output should display the firmware version you flashed. © Adafruit Industries https://learn.adafruit.com/adafruit-airlift-shield-esp32-wifi-co-processor Page 54 of 56...
- Page 55 Downloads Files ESP32 WROOM32 Datasheet (https://adafru.it/EVE) EagleCAD files on GitHub (https://adafru.it/F6p) Fritzing object in Adafruit Fritzing Library (https://adafru.it/F6q) Schematic Fab Print © Adafruit Industries https://learn.adafruit.com/adafruit-airlift-shield-esp32-wifi-co-processor Page 55 of 56...
- Page 56 © Adafruit Industries Last Updated: 2021-03-29 01:04:51 PM EDT Page 56 of 56...
- Page 57 Mouser Electronics Authorized Distributor Click to View Pricing, Inventory, Delivery & Lifecycle Information: Adafruit 4285...
Need help?
Do you have a question about the AirLift Shield ESP32 and is the answer not in the manual?
Questions and answers