PTZOptics PT-JOY-G4 User Manual
A 4th-generation network or serial camera controller
Hide thumbs
Also See for PT-JOY-G4:
- Quick start manual (4 pages) ,
- User manual (24 pages) ,
- User manual (33 pages)
Table of Contents
Advertisement
Advertisement
Table of Contents

Related Manuals for PTZOptics PT-JOY-G4


Summary of Contents for PTZOptics PT-JOY-G4
- Page 1 A 4th-Generation Network or Serial Camera Controller PT-JOY-G4 User Guide V1.0...
- Page 2 Contents when attempting to locate specific product information or setup instructions. Copyright Notice The entire contents of this manual / guide, whose copyright belongs to PTZOptics, may not be cloned, copied, or translated in any way without the explicit permission of the company. The product specifications referred to in this document are for reference only and as such are subject to updating at any time without prior notice.
-
Page 3: What's In The Box
● PTZOptics PT-JOY-G4 Quick Start Guide Introducing the PT-JOY-G4 The PT-JOY-G4 is designed to provide in depth control of the PTZOptics and HuddleCamHD line of cameras for use in production environments and more. With the ability to support either IP or Serial control from a single controller, the PT-JOY-G4 presents itself as a flexible control solution. -
Page 4: Table Of Contents
Table of Contents Preface Copyright Notice What’s in the Box Introducing the PT-JOY-G4 How to care for your PT-JOY-G4 Table of Contents PT-JOY-G4 Overview T op Down View & Layout B utton & Dial Descriptions R ear Panel View & Layout ... -
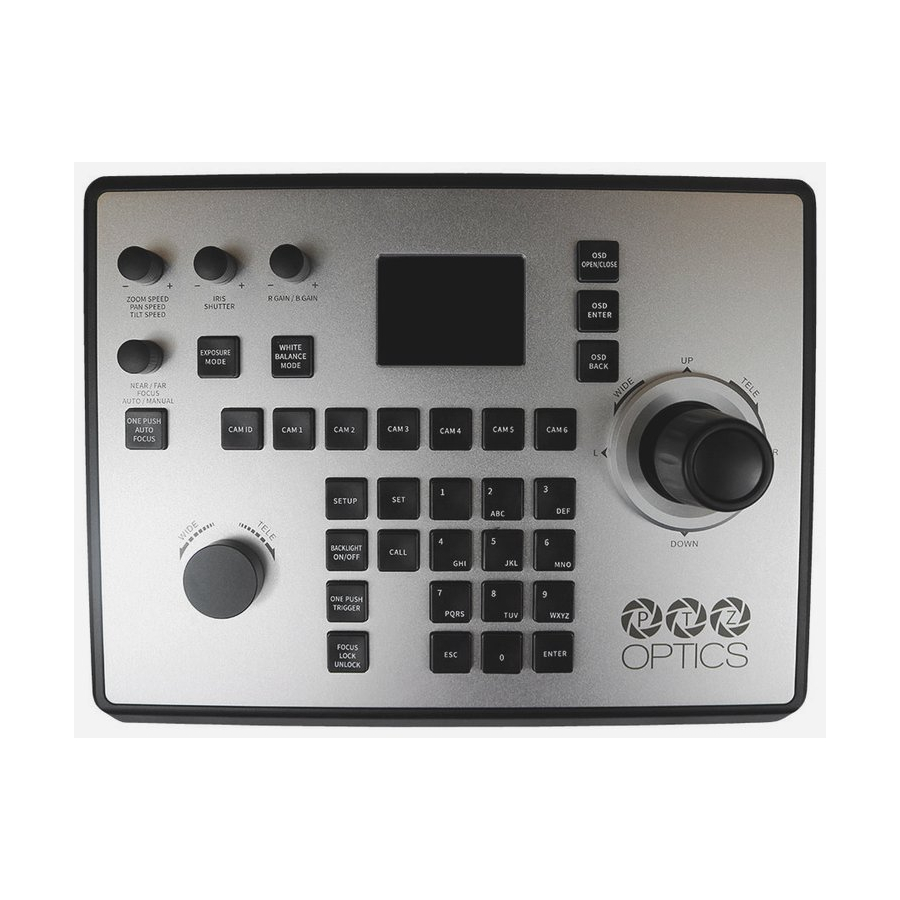
Page 5: Pt-Joy-G4 Overview
PT-JOY-G4 Overview Top Down View & Layout 1. Speed Control 7. Camera Control Zoom / Pan / Tilt Speed dial Slow zoom control 2. Exposure Control Camera P/T/Z joystick controller Iris / Shutter dial 8. Controller OSD Setup button Exposure Mode cycle button 9. -
Page 6: Button & Dial Descriptions
Button & Dial Descriptions The below descriptions will describe the buttons and dials available on the controller. 1. Speed Control The Speed Control section allows you to adjust the speed at which you pan, tilt, and zoom the camera. a. [SPEED] Dial Twist the Speed Control dial to increase or decrease the control speed. - Page 7 a. [CAM ID] Button The [CAM ID] button allows you to select any camera on the controller using the alpha-numeric keypad. b. [CAM #] Button The [CAM #] button allows you to quickly select a camera to control. Options include: 1 - 6 7.
-
Page 8: Rear Panel View & Layout
Rear Panel View & Layout 1. RS-232 Control Connection 2. RS-422 / RS-485 Control Connection Refer to the P hysically Connecting a Camera to the Controller section of this guide for more information. 3. Ethernet / RJ-45 (PoE) Network Connection Supports 802.3af PoE power 4. -
Page 9: Technical Specifications
Technical Specifications Network: NIC (TCP and UDP) Control Interfaces Serial: RS-232 Full Duplex, RS-485 Semi Duplex, RS-422 Full Duplex PTZOptics VISCA and VISCA over IP Protocols PELCO-D and PELCO-P via Serial Ports Limited Sony VISCA and VISCA over IP support... -
Page 10: Preparing To Use The Joystick
Preparing to use the Joystick Installation & Setup Power You can power your joystick using the included power supply or Power over Ethernet (802.3af). After applying power make sure that the I/O switch is flipped to “I” for “On”. Do not power the joystick controller using PoE and the power supply at the same time. Physically Connecting a Camera to the Controller To connect to a camera, you first need to decide which supported control method you need Network Control:... -
Page 11: Network Setup
Network Setup The PT-JOY-G4 will dynamically obtain an IP address upon connection to your LAN. If your network is not able to supply DHCP addresses you must assign a static IP address to the controller. To set a static IP address, follow the steps below. -
Page 12: Serial Control Setup & Options
Serial Control Setup & Options To control cameras using serial communications, first review the above section marked “ P hysically Connecting a Camera ” to select the appropriate option for your setup. Once you have selected a serial communications method, connect the appropriate cable to the joysticks selected control port and then to the camera’s matching control input (RS-485 or RS-232) To control multiple cameras using RS-232, you will need to utilize a “Daisy-Chain”... -
Page 13: Adding A Camera
3. IP Add.: IP Address of Camera to Control 4. Port: Camera control port. For PTZOptics and HuddleCamHD cameras, by default, the port assignments are 1259 for UDP control and port 5678 for TCP control. b. Once the above fields are filled, press the [ENTER] button to save the camera to the controller. -
Page 14: From The Web Interface
From the Web Interface To add a camera to the controller from the web interface, follow the steps below. 1. Type the IP address displayed on the controllers OSD into a web browser to access the web interface 2. Type in the login credentials to access the joysticks WebUI configuration page. a. -
Page 15: Joystick Osd Menu Control
Joystick OSD Menu Control 1. Add Network Device Refer to the A dding a Camera section of this guide for more information. 2. Add Serial Device Refer to the A dding a Camera section of this guide for more information. 3. -
Page 16: Operating The Camera
4. To call a preset, press the [CALL] button, and type in a preset number. Press the [ENTER] key to call the preset. When using a PTZOptics camera, you can call a preset at a specific focus value by setting the preset while in manual focus mode. -
Page 17: Adjusting The Camera's Image
Manual Focus mode. PTZOptics cameras will return to Auto Focus mode upon zooming in or out. You can lock the camera’s focus from returning to Auto Focus mode by pressing the [FOCUS LOCK / UNLOCK] button. While the focus is locked, you have full manual focus control from the [FOCUS] Dial. -
Page 18: Camera Osd Menu Control
5. Press the [OSD BACK] button to return to the previous window. 6. Press the [OSD OPEN/CLOSE] button again to close the camera's OSD menu. PTZOptics cameras will automatically close their OSD Menu after 2 minutes 30 seconds of inactivity by default. -
Page 19: Joystick Web Interface
Joystick Web Interface Device Management The Device Management page, available from the controllers web interface, allows you to define new cameras and adjust already configured cameras. Camera: Joystick control address. Base options include: 1 - 7 (IP & Serial) Expanded options include 1 - 255 (IP only) IP:... -
Page 20: Settings
Options include: DHCP or Static IP Address, Subnet Mask, Gateway, DNS1, & DNS2. For more information on how to obtain an IP address, Default Gateway, & Subnet Mask, see the following PTZOptics Knowledgebase Article: D iscovering your Network IP Information... -
Page 21: Troubleshooting And Extras
Certain functions don’t work with my camera This can occur when you are not using a PTZOptics camera, or your camera’s firmware isn’t up to date. 1. Some functions do not work with non-PTZOptics cameras as each camera manufacturer has some of their own unique commands that may not be fully compatible with the design of this controller. -
Page 22: Additional Information
Additional Information Warranty The PT-JOY-G4 includes a 2 Year Limited Warranty. This warranty covers all manufacturers defects, and any damage that is done to the joystick during shipping. This warranty does not cover physical damage to the joystick that is due to lack of proper care. If you have trouble with your joystick and wish to see if it is covered under the manufacturer's warranty, please contact our support team by submitting a ticket at ...
Need help?
Do you have a question about the PT-JOY-G4 and is the answer not in the manual?
Questions and answers
I have a PT-Joy -G4 Optics switcher controller and I can't get the beep sound to shut off when I press any/all buttons on the controller. I tried the setup menu and turned off Buton tones
To disable the beep sound on the PTZOptics PT-JOY-G4 joystick controller, you will need to access the controller’s OSD (On-Screen Display) menu using the following steps:
1. Press the [OSD OPEN / CLOSE] button to open the OSD menu on the controller.
2. Use the joystick to navigate through the menu options.
3. Press [OSD ENTER] to select a specific menu option.
4. Look for a setting labeled "Beep" or "Sound" in the menu (this is typically found under general settings or system settings).
5. Once located, move the joystick left or right to change the setting from "On" to "Off."
6. Press [OSD BACK] to return to the previous menu if necessary.
7. When finished, press the [OSD OPEN / CLOSE] button again to exit the OSD menu.
If you cannot find the "Beep" setting in the OSD, it may also be accessible via the Web User Interface (Web UI):
- Connect to the joystick via your network.
- Access the Web UI through a browser (refer to the manual for the IP address and login steps).
- Navigate to the Device Management or Settings section and look for the beep/sound option to disable it.
Would you like help finding the exact menu path in the Web UI?
This answer is automatically generated