
Related Manuals for Silent Gliss Move

Summary of Contents for Silent Gliss Move
- Page 1 0682 Original Operating Instructions Please keep these operating instructions in a safe place.
- Page 2 The German operating instructions are the original version. All documents in other languages are translations of the original version. All rights reserved in respect to registrations of patent, utility model or industrial design. 2 | EN...
-
Page 3: Table Of Contents
Safety instructions for operation Product description General Delivery contents Bidirectional wireless system Operating principle Connections Move App Initial log-on to the Move Server 3.8 Configuring the Move Transmitter Stick for one or several receivers Using other devices 3.10 Configuring the Move Server Technical data Cleaning and maintaining the device... -
Page 4: General
All activities with and on this appliance may only be per- formed as described in these operating instructions. Keep this document describing the Move system in a safe place for future reference. Make sure you also include these operating instructions if you pass on the appliance to a dif- ferent user. -
Page 5: Standards And Guidelines
Android operating system by Google and the Windows operating system by Microsoft to be linked to the control systems used in these applications. Move oper- ates with an existing system (home network with Wi-Fi and 5 | EN... -
Page 6: Warranty And Liability
Internet connection). The well-established bidirectional wire- less system Silent Gliss 9940 ensures smooth operation. The system allows users to operate and use roller shutters, blinds, marquises, lighting and similar wireless-operated appliances whilst at home or when out and about. Other areas of application must be discussed with the manufacturer beforehand. The operator shall be exclusively liable for any damage caused by improper use of the appliance. The manufacturer does not accept liability for any personal or material dam- age caused by misuse, incorrect installation or by improper handling or commissioning. -
Page 7: Safety
• operation of the appliance outside of the areas described in the technical data. Safety This appliance is not intended for use by persons (including children) with restricted physical, sensory or mental capaci- ties or by such persons as possess insufficient experience and/or knowledge for its use, unless in cases in which they are supervised by a person responsible for safety or have received instruction in the correct use of the appliance. -
Page 8: Product Description
• small appliance adapter to use the mains power cable • small appliance adapter with Europlug • network cable to connect the Move Server with a home network • USB extension cable • operating instructions summary Bidirectional wireless system... -
Page 9: Operating Principle
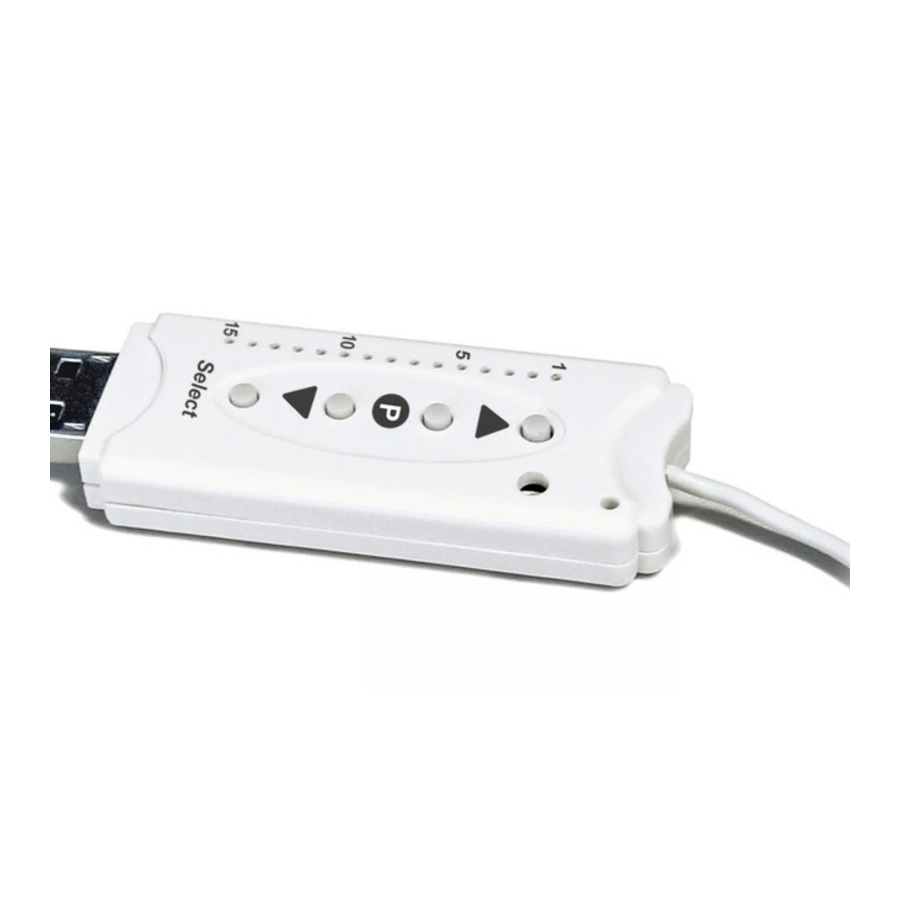
Operating principle The Move Server is permanently active and is integrated within the home network. When activated, the Move app connects with the Move Server. All configured receivers can be operated using the Move app and the Move server. 3.4.1 Connections on the Move Server Side view Left: Network connection RJ-45 port to connect with a compatible router... - Page 10 3.4.4 Move Transmitter Stick The Move Transmitter Stick permits bidirectional radio com- munication with the receivers. It is inserted in one of the two USB ports on the Move Server. Move Transmitter Stick: product features • 15-channel hand-held radio transmitter for bidirec-...
- Page 11 Move Transmitter Stick Antenna Channel display OPEN button Status display STOP/P button CLOSE button Select button 3.4.5 Move Transmitter Stick: status display The continuous light on the status display of the Move Transmitter Stick indicates a radio signal: The different colours mean: Flashing orange Channel is not configured for any receiver Orange Channel in bidirectional configura- Flashing fast tion mode. Operation of currently configured channels is not possible (unless by pressing STOP to cancel configuration mode).
-
Page 12: Connections
• Android device with Android (Android version 4.0 or higher) • Windows device (Windows version 8.1 or higher) • Home network with Wi-Fi router if the system is to be connected via Internet • Installed Move app. 12 | EN... -
Page 13: Move App
The Move Server must first be registered with our service partner in order to use the mobile Move app outside of your home network and to configure the communication settings. Move app The Move app is downloaded and installed from the App Store, Play Store or from the Windows Store; simply search for “Move”. You can only log on to the app with your user name and password. They are as follows when you log on for the first... -
Page 14: Initial Log-On To The Move Server
Initial log-on to the Move Server Use a network cable to connect the Move Server to the Wi-Fi router Requirements: The smartphone or tablet is already con- nected with the router via Wi-Fi. 1. Download the app from the relevant app store (Apple App Store, Google Play Store or Windows Store). - Page 15 If you are unable to connect after several attempts, tap on “+ Enter data manually” to enter the IP address. This will only work if you know the IP address assigned to the Move Server in your network. Enter a name and the IP address. Do not change the user name and password during initial log-on.
-
Page 16: Configuring The Move Transmitter Stick For One Or Several Receivers
If you are unable to connect after several attempts, tap on “+ Enter data manually” to enter the IP address. This will only work if you know the IP address assigned to the Move Server in your network. Enter a name and the IP address, and then tap on “OK” Configuring the Move Transmitter Stick for... - Page 17 3. Press the OPEN button to immediately acknowledge (no later than after 1 second) when the shutters/blinds start to rise. The status display lights up briefly. The shutters/ blinds stop – resume movement – stop – and then move toward the CLOSED position. 4. Press the CLOSE button to immediately acknowledge (no later than after 1 second) when the shutters/blinds start to descend. The status display lights up briefly. The...
- Page 18 The intermediate position 1 is now programmed. Programming the intermediate position 2 Requirements: The transmitter, i.e. the channel, has been configured. The end positions of the drive unit are defined. The shutters/ blinds are located in their lower end position. 1. Use the OPEN button to move the shutters/blinds to just above your preferred position. 2. Then simultaneously press the STOP/P button. The shutters/blinds stop. The status display lights up briefly. The intermediate position 2 is programmed. 18 | EN...
- Page 19 Travel to intermediate position 1 Requirements: The transmitter and the channel has been configured. 1. Briefly press the CLOSE button twice. The status display lights up briefly. 2. The shutters/blinds travel to the programmed intermedi- ate position. (The slats on blinds turn automatically when the intermediate position is reached. The shutters/blinds travel to the lower end position if an intermediate posi- tion is not programmed.) Travel to intermediate position 2 Requirements: The transmitter and channel has been configured. 1. Briefly press the OPEN button twice. The status display lights up briefly. 2. The shutters/blinds travel to the programmed intermedi- ate position. (The slats on blinds turn automatically when the intermediate position is reached. The shutters/blinds travel to the lower end position if an intermediate posi-...
-
Page 20: Using Other Devices
USB extension cable) to one of the two USB ports on the Move Server. The information about configured transmitters is transferred to the Move Server. You can then use the app to perform additional operations. Using other devices You can also use other devices that do not run the iOS or Android operating systems. The Move Server can be... -
Page 21: 3.10 Configuring The Move Server
You can use a browser (e.g. Safari) to access the integrated web server and configure the Move serve from there. 3.10.1 Connecting to the web server You must know the IP address of the Move Server in order to connect with the web server via a browser. You can find out the IP address by opening the Move app and tapping on "Change log-on data". Then tap on the green arrow next to... - Page 22 22 | EN...
- Page 23 Then open a browser on a device with access to the home network and the Move Server. You can also use the Safari browser on your iOS device, the browser on your Android device, or your Windows device. Enter https://xxx.xxx.xxx.xxx:10000/ in the address line, replacing xxx.xxx.xxx.xxx:10000/ with the address you noted earlier. It may look something like this for example: https://192.168.5.100:10000/. Tap on...
- Page 24 You will be asked to change the standard password the first time you log on. Enter a new password, and write it down in case you want to open the web server at a later date. The current system information is shown once you have logged on. The screen you see should look something like this one. You can tap on "System" and "Network" to access addi- tional submenus.
- Page 25 3.10.2 User settings Tap on "User settings". The screen that then opens will look something like this one. You can set the language selection to standard or to a dif- ferent language under "enexWeb language settings". You must tap on "Make changes" if you select a new language. 25 | EN...
- Page 26 You can also select from a variety of themes for your web server under "enexWeb design". You must tap on "Make changes" if you select a new design. Use "enexWeb password" if you want to define a new pass- word to log on to the web server. Make sure that you write down your new password so that you can log on to the web server again later on.
- Page 27 Here you can select a variety of time settings and syncing options. The Move Server has two clocks: the system time and the hardware time. If you want to automatically sync the time with an Internet time server, then set the option "Set the hardware time to"...
- Page 28 If you wish to set the time manually, then deactivate the option in the "Synchronise time server" tab, and set your custom time in the first tab "Set the time". 3.10.5 smartCONTROL Tap on "smartCONTROL". The screen that then opens will look something like this one. You can create and restore backups of the current server status with all scenarios, devices, rooms and devices.
- Page 29 Creating backups Tap on the field to the right of "Name" and give the backup a name. Then tap on "Backup" to create a new backup. The backup is a copy of all data from the Move Server, including scenarios, devices, rooms and users. The new backup will be displayed under "Current backups". We recommend you make a backup once you have com- pleted initial installation of the Move system. You can use this initial backup later on to restore in the event that you encounter problems.
- Page 30 (e.g. a PC) . You can then download a ZIP file, which can be stored at any location. Uploading an external backup If you wish to restore a backup you have saved externally (e.g. on a PC), you must first upload it to the Move Server. To do this you tap on "Select file" under "Upload backup", and then select your backup from the folder tree. Then tap on "Upload" to add the backup to the list of "Current back- ups", from where it can be activated.
- Page 31 3.10.6 Network settings This section is for advanced users only when configuring the network settings. You can access the respective sub- menu by tapping on one of the symbols or one of the two buttons. 3.10.7 Network interfaces Tap on the network interface symbol on the home page of the module to access an overview of active interfaces. This page lists the active interfaces (with assigned IP address), as well as those that are to be activated when booting. The IP address, status, and a variety of other settings can be changed by tapping on the respective interface.
- Page 32 To set a static IP instead of using DHCP, tap on the "In- terfaces activated during boot" and then on the Ethernet interface "eth0". Set the "From DHCP" selection to "Static configuration" and enter the IP address you have chosen for the Move Server. Tap on "Save" to confirm the change. You have to restart the Move Server to activate the changes. 32 | EN...
- Page 33 • Network key (highlighted in the diagram): Assign your network key here. Write down this network key. You need it to connect your iPhone or iPad directly with the Move Server via Wi-Fi. We strongly recommend you change the network password...
- Page 34 • Signal strength: Select the signal strength for the wireless network. • Router: Activate the router function. • DHCP server: Activate the DHCP server. Users will find a detailed overview of the active parameters under "Access Point Info". The devices connected with the HOME.server are also shown. You can uncheck the "SSID visible" by tapping on it if you do not need Wi-Fi.
- Page 35 Operating the Move Server without a LAN cable In the event that you wish to operate the Move Server as a client in an existing Wi-Fi network (e.g. if your router does not have a LAN port, or it is not possible to lay a network cable to the router), you can select "Switch to client mode"...
- Page 36 Port 10000 (https!) • Browser operation: Port 80 Important: Your firewall must allow access through these ports to enable operation of the Move Server. 3.10.10 Routing and gateways The Routing and gateways screen allows you to configure the routes that are currently active on your system, or that should be activated during the next reboot. 3.10.11 DNS client The "DNS client" screen allows you to change the name...
-
Page 37: Technical Data
Move Server with the same name con- tained in the list with a link to the IP address. 3.10.13 Apply configuration Changing some settings requires you to restart the system. -
Page 38: Cleaning And Maintaining The Device
Move Transmitter Stick: technical data Interface USB 2.0 Protection class [IP code] IP20 Permissible ambient 0 to 50 temperature [°C] Radio frequency [MHz] 868 band/915 band Transmission power [mW] < 10 Range [m] approx. 30 (in buildings) approx. 100 (outside) Weight [g] Cleaning and maintaining the device • Only use a soft, clean and dry cloth to clean the surface of the device. -
Page 39: Troubleshooting
Move Server. the Wi-Fi network of the Wi-Fi network of the router to which the router to which the Move Server is the Move Server is connected. connected. A different icon than The receiver is not Simply replace the... - Page 40 3. The receiver 3. The receiver is not suitable moves, but for bidirectional cannot be wireless opera- configured. This tion. receiver cannot be operated using the Move app. 40 | EN...
-
Page 41: Repair
Type of fault • Previous and unusual incidents • Accompanying circumstances • Own suspicions Manufacturer's address Silent Gliss International Limited Group Headquarters Worbstrasse 210 3073 Gümligen Switzerland Telephone +41 31 958 85 85 Email info@silentgliss.com www.silentgliss.com/worldwide Please consult our website if you require a different contact person. -
Page 42: Disposal
Legal notices The information contained in this documentation, including the software, can be modified without prior announcement for the purposes of technical progress. Labels such as Move, Move Server and Mover Transmitter Stick are registered trademarks of SilentGliss International Ltd. Apple, App Store (iTunes Store), iOS, iPhone, iPad and iPad mini are trademarks of the Apple Corporation in the USA and/or in other countries. Android, PlayStore are trademarks of Google. - Page 43 www.silentgliss.com/worldwide...
Need help?
Do you have a question about the Move and is the answer not in the manual?
Questions and answers