
Related Manuals for LG AS40GV Series


Summary of Contents for LG AS40GV Series
- Page 1 OWNER’S MANUAL LG Air Purif ier Please read this manual carefully before operating your set and retain it for future reference. Model name : AS40GVGL2 AS40GVSL2 P/NO : MFL68181343 www.lg.com/cn Rev.00_101116...
- Page 2 SAFETY PRECAUTIONS SAFETY PRECAUTIONS The precautions related with the safety shown below are to prevent unexpected hazard and dam- age through safe and accurate operation of the product. WARNING If not followed, It may cause death or major injury to the user. CAUTION If not followed, it may cause injury to the user or property damage.
- Page 3 SAFETY PRECAUTIONS Operation • Insert securely the power plug up to the end of its plug so that it will not be shaken. - If connection is unstable, it may cause fire. • Do not arbitrarily change or extend the power line. - It may cause fire and electric shock.
- Page 4 SAFETY PRECAUTIONS CAUTION Installation • When installing near to TV or audio, provide more than 1 m of distance with them. - TV or audio may have malfunction. • When pulling out the power plug, pull out by grabbing the head of the plug. - It may cause injury or electric shock.
- Page 5 SAFETY PRECAUTIONS • Do not use the power cord as tied. - Heat generation may cause fire. • Start cleaning and mending after pulling out the power plug and when the fan stops rotating. - You may get electric shock or injury. •...
-
Page 6: Table Of Contents
TABLE OF CONTENTS TABLE OF CONTENTS SAFETY PRECAUTIONS HOW TO INSTALL How to install the filter before using it HOW TO INSTALL HOW TO CLEAN Selecting installation place Use the air purifier as this. How to clean the filters How to clean exterior How to clean the sensor NAME OF THE PARTS Front side... -
Page 7: How To Install
HOW TO INSTALL HOW TO INSTALL Selecting installation place Main Unit • Place with handy power connections • Place with no obstacle to clog air inlet • Place with horizontal surface and rich air circulation WARNING There can be product failure if the air purifier is installed on a moving vehicle such as cars, boats and others. -
Page 8: Name Of The Parts
NAME OF EACH PART NAME OF THE PARTS Front side Display Air outlet Lighting lamp This is the light indicating the quality of the air in the room. It displays the cleanliness according to the indoor cleanliness detected by the odor sensor. •... -
Page 9: Operation Display And Control Part
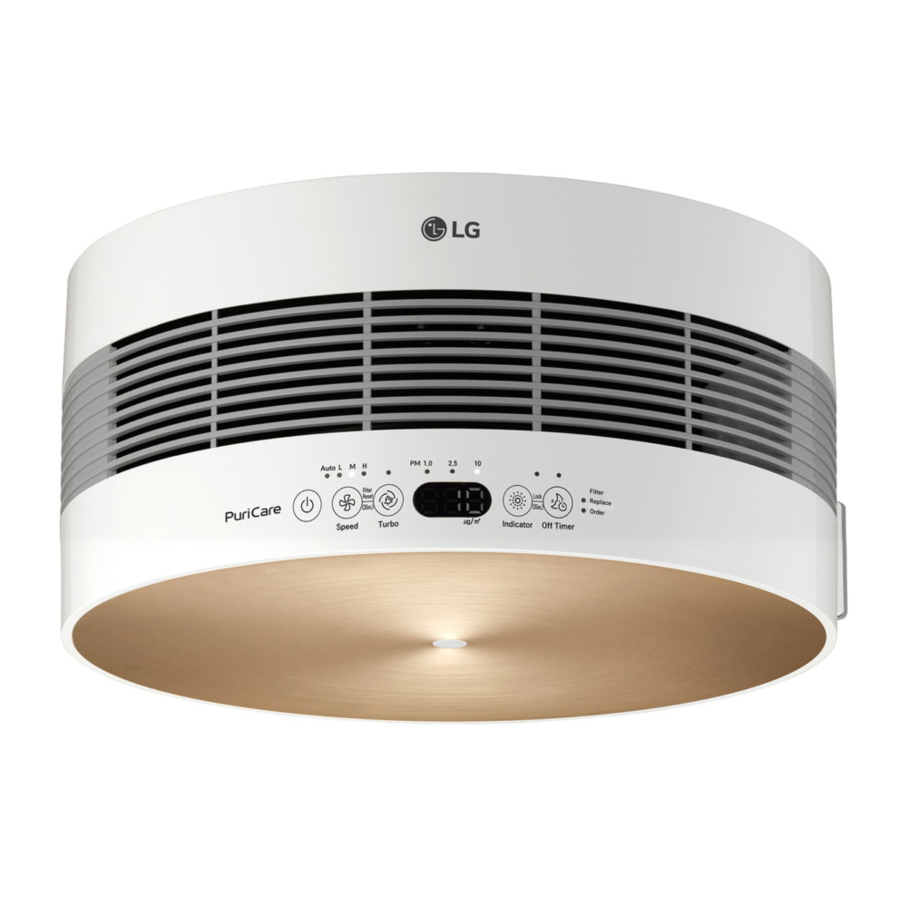
NAME OF EACH PART Operation display and control part Start/stop button Indicator button Speed button Filter Check lamp Dust/Odor Ionizer lamp indicator display Jet Clean/Ionizer button Off Timer/Lock button Start/stop button Use to start and stop the product. Speed button It adjusts wind volume. -
Page 10: Filter System
NAME OF EACH PART Filter system Pre Filter Cabin Filter Filter Case Filter name Function Pre Filter It removes big dusts to prolong the lifespan of the Cabin Filter. It removes the fine particles such as dead tick, pollen, cigarette smoke (particle), micro dust, mote, animal fur, etc. -
Page 11: How To Use
HOW TO USE HOW TO USE Air Cleaning Operation It cleans the indoor with clean and fresh air. 1. Press the button in order to start operation of the air purifier. • With the buzzer sound, it starts the operation with the operation mode indicator LED and the Lighting lamp turned on. -
Page 12: The Jet Clean Function
HOW TO USE The Jet Clean function It operates strongly during the predetermined time and purifies the indoor air. 1. Press the button. 2. Press the Jet Clean button. • It operates strongly for 30 minutes when the Jet clean function is selected. •... -
Page 13: Indicator Display
HOW TO USE Indicator display 1. Press the Indicator button and check the density of PM10/PM2.5/PM1.0. • Pressing the button each time checks the density of PM10 → PM2.5 → PM1.0 in turn. Press- ing the Indicator button during operation displays the density of PM10/PM2.5/PM1.0 at the display for 10 seconds. -
Page 14: Off Timer Operation
- The assessment of dust density was made against dust used for LG Electronics standards tests. • In case you use the product which generates steam and micro particles (humidifier, cooling device, spray, etc.), micro dust density could change. -
Page 15: Lock Function
HOW TO USE 3. How to disable sleep reservation: After setting 12 hour sleep reservation, press the Timer button once more. Lock function 1. Press the button. 2. Press down the Off Timer button 3 seconds or longer. • You can set the Lock function ( X ) with a “Ting” sound. •... -
Page 16: Filter Check Lamp
HOW TO USE Filter Check lamp 1. If the Filter Check lamp gets lit, turn off the product in operation by pressing the button and then pull the power plug out of the socket. 2. Open rear panel of the product and check the filter. If the filters are contaminated, clean or re- place. -
Page 17: How To Install
HOW TO INSTALL HOW TO INSTALL How to install the filter before using it Use the filter after removing the vinyl cover. 1. Pull and open the rear panel. 2. Remove the filter from the body. 3. Remove the vinyl cover of the filter. 4. -
Page 18: How To Clean
HOW TO CLEAN HOW TO CLEAN 1. If the product is in operation, press button to turn off the power. After you pull the power plug out of the socket, pull and then open the panel in the rear. 2. Pull the filter handle and remove from the body. •... - Page 19 HOW TO CLEAN h Do not wash the Cabin Filter with water, and they should be replaced if they are heavily con- taminated. Be careful of filters not to have water during operation. h The filter replacement cycle may be different according to the usage environment. 4.
-
Page 20: How To Clean The Filters
Care Filter may be different according to replacement the usage environment. * If you need more filters, please contact the LG service center <Figure 1> How to clean exterior Wipe the Air Purifier with a soft cloth wrung out in warm water. -
Page 21: How To Clean The Sensor
HOW TO CLEAN How to clean the sensor Open the dust sensor cover. Clean the dust sensor lens with cotton swab. (Clean once every six months.) CAUTION • Do not use nothing other than alcohol or water to clean the sensor. Otherwise, it can cause a product failure. -
Page 22: How To Store The Product
HOW TO STORE THE PRODUCT HOW TO STORE THE PRODUCT How to store the product If you do not use the product for extended periods of time, store it at dried and shaded place. 1. Press the button to start Air Purifier operation •... -
Page 23: Troubleshooting Before Calling For Service
TROUBLESHOOTING BEFORE CALLING FOR SERVICE TROUBLESHOOTING BEFORE CALLING FOR SERVICE If there is a problem with the product, check the following cases first before requesting service to the service center. Symptom Check Actions • Isn’t the power plug pulled out? •... - Page 24 TROUBLESHOOTING BEFORE CALLING FOR SERVICE Symptom Check Actions • Isn’t there foreign substance at • Refer to how to clean the sensor and There has been no the sensor? then clean the dust cleaner. change in micro dust concentra- • Are you using in an enclosed •...
-
Page 25: Product Specification
Height The external dimension, design and product standard can change to improve the quality of the product. Model name AS40GV Series Power supply 220 V~ / 50 Hz Product size (width x height x depth) 470 mm x 450 mm x 230 mm...
Need help?
Do you have a question about the AS40GV Series and is the answer not in the manual?
Questions and answers