Table of Contents
Advertisement
Available languages
Available languages
Quick Links
COMMERCIAL PANINI/TOASTING GRILLS
PARRILLAS/SANDWICHERAS COMERCIALES
GRILS/PRESSE-PANINI COMMERCIAUX
WPG300T
WFG300T/WDG300T
(not shown/ no ilustrado/
WPG250T
WFG250T/WDG250T/WPG250TB
(not shown/ no ilustrado/
For your safety and continued enjoyment of this product,
always read the instruction book carefully before using.
Para su seguridad y para disfrutar plenamente de este producto,
siempre lea las instrucciones cuidadosamente antes de usarlo.
Afin que votre appareil vous procure en toute sécurité beaucoup de satisfaction,
non illustré
non illustré
lire attentivement le mode d'emploi avant de l'utiliser.
)
(not shown/ no ilustrado/
)
(not shown/ no ilustrado/
WPG150T
WFG150T/WPG150TB
non illustré
WFG275T
WDG275T/WPG275T
non illustré
)
)
Advertisement
Table of Contents

Subscribe to Our Youtube Channel
Related Manuals for Waring WPG300T


Summary of Contents for Waring WPG300T
- Page 1 COMMERCIAL PANINI/TOASTING GRILLS PARRILLAS/SANDWICHERAS COMERCIALES GRILS/PRESSE-PANINI COMMERCIAUX WPG300T WPG150T WFG300T/WDG300T WFG150T/WPG150TB non illustré non illustré (not shown/ no ilustrado/ (not shown/ no ilustrado/ WPG250T WFG275T WFG250T/WDG250T/WPG250TB WDG275T/WPG275T non illustré non illustré (not shown/ no ilustrado/ (not shown/ no ilustrado/ For your safety and continued enjoyment of this product, always read the instruction book carefully before using.
-
Page 2: Important Safeguards
Return it to the nearest authorized service center for examination, repair, and/or adjustment. 9. The use of attachments not recommended or sold by Waring may cause fire, electric shock, or injury. 10. Do not use outdoors. -
Page 3: Grounding Instructions
SAVE THESE INSTRUCTIONS APPROVED FOR COMMERCIAL USE GROUNDING INSTRUCTIONS This appliance must be grounded while in use to protect the operator from electrical shock. The appliance is equipped with a 3-conductor cord and 3-prong grounding-type plug to fit the proper grounding- type receptacle. -
Page 4: Grounding Method
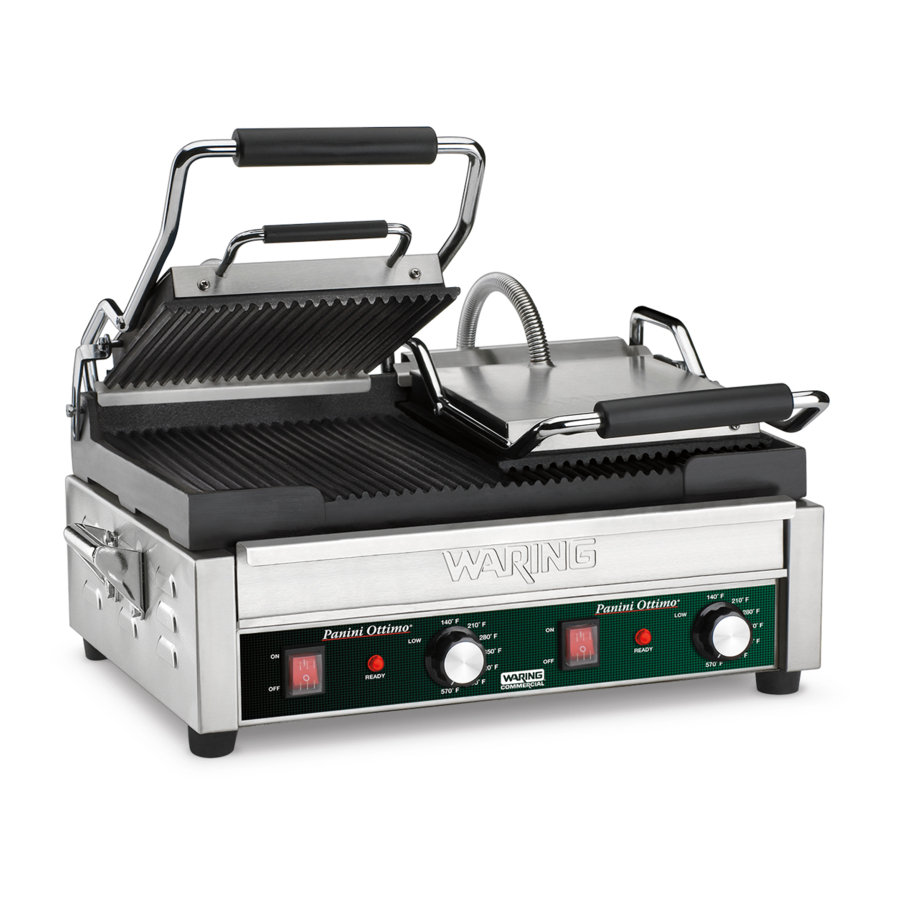
GROUNDING METHOD The lightning flash with arrowhead symbol within an equilateral triangle is intended to alert the user to the presence of uninsulated dangerous voltage within the product’s enclosure that may be of sufficient magnitude to constitute a risk of fire or electric shock to persons. The exclamation point within an equilateral triangle is intended to alert the user to the presence of important operating and maintenance (servicing) instruction in the... - Page 5 PARTS 1. Thermo-insulated handles 2. Temperature dial 3. ON/OFF power switch 4. Removable drip tray 5. Stainless steel housing 6. Bottom grill plate (ribbed or flat) 7. Top grill plate (ribbed or flat) 8. Ready indicator light 9. Cleaning brush/scraper 10.
- Page 6 17" x 9.25" Flat and Ribbed Plates These panini grills are compatible with the CAC124 Reprogrammable Timer (included). INSTRUCTIONS FOR USE 1. Remove Waring Commercial Panini/Toasting Grill from ® packaging. 2. Place on a firm and stable surface. 3. Remove all packaging and instruction book.
-
Page 7: Installation
13. For single-sided cooking, simply keep handle raised in open position. REPROGRAMMABLE TIMER INSTRUCTIONS Installation The CAC124 Reprogrammable Timer can only be installed in Waring Commercial appliances that have the appropriate port compatible with the CAC124. NOTE: Always be sure the appliance is unplugged and cool prior to installing or removing the reprogrammable timer. -
Page 8: Safety And Troubleshooting
NOTE: When batteries are removed, the timer automatically defaults to the factory setting of 10 seconds. SAFETY AND TROUBLESHOOTING Please note that the Waring Commercial Panini/Toasting Grill will be ® too hot to handle immediately after use. -
Page 9: Cleaning And Maintenance
Waring Service Center at 314 Ella T. Grasso Ave. Torrington, CT 06790, or any Factory Approved Service Center. This warranty... -
Page 10: Medidas De Seguridad Importantes
Regrese el aparato a un centro de servicio autorizado para su revisión, reparación o ajuste. 9. El uso de accesorios no recomendados o vendidos por Waring presenta un riesgo de incendio, electrocución o herida. 10. No lo utilice en exteriores. - Page 11 15. Supervise el uso de este aparato cuidadosamente cuando esté usado por o cerca de niños. 16. No utilice el aparato para ningún otro fin que no sea el indicado. GUARDE ESTAS INSTRUCCIONES APROBADO PARA USO COMERCIAL INSTRUCCIONES DE PUESTA A TIERRA Para su protección, este aparato está...
- Page 12 MÉTODO DE PUESTA A TIERRA El símbolo representado por un relámpago con punta de flecha dentro de un triángulo equilátero tiene como fin alertar al usuario de la presencia de voltajes peligrosos no aislados en el interior del aparato, los cuales pueden ser de suficiente magnitud para constituir un riesgo de incendio o electrocución.
- Page 13 PIEzAS 1. Asas aislantes 2. Control de temperatura 3. Botón de encendido/apagado 4. Bandeja de goteo removible 5. Cuerpo de acero inoxidable 6. Placa inferior (plana/"plancha" o estriada/"parrilla") 7. Placa superior (plana/"plancha" o estriada/"parrilla") 8. Luz de listo 9. Cepillo de limpieza/raspador 10.
- Page 14 WDG275T Parrilla/Sandwichera de 120V 1800W 35.5 cm x 35.5 tamaño estándar con placa estriada arriba y placa plana abajo WPG300T Parrilla/Sandwichera doble 240V 3200W 43 cm x 23.5 cm con placas estriadas WFG300T Parrilla/Sandwichera doble 240V 3200W 43 cm x 23.5 cm...
-
Page 15: Instrucciones De Uso
TEMPORIzADOR PROGRAMABLE Instalación El temporizador programable CAC124 puede ser instalado sobre todos los aparatos Waring equipados con un puerto compatible. NOTA: Siempre apague y desconecte el aparato antes de instalar/ remover el temporizador. 1. Instalación de las pilas • Retire las pilas del paquete... - Page 16 2. Instalación del temporizador • S iempre apague y desconecte el aparato antes de instalar el temporizador • I ntroduzca el temporizador en el puerto del aparato, hasta que las patas laterales se bloqueen • Su temporizador ya está instalado, operativo y listo para usar 3. Remoción del temporizador • S iempre apague y desconecte el aparato antes de remover el temporizador. • P resione firmemente las patas laterales mientras jala el temporizador hacia usted para liberarlo. • S i es necesario, utilice un destornillador plano para presionar las patas. Tenga cuidado de no dañar el temporizador y de no lastimarse.
-
Page 17: Limpieza Y Mantenimiento
Waring Service Center, 314 Ella T. Grasso Ave., Torrington, CT 06790, o a cualquier servicio postventa aprobado. Esta garantía: a) no se aplica a ningún producto desgastado, defectuoso, dañado o roto debido a uso, reparaciones/... -
Page 18: Importantes Consignes De Sécurité
9. L’utilisation d’accessoires non recommandés ou vendus par Waring peut présenter un risque d'incendie, d'électrocution ou de blessure. 10. Ne pas utiliser l'appareil à l'air libre. 11. Vérifier que l'appareil est éteint avant de le brancher. Toujours éteindre l'appareil (OFF) avant de le débrancher. -
Page 19: Instructions De Mise À La Terre
15. Il convient d'exercer une surveillance étroite lorsque cet appareil est utilisé par ou près d’enfants. 16. Ne pas utiliser cet appareil à des fins autres que celles pour lesquelles il a été conçu. GARDER CES INSTRUCTIONS USAGE COMMERCIAL AUTORISÉ INSTRUCTIONS DE MISE à... - Page 20 MÉTHODE DE MISE à LA TERRE Le symbole composé d’une flèche en forme d’éclair à l'intérieur d'un triangle équilatéral, à pour objet d'alerter l'utilisateur de la présence d'une tension dangereuse non- isolée à l'intérieur du boîtier, qui peut être d'une ampleur suffisante pour constituer un risque d'incendie ou de choc électrique.
- Page 21 PIÈCES 1. Poignées isolées 2. Réglage de température 3. Interrupteur 4. Bac de récupération des graisses amovible 5. Boîtier en acier inoxydable 6. Plaque inférieure (plate/"gril" ou striée/"plancha") 7. Plaque supérieure (plate/"gril" ou striée/"plancha") 8. Voyant de préchauffage 9. Brosse de nettoyage/racloir 10.
- Page 22 "gril" WDG275T Gril/Presse-panini de taille 120V 1800W 35,5 cm x 35,5cm standard avec plaque "gril" en haut et plaque "plancha" en bas WPG300T Gril/Presse-panini double 240V 3200W 43 cm x 23,5 cm avec plaques "gril" WFG300T Gril/Presse-panini double 240V 3200W 43 cm x 23,5 cm avec plaques "plancha"...
- Page 23 MINUTEUR PROGRAMMABLE Installation Le minuteur programmable CAC124 peut s'installer sur tous les appareils Waring équipés d'un port compatible. REMARQUE : Éteindre et laisser l'appareil refroidir avant de procéder au retrait ou à l'installation du minuteur. 1. Installation des piles • Déballer les piles...
- Page 24 • L e minuteur est maintenant est maintenant installé, opérationnel et prêt à l'emploi 3. Retrait du minuteur • É teindre et laisser l'appareil refroidir avant de procéder au retrait du minuteur • P resser fermement les pattes latérales tout en tirant doucement le minuteur vers vous pour le libérer. • A u besoin, utiliser un tournevis plat pour presser les pattes. Faire attention de ne pas abîmer le minuteur et de ne pas vous blesser.
-
Page 25: Nettoyage Et Entretien
(autres que des détergents) et des semi-liquides non-abrasifs, à condition que l'appareil n'ait pas été soumis à des charges excédant sa capacité maximale. Au titre de cette garantie, Waring réparera ou remplacera toute pièce nous paraissant afficher un vice de matière ou de fabrication. - Page 26 à l’usage abusif ou inapproprié, à la surcharge ou à la modification de l'appareil ; b) ne couvre aucun dommage accessoire ou indirect. Avertissement : Brancher cet appareil sur Courant Continu (C.C.) annulera la garantie. WARING COMMERCIAL 314 Ella T. Grasso Ave. Torrington, CT 06790...
- Page 28 ©2013 Waring Commercial 314 Ella T. Grasso Avenue Torrington, CT 06790 www.waringcommercialproducts.com Printed in China Impreso en la China Imprimé en Chine 13WC139154 WFG/WPG/WDG Timer Series IB IB-11956...
Need help?
Do you have a question about the WPG300T and is the answer not in the manual?
Questions and answers