Advertisement
Available languages
Available languages
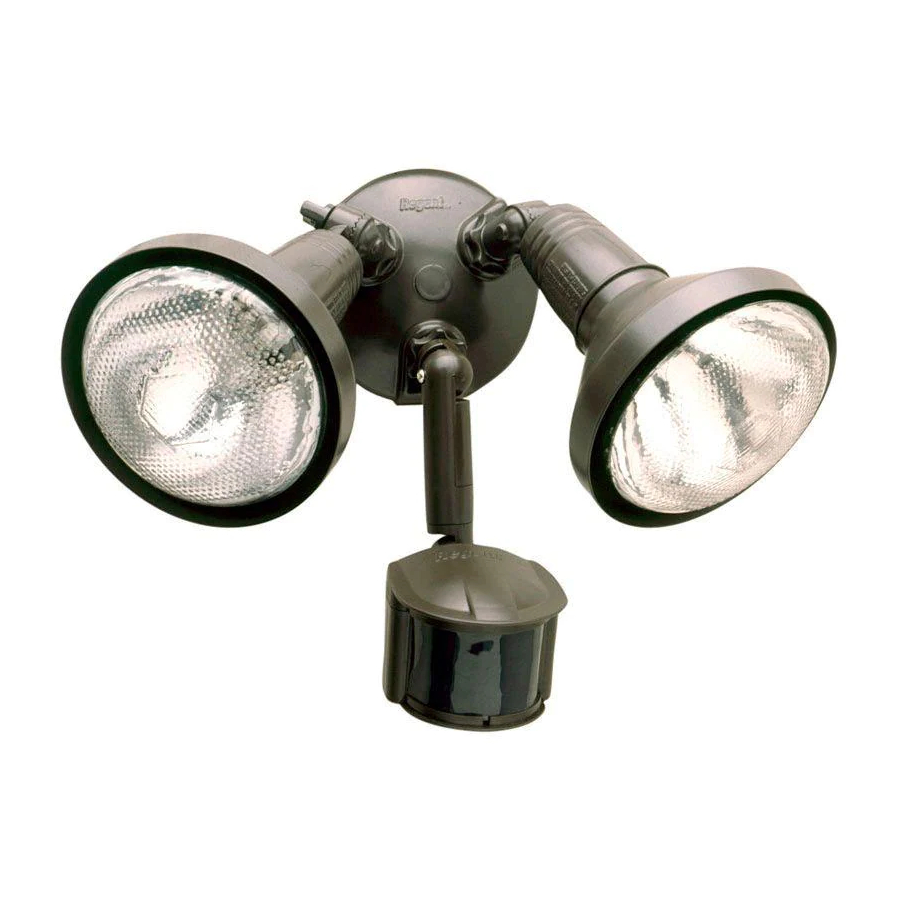
MS185R
(Bronze / Bronce)
MS185RW
(White/Blanco)
ENGLISH
ITEMS REQUIRED
(Purchase separately)
• Phillips screwdriver
• Drill with 3/16 in. drill bit (only needed if hole pattern
on coverplate does not match junction box)
• Outdoor weatherproof silicone caulking
• (2) 100 watt (MAX) PAR 38 floodlight bulbs
NOTE: For improved energy efficiency, lower wattage PAR halogen flood bulbs may
be used. Compact Fluorescent (CFL) bulbs contain electronics which may interfere
with the motion sensing function of your fixture and are not recommended. To meet
ENERGY STAR
®
requirements, maximum lamp wattage cannot exceed 250 watts.
HOW IT WORKS
Your motion activated floodlight senses heat images from
objects such as people, large animals and automobile engines.
When motion is detected, the lights will automatically turn
on. Once motion has stopped, the lights will turn off after a
preselected time delay. Your motion activated floodlight may
also be used as a standard floodlight.
IMPORTANT SAFETY INSTRUCTIONS
When using product, basic precautions should always be followed, including the following:
• Heed all warnings, including below warnings AND those included on product.
• Save these instructions and warnings.
• For outdoor use only.
• cULus LISTED for wet location.
• Disassembly of your fixture will void the warranty.
• Your fixture is prewired and preassembled for easy installation.
WARNING
• Read and follow these instructions.
• Risk of fire/electric shock. If not qualified, consult an electrician.
• To reduce the risk of a burn during relamping, disconnect power supply to the unit
before relamping.
• Bulb gets HOT quickly!
• Disconnect power and allow fixture to cool before changing bulb or handling fixture.
• Disconnect power at fuse or circuit breaker before installing or servicing.
Questions?/Des questions?/¿Preguntas? 1-800-334-6871 ConsumerProducts@ cooperlighting.com
PACKAGING CONTENTS/ CONTENU DE L'EMBALLAGE/CONTENIDO DEL PAQUETE
A. Motion detector
B. (2) Lampholder gaskets
and light fixture
Detector de movimiento
y accesorio
Luminaire avec détecteur de
mouvement
180 degrees
Instruction Manual/Manuel d'instructions/Instrucciones
C. (2) #6 and (2) #8 mounting screws
(use the size that fits your junction box)
(2) Juntas obturadoras
del receptáculo
(2) Tornillos #6 y (2) tornillos #8 de montaje
(utilice el tamaño que mejor se adecue a
(2) joints statiques pour douille
su caja de conexión)
(2) vis nº 6 et (2 )vis nº 8 pour boîte de jonction
(choisissez la dimension convenant à votre
boîte de jonction)
CAUTION
• Connect fixture to a 120 volt, 60 Hz power source. Any other connection voids
the warranty.
• Fixture should be installed by persons with experience in household wiring or by a
qualified electrician. The electrical system, and the method of electrically connecting
the fixture to it, must be in accordance with the National Electrical Code and local
building codes.
• Mount fixture to a grounded, recessed-mounted standard junction box marked for use
in wet locations.
• Suitable for wall mount or eave mount only. NOT suitable for ground mount installation.
• Do not allow sensor head to touch light housing – maintain at least 1 in. space
between fixture and sensor.
• For proper operation and protection against damage, the motion
sensor head adjustment knobs must be facing the ground.
• Keep away from flammable objects. Do not position fixture within 2 in.
Up to
of any combustible materials.
70 feet
• Always replace bulb with the same wattage or lower wattage than marked. Installing
a bulb of a higher wattage could create a fire hazard. Use of a higher wattage bulb
will void the warranty (maximum 150 watt halogen bulb). To meet ENERGY STAR
requirements, maximum lamp wattage cannot exceed 250 watts.
•
MINIMUM 90°C SUPPLY CONDUCTORS.
This device complies with Part 15 of the FCC Rules. Operation is subject to the
•
following two conditions: (1) This device may not cause harmful interference, and (2)
this device must accept any interference received, including interference that may cause
undesired operation. Under Part 15 of the FCC Rules, any changes or modifications to
the motion detector described in this instruction sheet that are not expressly approved
by Cooper Lighting Solutions could void the user's authority to operate the equipment.
NOTE: This equipment has been tested and found to comply with the limits for a
Class B digital device, pursuant to Part 15 of the FCC Rules. These limits are
designed to provide reasonable protection against harmful interference in a residential
installation. This equipment generates, uses and can radiate radio frequency energy
and if not installed and used in accordance with the instructions, may cause harmful
interference to radio communications. However, there is no guarantee that interference
will not occur in a particular installation. If this equipment does cause harmful
interference to radio or television reception, which can be determined by turning the
equipment off and on, the user is encouraged to try to correct the interference by one
or more of the following measures:
- Reorient or relocate the receiving antenna.
- Increase the separation between the equipment and receiver.
- Connect the equipment into an outlet on a circuit different from that to which the
receiver is connected.
- Consult the dealer or an experienced radio/TV technician for help.
WARNING: FCC Regulations state that any unauthorized changes or
modifications to this equipment not expressly approved by the manufacturer
could void the user's authorization to operate this equipment.
SAVE THESE INSTRUCTIONS.
1
D. (3) Wire nuts
(3) Conectores del cables
(3) capuchons de connexion
E. (2) Reflectors
(2) Reflectores
(2) réflecteurs
®
Advertisement
Table of Contents

Related Manuals for All-Pro MS185R

Summary of Contents for All-Pro MS185R
- Page 1 (2) vis nº 6 et (2 )vis nº 8 pour boîte de jonction (choisissez la dimension convenant à votre boîte de jonction) E. (2) Reflectors (2) Reflectores (2) réflecteurs MS185R (Bronze / Bronce) MS185RW (White/Blanco) CAUTION ENGLISH • Connect fixture to a 120 volt, 60 Hz power source. Any other connection voids the warranty.
-
Page 2: For Best Results
FOR BEST RESULTS SELECTING YOUR DESIRED FEATURE • Install the motion sensor/transmitter 8-12 feet Mode of Operation MODE Knob How to Set above the ground. (Motion sensor is less sensitive Adjustment Power Switch above 12 feet.) Auto Setting (motion activated) Knob arrow points to Turn the power to •... -
Page 3: Year Limited Warranty
3-YEAR LIMITED WARRANTY INSTRUCTIONS DE SÉCURITÉ IMPORTANTES Lors de l’utilisation d’un produit, des précautions de base doivent être respectées y compris THE FOLLOWING WARRANTY IS EXCLUSIVE AND IN LIEU OF ALL OTHER WARRANTIES, WHETHER EXPRESS, IMPLIED OR STATUTORY INCLUDING, BUT NOT LIMITED TO, ANY les suivantes : WARRANTY OF MERCHANTABILITY OR FITNESS FOR ANY PARTICULAR PURPOSE. - Page 4 REMARQUE : Après la mise à l’essai, cet équipement a été déclaré conforme aux limites 5. Pour éviter la pénétration d’humidité dans la boîte établies pour un dispositif numérique de catégorie B en vertu de la section 15 des de jonction, appliquez une petite quantité de règlements de la FCC.
-
Page 5: Dépannage
DÉPANNAGE CLS NE SERA EN AUCUN CAS TENU RESPONSABLE DES DOMMAGES SPÉCIAUX, INDIRECTS, ACCESSOIRES ET CONSÉCUTIFS (QUELLE QUE SOIT LA RAISON, MÊME SI CETTE Problème Cause Solution RESPONSABILITÉ REPOSE SUR UN CONTRAT, LA RESPONSABILITÉ STRICTE, OU DES DÉLITS, Y COMPRIS LA NÉGLIGENCE), NI POUR LA PERTE DE PROFITS, ET MÊME SI LA RESPONSABILITÉ La lampe ne L’alimentation •... -
Page 6: Para Obtener Los Mejores Resultados
CABLEADO Y MONTAJE DEL ACCESORIO • ¡La bombilla se CALIENTA rápidamente! ADVERTENCIA: Riesgo de choque eléctrico. Antes de la instalación o reparación, • Desconecte el accesorio y permita que se enfríe antes de cambiar la bombilla desconecte la alimentación eléctrica en el fusible o interrupto automático. o manipularlo. -
Page 7: Diagnostico Y Solucion De Problemas
SELECCIONE LA FUNCIÓN DESEADA Problema Causa Posible Acción Correctiva Como adjustar La luz se El interruptor que se • Cambie el ajuste del selector (que no Adjuste de la Modo de funcionamiento interruptor enciende encuentra en la parte esté en modo “TEST”). perilla de MODO electrico durante el día.
Need help?
Do you have a question about the MS185R and is the answer not in the manual?
Questions and answers