Table of Contents
Advertisement
Advertisement
Table of Contents

Related Manuals for CleanFreak CF-100 Series

Summary of Contents for CleanFreak CF-100 Series
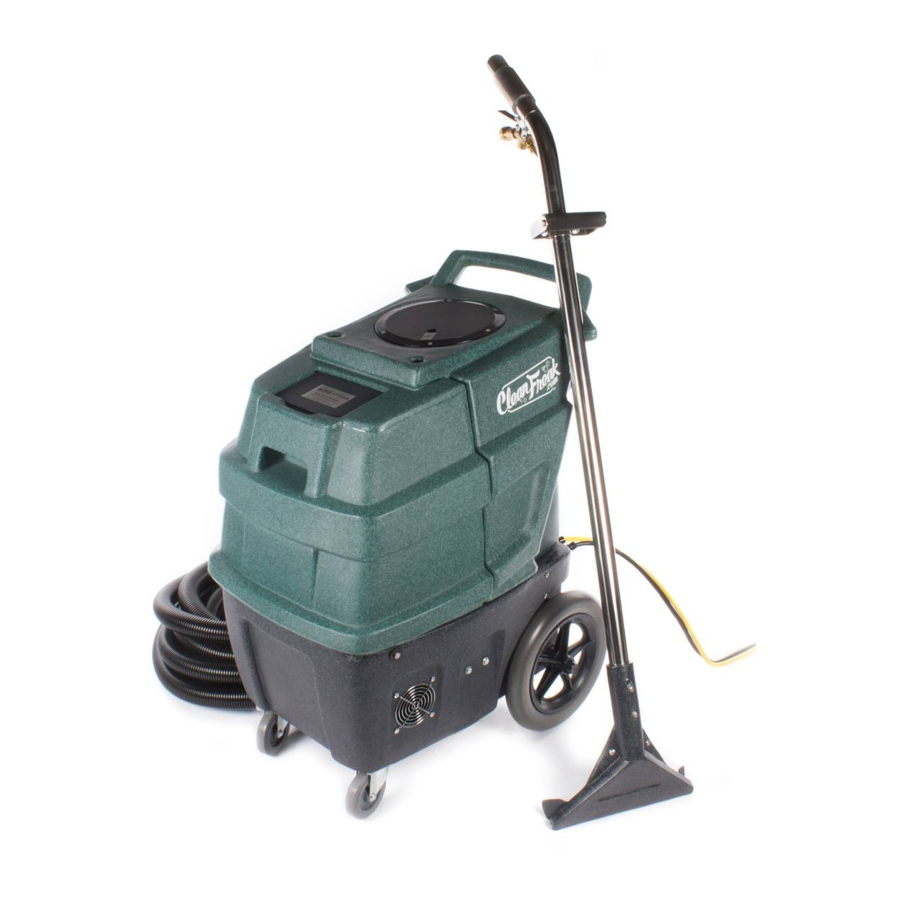
- Page 1 MODEL: CF-100 CF-100 SERIES CF-100-HEAT CF-25XG CF-25XG-HEAT Owner’s Manual IMAGES AND ILLUSTRATIONS ARE FOR REFERENCE ONLY. ACTUAL PRODUCTS MAY NOT BE EXACTLY AS SHOWN. 5109 N NATIONAL DR. KNOXVILLE, TN 37914 TEL: (888) 722-5508 WWW.CLEANFREAK.COM © All rights reserved...
-
Page 3: Table Of Contents
TABLE OF CONTENTS CAUTION TABLE OF CONTENTS LIMITED WARRANTY SAFETY INSTRUCTIONS EXTRACTOR OVERVIEW ASSEMBLY Connect power, Connect hose OPERATING THE EXTRACTOR: Before operating Operating After operating PREVENTATIVE MAINTENANCE HOW TO: How to use attachment tools How to bleed the system - System without electric instant water heater - System with electric instant water heater OPTIONS:... -
Page 4: Limited Warranty
Proof of purchase is necessary to establish the date of the original sale. Receipt of purchase or warranty registration can be used as proof of purchase. It is extremely important to register your purchase by sending CleanFreak the warranty registration form within 10 days of purchase (Page 5). -
Page 5: Safety Instructions
SAFETY INSTRUCTIONS WARNING! When using an electrical appliance, basic precautions should always be followed. To reduce the risk of fire, electric shock or injury following these tips: Do not leave appliance plugged in. Unplug from outlet when not in use. Electric shock could occur if used outdoors or on wet surfaces. -
Page 6: Extractor Overview
EXTRACTOR OVERVIEW recovery tank lid solution tank lid TF105110 hand grip solution filter inside solution tank image 8.2 housing latching bolt vent screen front casters PM10150 wet vacuum filter image 8.1 (*) = standard equipment for inside recovery tank unit with 500 psi pump image 8.3 cord winder handle... -
Page 7: Assembly
ASSEMBLY CONNECT ELECTRIC POWER CORD Protect the ground plug. This plug is to be used with a proper grounding type (three prong) receptacle. Do not break off or pull out the grounding blade. (see below image) ground blade (DO NOT break off) three prong receptacle image 9.1 CONNECT HOSE... -
Page 8: Operating The Extractor
OPERATING THE EXTRACTOR BEFORE OPERATING: Read the manual carefully and completely before attempting to operate the extractor. Make sure the unit is plugged into an electrical outlet with the same voltage as shown on the extractor. 1. When plugging in a dual power cord extractor A (see below image 10.1); each cable should be on separate circuits. When this is accomplished a green light will turn on when the “Circuit Test Switch”... -
Page 9: After Operating
OPERATING THE EXTRACTOR OPERATING: 1. Start and continue cleaning until the clean water tank is empty and/or recovery tank is full or until cleaning job is done. 2. If foam is detected in the recovery tank and hose, use a defoamer to prevent damage to the vacuum motors. AFTER OPERATING: 1. -
Page 10: Preventative Maintenance
PREVENTATIVE MAINTENANCE AFTER EACH USE: CLEAN, LUBRICATE, ETC... 1.Thoroughly clean all equipment and accessories after each use. a. Rinse solution tank, recovery tank, and hoses with clean water. b. Flush entire solution system with clean water. This includes all solution hoses and attachment tool. Do not allow liquid with cleaning chemicals to remain in the equipment. - Page 11 PREVENTATIVE MAINTENANCE cont. A clean vacuum lter (*) must be installed in the recovery tank at all times to protect the motor. (See below image 13.1) Serious damage to vacuum motors will occur when vacuum lter is not installed. (See below image 13.2) image 13.2 image 13.1 WITHOUT...
-
Page 12: How To
HOW TO HOW TO USE ATTACHMENT TOOL WITH ATTACHMENT TOOL: (effectively) BETTER TECHNIQUE WILL HELP WITH DRY TIME, CARPET LIFE, AND OVERALL COST. To clean, Pull the tool over the carpet with solution control valve lever pressed. (image 14.2, 14.1) Press the lever only while pulling back on the wand. - Page 13 HOW TO HOW TO BLEED WITHOUT ELECTRIC INSTANT WATER HEATER: Fill solution tank with clean water. Connect desired tool and extractor with vacuum hose and solution hose. Turn pump switch to “ON”. Open trigger valve from your attachment tool (See image 15.1), and spray until all air is out from the solution system.
-
Page 14: Options
OPTIONS AUTO DUMP PUMP AUTO DUMP PUMP: Fill solution tank with clean water. Connect desired tool and extractor with vacuum hose and solution hose. Remove auto dump pump connect cap and connect auto dump hose. See image 16.1. (available longer optional dump hose) Make sure manual drain valve/hose is closed/connected. -
Page 15: Auto Fill
OPTION AUTO FILL Connect the end of clean IN-LINE hose to water faucet, (Faucet Adapters may be needed). See image 17.3. Then, connect the end with female quick connect to WATER IN (Automatic Fill) at extractor. See image 17.1. & 17.3. -
Page 16: Chemical Feed & Mixing System
OPTIONS CHEMICAL FEED & MIXING SYSTEM 1. ADJUSTABLE CHEMICAL FEED SYSTEM (See image 18.2) (Detail; see adjustable chemical feed system page) 2. METERING TIPS PRESET CHEMICAL FEED SYSTEM (See image 18.3) (Detail; see metering tips preset chemical feed system page) 2. -
Page 17: Adjustable Chemical Feed System
OPTIONS 1. ADJUSTABLE CHEMICAL FEED SYSTEM NOTE: You may pre-spray your cleaning area with a pre-spray solution prior to extracting or you may use the CHEMICAL FEED AND MIXING SYSTEM to mix in the cleaning solution automatically with water while cleaning. -
Page 18: Metering Tips Preset Chemical Feed System
OPTIONS 2. METERING TIPS PRESET CHEMICAL FEED SYSTEM ABOUT: Same operation and setup as ADJUSTABLE CHEMICAL FEED SYSTEM, but preset chemical feed system do not use chemical feed adjustable flowmeter. (See images on “ADJUSTABLE CHEMICAL FEED SYSTEM” page) The metering tips preset chemical feed rate is controlled by a metering tip (different size) screwed into the metering barb on the side of the unit. -
Page 19: Electric Instant Water Heater (In Line Heater)
OPTIONS HEATERS 1. ELECTRIC INSTANT WATER HEATER (in line heater) 1. Fill solution tank with clean water. 2. Connect desired attachment tool. 3. Turn pump switch ON. 4. Bleed the line. (See image 21.2 and “How to Bleed the system” page.) 5. - Page 20 OPTIONS unit with 500 psi pump 1. 500 PSI PUMP 1. Fill solution tank with clean water. 2. Connect desired attachment tool. 3. Turn pump switch to “ON”. 4. Open trigger valve from attachment tool. See image 22.1. And spray until all air out from the solution system. See image 22.1.
-
Page 21: Troubleshooting
TROUBLE-SHOOTING TROUBLE-SHOOTING ELECTRICAL SYSTEM PROBLEM POSSIBLE CAUSE HOW TO REPAIR No electrical power 1. Check the outlet & the plug 1. Plug in properly (Component or extractor 2. Damage cord 2. See authorized repair person not turning on ) 3. Circuit breaker o or fuse blown 3. -
Page 22: Vacuum System
TROUBLE-SHOOTING VACUUM SYSTEM PROBLEM POSSIBLE CAUSE HOW TO REPAIR Vacuum motor on with little or no 1. Lid is not properly closed 1. Close the lid vacuum or suction at wand/ 2. Drain hose/valve not connected/ 2. Connect hose or close optional drain upholstery tool closed valve... - Page 23 TROUBLE-SHOOTING HEAT SYSTEM PROBLEM POSSIBLE CAUSE HOW TO REPAIR Water not heating up 1. Air in the heater 1. Bleed (See “How to bleed” page) 2. Bad thermostat 2. Replace 3. Heating element burned out 3. Replace 4. Safety valve open 4.
- Page 24 5109 N NATIONAL DR. KNOXVILLE, TN 37914 TEL: (888) 722-5508 WWW.CLEANFREAK.COM © All rights reserved...
Need help?
Do you have a question about the CF-100 Series and is the answer not in the manual?
Questions and answers