Advertisement
Quick Links
5. Placez le protège-tibia en position et fixez-le sous les bords de la coquille de la botte.
6. Insérez les sangles dans les boucles et ajustez-les à la compression souhaitée. Fermez les boucles
à bout bleu en position verrouillée.
Modification du site de décharge : Body Armor® Walker II
1. Retirez la semelle intérieure supérieure (beige) de la botte.
2. Placez une pellicule stérile sur la zone à décharger.
3. Marquez la zone à décharger sur la pellicule avec un marqueur transférable.
4. Placez le pied dans la botte et tenez-vous debout pour permettre à la marque de se transférer sur
la semelle intérieure inférieure (blanche). Retirez la semelle inférieure une fois que c'est terminé.
5. À l'aide d'un couteau utilitaire ou d'un outil rotatif, découpez la zone de décharge. Écartez les
bords (environ 30°). La zone de décharge doit être 0,5 cm plus large que le bord extérieur de la
zone à décharger et étendue distalement de 1,25 cm.
6. Replacez la semelle intérieure inférieure modifiée dans la botte et couvrez-la avec la semelle
intérieure supérieure.
La gestion du site de décharge doit être effectuée sous les instructions d'un professionnel de la santé
et en consultation avec celui-ci.
Mise en garde
Veuillez toujours suivre ces instructions d'utilisation. En cas de douleur ou de gonflement, cessez
l'utilisation et consultez immédiatement votre médecin. Cet appareil est conçu pour aider à la
récupération et doit être utilisé exclusivement sous les instructions d'un professionnel de la santé
et en consultation avec celui-ci. DARCO® International Inc. n'assume aucune responsabilité en cas
de mauvaise utilisation du produit. Il est conseillé de porter des pansements ou des chaussettes
avec la botte. Ne conduisez pas de véhicule pendant que vous portez cet appareil. Soyez extrême-
ment prudent lorsque vous marchez sur toutes les surfaces lorsque vous utilisez cet appareil.
Marchez plus lentement que d'habitude. Cet appareil est destiné à un usage par un seul patient.
Pour le patient ou l'utilisateur : Cet appareil à la fine pointe de la technologie a été conçu et fabriqué
par DARCO® International, Inc. pour le traitement d'une condition médicale spécifique. Si un incident
grave survient relativement à cet appareil, il doit être signalé au fabricant aux coordonnées indiquées
dans ce document et aux autorités compétentes du pays ou de l'État où vous vous trouvez. Une fois le
traitement terminé, jetez cet appareil conformément aux lois et aux ordonnances locales.
Manufactured for:
DARCO® International, Inc.
810 Memorial Blvd.
Huntington, WV 25701, USA
Phone 304.522.4883
www.darcointernational.com
DARCO® (Europe) GmbH
Gewerbegebiet 18
82399 Raisting, Germany
Telefon +49 8807 9228 0
www.darco.de
Made in China
BWAL-IFU-21_Rev0321
®
Body Armor® Walker
Instructions For Use
Body Armor® Walker
EN
Indications
> Postoperative use, trauma care, stress fractures, soft tissue injury
Contraindications
> Open fractures, poor circulation
Cleaning Instructions/Maintenance
> When the shell or inner liner is slightly dirty, clean it with a damp cloth or a soft brush.
> Allow the shell or inner liner to air dry only.
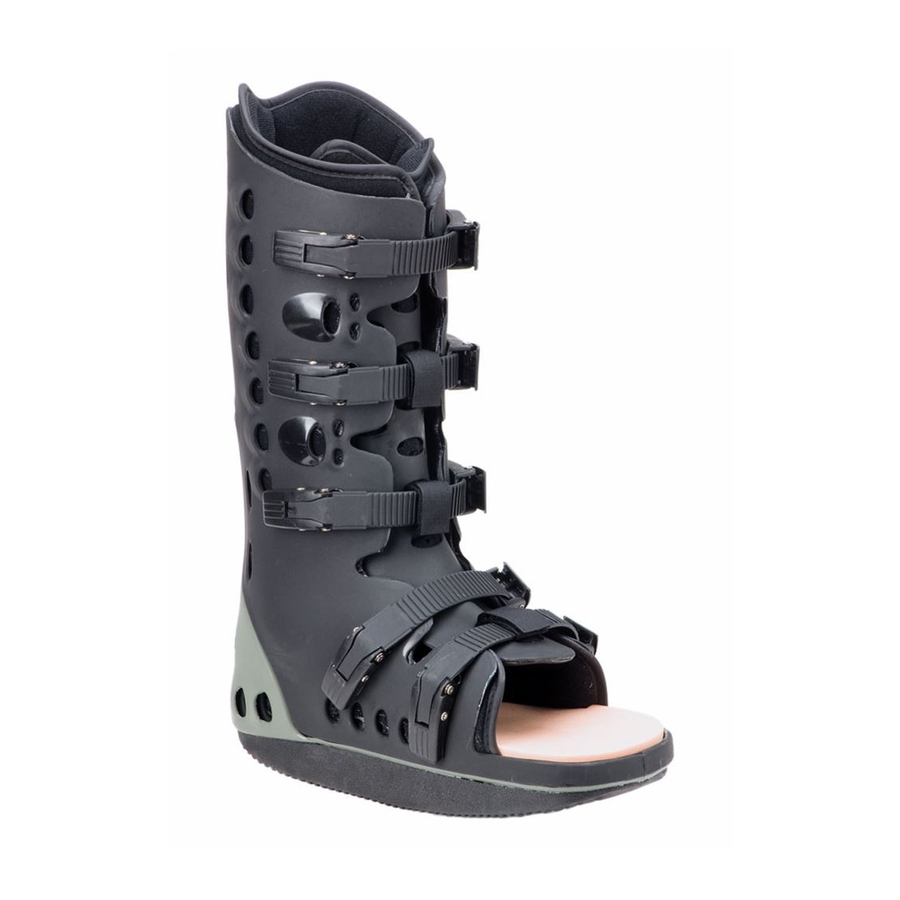
Instructions for use - Body Armor® Walker
1. Unlock all buckles and remove the shin guard, foam pads, and liner.
2. Wrap the liner around the foot and secure with the closures - Additional Liners are available.
3. Spread open the shell and place the foot heel first into the walker.
4. Place the foam pads in areas of excessive rubbing or to limit space (Optional).
5. Place the shin guard into position and secure it under the edges of the walker shell.
6. Insert straps into the buckles and adjust them to the desired compression. Close the blue-tipped
buckles to the locked position.
Instructions for use - Body Armor® Walker II
1. Unlock all buckles, remove the shin guard and foam pads.
2. If off-loading for ulcers, fractures, or other painful areas, see below instructions.
3. Spread open the shell and place the foot heel first into the walker.
4. Place the foam pads in areas of excessive rubbing or to limit space (Optional).
5. Place the shin guard into position and secure it under the edges of the walker shell.
6. Insert straps into the buckles and adjust them to the desired compression. Close the blue-tipped
buckles to the locked position.
Off-load site modification - Body Armor® Walker II
1. Remove top insole (tan) from the walker.
2. Place a sterile film over the area to be off-loaded.
3. Mark the area to be off-loaded on the film with a transferable marker.
4. Place the foot in the walker and stand to allow the mark to transfer to the bottom insole (white).
Remove bottom insole when complete.
5. Using a utility knife or rotary tool, cut out the relief area. Skive the edges (approx. 30°).
The relief area should be 0.5 cm larger than the outer edge of the area to be offloaded and
extended distally 1.25 cm.
6. Place the modified bottom insole back in the walker and cover with the top insole.
Off-load site management should be under the instruction of and in consultation with a healthcare
professional.
Body Armor® Walker Liner
Body Armor® Walker II
Advertisement

Related Manuals for Darco Body Armor Walker


Summary of Contents for Darco Body Armor Walker
- Page 1 Pour le patient ou l’utilisateur : Cet appareil à la fine pointe de la technologie a été conçu et fabriqué Instructions for use - Body Armor® Walker par DARCO® International, Inc. pour le traitement d’une condition médicale spécifique. Si un incident 1. Unlock all buckles and remove the shin guard, foam pads, and liner.
- Page 2 DARCO® International Inc. does not assume any responsibility for misuse of the product. It is El manejo del sitio de descarga debe estar bajo la instrucción de y en consulta con un profesional de advisable to wear dressings or socks with the walker.