
Summary of Contents for Chefwave CW-AF12V2
- Page 1 ™ 12 QT. Air Fryer Oven USER MANUAL CW-AF12V2 odEL 120V AC, 60H Please read this manual carefully before using the air fryer oven. Save these instructions.
- Page 2 WELCoME! Dear ChefWave™ Customer, Congratulations on your purchase of the ChefWave™ 12 Quart Air Fryer Oven with Dehydrator and Rotisserie. To ensure your safety and many years of trouble-free operation, please read this manual carefully before using this appliance and keep it in a safe place for future reference.
-
Page 3: Table Of Contents
TABLE oF CoNTENTS Safety Instructions Parts & Accessories Control Panel Using the Accessories Operating Instructions Cleaning & Maintenance Important Notice... -
Page 4: Safety Instructions
SAFETY INSTRUCTIoNS When using electrical appliances, basic safety precautions should be observed, including the following: • To protect yourself from electric shock, do not immerse the cord, plug, or appliance in water or other liquids. Do not allow any liquid to enter the appliance. - Page 5 • During operation, hot steam will release through the air outlet. Be sure to keep your hands and face at a safe distance from the steam and air outlet openings. When opening the appliance, be cautious of any hot steam that may escape.
- Page 6 • When removing accessories from the appliance, be careful not to touch the heating component. • If food has cooked for too long, it will burn and smoke will release through the air outlet. If this occurs, unplug the appliance immediately. After it has cooled completely, clean the food particles and oil from the accessories.
-
Page 7: Parts & Accessories
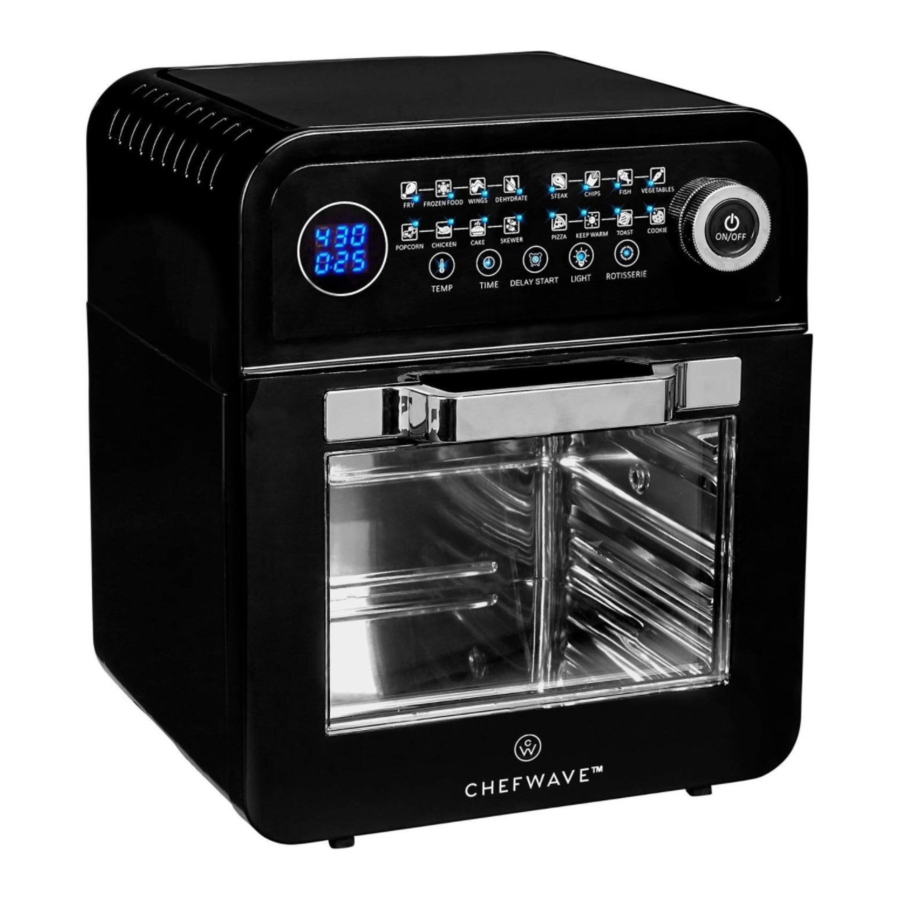
PARTS & ACCESSoRIES Parts Top cover 2. Control panel 3. Upper cover 4. Housing 5. Power cord 6. Inner case Door 8. Knob 9. On/Off button Accessories 10. Handle tool 11. Rotisserie tool 12. Wire rack 13. Frying basket 14. Drip pan 15. -
Page 8: Control Panel
CONTROL PANEL DELAY START Delay Start. Use this button to set a delayed start timer for the cooking process. Light. Use this button to turn on the light inside the oven. *Note: The light will stay on for 30 seconds whenever the door is opened. - Page 9 Menu settings. These are the preset cooking functions from which you can choose. The indicator lights will light up as you turn the knob to toggle through the functions. Once you make a selection, the corresponding indicator will stay lit throughout the cooking process.
-
Page 10: Using The Accessories
USING THE ACCESSoRIES DRIP PAN The drip pan should always be placed on the lower level of the appliance to catch grease, oil, and crumbs. Place the drip pan inside the appliance, as shown in the illustrations above. Always wear protective, insulated oven mitts when removing the drip pan from the hot air fryer. - Page 11 WIRE RACK When needed, place the wire rack on the top level of the appliance, as shown in the illustrations above. Always wear protective, insulated oven mitts when removing the wire rack from the hot air fryer.
- Page 12 MESH BASKET When needed, place the mesh basket on the top level of the appliance, as shown in the illustrations above. Always wear protective, insulated oven mitts when removing the mesh basket from the hot air fryer.
- Page 13 HANDLE TOOL Frying Basket Rotisserie Tool Skewer Rack Rotating Basket Always use the handle tool when removing the frying basket, skewer rack, rotating basket, and rotisserie tool. Handle tool #1, shown in the illustration above, is used to remove the frying basket. Handle tool #2, shown in the illustration above, is used to remove the skewer rack, rotating basket, and rotisserie tool.
- Page 14 FRYING BASKET Place food inside the frying basket. Be careful not to overfill the frying basket, as food may expand during cooking. Using the handle tool, place the frying basket inside the appliance. Remove the handle from the basket and close the door, as shown in the illustrations above.
- Page 15 ROTISSERIE TOOL Slide the tool through the center of the chicken and out the bottom end. Firmly attach the forks to the chicken and place it inside the appliance, as shown in the illustrations above.
- Page 16 SKEWER RACK Place food onto the skewer as shown in Step 5 below. Then assemble the rack as shown and place it inside the appliance.
- Page 17 ROTATING BASKET Assemble the rotating basket, as shown in the illustrations below. Place food inside the rotating basket. Be careful not to overfill the basket, as food may expand during cooking. Place the basket inside the appliance. STEP 1 STEP 2 STEP 3 STEP 4 STEP 5...
-
Page 18: Operating Instructions
oPERATING INSTRUCTIoNS Before First Use 1. Remove all packing materials, stickers, and labels. 2. Wash all of the accessories with warm water, dish detergent, and a non- abrasive sponge. 3. Wipe the inside and outside of the appliance with a soft, moist cloth. Do not wash or immerse the appliance, cord, or plug in water. - Page 19 FUNCTION DEFAULT TEMPERATURE DEFAULT TIME (ºF) 25 MINUTES FROZEN FOOD 10 MINUTES WINGS 10 MINUTES DEHYDRATE 8 HOURS STEAK 12 MINUTES CHIPS 20 MINUTES FISH 15 MINUTES VEGETABLES 12 MINUTES POPCORN 10 MINUTES (PREHEAT FOR 2 MINUTES) CHICKEN 30 MINUTES CAKE 30 MINUTES SKEWER...
- Page 20 4. If desired, press the Time button to adjust the default time setting. Turn the knob clockwise to increase or counterclockwise to decrease the cooking time. Each turn of the knob will change the time by 1 minute. The time range is 1 to 60 minutes.
- Page 21 Using the Delay Start Function 1. If you would like to set a timer for the cooking process, turn the knob to select a cooking function, and then press the Delay Start button. 2. Turn the knob clockwise to increase or counterclockwise to decrease the timer.
-
Page 22: Cleaning & Maintenance
5. Turn the knob to select a cooking function. 6. If desired, press the Temp button to adjust the default temperature setting. Turn the knob clockwise to increase or counterclockwise to decrease the cooking temperature. If desired, press the Time button to adjust the default time setting. -
Page 23: Important Notice
IMPORTANT NOTICE Do not dispose of this product with normal household waste. This product must be disposed of at an authorized facility for the recycling of electric appliances. By doing so, you help contribute to the protection of our environment. If you experience problems with this product, email Customer Service at cs@ mychefwave.com. - Page 24 ™...
Need help?
Do you have a question about the CW-AF12V2 and is the answer not in the manual?
Questions and answers