Advertisement
Quick Links
Instruction Manual for OSD Pro Expander
TM
Document Version 3.7
Introduction
TM
TM
Thank you for your purchase! This instruction manual will guide you through the installation and operation of your OSD Pro Expander
(OSD Pro
).
The full color, electronic version of this manual is available in the Product Manuals section of the Support tab on http://www.eagletreesystems.com.
The online manual includes any updates that were made after printing. Please read
the entire manual carefully before proceeding.
If, after you read the manual, you have further questions or problems, visit our support
web page for information on how to get answers to your questions, 24 hours a day.
Quick Start Guide
We recommend that most customers start with basic OSD Pro setup, and then proceed
as desired to use more advanced features. A Quick Start Guide, which supplements
this manual, is included with your product. The latest version of the quick start guide
is available in the Product Manuals section of the Support tab on
http://www.eagletreesystems.com.
Intended Uses
The OSD Pro is intended to be used exclusively in model planes, boats and cars. Any
other use is not supported.
Main Screen
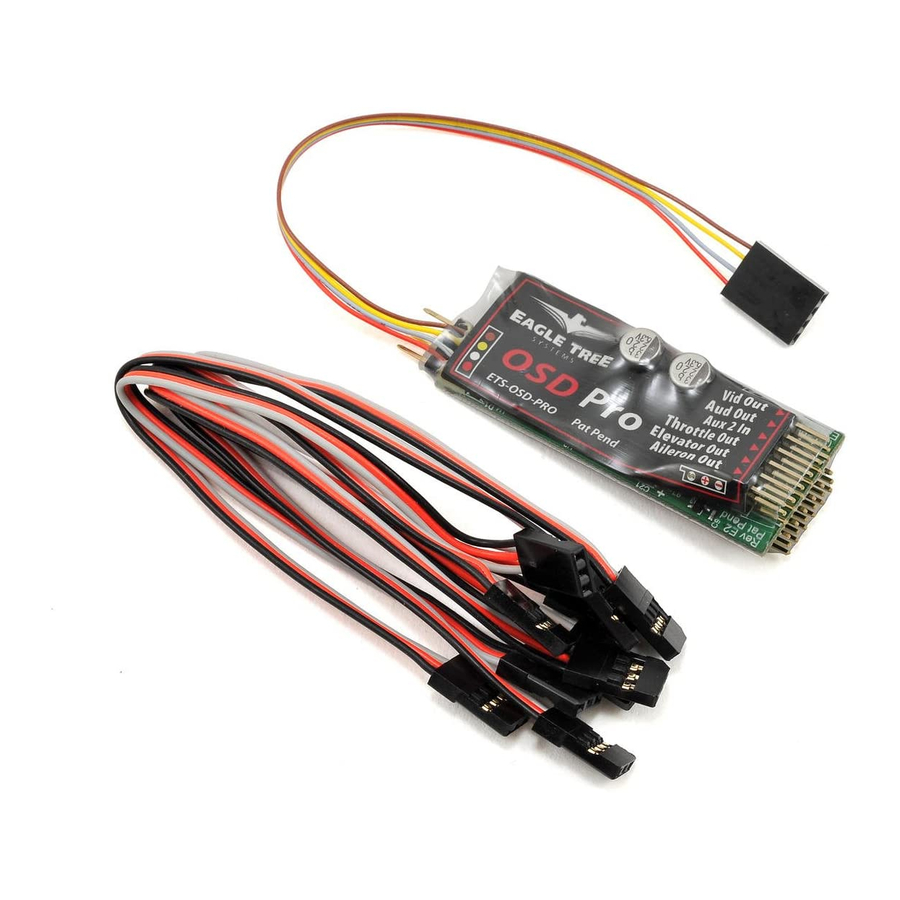
Packing List
Your package should include the following: The OSD Pro Expander, five (5) male to
male servo connectors, the eLogger battery backup cable (with recently shipped units), a printed version of this manual, and a printed version of the Quick
Start Guide.
What the OSD Pro
TM
Does
The OSD Pro is a powerful, modular, fully configurable Video/Audio On-Screen Display (OSD) device, providing graphics, voice announcements, alarms,
acoustic variometer with total energy compensation, Home Arrow, Artificial Horizon, Return to Home, Failsafe, "RADAR", waypoints, a flight simulator
for testing, and many other features. The information displayed can be as simple or advanced as you like, depending on how you configure the display, and
on which optional Eagle Tree sensors are connected.
To use your OSD Pro, you need the OSD Pro Expander, and the eLogger V3 or Data Recorder. To make full use of the OSD Pro, you also need our GPS
Expander. Several optional sensors and accessories are available from Eagle Tree to further enhance your OSD Pro, such as our barometric altimeter, pitot
airspeed sensor, temperature sensors, and many more. Note that these additional sensors connect to the eLogger V3 or Recorder, rather than directly
connecting to the OSD Pro.
When connected to your eLogger or Data Recorder, the OSD Pro
superimposes Eagle Tree data onto your video feed, displaying
the parameters you want to see on the video screen. The OSD
Pro is normally connected between the composite video output of
your video camera, and the composite video input of your video
transmitter or DVR. The OSD Pro supports NTSC and PAL
video modes – the video mode is automatically detected.
The figure at right shows a typical "FPV" onboard setup. Your
wiring may vary depending on your video hardware, power
system, etc.
General Safety Precautions
In addition to the warnings and other precautions in this manual,
the following precautions should always be observed:
Copyright © 2010 Eagle Tree Systems, LLC
http://www.eagletreesystems.com
Advertisement

Related Manuals for Eagle Tree Systems OSD Pro

Summary of Contents for Eagle Tree Systems OSD Pro
- Page 1 Eagle Tree sensors are connected. To use your OSD Pro, you need the OSD Pro Expander, and the eLogger V3 or Data Recorder. To make full use of the OSD Pro, you also need our GPS Expander. Several optional sensors and accessories are available from Eagle Tree to further enhance your OSD Pro, such as our barometric altimeter, pitot airspeed sensor, temperature sensors, and many more.
- Page 2 Your Camera and Video Recorder/Transmitter Two 3 pin servo connectors on the OSD Pro are used to route the composite video signal into and out of the OSD Pro. The input and output are compatible with standard 75 Ohm composite video equipment (either NTSC or PAL). See Figures 1 and 2 above, showing the top and bottom of the OSD Pro. The “Video Out”...
- Page 3 (optional) If your Video Transmitter (or DVR) has an audio channel, connect the “Audio Out” pins of the OSD Pro to the audio input of your transmitter. The “Audio In” pins allow you to connect an external microphone to the OSD Pro, for hearing flight sounds. For both the audio in and audio out connections, the pin nearest the circuit board is Ground, the middle pin is Power, and the top pin is Signal.
- Page 4 The four pin wire with black connector on the OSD Pro plugs into the “LCD/TX” port of your eLogger V3, as shown in Figure 3. If you have a PowerPanel or other sensors, those can “daisy chain” to the pins on the OSD Pro, with the polarity as indicated on the OSD Pro label, as shown in Figure 2.
- Page 5 Setting Alarms for Parameters The OSD Pro setup screen makes it easy for you to set up High or Low trigger threshold alarms for the parameters you have configured. These alarms can be used to alert you of potential problems, before they become serious.
- Page 6 For example, if you want to configure a low voltage alarm of 10 volts, and want the OSD Pro display to remain turned OFF until a voltage lower than 10 volts is detected, and you want the parameter spoken when the alarm occurs, you would do the following: Add the “Voltage”...
- Page 7 Page 7 The OSD Pro includes a powerful, graphical display of up to 3 waypoints, on the main screen, as shown in the Main Screen figure. These are displayed relative to the “Home” position, similar to the RADAR feature described above.
- Page 8 Display Live or Max Values?: Determines whether live or maximum values are displayed on the main screen. If Max is selected, the maximum values (minimum voltage) encountered since the OSD Pro was powered are displayed. There is an up arrow (or down arrow for voltage) displayed to the left of the parameters, indicating they are the Maximum (Minimum) values.
- Page 9 Normally the impact of the integral gain should be small. But, if a strong wind or other factor is keeping the plane from reaching home in a reasonable amount of time, integral gain will continue to increase the turn rate. Copyright © 2009-2010 Eagle Tree Systems, LLC http://www.eagletreesystems.com...
- Page 10 RADAR Up Direction (Degrees): This parameter sets the UP direction of the RADAR feature. For example, if you fly your model so that your body is facing 15 degrees N, you would set this to 15. This results in the RADAR icon flying up on the OSD Pro main screen when you are flying the model in the direction you are facing.
- Page 11 Aux2 channel to be dedicated to the OSD Pro, and not shared with other equipment. • Set OSD Text White Level: Adjusts the white level of the OSD Pro text and graphics. Normally, this does not need to be changed from the default setting of “7.”...
- Page 12 Configure Artificial Horizon Menu Information on how to connect the FMA Direct sensor to the OSD Pro system, and configure the Artificial Horizon display, can be found in this document: http://www.eagletreesystems.com/support/manuals/FMA-OSD-Pro.pdf...
- Page 13 For receivers which do not hold the servos at the last position or failsafe position when signal is lost (the servos either go limp or move randomly when the Transmitter is turned off), the OSD Pro looks for bad pulses (pulses of the wrong duration), or the absence of pulses. If enough bad or missing pulses are evident in a short period, Safety Mode is invoked, until the error rate decreases to a good level.
- Page 14 IMPORTANT: if your receiver does not support failsafes, and your model has four or more flight controls, additional steps may be needed to use the the Safety Mode features. Since the OSD Pro will take control of only three controls, the fourth control will be left connected directly to your receiver.
- Page 15 Testing and Adjusting the RTH Altitude Controller Subsystem (while Flying) Complete the steps a) and b) above. Important: NEVER fly with the Flight Simulator Enabled, and NEVER take off or land with the “Test Return to Home” mode enabled! Copyright © 2009-2010 Eagle Tree Systems, LLC http://www.eagletreesystems.com...
-
Page 16: Troubleshooting
24 hours a day. Issue: After I power my system, I see the OSD Pro startup screen, but then the OSD turns off, leaving only the video image. And/or, the OSD Pro’s data only display briefly, and then only the video is shown. - Page 17 Issue: I am using the eLogger V3, and the Video and OSD Pro Text is visible for a while, but then the Video goes blank. If I disconnect the eLogger V3 for a few minutes and reconnect it, the Video re-appears.
- Page 18 Limited Warranty Eagle Tree Systems, LLC, warrants the OSD Pro to be free from defects in materials and workmanship for a period of one (1) year from the date of original purchase. This warranty is nontransferable. If your unit requires warranty service during this period, we will replace or repair it at our option. Shipping cost to us is your responsibility.
Need help?
Do you have a question about the OSD Pro and is the answer not in the manual?
Questions and answers