
Related Manuals for Reflexion Boost 2.0


Summary of Contents for Reflexion Boost 2.0
- Page 1 Reflexion Boost 2.0 ® OWNER’S MANUAL MANUEL DU PROPRIÉTAIRE Customer Service : 1-800-268-4414 Service à la clientèle : 1-800-268-4414...
-
Page 2: Table Of Contents
table of contents / table des matières ENGLISH FRANÇAIS Consignes de sécurité et directives d’utilisation . . . . . . . . . 17–19 Safety Precautions and Usage Statements . . . . . . . . . . . . . . . . 1–2 Liste des pièces . -
Page 3: Safety Precautions And Usage Statements
In-Home Use and Hospital Disclaimer: Keep the power cord away from heated surfaces. Never operate The Reflexion Boost 2.0 adjustable bases are designed solely ® the base when the air openings are blocked. Keep air openings for in-home use. This base was not designed as a hospital bed free of lint, hair and the like. - Page 4 NOTE: If persistent marks remain visible after cleaning, seek Exceeding the recommended weight restrictions could damage professional advice. your Reflexion Boost 2.0 and void your warranty. For best ® performance, you should enter and exit the Reflexion Boost 2.0 ®...
-
Page 5: Parts List
parts list Before discarding the packing materials, ensure all the parts are accounted for. All electronics and components that need to be installed are located in boxes under the base or attached to the frame. Wireless Remote Control (1) AAA Batteries (2) Mattress Retainer Bar (1)* Legs (6) Power Cord (1) -
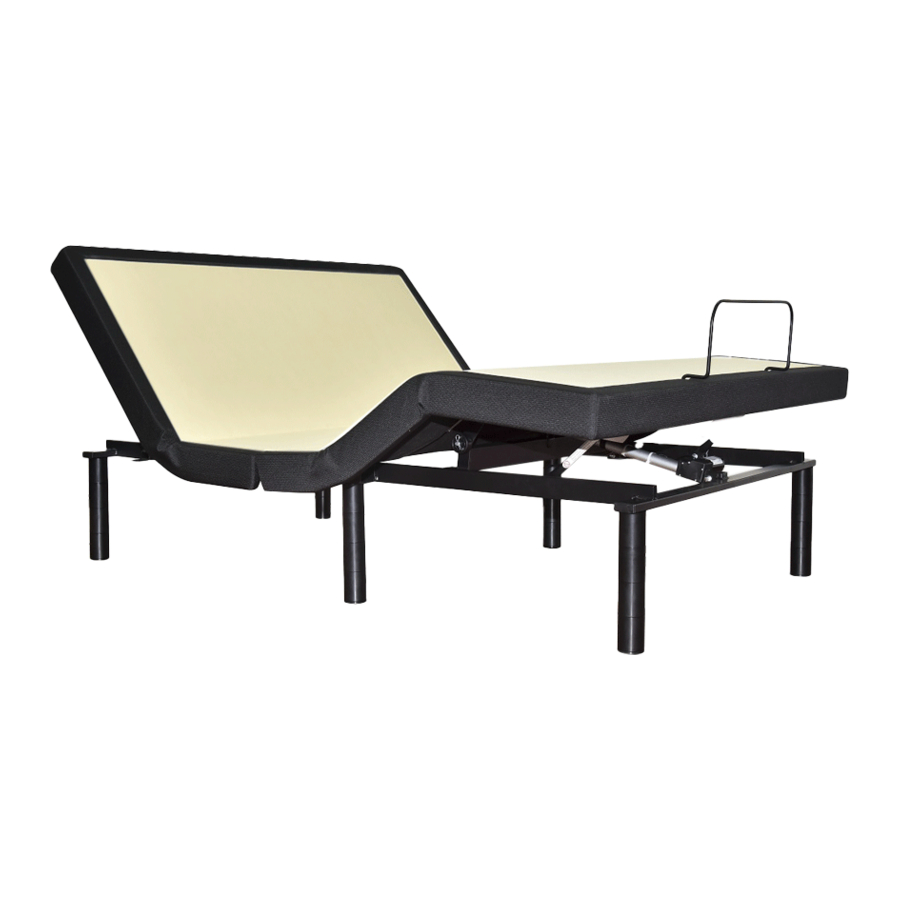
Page 6: Base And Remote Overview
base and remote overview Actual product design may vary. Control Box Head Motor Battery Backup Box LED Light Lifts and lowers Lifts and lowers Head portion of Foot portion of the base the base Lowers head and Reprogrammable foot portions of preset position. -
Page 7: Quick Reference Guide
quick reference guide Not to scale. For illustration purposes only. Read all instructions before beginning installation. CONTROL BOX OVERVIEW ELECTRONICS OVERVIEW Head Motor Foot Motor Power Cord Port Power LED Button Foot Motor Head Input Cord Light Port Motor Port Connection Input Power Cord... -
Page 8: Installation Guide
installation guide Always use two people when setting up the base. STEP 1 STEP 4 Place the bed base box in a desired location with the bottom of To sync two bases see detailed installation the box facing up. instructions on pages 10-11. Remove the binding straps and packing materials, making sure not to puncture the box with any sharp objects. - Page 9 installation guide STEP 7 Setup is now complete! Carefully flip the base over on to its legs. Important: Two people Test all functions on remote. are required to move the bed base. Do not drag across the floor. Do not rest frame on its side, excessive pressure may damage the legs.
-
Page 10: Remote Control
remote control Remote Control arrives paired to the adjustable base. Three (3) AAA batteries are required to operate the remote. ADJUST LED light Head Position Adjustments (A, B) D) FOOT UP A) HEAD UP button Use to raise and lower the head button section of your adjustable base. - Page 11 remote control Remote Pairing The original remote that comes in the box is already paired to the adjustable base. No further action is required. In the event *ALTERNATE REMOTE PAIRING PROCESS! that the remote is not paired with the base, follow the steps Locate the Control Box (see parts list on page 4) and press below.* the reset button twice.
-
Page 12: Connecting Strap
connecting strap (optional) If any split setup is being installed, plastic Connecting Straps are provided (one per base) to secure the bases together. STEP 1 STEP 2 Slide side (a) of the Connecting Strap onto leg bolt. Swing the With the bases in their desired strap and connect side (b) to the leg bolt. -
Page 13: Syncing Two Bases
syncing two bases (optional) A Sync Cord is included with the base. Not available on Queen, Full or King size bases. The Sync Cord connects the two control boxes to a single remote for the synchronization of two bases. STEP 1 Unplug bases from power source. -
Page 14: Headboard Brackets (Not Included)
headboard bracket installation guide (optional) Headboard Brackets are an optional accessory and are not included. A hex key is included with the accessory kit to complete installation. b.) To install the T-Bracket, slide the T-Bracket through the STEP 1 end of the headboard bracket. Align the flat side of the a.) Align the hole in the bracket to the brass sleeve into which T-Bracket plate to the mounting holes on the headboard. -
Page 15: Emergency Battery Backup Box
emergency battery backup box Two (2) 9 Volt batteries are required to operate the power down feature and are NOT included. OVERVIEW For emergency use only, in case of a power outage. In the event that the base is stuck in an articulated position during a power outage —... -
Page 16: Troubleshooting
troubleshooting If one or more functions on the bed base have stopped operating: ADJUSTABLE BASE • Check under the bed base to verify that the wired connections are secure and that there are no cords or bedding obstructing the movement of the base. •... - Page 17 Except for the 25 Year Warranty provided for the frame of this product, there is no this product, you take “as is” and “with all faults.” If you did not purchase this Reflexion warranty at all after five years, dating from commencement of this Limited Warranty.
-
Page 18: Warranty
WARRANTIES OF MERCHANTABILITY AND FITNESS FOR A PARTICULAR PURPOSE, OTHER THAN THE WARRANTY DESCRIBED ON THE FACE OF THIS LIMITED WARRANTY. If you the purchaser experience any problem with your Reflexion Boost 2.0 during the ® warranty period, please consult the troubleshooting section of your Reference Guide. -
Page 19: Consignes De Sécurité Et Directives D'utilisation
Attention : Avertissements importants relatifs à la sécurité Veuillez lire attentivement toutes ces consignes avant d’utiliser votre base réglable Reflexion Boost © CONSERVEZ CES DIRECTIVES base doit être branchée à un protecteur de surtension (non compris). - Page 20 Reflexion Boost 2.0 lorsque la base est en position à plat © sauter sur ou sous le lit. La base réglable ne doit pas être utilisée ou à...
- Page 21 consignes de sécurité et directives d'installation Entretien du tissu: Conformité FCC: Afin de prolonger la durée de vie de votre matelas, protégez- Cet appareil est conforme à la section 15 des règles de le, autant que possible, de l’action directe des rayons de soleil. la FCC.
-
Page 22: Liste Des Pièces
liste des pièces Avant de vous débarrasser des matériaux d’emballage, assurez-vous que toutes les pièces sont comptabi- lisées. Toutes les pièces électroniques et tous les composants devant être installés se trouvent dans les boîtes sous la base ou sont attachés au cadre. Télécommande sans fil (1) et piles AAA (2) Barre de retenue de matelas (1)* Pattes de lit (6) -
Page 23: Aperçu De La Base Et De La Télécommande
aperçu de la base et de la télécommande La conception réelle des produits peut varier. Moteur de la tête Boîtier de piles Voyant lumineux à DÉL de secours Élève et abaisse Élève et abaisse le tête de la base pied de la base Abaisse la tête et le Position préréglée pied de la base à... -
Page 24: Guide De Référence Rapide
guide de référence rapide Non à l’échelle. Pour fins d’illustration uniquement. Lire toutes les directives avant de commencer l’installation. APERÇU DU BOÎTIER DE COMMANDE APERÇU DES PIÈCES ÉLECTRONIQUES Moteur du Moteur pied de la tête Cordon d’alimentation (D) Port DÉL à haute Bouton Port/ Port/... -
Page 25: Guide D'installation
guide d’installation Pour des raisons de sécurité, l’installation de la base réglable nécessite la collaboration de deux personnes. ÉTAPE 1 ÉTAPE 4 Placez la boîte de la base réglable à l’endroit désiré en la Pour la synchronisation de deux bases, voir les directives déposant à... - Page 26 guide d’installation ÉTAPE 7 La configuration est maintenant terminée ! Remettez soigneusement la base sur ses pattes. Important : Essayez toutes les fonctions de la télécommande. Deux personnes sont requises pour déplacer la base réglable. Ne traînez pas la base sur le plancher. Ne laissez pas le cadre de lit reposer sur le côté, puisqu’une pression excessive pourrait endommager les pattes.
-
Page 27: Télécommande
télécommande La télécommande arrive déjà couplée à la base réglable. (3) Trois (3) piles AAA sont requises pour opérer la RÉGLAGE télécommande.télécommande Voyant lumineux à DÉL Réglage de la position de la tête (A, B) D) Bouton pour Utilisez pour élever et abaisser la tête ÉLEVER LE A) Bouton de votre base réglable. - Page 28 télécommande Couplage à distance *PROCÉDURE ALTERNATIVE DE COUPLAGE DE LA La télécommande d’origine qui est livrée avec l’ensemble est TÉLÉCOMMANDE! déjà couplée à la base du lit. Aucune action supplémentaire n’est Localisez le boîtier de commande (voir la listedes pièces à la page 21) et appuyez deux fois sur le bouton.
-
Page 29: Bandes De Connexion
attaches de raccordement S'il s'agit d'une installation de base divisée, les attaches de raccordement en plastique sont fournies (une par base), afin de joindre solidement les deux bases ensemble. ÉTAPE 1 ÉTAPE 2 Les bases étant à l’endroit Glissez le côté (a) de l'attache désiré, desserrez légèrement les de raccordement dans le boulon pattes de lit afin de permettre... -
Page 30: Synchronisation Des Deux Bases
synchronisation des deux bases Un cordon de synchronisation est compris avec la base. Il n’est pas fourni avec les bases de format grand, double ou très grand lit. Le cordon de synchronisation relie les deux boîtiers de commande à une seule télécommande afin d’assurer la synchronisation des deux bases. -
Page 31: De La Tête De Lit (Non Incluses)
guide d’installation des fixations de la tête de lit Les fixations de la tête de lit sont des accessoires optionnels et ne sont pas comprises. Une clé hexagonale est fournie avec la trousse d'accessoires pour terminer l'installation. ÉTAPE 1 ÉTAPE 3 Alignez le trou dans la fixation avec la Reliez votre tête de lit à... -
Page 32: Boîtier Des Piles De Secours
boîtier des piles de secours Deux (2) piles de 9 volts sont requises pour commander les fonctions du boîtier des piles de secours. Les piles ne sont pas comprises. APERÇU Pour une utilisation en situation d’urgence seulement, en cas de panne de courant. Si la base est bloquée dans une position articulée alors que survient une panne de courant, le boîtier des piles de secours ramènera la base à... -
Page 33: Dépannage
dépannage Si une ou plusieurs fonctions de la base de lit ont cessé de fonctionner : BASE RÉGLABLE • Vérifier sous la base réglable si tous les fils de connexion sont bien fixés et si aucun cordon, ni aucune pièce de literie n’obstrue les mouvements de la base. -
Page 34: Garantie
électrique et tous les cordons d’alimentation. La base réglable Reflexion Boost 2.0 est garantie contre les défauts de fabrication ou de © matériaux pendant une période de trois (3) ans à compter de la date d’entrée en vigueur MODALITÉS ADDITIONNELLES... - Page 35 Si vous, en tant qu’acheteur constatez quelque problème que ce soit avec votre base réglable Reflexion Boost 2.0 durant la période de garantie, veuillez consulter la section © Dépannage de votre Manuel du propriétaire. Si le problème persiste, veuillez communiquer avec le service à...
- Page 36 notes...
- Page 37 notes...
- Page 38 Veuillez avoir votre reçu de caisse en main. CUSTOMER SERVICE TOLL FREE NUMBER: 1-800-268-4414 NUMÉRO SANS FRAIS DU SERVICE À LA CLIENTÈLE : 1-800-268-4414 THANK YOU AND ENJOY YOUR REFLEXION BOOST 2.0 ® ADJUSTABLE BASE. MERCI ET PROFITEZ DE VOTRE BASE RÉGLABLE REFLEXION BOOST 2.0 .
Need help?
Do you have a question about the Boost 2.0 and is the answer not in the manual?
Questions and answers
Is the Reflexion® by Sealy Boost 2.0 compatible with people who have pacemakers? From research, it looks like some adjustable beds contain magnets that interfere with pacemakers