Advertisement
Advertisement
Table of Contents

Summary of Contents for Mistral MSEM508
- Page 1 Sewing Machine Instruction Manual Model: MSEM508...
-
Page 2: Important Safeguards
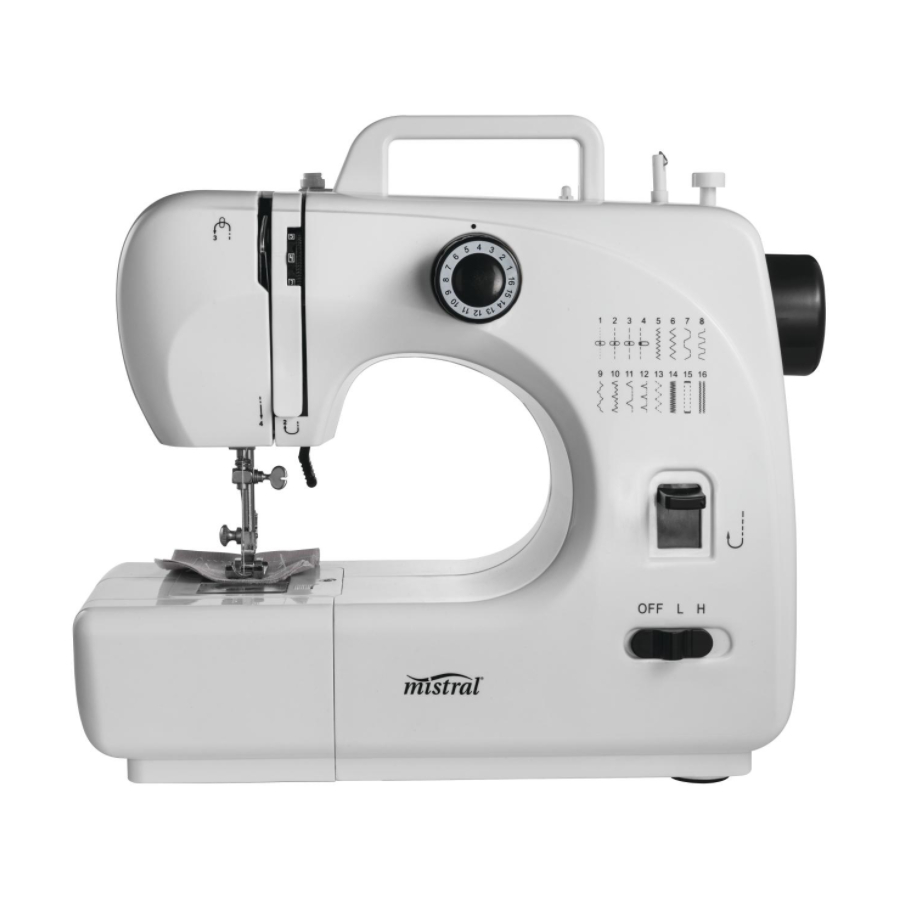
Important Safeguards changing the needle; threading the needle; changing bottom bobbin; When using this electrical appliance, changing any parts; the following basic safety precautions cleaning the machine; should always be followed: after each use. • Never run the machine when there’s thread For Your Safety in the needle,but no fabric on the machine. This could damage the machine. • To protect against the risk of electric shock, DO NOT IMMERSE the main unit, adapter or • Always keep your hands away from the... - Page 3 Features of Your Sewing Machine Front view 1. Take-up lever 2. Upper thread tension dial 3. Pattern selection dial 4. Thread cutter 5. Light 6. Needle clamp screw 7. Bottom bobbin 8. Drawer 9. Hand wheel 10. Reverse button 11. Power & speed switch Back view 1. Bobbin winder pin 2. Bobbin winder stop 3. Foot pedal input 4. Bobbin winder tension disk 5. Presser foot lifter 6. Presser foot 7. DC input 8.
-
Page 4: Presser Foot Replacement
Your Sewing Machine 2. Insert the new needle into the clamp with the flat side toward the correct direction (to the back). Be sure to push the needle completely USING THE FOOT PEDAL (A) AND into the clamp before tightening the needle ADAPTOR (B) clamp screw. 1. Connect the foot pedal by inserting the 3. Tighten the needle clamp screw. jack into the foot pedal input socket. Then you can use the foot pedal to turn on the Caution: Needle direction must be machine instead of using the hand switch... -
Page 5: Threading The Sewing Machine
Fig.3 Fig.4 2. Replacing the bottom bobbin (1) Slide the bobbin cover button to the right and remove the bobbin cover (Fig.7). Fig.5 Fig.6 (2) Put the new bobbin in the holder, with the thread going clockwise. Leave 10cm of THREADING THE SEWING MACHINE thread hanging out (Fig.8). 1. Threading upper thread (3) Make a loop and put it in the hole under the needle. Caution: Always switch off the (4) Hold the end of the upper thread with appliance, disconnect the appliance one hand, and turn the hand wheel from the power supply and remove the... - Page 6 the presser foot, and then gently remove the fabric from the sewing machine, and cut the thread with the thread cutter (Fig.14). Tips: • Please turn the hand wheel if it is difficult to remove the fabric, and then pull out the fabric gently. Fig.7 Fig.8 • If the thread has tangled or jammed, please turn the hand wheel and simultaneously pull the thread slightly to release the thread. Bottom bobbin mechanism is a more precise part, inappropriate actions may damage it.
- Page 7 2. Reverse sewing 7. Manual buttonhole Reverse sewing (back stitching) is useful for (1) Pull the cloth under the presser foot and lower reinforcing the beginning and end of seams. To the presser foot on the cloth where you need use this function proceed as follows: to sew buttonhole, then choose the 15th stitch. (1) Sew forwards as normal, and then press (2) Turn on the switch and sew 5-6 stitches in low and hold down the reverse stitch button speed, then turn off the switch (Fig.15).
-
Page 8: Winding The Bobbin
ADJUSTING STITCHING 8. Drawer This drawer is an accessory storage 1. As shown in the Fig.A, normal stitching shall compartment, which can be slid out and you have top and bottom threading evenly, can store spare bobbins, needles, etc. in it. It neither over tight nor loose. ( = Top thread; is located at the bottom side below the hand = Cloth; = Bottom thread) wheel. Fig.A 2. If the bottom threading looks like a straight line (Fig.B), which indicates the top thread is too loose. Please turn upper thread tension WINDING THE BOBBIN dial to direction with bigger number to increase pressure until the stitching returns to 1. Put a spool of thread on spool pin. (Fig.20) normal. - Page 9 Applicable Cloth For Sewing Sewing Cloth Cotton/Linen Silk/Wool Polyester Elastic Presentation Fabric specification √ × √ Regular √ × √ Thick √ × × × Thin √ √ √ Hard × × × × Soft Sewing effective: √: means easy to sew × : means difficult to sew : means not smooth to sew Note: 1.
-
Page 10: Care And Cleaning
Care and Cleaning Specifications WARNING! Adapter input: ....100-240 V AC, 50/60 Hz, 800mA Max. Before cleaning or storing the appliance, always unplug the appliance from the Adapter output:…………..……12V DC, 1500 mA electrical outlet. Never immerse the appliance, adapter Sewing Machine: ......12V DC, 1500 mA or cord in water or any other liquid. NOTE: As a result of continual improvements, Wipe the appliance housing clean with a damp the design and specifications of the product cloth and a mild detergent. Apply the cleansing... - Page 11 Notes...
- Page 12 Cat. No. MSEM508 October 2020...
Need help?
Do you have a question about the MSEM508 and is the answer not in the manual?
Questions and answers