Advertisement
Quick Links
Name:
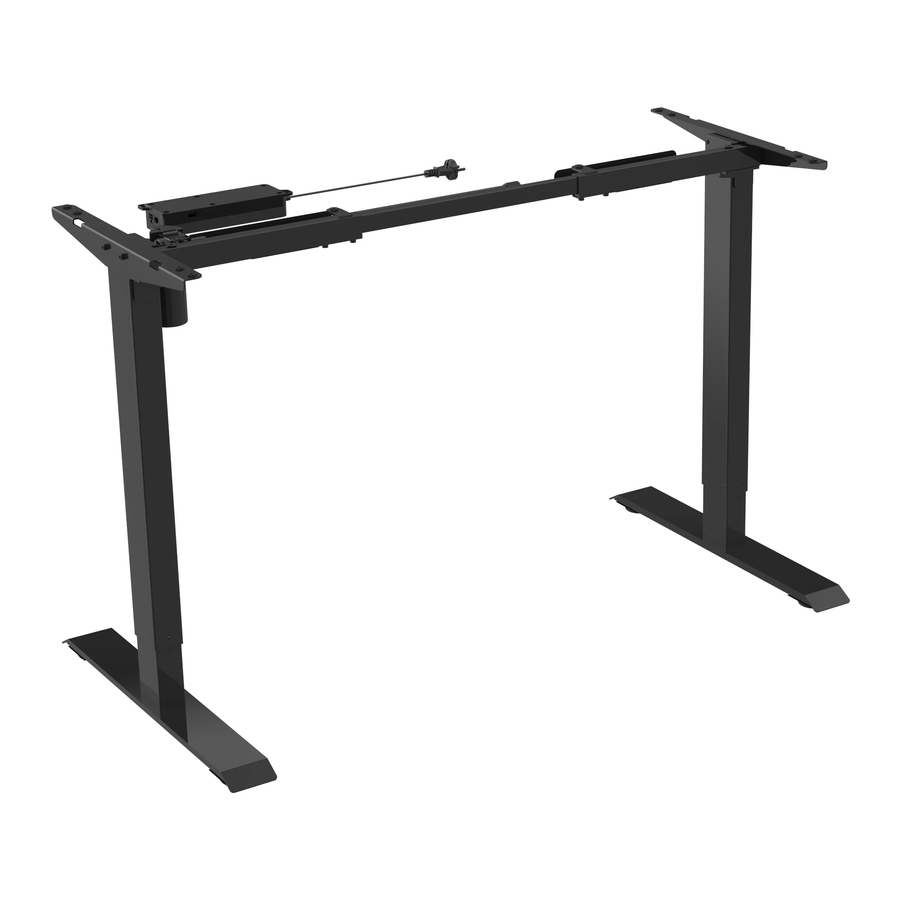
ELEMENT
Model #: ALN-LTM-2L2S-1M-**
1-motor
Narrows at base
LIFT TABLE SPECIFICATIONS
COLOUR:
Impekk colour code:
FINISH:
ACTIVATION
ELECTRICAL
SENSOR PRESSURE
TYPE OF REMOTE
NUMBER ON THE DISPLAY AT THE
LOWEST SETTING (INCHES)
HIGHEST SETTING (INCHES)
TELESCOPIC LEGS
Grey
White
GA
BL
Glossy
27.7
46
Black
NR
1
Advertisement

Subscribe to Our Youtube Channel
Summary of Contents for Alinea ALN-LTM-2L2S-1M-00
- Page 1 LIFT TABLE SPECIFICATIONS COLOUR: Grey White Black Impekk colour code: Name: ELEMENT FINISH: Glossy Model #: ALN-LTM-2L2S-1M-** ACTIVATION ELECTRICAL 1-motor SENSOR PRESSURE TYPE OF REMOTE NUMBER ON THE DISPLAY AT THE 27.7 LOWEST SETTING (INCHES) HIGHEST SETTING (INCHES) TELESCOPIC LEGS Narrows at base...
- Page 2 NUMBER OF LEG SECTIONS 2 Sections HIGHEST (mm) 1143mm 45" LOWEST (mm) 677mm 26.65" *Height includes glides GLIDES Threading: 3/4in BODY TABLE SUPPORT DETAIL 2 Legs Smallest Biggest WIDTH RANGE: 33.46 50.78 1290...
- Page 3 END SUPPORTS AND FEET 450 mm (19 3/4 in) Centered Angled Surface Mount Centered 650 mm (25.5in) PACKAGING Amount of boxes 1 box Protection requirements Cardboard...
-
Page 4: Technical Specifications
TECHNICAL SPECIFICATIONS Operation speed: Certifications: in/second: Sound level of operation: Decibels: <50 Weight capacity: Max.10% or 2 min.on and Kgs: Duty cycle: Power (A/V, Hz): 110V/240V-50/60HZ 18 min.off Lbs: Idle consumption <0.5w... - Page 5 TABLE ÉLECTRIQUE Modèle: Element (ALN-LTM-2L2S-1M-xx) Guide d`installation et d`instructions ELECTRIC TABLE (ALN-LTM-2L2S-1M-xx) Model: Element Assembly and instructions * Image pour références seulement. / Images for references only.
- Page 6 S.V.P lire ce document attentivement. Si ce produit est revendu, s.v.p donner ce document à l`acheteur. Please read this document carefully. If this desk is resold, please provide this manual to the buyer. Prévoyez un espace libre lorsque la table sera en mouvement. Assurez-vous que la table ne touche pas les murs.
- Page 7 Composantes incluses Parts Included Structure Frame Quincaillerie Composantes électriques Hardware Electrical components *Quantités sont requise, extras sont fournis* *Quantities below are required, extras are provided* Boîte de contrôle électrique Control Box Patte-Moteur électrique Electrical Motor Leg Cables extension pattes leg extension cables Câble d`alimentation Power Cord Manette d`ajustement des niveaux...
-
Page 8: Instructions D'assemblage
Instructions d`assemblage Assembly instructions A x 8 Étape - Step 1 Installez (4) et (5) ensemble, utilisez une clé 5x5 (C) pour serrer les vis (A). Install (4) & (5) together, use 5x5 Allen key (C) to tighten the screws (A). B x 4 Étape - Step 2 1. - Page 9 Étape - Step 3 Installez (7) et (4), en suivant l’image 1 en premier. Pour l’image 1, utilisez la clé (G) pour serrer. Pour l’image 2, utilisez la clé 2,5x2,5 (D) pour serrer. Install (7) & (4), following picture 1 first. For Image 1 use the wrench (G) to tighten For image 2 use 2.5x2.5 Allen key (D) to tighten.
- Page 10 Étape - Step 5 F x 14 Installez le boîtier de commande et la manette. Installez le bureau avec la vis (F). Install control box and remote keypad. Install desktop with screw (F). Boîte de contrôle Control box Manette Remote Keypad La distance entre le bord du bureau et la plaque de support doit être supérieure à...
- Page 11 Étape - Step 7 Connectez tous les câbles au boîtier de commande. Connect all cables onto the Control box. Connexion pour le boîtier de commande IB Connection for IB control box Câble d`alimentation Power cable Boîte de contrôle Control box Port d’alimentation Power port Cables des pattes...
- Page 12 Attention 1. Alimentation: AC100V-240V, 50 / 60Hz 2. Environnement de service: 0-40 C 3. Débranchez la fil d’alimentation avant le nettoyage, essuyez la poussière sur la surface avec un chiffon humide lors du nettoyage. Ne pas laisser de liquides pénétrer dans les pièces internes et ne desserrez aucun connecteur.
- Page 13 Attention 1. Power supply: AC100V-240V,50/60Hz 2. Service Environment: 0-40 C 3. Unplug the power plug before cleaning, wipe the dust on surface with slight wet dishcloth when cleaning, be careful not to let the drops into the internal parts, not loosen the connector. 4.
- Page 14 ELEMENT ALN-LTM-2L2S-1M-XX Modèles: **IMPORTANT** CONSIGNES POUR UN BON FONCTIONNEMENT SECURITAIRE DE VOTRE TABLE INSTALLATION : Prière de toujours suivre ces consignes SVP! -Ne jamais ouvrir la boite de contrôle. -Utilisez uniquement le câble d’alimentation A/C fourni. -Assurez-vous que la table est au niveau et n’est pas sur une surface trop inégale. -La table ne devra pas être installe dans un endroit poussiéreux ou humide.
- Page 15 ELEMENT Models: ALN-LTM-2L2S-1M-XX **IMPORTANT** GUIDELINES TO ASSURE SAFE AND PROPER OPERATION OF YOUR TABLE INSTALLATION GUIDELINES: - Never open the A/C Control Box. - Only use supplied Power Cable. - Do not install table on an uneven surface. - Do not install table in dusty or humid locations. - Never lean on or apply excessive weight to table while in operation.
- Page 16 LED Display There are seven buttons "▲”, "▼”, "1”, "2”, "3”, "M”, "A" (1) "▲”: Adjust the desk upwards (2) "▼”: Adjust the desk downwards (3) "1”: Position 1, first height position saved by the user (4) "2”: Position 2, second height position saved by the user (5) "3”: Position 3, third height position saved by the user (6) "M”: Height memory function (7) "A”: Alert button to remind the user to change posture...
-
Page 17: Troubleshooting
● Anti-collision sensitivity adjustment - optional features: a. Press and hold the “▲” “▼” button for 5 seconds at the same time to adjust the sensitivity. Each press will activate one of 4 settings in order (A-3, A-2, A-1, A-0); b. - Page 18 Affichage LED Il y a sept boutons « ▲ », « ▼ », « 1 », « 2 », « 3 », « M », « A » (8) « ▲ »: Ajustez le bureau vers le haut (9) « ▼ »: Ajustez le bureau vers le bas (10) «...
-
Page 19: Dépannage
d. Appuyez sur le bouton « A » et maintenez-le enfoncé pendant trois secondes pour désactiver le rappel de position longue. L'écran LED affiche « » ● Réglage de la sensibilité anticollision fonctionnalités optionnelles: e. Appuyez et maintenez le bouton « ▲ » « ▼ » pendant 5 secondes en même temps pour changer la sensibilité.
Need help?
Do you have a question about the ALN-LTM-2L2S-1M-00 and is the answer not in the manual?
Questions and answers