
Related Manuals for Yedi Houseware Air Fryer Lid GV026

Summary of Contents for Yedi Houseware Air Fryer Lid GV026
- Page 1 THE YEDI CAPITAL AIR FRYER LID ™ INSTRUCTION MANUAL Model No.: GV026 Suitable Capacity: 6 Quart/6 Liter For more recipes and cooking videos go to: www.yedihousewareappliances.com Follow us on Instagram @yedihouseware...
- Page 3 C ON TE NT S...
- Page 4 S PEC I FI C A T IONS This box contains: 1. Instruction Manual 2. Recipe Book 3. Yedi Capital Air Fryer Lid 4. Trivet 5. Frying Basket Your Yedi Capital Air Fryer Lid consists of the main dome housing with heating unit and touch-screen control display.
-
Page 5: Technical Data
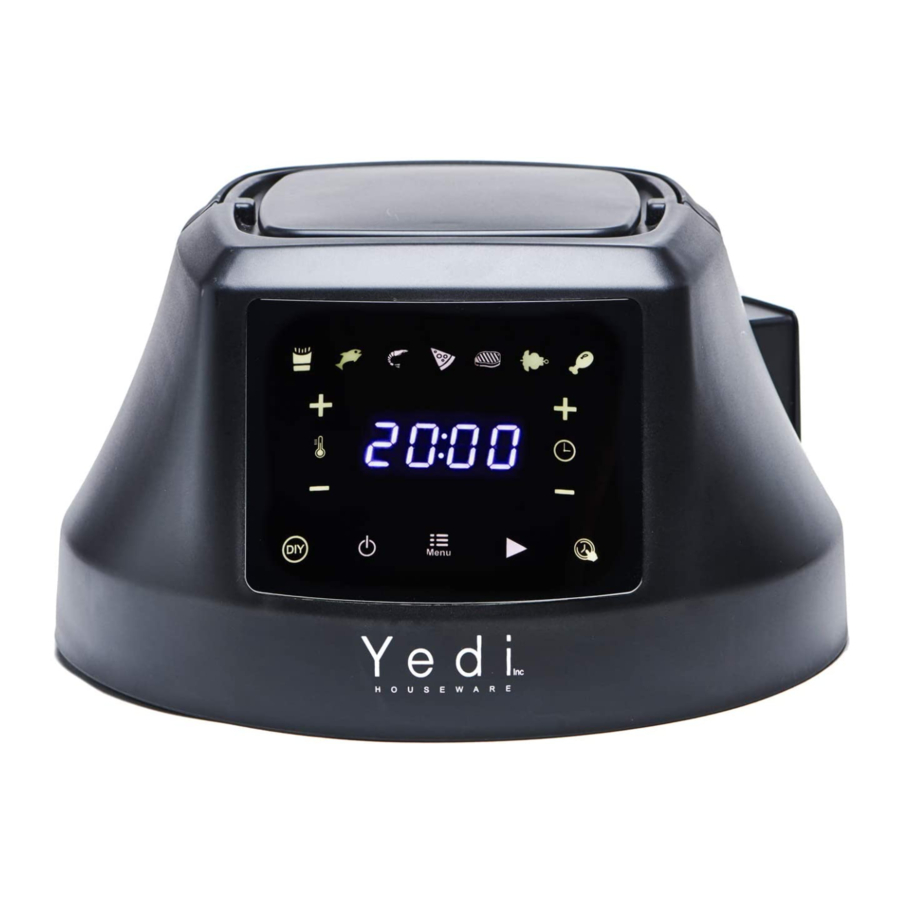
S TRUC TURE OF YOU R AP PLIA NC E Trivet Fry Basket Description: Air Fryer Lid Model: GV026 TE CHNIC A L Rated Voltage: 120V ~60Hz D ATA Power Consumption: 1300 Watts Fixed Capacity: 6 Qt, 6L... -
Page 6: Important Safety Information
I M PORT A N T SA F ETY INFO RMA TI ON Please read these notes carefully BEFORE using your appliance • NEVER USE THE AIR FRYER LID WHILE YOUR ELECTRIC PRESSURE COOKER IS ON! • MAKE SURE TO ALWAYS UNPLUG YOUR ELECTRIC PRESSURE COOKER BEFORE USING THIS APPLIANCE. -
Page 7: Before First Use
I M PORT A N T SA F ETY INFO RMA TI ON • During hot air frying, hot steam is released through the air outlet openings. Keep your hands and face at a safe distance from the steam and from the air outlet openings. •... -
Page 8: Using The Appliance
A SSE MB LI NG 4. Place your food in the frying basket. 5. Set the Air Fryer Lid on top of the inner pot. US ING TH E A PPL IANC E FRIES SHRIMP STEAK CHICKEN FISH PIZZA ROAST INCREASE TEMP INCREASE TIME DECREASE TEMP... - Page 9 US ING TH E A PPL IANC E Plug the Air Fryer Lid cord into a power outlet with a ground. Press the “Menu” button to select the desired function or press the “DIY” button to set the cooking temperature and time according to your personal preferences.
-
Page 10: Refe Renc E T Able
Settings: The below reference table will help you to select the basic settings for preparing different types of food. Keep in mind that these settings are mere indications. Since ingredients differ in origin, size, shape and brand, we cannot guarantee the best settings for your ingredients. Small ingredients usually require a slightly shorter preparation time than larger ingredients. -
Page 11: Troubleshooting
DE HY DR A TION The dehydration process only works in one of the following 5 temperatures: 115°F, 125°F, 135°F, 145°F, 155°F. When set to any of these temperatures, the Air Fryer lid timer will now show in hours instead of minutes, with a default cooking time of 12hours and an adjustable time range of 1h-24h. -
Page 12: Cleaning And Care
C L EA NIN G & C AR E The Frying basket and Steam Rack are dishwasher safe. • Remove plug from the mains socket, and allow the appliance to cool down before cleaning. • DO NOT immerse the lid unit of the appliance in water and make sure no water enters the appliance.
Need help?
Do you have a question about the Air Fryer Lid GV026 and is the answer not in the manual?
Questions and answers