Table of Contents
Advertisement
Quick Links
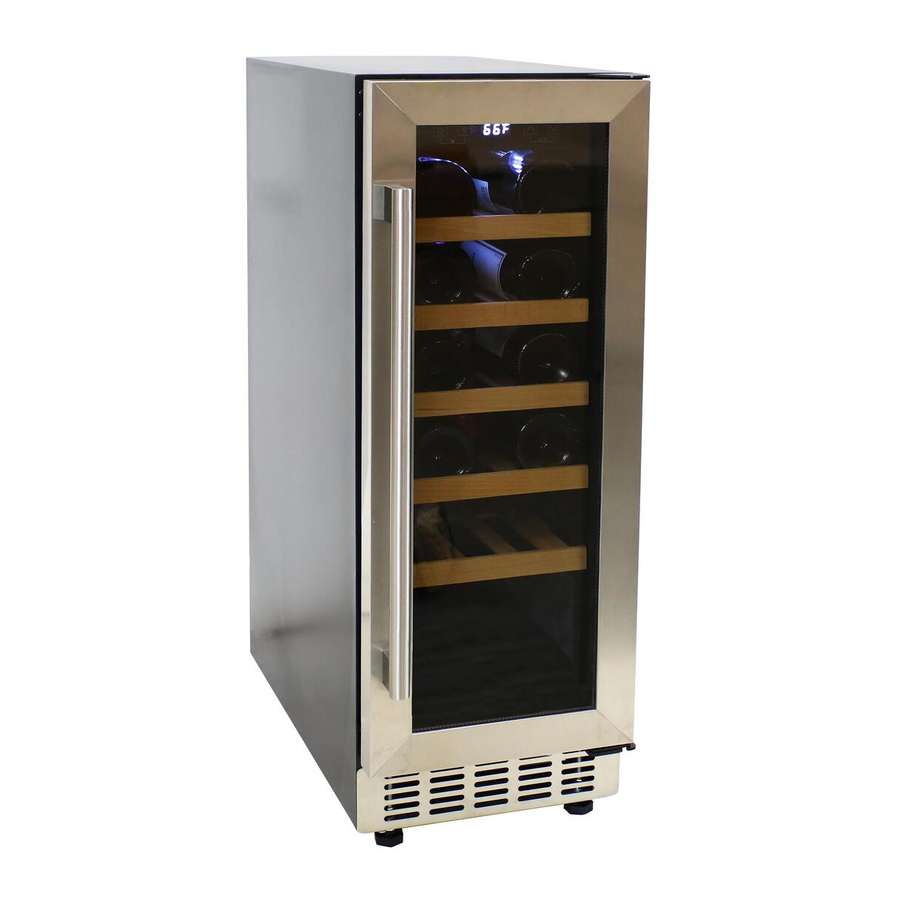
STAINLESS STEEL WINE COOLER
NOTE:
Shelves, door frame, handle and other accessories styles may vary by model and configuration.
All drawings in this manual are for reference.
JCF-58
Purchase Date:
Thank you for choosing Sunnydaze Decor. We stand behind our brand and the quality of the items we sell.
Replacement parts or products will be sent at our discretion within the 1-year warranty period. Proof of purchase, with
the date of purchase as well as photos of the merchandise defect, must be provided. Photos are used to determine
the cause of defects and for future quality control. Register your warranty at
If you have any questions, comments or concerns, feel free to contact us by phone at 888-881-4668, by email:
customerservice@nethealthshops.com, or via our contact us page at
WITH WOODEN SHELVES
/
/
Order/Customer Reference Number:
ATN-361
06/2020
https://tiny.cc/SunnydazeWarranty
https://tiny.cc/SunnydazeContact
Inspect packaging to ensure all
parts are accounted for before
disposing of packing materials.
Parts
Main Cabinet
Door Handle
Shelves
M4 x 40 mm Bolt
Top Left Hinge
Bottom Left Hinge
Tools Required
(not included)
Phillips Screwdriver
Qty.
1
1
5
2
1
1
Page 1 / 11
Advertisement
Table of Contents

Summary of Contents for Sunnydaze ATN-361
- Page 1 Order/Customer Reference Number: Thank you for choosing Sunnydaze Decor. We stand behind our brand and the quality of the items we sell. Replacement parts or products will be sent at our discretion within the 1-year warranty period. Proof of purchase, with the date of purchase as well as photos of the merchandise defect, must be provided.
-
Page 2: Table Of Contents
Table of Contents Safety Instructions ........................3 Electrical Connection ....................... 4 Technical Data ......................... 4 Appliance Features ........................5 Handle Installation ........................5-6 Installation Requirements......................7 Operation ..........................8-9 Maintenance & Cleaning ......................10 Troubleshooting ........................11 General Operating Instructions Remove all packaging and labels from your wine cellar. Be sure that all parts have been included before discarding any packaging materials. -
Page 3: Safety Instructions
Important Safety Instructions To reduce the risk of fire, electrical shock or injury when using your appliance, follow these basic precautions: • Do not operate this or any other appliance with a damaged cord. • Do not operate if housing is removed or damaged. •... -
Page 4: Electrical Connection
Electrical Connection Improper use of the grounded plug can result in the risk of electrical shock. If the power cord is damaged, frayed or shows cracks or abrasions across its length, have it replaced at an authorized service center. For your protection, this unit is equipped with a 3-conductor cord set that has a molded 3-prong grounding- type plug, and should be used in combination with a properly connected grounding-type outlet. -
Page 5: Appliance Features
Appliance Features Housing Upper Hinge Control Panel Door Seal Shelf Cover Board Handle Door Grill Lower Hinge Adjustable Foot NOTE: Shelves, door frame, handle and other accessories styles may vary by model and configuration. All drawings in this manual are for reference. Handle Installation Door Handle... - Page 6 Reversing the Door The wine cooler door is installed opening from left to right. To reverse the opening direction follow the instructions as noted below. Assistance is recommended when reversing the door. Lower Hinge Screws Top Right Hinge Top Left Hinge Right Lower Hinge Door Left Lower Hinge...
-
Page 7: Installation Requirements
Installation Requirements The appliance is designed to for freestanding installation only. Clean the interior surface with lukewarm water and a soft cloth before the first use. Before connecting the appliance to the power source, let it stand upright for approximately 24 hours. This will reduce the possibility of a malfunction in the cooling system from handling during transportation. -
Page 8: Operation
Operation Before Operation Checklist Before power is turned on, make sure the following steps have been taken: □ PACKING MATERIAL: All packing material and tape have been removed from the interior and exterior of the unit. □ CLEANING: Clean the appliance and check the drainage pipe to ensure a good connection. □... - Page 9 Attention °F °F 1. The cooling temperature can be set from 41 - 68 2. Alarm sound: when a system malfunction occurs and the alarm sounds, press any key on the control panel to cancel the alarm sound. 3. Error code: an alarm will be set off when an error occurs. Press any button to turn the alarm off. E1 Temperature Sensor - Open circuit E2 Temperature Sensor - Short Circuit E3 Defrost Sensor - Open Circuit...
-
Page 10: Maintenance & Cleaning
Maintenance and Cleaning Moving the Appliance • Unplug the power supply from the electrical outlet. 45º • Remove all contents from the appliance. • Defrost and clean the unit before moving. • Tape the door shut to prevent it from opening. •... -
Page 11: Troubleshooting
Troubleshooting Problem Possible Cause/Solution The appliance is making noise? The appliance may not be level. Adjust the feet until the unit is level. The appliance may have inadequate ventilation. Ensure the unit is far enough away from wall and the ambient temperature is not too high. Flowing liquid sound in cabinet? This is a normal sound from the refrigerant working inside the cabinet.
Need help?
Do you have a question about the ATN-361 and is the answer not in the manual?
Questions and answers