Table of Contents
Advertisement
Advertisement
Table of Contents

Related Manuals for Matsutec GP-280

Summary of Contents for Matsutec GP-280
- Page 1 Matsutec GP-280 User Manual...
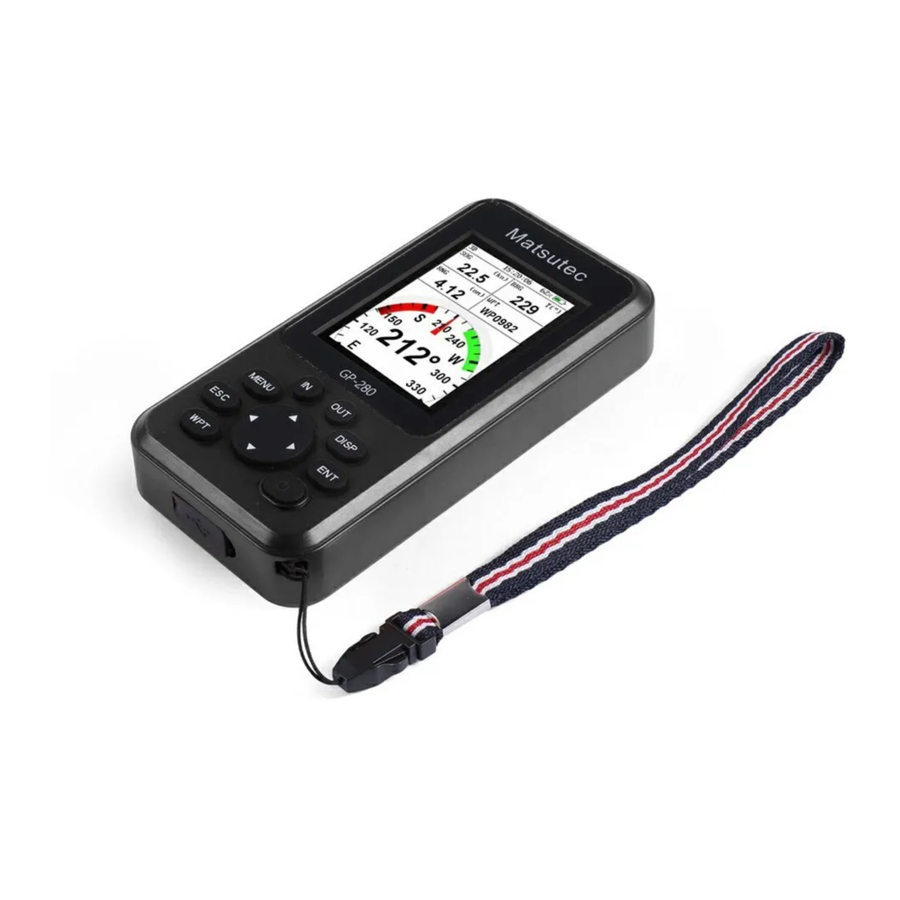
- Page 2 Foreword Thank you for your choice of GP-280. would appreciate feedback from you to go further where achieving. Please carefully read and follow the procedures and operation for best use of your unit. The unit is used as an auxiliary navigation device.
- Page 3 the only navigation device. The unit has built-in battery. Please don't put it in a fire or in a high temperature. It should be disposed properly when discarded avoid environmental pollution Information in this manual subject change without notice. Please feel free to contact our support whenever you need.
-
Page 4: Table Of Contents
FOREWORD ........1 FEATURES ........5 QUICK START .......6 ......6 OWER ON DJUST AND KEY PANEL ......... 6 BRILLIANCE MULTI-DISPLAY SCREENS ..8 ...... 11 ECEIVER STATUS ......12 AYOUT ......14 IELD ......16 ...... 17 LOTTER CREEN Map Settings ..17 Center Position .. - Page 5 ....20 T CURSOR POSITION ....24 T CURRENT POSITION ......25 AYPOINT LIST ......27 MARK ROUTE ......29 TRACK ......35 ALARMS/MESSAGES ..36 ....37 LARM INDICATION ......38 ESSAGE LISTS ..... 38 LARMS SETTINGS ..... 40 LARM MEANING MENU SETTINGS ....
-
Page 6: Features
Features • 2.8" 240X320 color LCD • Multi-display screen Plotter, Highway, Steering, Satellite, SOG meter, COG meter, and User data screen • Visual and audio alarm Arrival, Anchor, XTE, SBAS, etc. • Storage of 10,000 waypoints, 100 routes and 3,000 track points •... -
Page 7: Quick Start
1. Quick Start Power on/off Press and hold key to power on the unit. The unit beeps and starts up. Press and hold for three seconds to power off. The time remaining is counted down until power off. Adjust LCD and key panel brilliance Press key to show... -
Page 8: Brilliance
For LCD, press to loop over the brilliance or press ◀ or ▶ key to increase or decrease the brilliance. For key panel, press ▲ or ▼ key. Press ENT key or ESC key to exit. -
Page 9: Multi-Display Screens
2. Multi-display screens Main screens are shown as below. Press DISP key to step through sequentially. Press ESC key to invert the sequence. - Page 10 Plotter Highway Steering Satellite...
- Page 11 SOG Meter COG Meter User Data 1 User Data 2...
-
Page 12: Receiver Status
Receiver status Mark Meaning 2D position fixed 3D position fixed W2D/ 2D/3D WAAS E2D/ 2D/3D EGNOS M2D/ 2D/3D MSAS G2D/ 2D/3D GAGAN DOP larger Simulation Mode Not fixed... -
Page 13: Data Layout
Receiver status is showed in the upper screen as 2D or 3D, with SBAS or not. Data Layout In most screens except Satellite screen, data layout and data field could be changed as you like. Press MENU key to pop up the menu. - Page 14 Data Layout in most screens Data Layout in User Data...
-
Page 15: Data Field
Data Field Select menu item Data Field and then press ENT key. Then a data field is focused. arrow ▲,▼,◀ ▶ to move the focus to a data field, and press ENT key to open the data list. Select from the data list what you would like to show in the data filed or press ESC key to exit. - Page 16 Data Meaning Latitude POSN Longitude Speed over Ground Course over Ground Range...
-
Page 17: Zoom In/Out
Bearing Cross-track error Estimated time to arrival Time to Go Waypoint to Go Date Date Odometer Trip Trip distance None Blank Zoom In/Out Press IN or OUT Key to zoom in or zoom out. -
Page 18: Plotter Screen
Zoom scale is available among 0.02 nm ~ 320 nm Plotter screen and among 0.2 nm ~ 16 nm in Highway screen. Plotter Screen In Plotter screen, waypoint mark, route line, and track trails are displayed under default settings. It can be set to your preference. - Page 19 Setup Map. The name text of Goto or un-Goto waypoint could be show respectively, and also the text size. Track log could be set to show or not too.
-
Page 20: Center Position
Center Position Normally when travels off the plotter screen, it will automatically return back to the center of the screen. -
Page 21: Waypoint
When cursor is shown, it won’t center automatically. Press and hold ENT key to return back to the center. 3. Waypoint Waypoint could accessed by 4 conditions: cursor position, current position, through the waypoints list and at the MOB position. At cursor position In Plotter screen, use arrow key ▲,▼,◀... - Page 23 move the cursor to a place that you want to lay a waypoint, and press ENT key to add a new waypoint at the cursor position. A waypoint is created with default properties. The properties of name, icon, color, position and comment could modified...
- Page 24 Waypoint Info. Screen When you move cursor to an existed waypoint in Plotter screen, and press ENT key, then a menu will...
- Page 25 for further access to the waypoint, such as, set as Goto or Cancel Goto, Edit, Move, Delete. In Plotter screen, Delete disabled when waypoint destination. 1. When a waypoint is not set as a destination...
-
Page 26: At Current Position
2. When a waypoint is set as a destination At current position When location is fixed, press WPT key in any screen to enter a waypoint at current position and the Waypoint Info. Screen... -
Page 27: Waypoint List
will be opened. Waypoint list Press MENU key to show the main menu, and select item Waypoints to list the waypoints by Name or by Range from current position. Press ▲ or ▼ key to focus a line in the list, and press ENT key, then 1. - Page 28 2. When a waypoint line is selected, a menu is pop up for further operation.
-
Page 29: Mob Mark
MOB mark Press and hold WPT key to enter a MOB mark. - Page 30 MOB position will be set as Goto destination automatically when a MOB mark is entered. Only one MOB mark is available. Each time the MOB mark is entered, the previous MOB mark and position data overwritten.
-
Page 31: Route
4. Route Press MENU key to show the main menu, and select item Routes to list the route by Name or by Range. Create New Route Press ▲ or ▼ key focus [New] line in the list, and press ENT key, then a new route will be created and Route Info. - Page 32 Route Operation Press ▲ or ▼ key in...
- Page 33 route list Screen to focus a...
- Page 34 route line in the list, and press ENT key, a menu is opened further operation, such as set the route Goto destination Forward Reverse, Edit, Delete, or Cancel Route. A destination route could not be deleted until Cancel Route. When Edit is selected, Route Info.
- Page 36 Manage waypoints in a Route Route Info. Screen...
- Page 37 In the Route Info. Screen, press ▲ ▼ to move the focus waypoint that you want to manage and then press ENT key to pop up a menu for further operation, such as Add, Change, Skip, Skip Off or Delete. Up to 30 waypoints could be added in a route.
-
Page 38: Track
Waypoints Change could be sorted alphabetically or by distance. 5. Track Track points are recorded at an interval of distance or according to display range. The record interval and color could be set from the MENU. Press MENU key and select Settings. -
Page 39: Alarms/Messages
When the track memory becomes full, the oldest track point is erased to make space for the latest. The tracks can be deleted collectively or by color. 6. Alarms/Messages... -
Page 40: Alarm Indication
Alarm indication When an alarm setting is violated, buzzer sounds and the name of the offending alarm and the alarm icon appear on the screen. You can silence the buzzer and remove the alarm name indication pressing any key. The alarm icon remains on the... -
Page 41: Message Lists
screen until the reason for the alarm is cleared. Message lists Entering the Messages page of the main MENU, you can browse all the alarm messages present. Alarms settings... - Page 42 Press MENU key and select Settings. Use arrow key to open the Alarms.
-
Page 43: Alarm Meaning
Alarm meaning Alarm Meaning Off the intended course by the range set Arrival Approaching the range set arrival area Anchor Move range from the rest place TIME The time set has come Speed Speed is higher than the rang set SBAS No SBAS signal... -
Page 44: Menu Settings
7. Menu Settings A concise menu is offered to customize a variety of settings. The following is the MENU Settings diagram for your reference. - Page 45 Menu Settings General Key Beep (On, Off) Language (English) Units (nm, km, sm) Time Offset (-14:00 ~ +14:00) Time Display (12 Hour, 24 Hour) Date Display (MM/DD/YY or DD/MM/YY) Backlight Time Out (Stays on / 15s / 30s / 1 Minute)
- Page 46 Navigation Position Format (xx.xx', COG / xx'xx.x'', xx.xxxx) BRG ref. (Mag., True) Magnetic Variation (Auto, manual) TTG/ETA SPD (Auto, manual) Smooth Position (0 to 999 s, 0 s) Smooth SOG/COG (0 to 9999s, 5 s)
- Page 47 Alarms Buzzer (Long, Short, Continuous) Arrival / Anchor (Off, Arrival, Anchor) (Auto, manual) Speed (Auto, manual) Time (On, Off) SBAS (On, Off)
- Page 48 Track Record (Off, Distance, Auto) Color (Red, Blue, etc.) Delete (All, By Color) Delete All Waypoints (On, Off) All Routes (On, Off)
- Page 49 Reset Trip (On, Off) (Off, Hot, Cold) Menu settings (On, Off) Factory Reset (On, Off) Simulate Mode (On, Off) Speed (Off, Hot, Cold) Course (On, Off) Latitude Longitude...
- Page 50 Self Test LCD Test Key Test System Version...
Need help?
Do you have a question about the GP-280 and is the answer not in the manual?
Questions and answers
can you give waypoint a name like apex
Yes, the Matsutec GP-280 allows assigning a name to a waypoint. The name can be modified using the Edit operation after the waypoint is created.
This answer is automatically generated