Table of Contents
Advertisement
Quick Links
1.
INTRODUCTION ................................................................................................................ 2
2.
MINIMUM SYSTEM REQUIREMENTS.............................................................................. 2
3.
BOX CONTENTS ............................................................................................................... 3
4.
INSTALLATION ................................................................................................................. 3
4.1.
Installing drivers .......................................................................................................... 3
4.1.1.
Installation in Windows Vista .......................................................................... 4
4.1.2.
Installation in Windows XP .............................................................................. 6
4.1.3.
Installation on Mac .......................................................................................... 7
4.2.
4.3.
Power consumption and USB hub .............................................................................. 9
5.
CONNECTIVITY AND FEATURES .................................................................................. 10
5.1.
Overview ................................................................................................................... 10
5.2.
Key features .............................................................................................................. 11
5.3.
Connector types ........................................................................................................ 12
5.4.
Connecting headphones ........................................................................................... 12
5.5.
Connecting a microphone ......................................................................................... 12
6.
THE CONTROL PANEL .................................................................................................. 13
6.1.
Accessing the control panel (Windows) .................................................................... 13
6.2.
Accessing the control panel (Mac) ............................................................................ 14
6.3.
Using the DeeJay Trim 4&6 control panel ................................................................ 14
6.3.1.
General settings ............................................................................................ 14
6.3.2.
Main tab ........................................................................................................ 15
6.3.3.
Audio settings: Windows (ASIO tab) ............................................................. 16
6.3.4.
Audio settings: Mac ....................................................................................... 17
6.3.5.
Advanced tab ............................................................................................... 17
6.3.6.
About tab ...................................................................................................... 18
6.3.7.
Advanced audio settings ............................................................................... 18
7.
F.A.Q. ............................................................................................................................... 19
8.
TECHNICAL SUPPORT .................................................................................................. 21
8.1.
Warranty information ................................................................................................. 22
8.2.
Additional warranty provisions .................................................................................. 22
CONTENTS
1/24
Advertisement
Table of Contents

Summary of Contents for Guillemot DEEJAY TRIM 4
-
Page 1: Table Of Contents
Installation in Windows XP ................6 4.1.3. Installation on Mac ..................7 4.2. Connecting and disconnecting your DeeJay Trim 4&6 ..........8 4.3. Power consumption and USB hub ................9 CONNECTIVITY AND FEATURES .................. 10 ... -
Page 2: Introduction
1. INTRODUCTION Congratulations on your purchase! DeeJay Trim 4&6 is an advanced and versatile USB audio interface designed for DJing, and in particular for professional and semi-professional DJs using DJ control surfaces without integrated audio (such as DJ Control Steel, Vestax VCI-100, Numark Total Control…). -
Page 3: Box Contents
User Manual 4. INSTALLATION Make sure that the power switch at the back of your DeeJay Trim 4&6 is set to the OFF position. Proceed with the connections as indicated below, but only put the switch in the ON position when prompted to do so by the installer application during the installation procedure. -
Page 4: Installation In Windows Vista
- Click on the option to install the DeeJay Trim 4&6 drivers and follow the on-screen instructions. We recommend that you connect DeeJay Trim 4&6 to a USB 2.0 port directly on your computer in order to enjoy the fastest transfer rates and optimal performance. You should also be sure to always connect the included external power supply, to ensure adequate power under all mixing conditions. - Page 5 A dialog box appears, prompting you to connect DeeJay Trim 4&6 to your computer's USB port. - Set the power switch at the back of the DeeJay Trim 4&6 to the ON position, then click Next. Your computer automatically detects the DeeJay Trim 4&6 and completes the installation of the required drivers.
-
Page 6: Installation In Windows Xp
A dialog box appears, prompting you to connect DeeJay Trim 4&6 to your computer's USB port. - Set the power switch at the back of the DeeJay Trim 4&6 to the ON position, then click Next. Your computer automatically detects the DeeJay Trim 4&6 and completes the installation of the required drivers. -
Page 7: Installation On Mac
A dialog box appears, prompting you to connect DeeJay Trim 4&6 to your computer's USB port. - Set the power switch at the back of the DeeJay Trim 4&6 to the ON position. Your computer automatically detects the DeeJay Trim 4&6 and completes the installation of the required drivers. -
Page 8: Connecting And Disconnecting Your Deejay Trim 4&6
DeeJay Trim 4&6 features a "hook" at the back of the unit, which can be used to make a loop in the USB cord attaching the device to your computer. This is a security measure and... -
Page 9: Power Consumption And Usb Hub
If you identify a particular device which is causing problems in terms of performance, disconnect the device from your DeeJay Trim 4&6. You can try connecting the device in question to a USB port directly on your computer and see if that resolves the issue. -
Page 10: Connectivity And Features
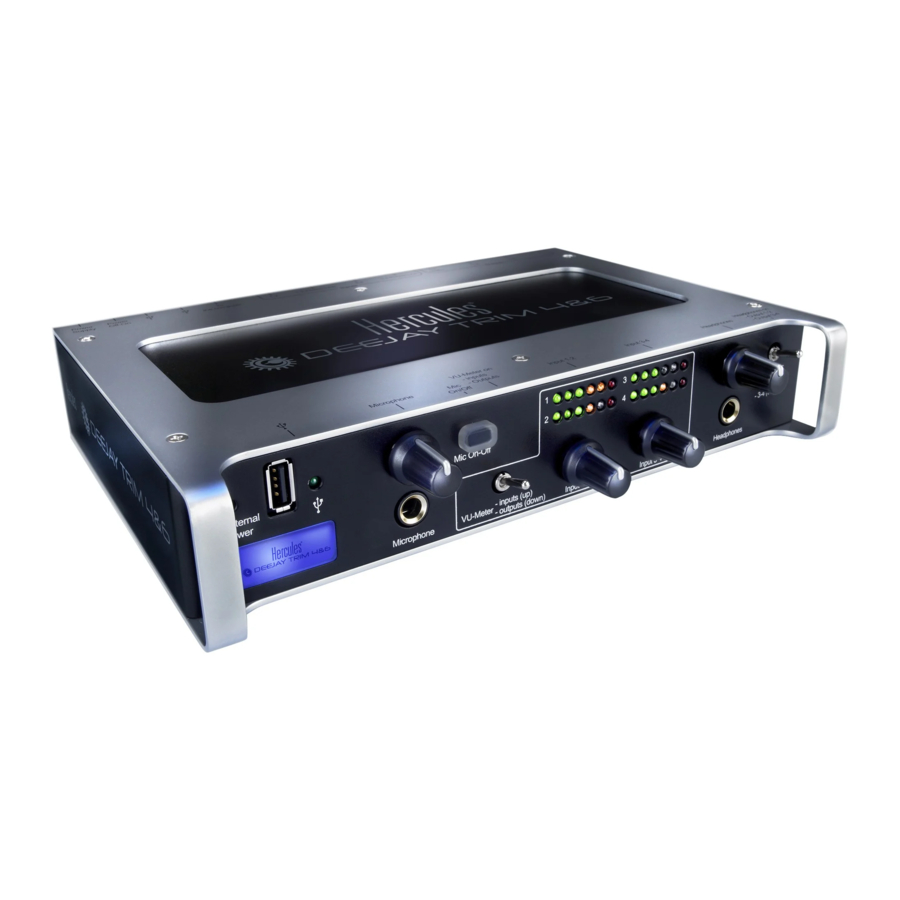
5. CONNECTIVITY AND FEATURES Your DeeJay Trim 4&6 features multiple connectors on its front and back faces, along with a variety of useful controls. You can use the connectors to connect various devices, as illustrated in the diagrams below. 5.1. Overview... -
Page 11: Key Features
- 1/4" jack outputs 1-2: these outputs can be used to connect professional-level gear or a PA system to the DeeJay Trim 4&6. Channels 1-2 are the main output channels for your mix. - Line/phono switches: use these switches to select the input level for the corresponding inputs. -
Page 12: Connector Types
2, for example), or use your microphone to substitute your voice for the music being played on channels 1-2. Press the Mic On-Off button on the front of the DeeJay Trim 4&6 to switch your microphone on or off. You can use the microphone volume knob (just to the left of the button) to adjust your microphone's input level. -
Page 13: The Control Panel
6.1. Accessing the control panel (Windows) The Hercules DJ icon appears on the right-hand side of your Windows taskbar, next to the clock: to launch the control panel for your DeeJay Trim 4&6 audio interface, simply left-click this icon with your mouse. -
Page 14: Accessing The Control Panel (Mac)
6.2. Accessing the control panel (Mac) To launch the control panel on Mac, double-click the DeeJay Trim 4&6 icon on your desktop. 6.3. Using the DeeJay Trim 4&6 control panel The control panel allows you to manage the different settings for your DeeJay Trim 4&6. -
Page 15: Main Tab
Trim 4&6 as if you had disconnected it and then reconnected it to your computer. Each change in audio configuration in WDM mode disables your DeeJay Trim 4&6 audio interface for approximately 10 seconds, and you are alerted by the following message:... -
Page 16: Audio Settings: Windows (Asio Tab)
- You can also disable/enable or adjust the talk-over attenuation level, that is to say, the level of reduction of the music when you press the Mic On-Off button on your DeeJay Trim 4&6's front face to enable and let you talk into the microphone (-6 dB by default: -3 dB provides the loudest background music level, and -9 dB the lowest background music level). -
Page 17: Audio Settings: Mac
then assign these input and output ports for recording or playback when using ASIO-compatible software applications. When switching to ASIO mode, you can adjust the following settings: Sample rate, Sample size and ASIO buffer size. Any modifications to the ASIO settings must be performed before launching the application you wish to use. -
Page 18: About Tab
- This tab provides all of the information on the versions of the package, firmware, driver, DJ API and control panel you are using. Please refer to this information when contacting technical support. The contents of this tab are only visible when DeeJay Trim 4&6 is connected to your computer. - Page 19 A high-speed USB hub is built into the DeeJay Trim 4&6 in order to provide two benefits: a) DJs need a hub to mix with their DJ control surface: DeeJay Trim 4&6 is built for use with a control surface, and connecting both devices (USB audio interface + USB control surface) requires 2 USB ports, so laptops with only 2 USB ports would then lack USB ports to connect hard disks, USB keys or a USB mouse.
- Page 20 - 2 audio modes: 2 in/6 out audio mode in addition to the 4 in/4 out mode DeeJay Trim 4&6 has a 2 in/6 out mode in addition to the standard 4 in/4 out mode, allowing you to export a computer mix to a 6-channel analog mixer.
-
Page 21: Technical Support
8. TECHNICAL SUPPORT If you encounter a problem with your product, please go to http://ts.hercules.com and select your language. From there you will be able to access various utilities (Frequently Asked Questions (FAQ), the latest versions of drivers and software) that may help to resolve your problem. If the problem persists, you can contact the Hercules products technical support service (“Technical Support”): By email:... -
Page 22: Warranty Information
(2) years from the date of purchase and are subject to the conditions set forth in this limited warranty. In no event shall Guillemot Corporation S.A. - Page 23 Guillemot Corporation S.A. reserves the right to make changes to specifications at any time and without notice. The information provided by this document is believed to be accurate and reliable. However, no responsibility is assumed by Guillemot Corporation S.A. either for its use or for the infringement of patents or other rights of third parties resulting from its use.
- Page 24 ENVIRONMENTAL PROTECTION RECOMMENDATION At the end of its working life, this product should not be disposed of with standard household waste, but rather dropped off at a collection point for the disposal of Waste Electrical and Electronic Equipment (WEEE) for recycling. This is confirmed by the symbol found on the product, user manual or packaging.
Need help?
Do you have a question about the DEEJAY TRIM 4 and is the answer not in the manual?
Questions and answers