
Summary of Contents for tracktion F-em
- Page 1 F-em Frequency Modulation Synthesizer USER GUIDE TRACKTION COMPANY | www.tracktion.com...
-
Page 2: Credits
F-em User Guide Credits Programming: Wolfram Franke Additional Programming: David Rowland User Interface Design: Sasha Radojevic Sound Design and Sample Content: Alessandro Cardinale, Ed Ten Eyck, Jay de Miceli, Klaus-Peter Rausch (KPR), Stranjah, Vasil Ivanov (The Editor), Yuli Yolo Manual: Wolfram Franke, Holger Steinbrink... -
Page 3: Table Of Contents
F-em User Guide Table of Contents Credits Table of Contents 1. Introduction Some Basics 2. Installation & Authorisation 2.1 Windows PC 2.2 macOS 2.3 Linux Ubuntu 2.4 Authorisation 3.Basic Operations 3.1 Loading Instruments on the Browser Page 3.2 Saving Instruments 3.3 The Macro Parameters in the Browser Page... -
Page 4: Introduction
We hope you enjoy it as much as we do, have a lot of fun with it and make great music with it. F-em is a premium quality instrument that combines an advanced FM synthesis engine with a stunning array of programming options. -
Page 5: Some Basics
In F-em, each operator offers synchronisation, a Pitch LFO and a Level LFO as well as a Pitch envelope (with Level Scaling) and a Level envelope. Besides this, 2 sample oscillators and 2 filters are available for FM purposes. -
Page 6: Installation & Authorisation
2. Installation & Authorisation The installation including all sample and sound data requires approximately 2 GB space on your hard drive. F-em can be installed and unlocked on up to 4 different computers with a single license. 2.1 Windows PC ✎... -
Page 7: Authorisation
To authorize the plugin on Linux, you must use the offline authorization method. 2.4 Authorisation F-em uses a software based copy protection and can only run with an activated license. After installation, please load F-em as instrument within your DAW. The plug-in is currently locked and running in demo mode (a noise occurs periodically). -
Page 8: Basic Operations
F-em User Guide 3. Basic Operations 3.1 Loading Instruments on the Browser Page Click on the folder button in the head section to open the Browser section. Here you can quickly locate e.g. categories or styles of Instruments by selecting one or more tag. -
Page 9: Saving Instruments
Instrument library. The file ending contains „.fminst“. A newly saved preset is appended to the end of the file browse list. When launching F-em, the files are scanned starting with your user's instruments folder, followed by the public instruments folder (the one with the factory instruments). This results in the order that your creations come first followed by the ones from the... - Page 10 The Virtual Keyboard F-em provides a virtual keyboard with 128 keys. Click on a key to play the corresponding note. The vertical position of the initial click of the key determines the velocity.
-
Page 11: The User Interface
F-em User Guide 4. The User Interface F-em is divided into different sections which are described in detail within the next chapters. The Header section (1) offers basic instrument functions. The Main Edit (2) section includes lot of controls to edit a Sound Layer in detail. -
Page 12: Header Section
Instrument. You can also change the name of the Instrument during the storing process. • The Master Volume dial allows you to adjust overall volume of F-em. The meter left besides the Volume dial displays the outgoing audio signal. • Click on the Global button (gear symbol) to open a pop-up window with additional parameters (see picture on the right). -
Page 13: Keyboard Section
Sounds) to open the folder where the sounds or samples are placed. If you want to move the preset/sample content, you need to show F-em the new data path. This can be done within the Locations window. • Install Content Pack - If you have downloaded a content pack outside of the Tracktion Download Manager, click this button to locate and install the pack. -
Page 14: Master Section
(and Unison is set to 1). • Voices: Determines the maximum number of voices that F-em produces (up to 256 voices, default is 40). Decreasing the number of voices improves efficiency and therefore reduces load on CPU. If voice count is set too low, then “voice stealing”... -
Page 15: Working With Layers
F-em User Guide 4.5 Working with Layers F-em offers 4 Layers. Each Layer offers a full range FM synthesis engine, an equalizer, an arpeggiator, an effect section and comprehensive modulation options as LFOs, sources and modifiers. Finally, the audio signal of the 4 Layers is mixed together. -
Page 16: The Main Edit Section
View. Read more about modulations in the corresponding chapter on page 49. 5.1 Basic Sound Editing Operations For deeper sound editing, it is useful to know, how F-em is structured and how to select subpages. Here is a short overview, how to edit a sound: •... -
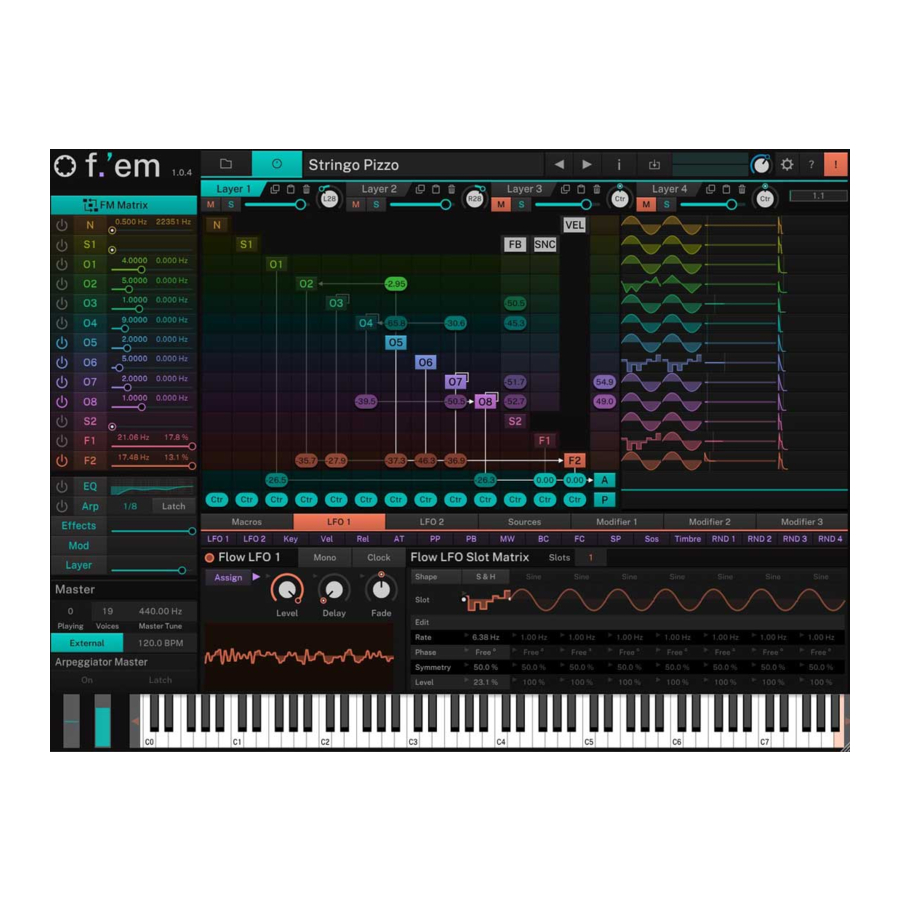
Page 17: The Fm Matrix
F-em User Guide 5.2 The FM Matrix To open the FM Matrix page, click on the FM Matrix selection button. The FM Matrix page with a simple FM connection Here, you setup you FM connections. As you might know, each operator... - Page 18 F-em User Guide corresponding Sync selection field in the SNC column and move the mouse up or down. Each operator can be controlled by velocity. To do so, click on the corresponding velocity selection field in the VEL column and move the mouse up or down.
-
Page 19: Noise Generator
F-em User Guide 5.3 Noise Generator On this page, you find the noise generator controls. To open this page, click on the N selection field in the left section. Each Layer features its own noise generator. • Noise Activation: Click on this... -
Page 20: Operator 1 To
F-em User Guide 5.4 Operator 1 to 8 On these pages, you find the Operator controls. To open an Operator page, click on the corresponding selection field O1 to O8 in the left section. Each Layer features its own set of 8 operators. Because every Operator features the same parameters, it will be described at once. -
Page 21: Sample Oscillator 1 And
F-em User Guide of the waveform if you want a sharp click on note start. This is an easy and fast way to get nice and punchy bass drum or percussion sounds. You can reduce the click volume by moving Startphase away from this maximum magnitude until you are happy with the result. - Page 22 Clicking on the Sample Selection button opens a browser window where you can toggle between Preset samples which comes with F-em and User samples. The user sample list depends on the content of F-em’s user sample folder on your hard drive. To locate and open this folder, click on the Reveal button.
-
Page 23: Common Modulation Sources
F-em User Guide 5.6 Common Modulation Sources Each Operator (O1 to O8), both Sample Oscillators (S1 and S2), the Noise Generator (N) and also both Filters (F1 and F2) offer the same modulation source that will be described in detail on the next pages. - Page 24 F-em User Guide time set by Delay before it is faded out, or to start with zero amplitude before it is faded in. • Fade: Controls the fade in or fade out of the Pitch LFO waveform. When set to center, the Pitch LFO stays at its maximum amplitude forever.
- Page 25 F-em User Guide shown in the LFO waveform display. A setting of “Free” means, that the start phase is random. • Delay: Controls the time before the Level LFO waveform is faded in or out. Depending on the setting of Fade, it either...
- Page 26 F-em User Guide envelope display horizontally or vertically. Please note that a time of 0 s really means 0 s, which can result in a click. • Slope handle: Controls the slope of the respective envelope stage. These parameters are adjusted by clicking on the rounded rectangular handles in the envelope display and move it vertically.
- Page 27 F-em User Guide make useful loop settings which means lower settings for the stage loop start as for the stage loop end. • Clock: Activates the synchronization of the Envelope breakpoints to the internal clock, that is delivered by the host application.
- Page 28 F-em User Guide • Breakpoint handle: Controls the level of the respective keyboard section. These parameters can be adjusted by clicking on the corresponding breakpoint handle and moving it in the display horizontally or vertically. • Slope handle: Controls the slope of the respective area. These parameters are adjusted by clicking on the rounded rectangular handles in the display and move it vertically.
- Page 29 F-em User Guide rounded rectangular handles in the envelope display and move it vertically. The slope of the stage can be changed gradually between fully exponential when the handle is moved fully down, to linear when the handle is in the center between the previous and next stage up to an inverse exponential shape when the handle is moved fully up.
- Page 30 F-em User Guide the grid can be adjusted by the value field above the Clock button. • Velocity: Specifies how much volume level will be affected by keyboard velocity. Use this feature to give more expression to the sound. With a setting of 0.00 velocity will have no effect on the volume.
-
Page 31: Filter 1 And
(almost) unaffected, the stop band is the frequency range that is attenuated, sometimes fully. F-em offers various Filter types abbreviated LP, BP, HP or BS, followed by a number denoting the slope in decibel per octave. - Page 32 F-em User Guide its center frequency and lets frequencies pass that are further away from it. Comb = Differ from the other filter types greatly, because they don’t actually damp any part of the signal, but instead add a delayed version of the input signal to the output.
-
Page 33: Eq - Equalizer And Amp
F-em User Guide 5.8 EQ - Equalizer and Amp On this page, you find the amplifier controls as well as a 4-band equalizer. To open this page, click on the EQ selection field in the left section. Each Layer features its own equalizer and amp controls. - Page 34 F-em User Guide • Low/High Band Selection: Selects the filter type of the first and last band. A Shelf filter type looks like a normal or an inverted “S” and it sounds and works similar to a low or high pass filter with adjustable stop band attenuation or boost.
-
Page 35: Arpeggiator
F-em User Guide 5.9 Arpeggiator On this page, you find the arpeggiator controls. To open this page, click on the Arp selection field in the left section. Each Layer features its own arpeggiator. All arpeggiators can be controlled in the Arpeggiator Master section. - Page 36 All arpeggiator settings like Direction, Clock Division, Tempo etc. are performed in F-em. The MIDI file import only sets the steps that make up the arpeggiator pattern. The pattern starts at 0 (i.e. song start). The “neutral” time base is 16th but the sequence can contain arbitrary notes like 32th, 64th, quarter or half notes or anything else.
- Page 37 F-em User Guide “Descending” is the opposite of Ascending. The example would be sorted as G1, E1 and C1. • Input Velocity: Click on the Fix button to activate it (it lights turquoise). From now on, all incoming velocities will be ignored and the arpeggio notes are played with a static velocity which is determined with Value.
-
Page 38: Effects 1 To
F-em User Guide 5.10 Effects 1 to 4 To open the Effects page, click on the Effects selection field in the left section. Here, you find all parameters regarding to the four effect busses. Each Layer features its own effect bus. For each effect bus, one of 9 different effect types can be selected. - Page 39 F-em User Guide Chorus The Chorus multiplies the signal by generating delayed copies of it and slightly modulating the speed with which these delayed signals are played back resulting in a detune effect. The signal then sounds like an ensemble or, as the name says, a chorus.
- Page 40 F-em User Guide Phaser The Phaser creates 2, 4, 6, 8, 10 or 12 phase- shifted signal copies creating equally spaced peaks and dips in the frequency spectrum. These phase-shifters are modulated in a way that a sweeping effect is created.
- Page 41 On band stop types, it narrows the stop band, which is almost inaudible. Delay F-em offers a time-based and a clock- based stereo modulation delay. Stereo means that the left and the right signals are processed independently, while modulation...
- Page 42 • Pan: Determines the stereo panning of the delay effect. Reverb Natural / Reverb Plate / Reverb Non-Linear F-em features high-quality reverb algorithms in different flavors. They all share common parameters. The reverb natural algorithm simulates the reverberation that occurs in natural rooms.
- Page 43 F-em User Guide shorter ones. If the reverb starts to sound not dense enough, you might try to increase the Decay of the sound, maybe a snare drum, by a little to smooth it out. • Mix: Adjusts the relation between the dry signal at the full left to the wet effect signal at the full right.
-
Page 44: The Mod Matrix
On the first page of the Matrix page you will find the first 15 modulation slots. Click on the “016” button to select the next 15 ones and so on. Again, you should use the comprehensive modulation assignment of F-em to easy add modulations. Read more about this in the chapter “Modulation Assignment”. -
Page 45: The Layer Page
F-em User Guide 5.12 The Layer Page Here you find the basic Sound controls as Unison Mode, Key Range and Velocity Range as well as a comprehensive Trigger management. To open this page, click on the layer selection field in the left section. Each Layer features its own Layer page. - Page 46 Click on this button, to activate the MPE option for the current Layer. The global MPE option must also activated. In this mode, F-em reacts on incoming MPD data that is sent by a MPE Controller as for example the Roli Seaboard.
- Page 47 Aftertouch modulation assignments. Trigger F-em offers a very comprehensive trigger system that allows you to control the triggering behavior for the actual Sound layer. You can use this section to create articulations or to add release sounds. The trigger table offers an overview for up to 8 logical operations that can defined.
-
Page 48: The Macros Tab
F-em User Guide Glide Enables or disables the Glide effect. “Glide” or “Portamento” describes the continuous gliding from one note to another. This effect can be created on fretless stringed instruments or some brass instruments (e.g. trombone). It is very common on synthesizers and used throughout all music styles. -
Page 49: Modulation Assignment
For this to work, you need two modulation sources, where one controls the depth of the other, in this case the LFO controlled in depth by the Modulation Wheel. F-em certainly offers this as well. Internally, this results in a multiplication between the two sources, so it doesn‘t matter which Assign button is pressed first. - Page 50 Just let your imagination go crazy. As soon as you press one of the Assign buttons, the view of the F-em sections changes slightly and the selected Assign button lights. All continuous parameter controls are now bipolar, which means that you can modulate each parameter in either direction.
-
Page 51: Modulation Sources
LFO like e.g. one of the Envelopes Decay, or the Band Frequencies of the Equalizer. The F-em Flow LFOs contain a unique functionality: Both Flow LFO provides up to 8 slots with independent parameter settings. This means, that you can set up a complex LFO arrangement based on 8 completely different LFOs which can be switched through by another modulation source, e.g. - Page 52 F-em User Guide synchronizes the rate of the LFO, to also synchronize it to the note start, set Start Phase accordingly. • Level: Controls the amount of modulation applied by the Flow LFO. • Delay: Controls the time before the Flow LFO waveform is faded in or out.
- Page 53 5) To close the LFO Curve editor, click on the X in the upper left corner. Other Mod Sources Beside the Flow LFOs and Operator LFOs and Envelopes, F-em offers a lot of other modulation sources. Click on the Sources button to call up the corresponding sources.
- Page 54 (e.g. through vibrato). Poly Pressure is unipolar. Poly pressure is an important modulation source when using the MPD (MIDI Polyphonic Expression) option of F-em. • Controllers sources: • The Pitch Bend wheel or some similar control found on most MIDI keyboards.
- Page 55 • Random sources (RND 1, 2, 3, 4): Upon playing a note, F-em generates 4 random values for this voice that you can use to create slight deviations resulting e.g. in a livelier sound. These values are held as long as the voice plays, so these Random Values are 4 simple sample &...
- Page 56 F-em User Guide independently by clicking on the small A(ssign) button. The source signal an either act as unipolar or bipolar controller, depending on the status of the Bi button. Based on the assigned synthesis parameters, the pads can produce subtle sound changes as well as extrem morphings.
-
Page 57: Appendix
F-em User Guide 7. Appendix 7.1 Modifiers and their Operations Modifiers are used to generate a modulation signal by using one or two input modulation signals processed by a certain algorithm! Most modifiers use two input modulation signals, some use only one due to their nature. - Page 58 F-em User Guide Unipolarize Converts a modulation that happens between -1 and +1 to between 0 and 1. Note that the result is not always the same compared to e.g. an LFO with unipolar waveform. If a bipolar LFO is set up to fade out to 0, this 0 becomes 0.5 with the Unipolarize modifier, but it would be 0 if an...
- Page 59 F-em User Guide Reverse Subtracts a from 1 or from -1 if a is smaller than zero. Values close to 0 become close to 1 and vice versa. Performs the following operation: y = a < 0 ? (-1 - a) : (1 - a) Threshold Only returns a if a is greater or equal than b, else returns 0.
- Page 60 F-em User Guide S&H Clocked (Clocked Sample & Hold) Performs the following operation: b = clockdiv(b); (The rest as Sample & Hold) Delay Performs the following operation: b = b * b * n; x[0] = a; y = x [-b];...
-
Page 61: Product Support
If you have any questions, please contact us by email: support@tracktion.com or write a request via our support form on: https://tracktion.zendesk.com/hc/en-us/requests/new Tracktion Software Corporation 11644 NE 80th St Kirkland, WA 98033 www.tracktion.com © 2021 Tracktion Software Corporation. All rights reserved.
Need help?
Do you have a question about the F-em and is the answer not in the manual?
Questions and answers