Table of Contents
Advertisement
Available languages
Available languages
Quick Links
Advertisement
Chapters
Table of Contents

Summary of Contents for Mvision HD-270CN
-
Page 3: Table Of Contents
TABLE OF CONTENTS GENERAL SAFETY GENERAL INFORMATION I. UNPACKING II. FEATURES III. REMOTE CONTROL UNIT (RCU) IV. HOW TO SETTING RCU FOR TV V. FRONT PANEL VI. REAR PANEL INSTALLING EQUIPMENT CHANNEL LIST GUIDE MENU GUIDE MAIN PAGE I. CHANNEL MANAGER II. -
Page 4: General Safety
GENERAL SAFETY WARNING Please read the following recommended instructions carefully to avoid the risk of your physical Injury before the product is operated. Do not cover the receiver and keep clear space around the receiver for sufficient. Check the receiver’s operation voltage 90~250V, 50Hz~60Hz, 12V 2.5A Adaptor Keep liquid away from the receiver. -
Page 5: General Information
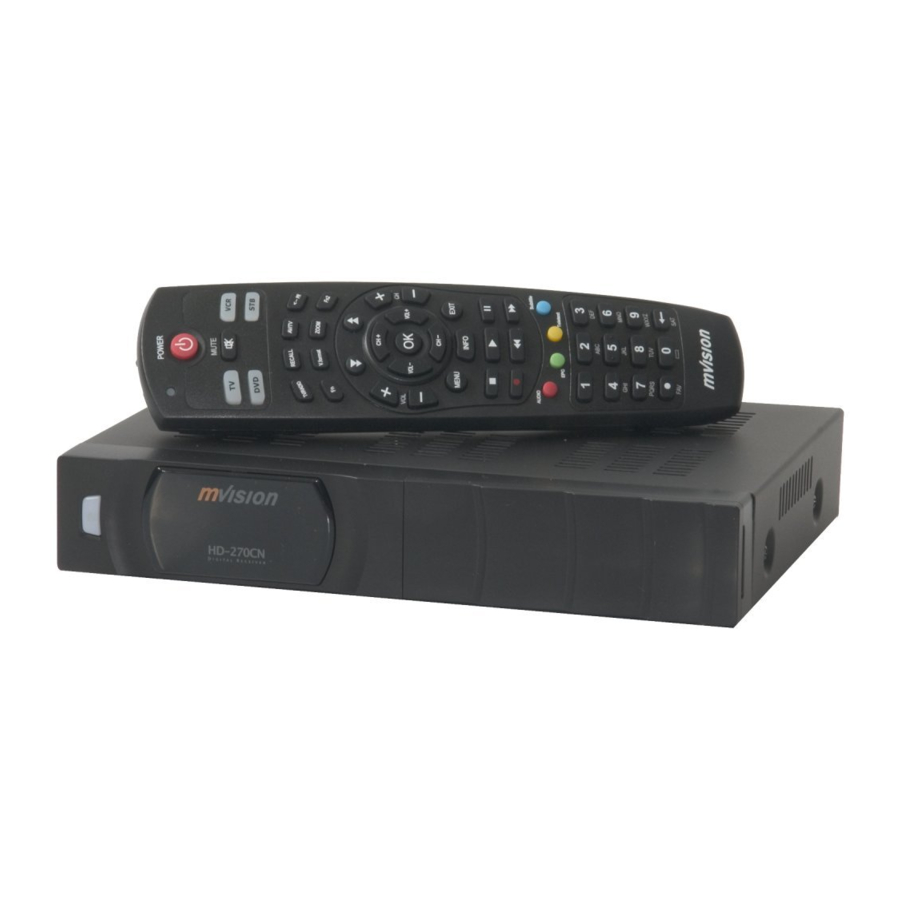
GENERAL INFORMATION I. UNPACKING Please ensure that the following items are included with the receiver in your pack- ing. 1) Remote Control Unit (RCU) 2) Batteries (2EA) 3) User’s Manual 4) 12V 2.5A Adaptor II. FEATURES ·Supports MPEG-2, MPEG-4, H.264 and fully DVB compliant ·Satellite &... -
Page 6: Remote Control Unit (Rcu)
GENERAL INFORMATION III. REMOTE CONTROL UNIT (RCU) - Page 7 GENERAL INFORMATION III. REMOTE CONTROL UNIT (RCU) 1. POWER Switch the receiver between operation and standby mode. 2. MUTE Enable or disable the audio. 3. TV Switch to TV mode. 4. DVD Switch to DVD mode. 5. VCR Switch to VCR mode. 6.
-
Page 8: How To Setting Rcu For Tv
GENERAL INFORMATION IV. HOW TO SETTING RCU FOR TV... - Page 9 GENERAL INFORMATION IV. HOW TO SETTING RCU FOR TV I. Manual Search At first, Turn on the TV 1) Press ➊Device LED Key ( STB or TV or VCR or DVD ) + ➋"OK" key at the same time during 2 or 3 seconds. Then the Device LED Lamp will be on →...
-
Page 10: Front Panel
GENERAL INFORMATION V. FRONT PANEL 1. POWER Switch the receiver power On and Standby. 2. USB To upgrade firmware / Recording. 3. SMART SLOT Insert Smart Card. NOTE: All USB 2.0 flash drive may not be compatible with the product. -
Page 11: Rear Panel
GENERAL INFORMATION VI. REAR PANEL 1. AERIAL Connect to Terrestrial antenna cable. 2. LOOP OUT Connect to another STB. 3. SAT IN Connect to Satellite antenna cable. 4. LOOP OUT Connect to another STB. 5. TV SCART Connect to TV SCART cable. 6. -
Page 12: Installing Equipment
INSTALLING EQUIPMENT This section explains several ways of connecting the receiver to your existing TV, VCR and Hi-Fi system. You can choose one of the following setups that we recommend. If you have any problem or need help, consult your dealer or service provider. Please ensure that the following items are included with the receiver in your packing. -
Page 13: Channel List Guide
CHANNEL LIST GUIDE 1. Normal Live Mode a) When you select one channel, information bar appears automatically on the screen for few seconds. This bar provides you the current channel information. b) Press INFO button to see the information during normal live mode. - Page 14 CHANNEL LIST GUIDE 4.EPG (Electronic Program Guide) a) Press EPG button on the live mode. b) EPG of the current channel appears on the screen. c) Select the channel that you want to watch program. d) It will be appear like rightside picture. 5.
-
Page 15: Menu Guide
MENU GUIDE MAIN PAGE Press the MENU button on the RCU to open Main Page on the screen. Main Page will be displayed. 1. You can move into the main page using ▲▼◀ ▶ on the RCU. 2. Press OK to confirm your selection. 3. - Page 16 MENU GUIDE I. CHANNEL MANAGER I-2. Rename 1. Using◀ ▶go to the Rename mode. 2. Select the channel that you want to rename using ▲▼ and then press OK. 3. Keypad Dialog displays on the screen. 4. Edit the name entering NUMBERS and / or WORDS in the Keypad Dialog.
-
Page 17: Installation
MENU GUIDE II. INSTALLATION This section may help you to set up antenna and scan satellite or transponder, etc. Select Installations ▲▼ in Main Page using and press OK. Press EXIT to return to the previous menu or press MENU to go to the current live channel. II-1. - Page 18 MENU GUIDE II. INSTALLATION II-2. DiSEqC Switch 1. Select Channel Search in Installation using ▲▼ and press OK. a) If you select DiSEqC Switch and press OK on the menu will be, DiSEqC Switch Page will be dis- played. b) Select the proper Satellite of each DiSEqC port (A~D) using ◀...
- Page 19 MENU GUIDE II. INSTALLATION f) Motor Control Select the position using ◀ ▶ and then press OK. Message box displays on the screen. - Store Sat position : Stores the current position of the motor for the selected satellite. - Goto Sat Position : Moves the motor to the stored position of the selected satellite.
- Page 20 MENU GUIDE II. INSTALLATION II-4. Terrestrial Search ▲▼ 1. Select Channel Search in Installation using and press OK. 2. 1) Select the region where you are using ◀ ▶. 2) You can select searching type which you want among Auto and Manual using◀ ▶. 3) Auto a) Select ‘Search’on the Screen and pres OK button to scan channels.
- Page 21 MENU GUIDE II. INSTALLATION 3. Playing the Movie File by Home Streaming a) Press “Fn” key of RCU in normal view of STB and then the movie file list in PC will be appeared in TV Screen. b) Select the file which you want to see by using navigation keys of RCU and press “OK”...
-
Page 22: Options
MENU GUIDE III. OPTIONS This section may help you to set up OSD language, time, etc. Select Options in Main Page using ▲▼ and press OK. Press EXIT to return to the previous menu or press MENU to go to the current live channel. III-1. - Page 23 MENU GUIDE III. OPTIONS III-2. Control Panel 1. Select TV Setup in Options using ▲▼ and press OK. a) HD Type - Select HD video Output. b) TV Type - Select your TV type. c) Aspect Ratio - Select screen ratio. d) Screen Control - Select screen display modes.
-
Page 24: Utility
MENU GUIDE IV. UTILITY This section may help you to use USB, etc. Select Utility in Main Page using ▲▼ and press OK. · IV -1. System Information · IV -2. Timer · IV -3. Calendar IV-1. System Information This option help you to know the current S/W and H/W version. -
Page 25: Accessory
ME NU GUIDE V. ACCE SSOR Y This section may help you to use USB , etc. Select Utility in Main Page using and press OK. V - 1. USB · V - 2. Smart Card · V - 3. Network / Videoclub ·... -
Page 26: Pvr Guide
PVR GUIDE PVR GUIDE This section may help you how to use PVR function on this STB. I. Recommended Devices If you want to use PVR function, you need to prepare equipment as below. - External USB Hard Disk Drive. - Flash memory stick - Format Type: FAT16/32 (System does not support NTFS and other file system) - Page 27 PVR GUIDE PVR GUIDE II. Record Function II-2 Instant Recording - Press “RECORD button” on RCU to start recoding program. - While Recoding program - Press “PAUSE” key to execute “Time Shift” - You can use “LEFT/RIGHT button” to view desired time while recoding program.
- Page 28 PVR GUIDE PVR GUIDE III. Playback Function - To play previously recorded program, press “Play button”on RCU. - Use the arrow buttons to select the file which you want to play and press “OK button” to play. - While Playing program. - If you press “LEFT/RIGHT button”...
- Page 29 PVR GUIDE PVR GUIDE V. Time Shift Function - If you want to execute “Time Shift” in Live mode You should set “On” of Time Shift In PVR Option (Accessory → PVR → TimeShift “ON”). - To star Time Shift in Live mode, press “PAUSE” to start. - Time shift will played during 30 minutes in Live Mode.
- Page 30 PVR GUIDE PVR GUIDE VII. MP3 Play - Select MP3 file which you want to play in USB menu. - After you select MP3 file, MP3 play window will be executed. VIII. JPG View - Select JPG file which you want to see in USB menu. - Press OK to see the JPG which you want to.
- Page 31 PVR GUIDE PVR GUIDE X. How to play the record by PVR of 'HD-XXX' in PC or Divx Player X-1 How to play in PC A) Play KM Player. B) Select Language. 1) Click right button of Mouse → Language → your lan- guage.
- Page 32 PVR GUIDE PVR GUIDE X-3 How to Convert the file by Divx Manager A) Play Divx Manager. 1) Setting → Model →Rapsody RSH-250/350 B) Select the folder where the file that you want to convert is. Then the file's information will appear. C) And select the file which you want to convert and select “Convert”.
-
Page 33: Troubleshooting
TROUBLESHOOTING Solution Problem Nothing appears on the Front ·Check that the power cable is plugged into the power sock- Panel or No power supply ·Check the dish and adjust it. No Picture ·Check the cable connection and correct it. ·Check channel and video output. ·Check the volume level of the TV and receiver. -
Page 34: Specifications
SPECIFICATIONS I.Conditional Access Module Interface Specification Item SMART CARD 2 SLOTS, ISO 7816, GSM11.11 and EMV (payment systems) compatibility II. Tuner & Channel (DVB-S2) Specification Item 1 × F Type, IEC169-24, Female Type Frequency Rage 950MHz to 2150MHz RF Impedance 75 Ohm unbanlanced Signal Level -65 to -25 dBm... - Page 35 SPECIFICATIONS V. MPEG Transport Stream & A/V Decoding Item Specification Transport Stream 13818-1 MPEG-2, H.264/AVC Transport stream Specification Profile Level MPEG-2 MP@ML, MP@HL, MPEG-4 H.264/AVC Input Rate Max. 90Mbit/s Aspect Ratio 4:3, 16:9, Letter Box Frame Rate 25Hz for PAL, 30Hz for NTSC Video Resolution 576i, 576p, 720p, 1080i Teletext...
- Page 38 INDICE SEGURIDAD GENERAL INFORMACIÓN GENERAL I. DESEMBALAJE II. CARACTERISTICAS III. MANDO A DISTANCIA(RCU) IV. COMO CONFIGURAR EL MANDO A DISTANCIA CON LA TV V. PANEL FRONTAL VI. PANEL TRASERO INSTALACIÓN DEL EQUIPO GUÍA LISTA DE CANALES GUÍA MENÚ MENÚ PRINCIPAL I .
-
Page 39: Seguridad General
SEGURIDAD GENERAL AVISO Por favor, leer las siguientes recomendaciones atentamente para evitar el riesgo de posi- bles daños del equipo. No cubrir el receptor y mantener limpio el espacio alrededor del equipo. Comprobar la tensión de entrada al receptor AC 90~240V, 50Hz~60Hz, 12V 2.5A Adaptor Mantener los lÍquidos lejos del receptor. -
Page 40: Información General
INFORMACIÓN GENERAL I.DESEMBALAJE Por favor, asegurarse de que los siguientes articulos están incluidos con el receptor. 1) Mando a distancia (RCU) 2) Pilas (2EA) 3) Manual de instrucciones 4) 12V 2.5A Adaptor II. CARATERISTICAS ·Soporta MPEG-2, MPEG-4, H.264 y toda la Norma DVB ·Receptor Digital HD Combo (Satelite y Terrestre) ·2 Lectores de Tarjetas ·DiSEqC 1.0, 1.1, 1.2 y USALS... -
Page 41: Mando A Distancia(Rcu)
INFORMACIÓN GENERAL III MANDO A DISTANCIA (RCU) - Page 42 INFORMACIÓN GENERAL III MANDO A DISTANCIA (RCU) 1. POWER Conmuta al receptor entre operativo y en modo stand by. 2. MUTE Habilita o deshabilita el audio. 3. TV Modo de TV. 4. DVD Modo de DVD. 5. VCR Modo de VCR. 6.
- Page 43 INFORMACIÓN GENERAL IV. COMO CONFIGURAR EL MANDO A DISTANCIA A LA TV...
-
Page 44: Como Configurar El Mando A Distancia Con La Tv
INFORMACIÓN GENERAL IV. COMO CONFIGURAR EL MANDO A DISTANCIA A LA TV I. Búsqueda manual En primer lugar, encienda su televisor. 1) Pulse el botón ➊( STB o TV o VCR o DVD ) + ➋"OK" al mismo tiempo durante 2 o 3 segundos. La luz del botón seleccionado se quedara fija y entrará... -
Page 45: Panel Frontal
INFORMACIÓN GENERAL V. PANEL FRONTAL 1. POWER Conmuta el receptor entre encendido y Standby. 2. LECTOR DE TARJETAS Insertar Tarjeta. 3. USB Conectar al Puerto USB. Nota: No todas las “memorias USB 2.0” son compatibles con nuestro producto. -
Page 46: Panel Trasero
INFORMACIÓN GENERAL VI. PANEL TRASERO 1. AERIAL Conectar al cable de antena Terrestre. 2. LOOP OUT Conectar a otro STB (receptor). 3. SAT IN Conectar al cable de antenna de Satélite. 4. LOOP OUT Conectar a otro STB (receptor). 5. TV SCART Conectar al cable EUROCONECTOR TV. -
Page 47: Instalación Del Equipo
INSTALACIÓN DEL EQUIPO Esta sección explica varias maneras de conectar el receptor a tu TV, VCR y sistema HI-FI. Se puede elegir una de las siguientes configuraciones que recomendamos. Si tiene algún problema ó necesita ayuda, consulte a su distribidor ó punto de venta. Por favor comprobar que los siguientes articulos están incluidos con el receptor en su caja. -
Page 48: Guía Lista De Canales
GUÍA LISTA DE CANALES 1. Modo de vista normal a) Cuando se selecciona un canal, la barra de información aparece automáticamente en la pantalla por unos pocos segundos. Esta barra proporciona la información del canal actua. b) Presionar la tecla INFO para ver la información durante el modo de vista normal. - Page 49 GUÍA LISTA DE CANALES 4.EPG (Guía Electrónica de Programas) a) Presionar la tecla EPG en el modo de vista normal. b) Aparecerá la EPG del canal actual en la pantalla. c) Seleccionar el canal deseado para ver la EPG. d) Aparecerá como la foto que esta en la derecha. 5.
-
Page 50: Guía Menú
GUÍA MENÚ MENÚ PRINCIPAL Presionar la tecla MENU del mando a distancia para abrir la pantalla de la página principal La página principal será mostrado. 1. Puede moverse dentro del menú principal presionando ▲▼◀ ▶ del mando a distancia. 2. Presionar OK para confirmar la selección. 3. - Page 51 GUÍA MENÚ I. GESTOR DE CANALES I-2. Renombrar 1. Utilizando las teclas ◀ ▶ ir al modo de Renombrar. 2. Seleccionar el canal que se quiere renombrar utilizando ▲▼ presionar OK. 3. Se visulaizará un teclado en la pantalla. 4. Editar el nombre utilizando el teclado NÚMERICO y /ó PALABRAS . 5.
- Page 52 GUÍA MENÚ II. INSTALACIÓN Esta sección ayuda a configurar la antena y buscar satélite ó transpondedores, etc…Seleccionar instalación en el menú principal y presionar OK. Presionar EXIT para ir al menú principal ó presionar MENU para volver al canal actual que se estaba viendo. II-1.
- Page 53 GUÍA MENÚ II. INSTALACIÓN II-2. Conmutador DiSEqC 1. Selecionar buscar canales en el modo de instalación utilizando ▲▼ y presionar OK. a) Si se presionar DiSEqC Switch y presionar OK en el menu y aparecerá la página de Conmutación de DiSEqC en la pantalla.
- Page 54 GUÍA MENÚ II. INSTALACIÓN f) Control de Motor Seleccionar la posición utilizando ◀ ▶y presionar OK. Aparecerá en la pantalla una caja de mensaje. - Memorizar la Posición del motor para el satélite seleccionado. - Ir a Posición Satélite : Mover el motor a la posición memorizada del satélite seleccionado.
- Page 55 GUÍA MENÚ II. INSTALACIÓN II-4. Terrestre Buscar 1. Seleccionar Buscar Canales en Instalación usando ▲▼ y presionar OK 1) Seleccionar la region desde donde se quiere hacer la búsqueda◀ ▶. 2) Se puede seleccionar el tipo de búsqueda entre Auto y Manual usando◀...
- Page 56 GUIA MENU II. INSTALACION 3. Reproduzca la película con home streaming. a) Pulse la tecla “Fn” y la lista de películas de su PC apare- cerá en la pantalla de su televisor. b) Seleccione el archivo que usted desea ver y presione “OK” para reproducirlo.
-
Page 57: Opciones
GUÍA MENÚ III. OPCIONES Esta sección ayuda a confugurar el idioma del OSD, hora, etc. Seleccionar Opciones en el menu principal y presionar OK. Presionar EXIT para volver al menú anterio ó presionar MENU para ir al canal actual que se estaba viendo III-1. - Page 58 GUÍA MENÚ III. OPCIONES III-2. Configuración de TV 1. Seleccionar Configuración de TV en Opciones utilizando las teclas (arriba / abajo), y presionar OK. a) Tipo HD - Seleccionar la salida de video HD. b) Tipo TV - Seleccionar el tipo de TV. c) Relación de aspecto de pantalla - Seleccionar el ratio de pantalla.
-
Page 59: Utilidad
GUÍA MENÚ IV. UTILIDAD Esta sección ayuda a usar USB etc. Seleccionar ▲▼ Utilidades en la Página Pricipal utilisando · IV -1. Información de Sistema · IV -2. Programador · IV -3. Calendario IV-1. INFORMACIÓN DE SISTEMA Esta opcion ayuda a saber la actual versión de S/W y H/W. También se le informa del nombre del producto. -
Page 60: Accesorios
GUÍA ME NÚ V. ACCE SOR IOS Esta sección ayuda a usar USB etc. Seleccionar Utilidades en la Página Pricipal utilizando V - 1. USB · V - 2. (Smart Card) Menú Tarjeta · V - 3. Red / Videoclub ·... -
Page 61: Pvr Guide
PVR GUIDE PVR GUIDE I. Dispositivos Recomendados - Unidad de Disco Duro Externo USB. - Flash memory stick. - Tipo de Formato: FAT16/32 (el sistema no soporta NTFS, ni otros ficheros desistema). II. Función de Grabación II-1 Programar Grabación 1. Programar la Hora de Grabación : Configurar la hora de grabación en ”... - Page 62 PVR GUIDE PVR GUIDE II. Función de Grabación II-2 Grabación inm ediata - Presionar la “tecla RECORD” en el mando a distancia para empezar la grabación. - Mientras se está grabando el programa. - Presionar la tecla “PAUSE” para ejecutar la opción de “Time Shift”.
- Page 63 PVR GUIDE PVR GUIDE III. Función Reproducción - Para reproducir los programas grabados previamente, pre- sionar la tecla “Play” en el mando a distancia. - Utilizar las teclas cursores (arriba / abajo) para seleccionar el fichero que se desea reproduciry presionar la tecla “OK”. - Mientras se está...
- Page 64 PVR GUIDE PVR GUIDE V. Función TimeShift - Si se quiere ejecutar “Time Shift” en modo en vivo se debe configurar en “Encendido (On)” en la Opción PVR del Time Shift (Accesorios → PVR → TimeShift “ON”). - Para empezar el Time Shift en modo en vivo, presionar “PAUSE”...
- Page 65 PVR GUIDE PVR GUIDE VII. Reproducció n MP3 - Seleccionar el fichero MP3 que se desea reproducir dentro del menú USB. - Después de seleccionar el fichero MP3, aparecerá una ven tana de reproducción de ficheros MP3. VIII. Reproducir ficheros JPG - Seleccionar el fichero JPG que se desea ver dentro del menú...
- Page 66 PVR GUIDE PVR GUIDE X. Como reproducir “el fichero grabado en la opció n PVR del HD-XXX” en el PC ó DivX Player X-1 Como Reproducir desde el PC A) Abrir el reproductor KM Player. B) Seleccionar el Idioma. 1) Pulsar el botón derecho del ratón → Idioma → elegir idioma C) Cambiar la extension del nombre del fichero grabado a “.mpg”.
- Page 67 PVR GUIDE PVR GUIDE X-3 Com o c onvertir el f iche ro en el Divx Manager A) Abrir el programa Divx Manager. 1) Setting → Model → Rapsody RSH-250/350 B) Seleccionar la carpeta donde se encuentra el fichero que se desea convertir.
-
Page 68: Solución De Problemas
SOLUCIÓN DE PROBLEMAS Solución Problema Nada aparece en el display ·Comprobar la conexión del cable de alimentación con el frontal ó no enciende la enchufe de la pared. fuente de alimentación ·Comprobar la antena y ajustarla. No hay imagen ·Comprobar la conexión del cable y corregirlo. ·Comprobar el canal y la salida de Vídeo. -
Page 69: Especificaciones
ESPECIFICACIONES I.Conditional Access Module Interface Specification Item SMART CARD 2 SLOTS, ISO 7816, GSM11.11 and EMV (payment systems) compatibility II. Tuner & Channel (DVB-S2) Item Specification 1 × F Type, IEC169-24, Female Type Frequency Rage 950MHz to 2150MHz RF Impedance 75 Ohm unbanlanced Signal Level -65 to -25 dBm... - Page 70 ESPECIFICACIONES V. MPEG Transport Stream & A/V Decoding Item Specification Transport Stream 13818-1 MPEG-2, H.264/AVC Transport stream Specification Profile Level MPEG-2 MP@ML, MP@HL, MPEG-4 H.264/AVC Input Rate Max. 90Mbit/s Aspect Ratio 4:3, 16:9, Letter Box Frame Rate 25Hz for PAL, 30Hz for NTSC Video Resolution 576i, 576p, 720p, 1080i Teletext...
- Page 73 INDEX ALGEMENE VEILIGHEID ALGEMENE INFORMATIE I. INHOUD PAKKET I I. SPECIFICATIES III. AFSTANDSBEDIENING (RCU) IV. AFSTANDSBEDIENING INSTELLEN VOOR TV V. VOORKANT PANEEL VI. ACHTERKANT PANEEL INSTALLATIE KANALENLIJST MENU HOOFDMENU I. KANALENLIJST II. INSTALLATIE III. OPTIES IV. UTILITY V. ACCESSOIRES PVR Guide PROBLEMEN OPLOSSEN SPECIFICATIES MERKEN LIJST...
- Page 74 ALGEMENE VEILIGHEID WAARSCHUWING Lees eerst de veiligheidsvoorschriften om eventuele schade aan u of uw installatie te voorkomen. Bedek de ontvanger niet en houd de omringende omgeving schoon. Controleer de ingangsspanning AC 90~240V, 50Hz~60Hz,12V 2.5A Adaptor Houd vloeistoffen op afstand van uw ontvanger. De ontvanger mag niet worden blootgesteld aan druppels of spetters, plaats ook geen voorwerpen met vloeistoffen op de ontvanger.
- Page 75 ALGEMENE INFORMATIE I. INHOUD PAKKET Verzeker u zelf dat de volgende voorwerpen in de verpakking zitten. 1) Afstandsbediening (RCU) 2) Batterijen (2EA) 3) Handleiding 4) 12V 2.5A Adaptor II. SPECIFICATIES ·Supports MPEG-2, MPEG-4, H.264 and fully DVB compliant ·Satellite & Terrestrial receiver ·2 Slot smart card ·DiSEqC 1.0, 1.1, 1.2 and USALS ·Aspect ratio adjustment 4:3 (16/9 crop), 4:3 (16/9 letterbox), 16:9 (4/3 pillar box)
- Page 76 ALGEMENE INFORMATIE III. AFSTANDSBEDIENING (RCU)
- Page 77 ALGEMENE INFORMATIE III. AFSTANDSBEDIENING (RCU) 1. POWER Ontvanger AAN of UIT. 2. MUTE Geluid AAN of UIT. 3. TV TV mode. 4. DVD DVD mode. 5. VCR VCR mode. 6. STB STB mode. 7. TV / RADIO Schakelt tussen TV en Radio. 8.
- Page 78 ALGEMENE INFORMATIE IV. AFSTANDSBEDIENING INSTELLEN VOOR TV...
- Page 79 ALGEMENE INFORMATIE IV. AFSTANDSBEDIENING INSTELLEN VOOR TV I. Handmatig zoeken In eerste instantie zet de tv aan. 1) Druk op Device LED Key ➊(STB of TV of VCR of dvd) + ➋"OK" -toets, op hetzelfde moment, gedurende 2 of 3 seconden.
- Page 80 ALGEMENE INFORMATIE V. VOORKANT PANEEL 1. POWER Schakelt de ontvanger tussen Aan en Stand By. 2. Kaartlezer Slot Voer smartcard in. 3. USB Verbinding voor USB Memory. NOOT: Niet alle “USB 2.0 geheugens” zijn geschikt voor ons product.
- Page 81 ALGEMENE INFORMATIE VI. ACHTERKANT PANEEL 1. AERIAL Verbinding met terrestrische antennekabel. 2. LOOP OUT Verbinding met andere ontvanger. 3. SAT IN Verbinding met satellite antennekabel. 4. LOOP OUT Verbinding met andere ontvanger. 5. TV SCART Verbinding naar TV SCART kabel. 6.
- Page 82 INSTALLATIE Dit hoofdstuk beschrijft verschillende mogelijkheden voor het aansluiten van de ontvanger met een TV, VCR en HI-FI systeem. U kunt kiezen uit de volgende configuraties die wij beschrijven. Mocht u toch problemen ondervinden dan verwijzen wij u voor eventuele hulp naar de distributeur of verkooppunt.
- Page 83 KANALENLIJST 1. Normaal Beeld a) Als u een kanaal kiest verschijnt automatisch een informatiebalk in beeld gedurende een aantal seconden. Deze balk geeft informatie over het betreffende kanaal. b) Selecteer de INFO knop voor informatie tijdens normaal gebruik. 2. Eenvoudige kanalenlijst a) Druk op de OK knop tijdens normaal gebruik om naar de kanalenlijst te gaan.
- Page 84 KANALENLIJST 4. EPG (Elektronische Programma Gids) a) Druk op de EPG knop tijdens normaal gebruik. b) Er verschijnt een scherm met de EPG van het bewuste kanaal. c) Selecteer het gewenste kanaal om de EPG te tonen. e) Verschijnt net als de foto rechts. 5.
- Page 85 MENU HOOFDMENU Druk op de MENU knop om het scherm van het hoofdmenu te activeren Het hoofdmenu scherm verschijnt. 1. U kunt door het hoofdmenu schuiven door op de knoppen ▲▼◀ ▶ te drukken van uw afstandsbediening. 2. Druk op OK om uw selectie te activeren. 3.
- Page 86 MENU I. KANALENLIJST I-2. HERBENOEMEN 1. Door gebruik te maken van de knoppen ◀ ▶ kunt u naar Herbenoemen gaan. 2. Selecteer het kanaal dat u wilt herbenoemen door gebruik te maken van ▲▼en druk op OK. 3. Er verschijnt een toetsenbord op het scherm. 4.
- Page 87 MENU II. INSTALLATIE Hier kunt u de antenne configureren en zoeken naar satellieten of transponders, etc. Selecteer installatie in het hoofdmenu en druk op OK. Druk op EXIT om terug te keren naar het vorige menuscherm of druk op MENU om terug te keren naar het kanaal dat u aan het bekijken was.
- Page 88 MENU II. INSTALLATIE II-2. DISEQC SWITCH 1. Selecteer de optie kanalen zoeken door gebruik te maken van ▲▼ en druk op OK. a) Als u DiSEqC Switch kiest en op OK drukt, verschijnt er een scherm met DiSEqC opties in beeld. b) Selecteer de poorten (A~D) van elke gewenste satelliet door gebruik te maken van ◀...
- Page 89 MENU II. INSTALLATIE f) Motor Controle Selecteer de positie door gebruik te maken van ◀ ▶ en druk op OK. Er verschijnt een scherm met een bericht in beeld. - Opslaan sat positie : Sla de positie van de motor voor de gewenste satelliet op.
- Page 90 MENU II. INSTALLATIE II-4. TERRESTRISCH ZOEKEN 1. Selecteer Kanalen Zoeken in Installatie met ▲▼ en druk op OK. 2. 1) Selecteer de regio waar u gebruik maakt van ◀ ▶. 2) U kunt het type zoeken zelf bepalen, zowel auto als handmatig met ◀...
- Page 91 MENU II. INSTALLATIE 3. Het film bestand afspelen via Home Streaming a) Druk de "Fn" knop van afstandsbedieing in selecteer “normale weergave” vervolgens zal er een film bestands lijst verschijnen. b) Selecteren het bestand dat u wilt zien van navigatie toetsen op de afstandsbediening en druk op "OK"...
- Page 92 MENU III. OPTIES Deze optie helpt u bij het instellen van de menutaal, tijd, etc. Selecteer Opties in het hoofdmenu ▲▼en druk op OK. Druk op EXIT om terug te keren naar het vorige menuscherm of druk op MENU om terug te keren naar het kanaal dat u aan het bekijken was.
- Page 93 MENU III. OPTIES III-2. TV CONFIGURATIE 1. Selecteer de TV configuratie in Opties door gebruik te maken van ▲▼en druk op OK. a) HD Type - Selecteer HD video Uitgang. b) TV Type - Selecteer uw TV type. c) Aspect Ratio - Selecteer screen ratio.
- Page 94 MENU IV.UTILITY Hier kunt u hulp krijgen om de USB te gebruiken etc. Selecteer Utility in het hoofdmenu met behulp van ▲▼ en druk op OK. ·IV - 1. SYSTEEM INFORMATIE · IV -2. TIMER · IV -3. KALENDER IV-1. SYSTEM INFORMATION Met behulp van deze optie kunt u zien wat de actuele S/W en H/W is.
- Page 95 ME NU V. ACCE SSOIR E S Hier kunt u hulp krijgen om de USB te gebruiken etc. Selecteer Utility in het hoofdmenu met behulp van druk op OK. V - 1. USB · V - 2. Smart Card · V - 3.
- Page 96 PVR GUIDE PVR GUIDE I. Aanbevolen Medium - Externe USB Harde Schijf. - Flash memory stick. - Format Type: FAT16/32 (Systeem accepteerd geen NTFS en andere file systemen. II. Opname Functies II-1 Geprogrammeerde opnames 1. Tijd Opnames : Stel gewenste opname tijd in in “Utility → Timer” om opeen gewenste tijd op te nemen.
- Page 97 PVR GUIDE PVR GUIDE II. Opname Functies II-2 Onmiddelijke Opname - Selecteer de rode opname knop om de opname te starten. - Terwijl u opneemt. - Selecteer de “PAUSE” knop om “Time Shift” op te starten. - U kunt de “links/rechts” knop gebruiken tijdens de opname. Selecteer “OK knop”...
- Page 98 PVR GUIDE PVR GUIDE III. Playback Functie - Om de eerdere opnames af te spleen selecteer “Play knop” van uw afstandsbediening. - Gebruik de pijlen om de gewenste opname te selecteren door middel van de OK knop. - Tijdens het kijken. - Indien u de links/rechts knop selecteert tijdens opname of afspelen zal het huidige program waar u naar kijkt stoppen en de opname zal beginnen met afspelen op de gewenste...
- Page 99 PVR GUIDE PVR GUIDE V. TimeShift Functie - Indien u de timeshift wil inschakelen moet u in onderstaand menu de timeshift op AAN zetten. (Accessoires → PVR → TimeShift “AAN”). - Om de Time Shift te starten tijdens kijken selecteert u de “PAUZE”...
- Page 100 PVR GUIDE PVR GUIDE VII. MP3 Play - Selecteer MP3 file die u af wilt spelen. - Na het afspelen van de MP3 file, zal de MP3 scherm tevoor schijn komen. VIII. JPG Play - Selecteer JPG file die u wilt bekijken in het USB menu. - Selecteer “OK”...
- Page 101 PVR GUIDE PVR GUIDE X. Opgenomen files afspelen op uw PC of DIVX speler. X-1 Afsp ele n op PC. A) Afspelen KM Player. B) Selecteer Taal. 1) Selecteer rechter muis knop → Language → uw taal. C) Verander de extensie van de opname in “*.mpg”. ※...
- Page 102 PVR GUIDE PVR GUIDE X-3 Converteren met DIVX manager. A) Afspelen Divx Manager 1) Setting → Model → Rapsody RSH-250/350 B) Selecteer de bestemmingsfolder waar u de geconver teerde files wilt opslaan. C) Selecteer de files die u wilt converteren en selecteer “Convert”.
- Page 103 PROBLEMEN OPLOSSEN Oplossing Probleem Er verschijnt niets op de ·Controleer of de stekker in het stopcontact zit. display ·Controleer de schotel en stel deze juist af. ·Controleer de kabel aansluiting. Geen beeld ·Controleer kanaal en Video uitgang. ·Controleer het volume niveau van de TV en de ontvanger. ·Controleer de MUTE status van de TV en de ontvanger.
- Page 104 SPECIFICATIES I.Conditional Access Module Interface Item Specification SMART CARD 2 SLOTS, ISO 7816, GSM11.11 and EMV (payment systems) compatibility II. Tuner & Channel (DVB-S2) Item Specification 1 × F Type, IEC169-24, Female Type Frequency Rage 950MHz to 2150MHz RF Impedance 75 Ohm unbanlanced Signal Level -65 to -25 dBm...
- Page 105 SPECIFICATIES V. MPEG Transport Stream & A/V Decoding Item Specification Transport Stream 13818-1 MPEG-2, H.264/AVC Transport stream Specification Profile Level MPEG-2 MP@ML, MP@HL, MPEG-4 H.264/AVC Input Rate Max. 90Mbit/s Aspect Ratio 4:3, 16:9, Letter Box Frame Rate 25Hz for PAL, 30Hz for NTSC Video Resolution 576i, 576p, 720p, 1080i Teletext...
- Page 108 TABELA DE CONTEÚDO SEGURANÇA GERAL INFORMAÇÕES GERAIS I. DESEMBALAGEM II. Características III. Unidade de Telecomando (RCU) IV. COMO SINTONIZAR O TELECOMANDO (RCU) PARA TV V. PAINEL FRONTAL VI. PAINEL TRASEIRO INSTALAÇÃO DO EQUIPAMENTO GUIA Lista Canal GUIA do MENU PÁGINA PRINCIPAL I .
- Page 109 GERAL DE SEGURANÇA AVISO Por favor, leia as seguintes instruções cuidadosamente recomendado para evitar o risco de danos físicos antes do seu produto é operado. Não cubra o receptor e manter em torno de espaço livre suficiente para o receptor. Verificar o funcionamento do receptor tensão 90 ~ 250V, 50Hz ~ 60Hz, 12V 2.5A Adaptor Mantenha líquidos longe do receptor.
- Page 110 INFORMAÇÕES GERAIS I. DESEMBALAGEM Verifique se os seguintes itens estão incluídos com o receptor em sua embalagem. 1) Unidade de Telecomando (RCU) 2) Baterias (2XLR3(AAA)) 3) Manual do Utilizador 4) 12V 2.5A Adaptor II. CARACTERISTICAS ·Suporta MPEG2, MPEG4, H.264 e toda a norma DVB ·Receptor satélite e terrestre ·2 Leitores Interface Comum ·DiSEqC 1.0, 1.1, 1.2 &...
-
Page 111: Informações Gerais
INFORMAÇÕES GERAIS III. Unidade de Telecomando = (RCU) -
Page 112: Unidade De Telecomando (Rcu)
INFORMAÇÕES GERAIS III. Unidade de Telecomando = (RCU) 1. POWER pôr o receptor entre funcionamento e modo de espera. 2. MUTE Liga ou desliga o som do receptor. 3. TV TV modo. 4. DVD DVD modo. 5. VCR VCR modo. 6. - Page 113 INFORMAÇÕES GERAIS IV. Como (Sintonizar o telecomando) RCU para TV.
-
Page 114: Como Sintonizar O Telecomando (Rcu) Para Tv
INFORMAÇÕES GERAIS IV. Como (Sintonizar o telecomando) RCU para TV. . Busca manual Ligue a TV. 1) Caregar na tecla do dispositivo escolhido ➊( STB ou TV ou VCR ou DVD ) e na ➋tecla "OK" ao mesmo tempo durante 2 ou 3 segundos. Em seguida, a lâmpada LED do dispositivo indicará o Modo de Ajuste. 2) Encontrar o código de três dígitos do dispositivo na lista da marca e entrar os três dígitos de acordo, um por um. -
Page 115: Painel Frontal
INFORMAÇÕES GERAIS V. PAINEL FRONTAL 1. POWER receptor ligado On e/ desligado OFF vigília. 2. LECTOR DE TARJETAS Entrada de cartão de acesso SMART SLOT 3. USB Liga a dispositivos USB. NOTA: Todas as Memórias Pen Drive USB 2.0 podem não ser compatíveis com o produto. -
Page 116: Painel Traseiro
INFORMAÇÕES GERAIS VI. PAINEL TRASEIRO 1. AERIAL Entrada que Conecta ao cabo da antena terrestre. 2. LOOP OUT Liga a outro STB (receptor). 3. SAT IN Liga a cabo da antena via satélite. 4. LOOP OUT Liga a outro STB. 5. -
Page 117: Instalação Do Equipamento
INSTALAÇÃO DO EQUIPAMENTO Esta secção explica várias maneiras de conectar o receptor ao seu actual TV, videocassete e sistema Hi-Fi. Você pode escolher uma das seguintes configurações que recomendamos. Se você tem algum problema ou precisa de ajuda, consulte o seu fornecedor ou prestador de serviços. - Page 118 GUIA Lista de canais 1. Ver Live Modo Normal a) Quando você seleccionar um canal de informação barra aparece automaticamente no ecrã durante alguns segundos. Esta barra fornece o canal actual informação. b) Pressione botão INFO para ver as informações ao vivo durante o modo normal.
- Page 119 GUIA Lista de canais 4.EPG (Electronic Program Guide) a) Pressione o botão do EPG modo de viver. b) EPG do canal actual aparece no ecrã. c) Seleccione o canal que deseja assistir programa. d) Será exibido na imagem ecrã como lado direito (rightside).
-
Page 120: Página Principal
MENU GUIA Página principal Pressione o botão MENU telecomando =RCU para abrir principal Página no ecrã. Página principal onde será exibido. 1.Você pode mover para a página principal Utilizando, ▲▼◀ ▶ sobre a RCU. 2. Pressione OK para confirmar a sua selecção. 3. - Page 121 MENU GUIA I. Gestor de canais I-2. Renomeie 1. Usando ◀ ▶ vá para o modo Renomear. 2. Escolha o canal que pretende renomear usando ▲▼ e, em seguida, pressione OK. 3. Diálogo teclado exibido na ecrã. 4. Edite o nome digitando números e / ou palavras no teclado Diálogo.
- Page 122 MENU GUIA II. Instalação Esta secção pode ajudá-lo a criar e antena digitalizar ou transponder de satélite, etc Escolha Instalações na página principal utilizando ▲▼ e pressione OK. Pressione EXIT para retornar ao menu anterior ou prima MENU para ir viver para o actual canal.
- Page 123 MENU GUIA II. Instalação II-2. DiSEqC Switch 1. Seleccione Pesquisa de canal, em Instalação usando ▲ ▼e pressione OK. a) Se você seleccionar DiSEqC Switch e pressione OK no menu será, DiSEqC Switch página será exibida. b) Seleccione o Satélite de cada porta DiSEqC (A ~ D), usando e ◀...
- Page 124 MENU GUIA II. Instalação f) Controle motor Seleccione a posição utilizando ◀ ▶e, em seguida, pressione OK. Caixa de mensagem exibe no ecrã. - Memorizar posição de satélite: Armazena a posição actual do motor para o satélite seleccionado. - Goto sábado Posição: Move o motor para a posição de armazenados satélite seleccionado.
- Page 125 MENU GUIDE II. Instalação II-4. Pesquisa Terrestre 1. Seleccione Pesquisa de canal em Instalação usando ▲▼ e pressione OK. 1) Escolha a região onde você está usando ◀ ▶. 2) Você pode seleccionar qual você quer pesquisar tipo entre Automático e manual usando ◀ ▶. 3) Auto a) Seleccione 'Procura' on no ecrã...
- Page 126 MENU GUIA II. Instalação 3. Ver o filme pelo Home Streaming a) Prima "Fn" no controle remoto no modo normal do Receptor e, em seguida a lista de arquivos dos filmes no PC aparecerá no ecrãn da TV. b) Selecione o arquivo que você deseja reproduzir usando as teclas de navegação do controle remoto e pressione "OK"...
-
Page 127: Opções
MENU GUIA III. OPÇÕES Esta secção pode ajudá-lo a configurar OSD idioma, tempo, etc Escolha Opções na Página principal utilizando ▲▼ e pressione OK. Pressione EXIT para retornar ao menu anterior ou prima MENU para ir para ver o canal actual. - Page 128 MENU GUIA III. OPÇÕES III-2. Painel de Controle. 1. 1. Seleccione Configuração na TV usando Opções ▲▼ e pressione OK. a) Tipo HD - Escolha a saída de vídeo HD. b) Tipo TV - Seleccione o seu tipo de televisor. c) Aspecto Ratio - Seleccione tela ratio.
- Page 129 MENU GUIA IV. Utilitário Esta secção pode ajudá-lo a usar USB, etc Seleccione ▲▼ Utilitário na página principal utilizando pressione OK. · IV -1. Sistema de Informação · IV -2. Temporizador · IV -3. Calendário IV-1. Sistema de Informação Esta opção ajuda-lo a conhecer a actual S / W e H / W versão.
- Page 130 ME NU GUIA V. ACESSÓRIO Esta secção pode ajudá- lo a usar USB , etc Seleccione Utilitário na página principal utilizando pressione OK. V - 1. USB · V - 2. Smart Card · V - 3. Rede / Videoclube ·...
-
Page 131: Pvr Guide
PVR GUIDE PVR GUIDE I. Dispositivo Recomendado - Externa USB Disco rígido (Hard Disk Drive). - Memória Flash (PEN memory stick) - Tipo de formato: FAT16/32 (Sistema não dá suporte a sistema de arquivos NTFS e outros). II. Função Gravação. II-1 Gravação Guardada. - Page 132 PVR GUIDE PVR GUIDE II. Função Gravação. II-2 Gravação Instantânea - Pressione o botão "RECORD(gravar)" no telecomando para iniciar a gravação do programa. - Enquanto grava o programa. - Pressione o botão "PAUSE" chave para executar o "Time Shift”. - Você pode usar o botão "LEFT / RIGHT botão" para visualizar tempo desejado enquanto recodificação programa.
- Page 133 PVR GUIDE PVR GUIDE III. Função Play = Ver. - Para ver o programa previamente gravado, prima "botão Play" no telecomando. - Utilize as teclas de seta para seleccionar o ficheiro que pretende reproduzir e prima "OK" para reproduzir. - Enquanto estiver vendo o programa. - Se você...
- Page 134 PVR GUIDE PVR GUIDE V. Função TimeShift - Se você quiser executar "Time Shift" no modo ver, Live Você deve definir "On" do Time Shift Na Opção PVR (PVR → Accessório → TimeShift "ON"). - A estrela Time Shift no modo ver Live, prima "PAUSE" para iniciar.
- Page 135 PVR GUIDE PVR GUIDE VII. Ver MP3 Play - Escolha um arquivo MP3 que você quiser ver no menu USB. - FAT32. - Depois de seleccionar um arquivo MP3,para ver o MP3 na janela será executado. VIII. Ver JPG Play - Seleccionar arquivo JPG que você...
- Page 136 PVR GUIDE PVR GUIDE X. Como ver o "o arquivo gravado pelo PVR de HD-XXX" no PC ou DivX Player X-1 Como ver no PC. A) VER KM Player. B) Seleccione o Idioma 1) Clique botão direito do mouse → Língua → Língua do seu idioma.
- Page 137 PVR GUIDE PVR GUIDE X-3 Como converter o arquivo por Divx Manager A) Ver em Divx Manager. 1) Defenir Acertos → Modelo → Rapsody RSH-250/350 B) Seleccione a pasta onde o ficheiro que pretende é convertido. Então o arquivo de informação será exibido. C) e seleccione o arquivo que você...
- Page 138 TROUBLESHOOTING Problem Solution Nothing appears on the Front ·Check that the power cable is plugged into the power socket. Panel or No power supply ·Check the dish and adjust it. ·Check the cable connection and correct it. No Picture ·Check channel and video output. ·Check the volume level of the TV and receiver.
- Page 139 SPECIFICATIONS I.Conditional Access Module Interface Item Specification SMART CARD 2 SLOTS, ISO 7816, GSM11.11 and EMV (payment systems) compatibility II. Tuner & Channel (DVB-S2) Item Specification 1 × F Type, IEC169-24, Female Type Frequency Rage 950MHz to 2150MHz RF Impedance 75 Ohm unbanlanced Signal Level -65 to -25 dBm...
- Page 140 V. MPEG Transport Stream & A/V Decoding Item Specification Transport Stream 13818-1 MPEG-2, H.264/AVC Transport stream Specification Profile Level MPEG-2 MP@ML, MP@HL, MPEG-4 H.264/AVC Input Rate Max. 90Mbit/s Aspect Ratio 4:3, 16:9, Letter Box Frame Rate 25Hz for PAL, 30Hz for NTSC Video Resolution 576i, 576p, 720p, 1080i Teletext...
- Page 143 INDICE SICUREZZA IN GENERALE INFORMAZIONI GENERALI I. IMBALLAGGIO II. CARATTERISTICHE III. TELECOMANDO (RCU) IV. COME IMPOSTARE IL TELECOMANDO PER LA TV V. PANNELLO FRONTALE VI. PANNELLO POSTERIORE INSTALLAZIONE APPARECCHIATURE GUIDA LISTA CANALI GUIDA DEI MENU PRIMA PAGINA I . CANALE MANAGER I I.
-
Page 144: Sicurezza In Generale
SICUREZZA IN GENERALE ATTENZIONE Prima di mettere in funzione tale dispositivo si prega di leggere le seguenti istruzioni con attenzione per evitare il rischio di compromettere la propria integrità fisica. Non coprire il ricevitore e mantenere un sufficiente spazio libero attorno al ricevitore. Verificare la tensione di funzionamento del ricevitore massimo 90 ~ 250V, 50Hz ~ 60Hz , 12V 2.5A Adaptor, tenere le sostanze liquide a una sufficiente distanza di sicurezza dal ricevitore. -
Page 145: Informazioni Generali
INFORMAZIONI GENERALI I. DISIMBALLAGGIO Si prega di assicurarsi che i sotto elencati elementi siano inclusi nell’imballaggio contenente il ricevitore. 1) Telecomando (RCU) 2) Batterie (2EA) 3) Manuale d'uso 4) Cavo A / V II. CARATTERISTICHE ·Supporta MPEG-2, MPEG-4, H.264 e pienamente compatibile DVB ·Ricevitore satellitare e terrestre combo ·2 Slot smart card ·DiSEqC 1.0, 1.1, 1.2 e USALS... -
Page 146: Telecomando (Rcu)
INFORMAZIONI GENERALI III. TELECOMANDO (RCU) - Page 147 INFORMAZIONI GENERALI III. TELECOMANDO (RCU) 1. POWER Commuta il ricevitore tra funzionamento e modalità standby. 2. MUTE Attiva o disattiva l'audio. 3. TV modalità TV. 4. DVD modalità DVD. 5. VCR modalità VCR. 6. STB modalità STB. 7. TV / RADIO commuta tra TV e Radio.
- Page 148 INFORMAZIONI GENERALI IV. COME IMPOSTARE IL TELECOMANDO PER LA TV...
-
Page 149: Come Impostare Il Telecomando Per La Tv
INFORMAZIONI GENERALI IV. COME IMPOSTARE IL TELECOMANDO PER LA TV I. Ricerca Manuale Per iniziare, accendere il televisore. 1) Premere il pulsante LED del telecomando ➊(TV o VCR o DVD) + ➋tasto "OK" allo stesso tempo, per 2 o 3 sec- ondi. -
Page 150: Pannello Frontale
INFORMAZIONI GENERALI V. PANNELLO FRONTALE 1. POWER commuta le modalità acceso e stand-by del ricevitore . 2. LECTOR DE TARJETAS Accesso per la smart card. 3. USB connessione per dispositivi USB. Nota: Non tutti i flash drive USB 2.0 potrebbero essere compatibili con il prodotto... -
Page 151: Pannello Posteriore
INFORMAZIONI GENERALI VI. PANNELLO POSTERIORE 1. AERIAL Collegamento per il cavo dell’ antenna terrestre. 2. LOOP OUT Connessione a un altro STB. 3. SAT IN Collegamento al cavo dell'antenna satellitare. 4. LOOP OUT Connessione a un altro STB. 5. TV SCART Connessione alla TV tramite cavo SCART. -
Page 152: Installazione Apparecchiature
INSTALLAZIONE APPARECCHIATURE Questa sezione spiega i vari modi per collegare il ricevitore a vari sistemi TV, VCR e Hi-Fi. È possibile scegliere una delle seguenti configurazioni i consigliate. Se avete qualche problema o bisogno di aiuto, rivolgersi al rivenditore o fornitore di servizi. Si prega di assicurarsi che gli elementi elencati di seguito siano inclusi nella confezione del ricevi- tore. - Page 153 GUIDA DELLA LISTA DEI CANALI 1. Modalità di visione standard a) Quando si seleziona un canale,la barra delle infor- mazioni appare automaticamente sullo schermo per alcuni secondi. Questa barra fornisce tutte le infor- mazioni del canale in visione. b) Premere il tasto INFO per visualizzare le informazioni durante la modalità...
- Page 154 GUIDA DELLA LISTA DEI CANALI 4.EPG ( GUIDA ELETTRONICA DEI PROGRAMMI) a) Premere il tasto EPG in modalità di visione standard. b) Verrà visualizzata l’ EPG del canale corrente . c) Selezionare il canale di cui si desidera visionare il pro- gramma.
-
Page 155: Guida Dei Menu
GUIDA AI MENU PAGINA PRINCIPALE Premere il tasto MENU del telecomando per aprire la Pagina Principale sullo schermo. La pagina principale sarà visualizza- 1. È possibile spostarsi nella pagina principale con i tasti ▲▼ ◀ ▶ del telecomando. 2. Premere OK per confermare la selezione. 3. -
Page 156: Canale Manager
GUIDA AI MENU I. CANALE MANAGER I-2. Rinominare 1. Utilizzando i tasti ◀ ▶ passare alla modalità Rinomina. 2. Selezionare il canale che si desidera rinominare utilizzando i tasti ▲▼ presionar OK. 3. Una tastiera di dialogo sarà visualizzata sullo schermo. 4. - Page 157 GUIDA AI MENU II. INSTALAZIONE In questa sezione è possibile configurare l'antenna e la scan- sione satellitare o transponder, ecc . Selezionare Istallazione nella pagina principale utilizzando i tasti▲▼premere OK. Premere EXIT per tornare al menu precedente oppure pre- mere MENU per passare al canale corrente in visione. II-1.
- Page 158 GUIDA AI MENU II. INSTALLAZIONE II-2. Switch DiSEqC 1. Selezionare Ricerca Canale in Installazione usando i tasti ▲▼ e premere OK. a) Se si seleziona Switch DiSEqC e si preme OK nel menu sarà visualizzatala pagina DiSEqC Switch. b) Selezionare il satellite più appropriato per ogni porta DiSEqC (A ~ D) utilizzando i tasti ◀...
- Page 159 GUIDA AI MENU II. INSTALLAZIONE f) Motor Control Selezionare la posizione utilizzando i tasti ◀ ▶e premere OK. Sarà visualizzata sullo schermo una finestra di mes- saggio. - Memorizzazione della posizione Sat: memorizzare la posizione corrente del motore per il satellite selezionato.
- Page 160 GUIDA AI MENU II. INSTALLAZIONE II-4. Ricerca terrestre 1. Selezionare Ricerca Canale in Installazione usando i ▲▼ tasti e premere OK. 2. 1) Selezionare la regione di utilizzo con i tasti ◀ ▶. 2) È possibile selezionare il tipo di ricerca tra le opzioni automatico e manuale con i tasti ◀...
- Page 161 GUIDA AI MENU II. INSTALLAZIONE 3. Riproduzione del file video da Home Streaming a) Premendo il tasto “Fn” del telecomando nella visualiz- zazione normale del ricevitore apparirà l’ elenco dei filmati del PC sul tuo TV. b) Selezionando il file che si desidera visualizzare e utilizzan- do i tasti di navigazione del telecomando, premendo il pul- sante "OK"...
-
Page 162: Opzioni
GUIDA AI MENU III. OPZIONI In questa sezione è possibile configurare la lingua OSD, orario, ecc . Selezionare Opzioni nella pagina principale utilizzando i tasti ▲▼ e premere OK. Premere EXIT per tornare al menu precedente o premere MENU per passare al canale corrente in visione. - Page 163 GUIDA AI MENU III. OPZIONI III-2. Pannello di controllo 1. Selezionare Impostazione TV in Opzioni con i tasti ▲▼ e pre- mere OK. a) Tipo di HD - Selezione dell’uscita video HD. b) Tipo TV - Selezione del tipo di TV. c) Aspect Ratio - Selezione del rapporto dello schermo.
-
Page 164: Utilita
GUIDA AI MENU IV. UTILITY In questa sezione è possibile utilizzare USB, ecc Selezionare utility nella pagina principale utilizzando i ▲▼ tasti e premere OK. · IV -1. System Information · IV -2. Timer · IV -3. Calendario IV-1. SYSTEM INFORMATION Questa opzione permetterà... -
Page 165: Accessori
GUIDA AI ME NU V. ACCE SSOR I In questa sezione è possibile utilizzare USB , ecc. Selezionare utility nella pagina principale utilizzando i tasti e premere OK. V - 1. USB · V - 2. Smart Card · V - 3. Network / Videoclub ·... -
Page 166: Pvr Guide
PVR GUIDE PVR GUIDE I. Dispositivi Raccomandati - External Hard Disk USB Drive. - Flash memory stick. - Formato Tipo: FAT16/32 (Il sistema non supporta NTFS e altri sistemi di file ) II. Funzione di registrazione II-1 Programmare una registrazione a tempo 1. - Page 167 PVR GUIDE PVR GUIDE II. Funzione di registrazione II-2 Registrazione istantanea - Premere il pulsante "RECORD" sul telecomando per avviare la registrazione del programma. - Durante la registrazione del programma - Premere il tasto "PAUSE" per eseguire " Time Shift” - È...
- Page 168 PVR GUIDE PVR GUIDE III. Funzione di riproduzione - Per riprodurre il programma registrato in precedenza, pre- mere il tasto "Play" sul telecomando. - Utilizzare i tasti freccia per selezionare il file che si desidera riprodurre e premere "OK" per la riproduzione. - Durante la riproduzione del programma .
- Page 169 PVR GUIDE PVR GUIDE V. Funzione TimeShift - Se si desidera eseguire il "Time Shift" in modalità in diretta è necessario impostare Time Shift su "On" nelle opzioni PVR (Accessory → PVR → TimeShift su "ON"). - Per la partenza del Time Shift in modalità in diretta , pre- mere "PAUSE"...
- Page 170 PVR GUIDE PVR GUIDE VII. Riproduzione MP3 - Selezionare il file MP3 che si desidera riprodurre nel menu USB. - Dopo aver selezionato il file MP3, si formerà la finestra di riproduzione MP3. VIII. Riproduzione JPG - Selezionare il file JPG desiderato nel menu USB. - Premere OK per visualizzare l’JPG desiderato.
- Page 171 PVR GUIDE PVR GUIDE X. Come riprodurre 'il file registrato da PVR del HD-XXX "tramite PC o DivX Player X-1 Come riprodurre tramite PC A) Riproduzione KM Player. B) Selezione della lingua. 1) Pulsante destro del Mouse → Lingua → la propria lingua.
- Page 172 PVR GUIDE PVR GUIDE X-3 Come convertire i file Divx Manager A) Riproduzione Divx Manager. 1) Impostare → Modello → Rapsody RSH-250/350 B) Selezionare la cartella in cui è posizionato il file che si desidera convertire. Quindi appariranno le informazioni del file.
- Page 173 TROUBLESHOOTING Problem Solution Nothing appears on the Front ·Check that the power cable is plugged into the power sock- Panel or No power supply ·Check the dish and adjust it. ·Check the cable connection and correct it. No Picture ·Check channel and video output. ·Check the volume level of the TV and receiver.
- Page 174 SPECIFICATIONS I.Conditional Access Module Interface Item Specification SMART CARD 2 SLOTS, ISO 7816, GSM11.11 and EMV (payment systems) compatibility II. Tuner & Channel (DVB-S2) Specification Item 1 × F Type, IEC169-24, Female Type Frequency Rage 950MHz to 2150MHz RF Impedance 75 Ohm unbanlanced Signal Level -65 to -25 dBm...
- Page 175 V. MPEG Transport Stream & A/V Decoding Item Specification Transport Stream 13818-1 MPEG-2, H.264/AVC Transport stream Specification Profile Level MPEG-2 MP@ML, MP@HL, MPEG-4 H.264/AVC Input Rate Max. 90Mbit/s Aspect Ratio 4:3, 16:9, Letter Box Frame Rate 25Hz for PAL, 30Hz for NTSC Video Resolution 576i, 576p, 720p, 1080i Teletext...
- Page 176 BRAND LIST BRAND CODE NO. BRAND CODE NO. ADMIRAL 072 081 160 161 096 006 004 101 143 011 072 081 120 164 CURTIS MATHES ADVENT AIKO DAEWOO 076 103 055 004 127 143 016 043 044 AKAI 006 146 248 125 120 ALARON DAYTRON...
- Page 177 BRAND LIST INFINITY 006 004 062 101 INKEL MULTITECH INTEQ 015 025 006 134 040 056 007 019 024 237 NIKEI JCPENNEY 004 006 008 024 030 065 101 143 156 NIKKO JENSEN ONKING 038 001 034 083 206 ONWA KENWOOD 006 001 OPTIMUS...
- Page 178 BRAND LIST SANYO 007 053 057 082 020 UNIVERSAL 008 009 SCOTCH VIDEOCONCEPTS SCOTT 004 005 028 043 048 143 VIDIKRON 174 188 164 SEARS 004 007 015 028 030 057 082 094 143 VIDTECH 160 052 164 WARDS 004 064 164 008 009 019 028 060 061 SEMIVOX 063 072 074 143 SEMP...
- Page 179 BRAND LIST COLT KODAK 031 101 CRAIG 003 040 135 024 101 101 004 012 020 031 041 LLOYD CUIRTIS_MATHES CYBERNEX LOGIK DAEWOO 005 108 111 117 017 065 007 010 003 009 017 034 101 004 106 DAYTRON MAGIN 012 023 043 MAGNASONIC DYNATECH...
-
Page 180: Brand List
BRAND LIST PHILIPS 031 034 054 067 101 150 PILOT SYLVANIA 031 034 059 067 PIONEER 021 004 048 SYMPHONIC PORTLAND TANDY 034 010 PROFITRONIC TATUNG PROTEC TEAC 034 043 PULSAR TECHNICS 031 070 QUARTZ TEKNIKA 031 034 101 QUASAR 031 070 133 140 163 014 THOMAS RADIO_SHACK... - Page 181 BRAND LIST GOLDSTAR 235 239 TECHNICS GO_VIDEO THETA DIGITAL TOSHIBA 233 244 219 205 HARMAN_KARDON HITACHI VENTURER HITEKER YAMAHA 249 226 ZENITH 239 226 235 239 KENWODD 235 239 MAGNAVOX 254 237 MARANTZ 253 242 MCINTOSH MEMOREX MITSUBISHI MYRYAD 247 239 NAKAMICHI ONKYO OPTIMUS...
Need help?
Do you have a question about the HD-270CN and is the answer not in the manual?
Questions and answers