Table of Contents
Advertisement
Quick Links
Advertisement
Table of Contents

Subscribe to Our Youtube Channel
Summary of Contents for AlertLabs SHUTTIE
- Page 1 SHUTTIE Installation Manual...
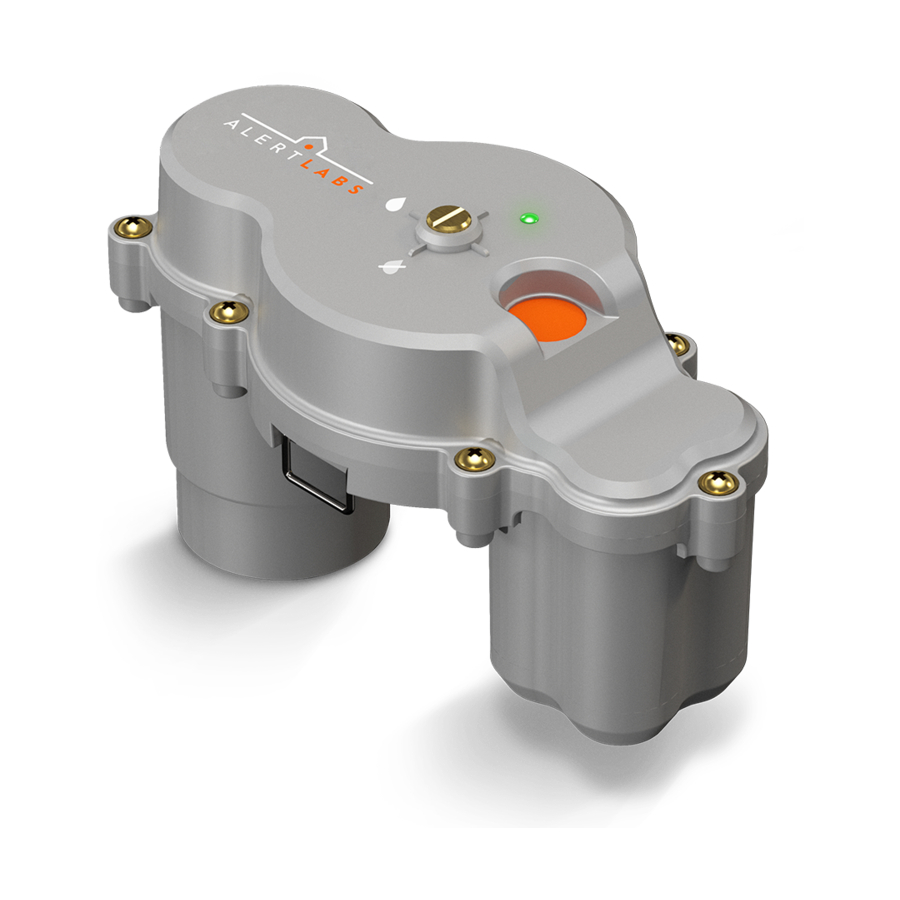
- Page 2 Warning! This product includes moving parts. Keep your fingers or any other objects away. Warning! This product was designed to prevent water leakage damages and should be used for this purpose only. SHUTTIE SPECIFICATION Part No. HDW-000081-001 Product description The wireless, battery operated water Actuator is mounted on an ISO5211 ball valve installed on the main water line.
- Page 3 IC STATEMENTS FCC STATEMENTS This device contains licence-exempt transmitter(s)/receiver(s) that This device complies with Part 15 of the FCC Rules. Operation is comply with Innovation, Science and Economic Development subject to the following two conditions: Canada’s licence-exempt RSS(s). Operation is subject to the following (1) This device may not cause harmful interference, and two conditions: (2) This device must accept any interference received, including...
-
Page 4: What's Included
What’s Included Shuttie T-Shaped Key Actuator Valve Screws Perpendicular Actuator Lock washers Mount Nuts Perpendicular Valve Batteries Adapter Insert Shuttie Installation In-line Actuator Mount Manual In-line Valve Adapter Insert Installation manual Installation Guide manual d'installation Guide d'installation... -
Page 5: What You Need
What You Need Phillips Head Screwdriver Installation manual Guide d'installation... -
Page 6: What To Do First
What To Do First Call a plumber Ask the plumber to install the valve because the water pipe will need to be cut. A plumber installed this valve... -
Page 7: Installation Options
Installation Options Shuttie can be installed either in-line or perpendicular to the water line. In-line Perpendicular Installation: Installation:... - Page 8 Remove Shuttie from the box and remove the plastic wrap from the batteries. NOTE: When the batteries are first installed and the compartment is closed, Shuttie will automatically start a cleaning process where it will close and then open again.
-
Page 9: Inserting The Batteries
Place all 4 x CR123 batteries into the compartment with ‘ - ’ end facing out. Place the cap back onto the compartment. Align the edges of the cap and compartment before tightening the screw to make sure it closes properly. Press the orange button briefly to check the Shuttie LED status color. It should blink green. -
Page 10: Installing The Adapter
LONG ACTUATOR MOUNT SHORT ACTUATOR MOUNT In-line installation Perpendicular installation Installing The Adapter Open a water tap briefly to confirm that the valve is open and water is running. If the valve is closed, turn it 90 degrees using a wrench. Select the actuator mount according to installation type. Remove the one you need from the box. - Page 11 IN-LINE PERPENDICULAR INSTALLATION INSTALLATION Place the valve adapter insert onto the valve. The direction of the rectangular slot will depend on the type of installation (see images above). PARALLEL to the pipe - In-line installation PERPENDICULAR to the pipe - Perpendicular installation.
- Page 12 Slide the gray actuator mount over the valve adapter insert, aligning the screw holes on the water valve. NOTE: There are 2 holes for screws on opposite corners of the actuator mount that align to the holes on the water valve.
- Page 13 Next you will need the bag of screws, lock washers, and nuts. Insert the screws through the mount and valve. Tighten the nuts with lock washers onto the screws. NOTE: Fully tighten the screws with the hexagon heads inside the cut-outs in the adapter mount.
- Page 14 Mounting Shuttie Make sure Shuttie is set to the open position. When the line of the brass actuator shaft is horizontal, Shuttie is in the open position . The metal locking pin must also be pulled out so that Shuttie can slide onto the actuator mount.
- Page 15 Slide Shuttie onto the actuator mount by inserting the brass actuator shaft into the rectangular slot.
- Page 16 Make sure that you have access to the metal locking pin once Shuttie is attached. Push the metal locking pin into its slots to lock the valve adapter in place.
- Page 17 Brass actuator shaft in closed position Now you can test that valve will close. Press and hold the orange button for 5 seconds then release. The line of the brass actuator shaft will move to a vertical position to match . Turn on a water tap to confirm that water flow through the pipe stops.
-
Page 18: Troubleshooting
If the valve is closed at the beginning of the installation process, turn the valve 90 degrees with a wrench. After the adapter is installed you can use the T-shaped key that comes in the Shuttie box. What if the valve is stuck?! If the valve gets stuck (not fully open or closed), try again by holding the orange button for 5 seconds. - Page 20 © Alert Labs Inc. 2020...
Need help?
Do you have a question about the SHUTTIE and is the answer not in the manual?
Questions and answers