Audi A6 Help Manual
Key function
Hide thumbs
Also See for A6:
- Pricing and specification manual (68 pages) ,
- Repair manual (67 pages) ,
- Getting to know manual (24 pages)

Related Manuals for Audi A6


Summary of Contents for Audi A6
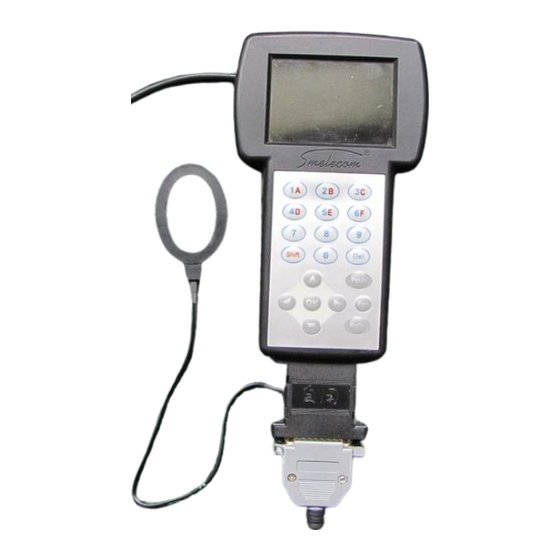
- Page 1 Help Manual for AUDI A6/Q7 Key Function. Connect OBD adapter to the transponder adapter first, then connect to the machine. PICTURE 1 Connect OBD adapter to the diagnostic socket of the car, choose “IMMO” from the main menu, PICTURE 2...
- Page 2 Choose “AUDI” menu, then “AUDI 4TH IMMO SYSTEM” PICTURE 3 Choose “A6/Q7”. PICTURE 4...
- Page 3 In this process, you need to turn on the ignition with the working key, but you should keep all the other keys to hand. If the keys are ordered by VIN from an AUDI dealer, press “OK” to go to the...
- Page 4 KEY menu, please put the new blank key in the transponder adapter correctly, and then press “OK”, the tool will write the blank key to a key of A6/Q7. After writing key successfully, you can press “ESC” to go to the KEY ADAPTION process.
- Page 5 KEY ADAPTION In PICTURE 6, if press “OK”, you will come to the KEY ADAPTION menu. In this step , the tool will show you the current amount of keys, and you should input the new amount of keys to be adapted PICTURE 9 Press “OK”, then insert the first key to be adapted into the ignition, turn the ignition to “on”...
- Page 6 PICTURE 11 Choose “WITHOUT WORKING KEY ON HAND”. This means that all keys lost and no key can start the car PICTURE 12...
- Page 7 In this process, please make connection as the PICTURE 17 shows, then press ”OK”, wait for a few minutes, the tool will go to the next page. Before key adaption, make sure that the keys are ordered by VIN number from an AUDI dealer, otherwise you have to go to the writing key KEY ADAPTION program to write keys first.
- Page 8 PICTURE 15 Relay Position PICTURE 16 remove the relay in red circle...
- Page 9 PICTURE 17 Connect the two points PICTURE 18...
- Page 10 KEY menu, please put the new blank key in the transponder adapter correctly, and then press “OK”, the tool will write the blank key to a key of A6/Q7. After writing key successfully, you can press “ESC” to go to the KEY ADAPTION process.
- Page 11 KEY ADAPTION In PICTURE 18, if press “OK”, you will come to the KEY ADAPTION menu. Before key adaption, remove the wire connected in the PICTURE 17,and install the relay back. Press “OK” to go on, “ESC” to exit. PICTURE 21 In this step , the tool will show you the current amount of keys, and you should input the new amount of keys to be adapted PICTURE 22...
- Page 12 Press “OK”, then insert the first key to be adapted into the ignition, turn the ignition to “on” and hold more than 1 second, then turn off and take out the key, then repeat the same procedure with the second key and so on until the last key is adapted to the car, the tool will show “finished”. PICTURE 23 PICTURE 24...
- Page 13 Choose “EZS-J518 BIN MODE”. This is the supplement to “without working keys on hand”, some times, you lost all keys and you can not make key adaption by “without working keys on hand” menu, you can make key adaption by this menu. PICTURE 25 In this process, you should remove the J518 module and read eeprom dump from the 9s12 mcu by any 9s12 programmer, save as bin file, and copy the file to “USER”...
- Page 14 Choose the file you saved, press “OK”. PICTURE 27 Before key adaption, make sure that the keys are ordered by VIN number from an AUDI dealer, otherwise you have to go to the writing key program to write keys first. Press “OK” to go to the...
- Page 15 KEY menu, please put the new blank key in the transponder adapter correctly, and then press “OK”, the tool will write the blank key to a key of A6/Q7. After writing key successfully, you can press “ESC” to go to the KEY ADAPTION process.
- Page 16 KEY ADAPTION In PICTURE 28, if press “OK”, you will come to the KEY ADAPTION menu. In this step , the tool will show you the current amount of keys, and you should input the new amount of keys to be adapted PICTURE 31 Press “OK”, then insert the first key to be adapted into the ignition, turn the ignition to “on”...
- Page 17 PICTURE 33 Choose “MAKE KEY BLANK”. This process can make the adapted keys blank. Better not use the working keys from the car for this function, otherwise the working keys can not start the car any more, Press “OK” to continue. PICTURE 34...
- Page 18 PICTURE 35 Please confirm the OBD adapter is connected to the car, turn on the ignition with the working key. Press “OK” to reset the key. PICTURE 36...
- Page 19 Put the key to be reset in the transponder adapter, Press “OK” to continue. PICTURE 37 The tool will read the information from car, please input the file name to save it. This file is very important, please save it. PICTURE 38...
- Page 20 PICTURE 39 Choose “MAKE KEY BLANK BIN MODE”. PICTURE 40...
- Page 21 For this menu, you should have the J518 dump. If the car is not here, you should use the file saved in the “A6DATA” folder in the sd card, just the one you saved when you do the car. You should copy it to the “USER”...
- Page 22 Put the key need to be made blank in the transponder. Press OK to continue. The tool will show you “Finished”. PICTURE 43 PICTURE 44...
- Page 23 IMPORTANT NOTE: when making key adaption or writing key, you must put the key in the transponder adapter correctly, otherwise the tool cannot read ID from the key. Then you need to modify the position of the key; the key should be inside the ellipse and near the ellipse enough. Sometimes you put a key inside the ellipse and near the ellipse, but in fact the transponder inside the key is not inside the ellipse or near the ellipse!! PLEASE SEE RIGHT AND WRONG POSITIONS ILLUSTRATED BELOW.
- Page 24 WRONG POSITION CORRECT POSITION...
- Page 25 WRONG POSTION...
Need help?
Do you have a question about the A6 and is the answer not in the manual?
Questions and answers