Advertisement
Quick Links
Advertisement

Summary of Contents for ANTIDOTE Carbon Jack
- Page 1 USER MANUAL...
- Page 2 PAGE 3 YOUR CARBONJACK PAGE 4 LIFETIME WARRANTY PAGE 6 PARTS LIST AND TORQUE SPECS PAGE 9 OTHER PARTS SPECS PAGE 10 SETUP PAGE 18 FLOATING DAMPING SUSPENSION (FDS) PAGE 20 MAINTENANCE PAGE 22 CONTACT TABLE OF CONTENTS...
- Page 3 The ANTIDOTE team have made every effort for you to enjoy the best flow imaginable while out on the trails. This guide will provide you with the most important information about the Carbonjack. You will certainly find some useful details, and above all else, the key details regarding the use of the product.
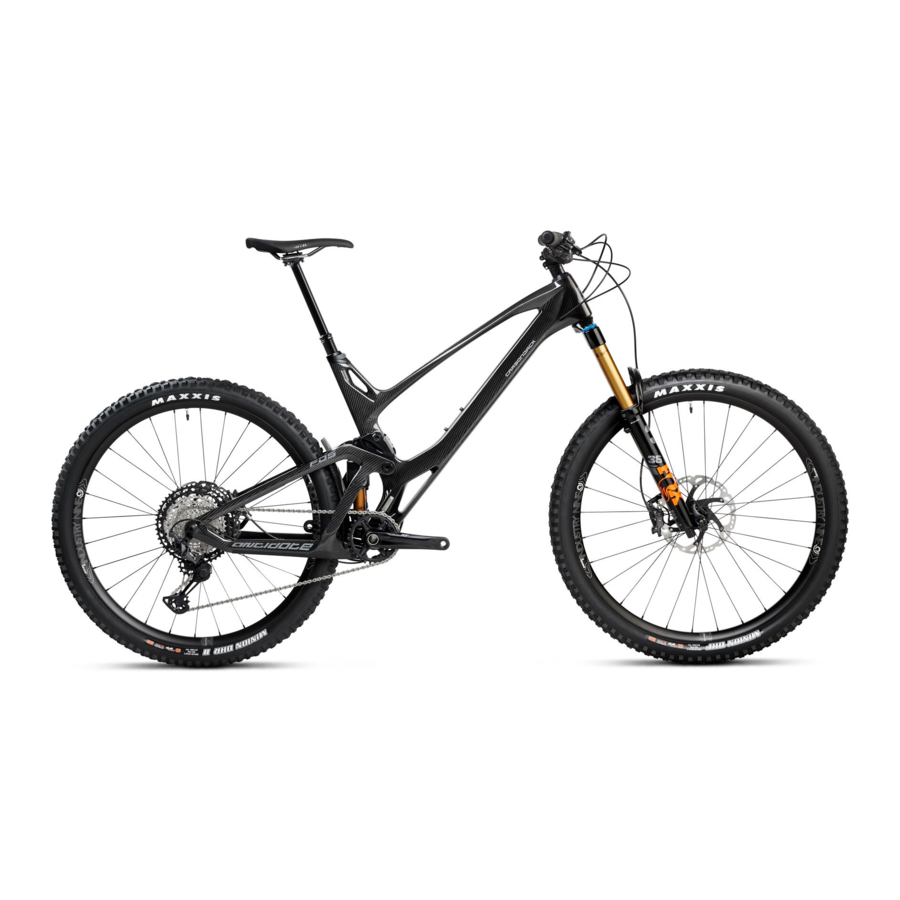
- Page 4 Your frame is covered by a limited lifetime warranty. In the cases of damage other than resulting from wear, we are happy to help our customers deal with defects. Details about the complaint process can be found on our website. MEET THE CARBONJACK...
- Page 5 LIFETIME WARRANTY TERMS LIFETIME: The warranty applies indefinitely for the original owner, starting with the date of purchase. 2 YEARS: Suspension bearings Paint finish THIS WARRANTY DOES NOT COVER: Damage caused by: -Improper installation of components, parts, or accessories -Improper assembly and maintenance -Misuse, abuse and neglect Damage caused in the event of an accident or crash Labor costs incurred for parts replacement or frame swap...
- Page 6 PARTS LIST AND TORQUE SPECS MEET THE CARBONJACK...
- Page 7 PARTS LIST...
- Page 8 PART TORQUE MAX 4-5 13-15 8-10 8-10 8-10 13-15 MAX 2 13-15 TORQUE SPECS...
- Page 9 FRAME ADDITIONALS SPECIFICATION SIZE Seat insertion (mm) Headset: semi integrated ZS44/ZS56 Seat post diameter (mm) 30,9 brake adapter: PM180 or Pm203 Rear axle: LENGTH: min171mm, max 173,5mm. THREAD: M12x1,5 (min 15mm thread length) Recommended rear shock: Ohlins TTX22 Custom, Fox Float X2, Fox DHX2 DVO Topaz T3Air (if you have different model of rear shock, it may be incompatible.
- Page 10 set your bike...
-
Page 11: Torque Wrench
SUSPENSION PUMP ALLEN AND TORX BITS Use for setting the air pressure Allen and torx bits are necessary for correctly. See page 18 and read the the entire frame and bike. Bits must be instructions carefully. used in combination with a torque wrench. - Page 12 step 2 step 3 step 1 Install the eyelet reducer bushing in Carefully push the bushing in, using a Check the type of rear shock you have the eyelet closer to the shock vise makes the process easier. Apply – in case of questions regarding piggyback grease compatibility, contact us...
- Page 13 step 7 step 8 step 9 Make sure that the entire eyelet Rotate the shock stanchion so that the air In order to install the rear shock, assembly measures 30 milimetres valve is on the same side as the shock remove the rear wheel from the frame (within 0.03mm of negative tolerance) piggyback, and the lower eyelet is...
- Page 14 step 1 step 2 step 3 The rear mudguard is fixed in place Repeat the process on the lower end Your mudguard is in place. Good to using quick installation tape Dual Lock of the mudguard Thin 3M SJ-4570. Press the mudguard until it clicks in place mud guard INSTALATION...
- Page 15 step 1 step 2 Remove the plastic pad spacers before installing Use Teflon grease on the wheel axle the wheel. Remember to always install them in the brake caliper whenever the wheel is removed step 3 step 4 Set the wheel in the correct position, insert the If the seatpost cable prevents it from being axle and tighten it (apply 12 Nm of torque) removed, push the cable from the other side...
- Page 16 step 1 step 2 Tighten the stem bolts using appropriate torque Tighten the seatpost clamp bolt (apply maximum (consult your stem manufacturer for the torque of 4-5 Nm of torque). Use a torque wrench figure). Use a torque wrench wrench step 4 step 3 Tighten the stem clamp bolts using appropriate...
- Page 17 STEP 1 STEP 2 Set the derailleur limit screws Adjust the derailleur using the barrel adjuster on the shifter STEP 3 Before riding the bike, make sure that the brake lever is tightened to the handlebar setup cheking...
-
Page 18: Suspension Setup
FLOATING DAMPING SYSTEM SUSPENSION SETUP FDS suspension is a specific system in which the proper kinematic operation occurs only when the sag is set correctly. The system allows for high pedalling efficiency while remaining fully active on uneven ground, as well as under braking. - Page 19 step 1 step 2 When adjusting the suspension, wear all riding gear (such Once in the riding position, have your assistant push the as riding shoes, the helmet, and protective padding) in sag indicator all the way down, towards the suspension order for your weight to be accurate.
-
Page 20: Maintenance
MAINTENANCE take care of the bike... - Page 21 In order to maintain the proper operation of the bike, adhere to the following service intervals once per year or Action before each ride regularly every 100 riding hours Cleaning, chain lubrication, checking the brakes, checking all screws” Checking the sag checking settings and inspecting the bike for damage Full service: suspension and brake service, replacement of frame bearings and shock bushings, thorough frame inspection, wheel truing, replacing brake pads Warning!
- Page 22 THANKS FOR READING LET'S RIDE! But in case of any difficulties, contact us: support@antidotebikes.com FOLLOW US: antidotecarbonbikes antidotebikes...
Need help?
Do you have a question about the Carbon Jack and is the answer not in the manual?
Questions and answers