Table of Contents
Advertisement
Quick Links
Assembly Instructions for your
IMPORTANT: READ THIS INFORMATION BEFORE PROCEEDING WITH THE ASSEMBLY!
The furniture and wardrobe combination consists of a number of
die-cut pieces of grayboard which, when assembled, are designed
to last a long time. The assembly is simple when you follow the
step-by-step assembly instructions. It can also be a lot of fun.
TO MAKE IT EASIER TO UNDERSTAND THE ASSEMBLY INSTRUCTIONS
THIS IS A SLOT:
THIS IS A NOTCH:
THESE ARE TABS:
ARROW INDICATES
DIRECTION IN
FOLDING A TAB:
THIS IS A HOLE:
NOTE:
1. SHADED AREAS IN THE DRAWINGS REPRESENT THE
PRINTED SIDE OF THE BOARD.
2. MAKE CERTAIN TO FOLD ALL CREASE LINES AS INDICATED
BY THE BROKEN LINES IN THE DRAWINGS.
3. PLACE FURNITURE PIECES ON A FLAT SURFACE WITH THE
PRINT SIDE UP TO SEPARATE. MAKE CERTAIN TO REMOVE
THE PIECES OF FURNITURE BY CAREFULLY PUSHING
THROUGH THE PRINT SIDE.
4. THE PIECES OF FURNITURE ARE ONE-TIME ASSEMBLY.
Furniture • Wardrobe • Bookcase
CHECK EACH STEP AS YOU COMPLETE IT
TAB
TAB
T.M. ® & © 1962 MATTEL, INC.
HAWTHORNE, CAL., U.S.A.
PATENT NO. 2,872,753
©2017 Mattel. All Rights Reserved.
DREAM HOUSE
The furniture and wardrobe parts are held together by
small nicks. They will separate easily but do so carefully.
Remove all waste from slots and notches with handle of
spoon (not included). Place all parts in alphabetical order.
The assembly of the furniture and wardrobe
is based principally on inserting a tab into a
slot or inserting a notch into another notch.
THIS IS HOW ONE
NOTCH GOES INTO
ANOTHER:
ARROW INDICATES PUTTING A
KEY LOCK THROUGH A MATCHING
HOLE AND ATTACHING RETAINER.
WARNING:
CHOKING HAZARD
– Small parts.
Not for children under 3 years.
FND44
SOME PIECES OF THE
FURNITURE HAVE HOLES
SO THAT A FINGER CAN
BE INSERTED TO HOLD
THE BOARD FIRMLY
WHILE PUSHING THE
LEGS THRU THE SLOTS.
FND44-0970
1101578908-DOM
PAGE 1
Advertisement
Table of Contents

Related Manuals for Mattel Barbie Dream House


Summary of Contents for Mattel Barbie Dream House
- Page 1 WHILE PUSHING THE THE PIECES OF FURNITURE BY CAREFULLY PUSHING LEGS THRU THE SLOTS. THROUGH THE PRINT SIDE. 4. THE PIECES OF FURNITURE ARE ONE-TIME ASSEMBLY. T.M. ® & © 1962 MATTEL, INC. WARNING: HAWTHORNE, CAL., U.S.A. CHOKING HAZARD – Small parts.
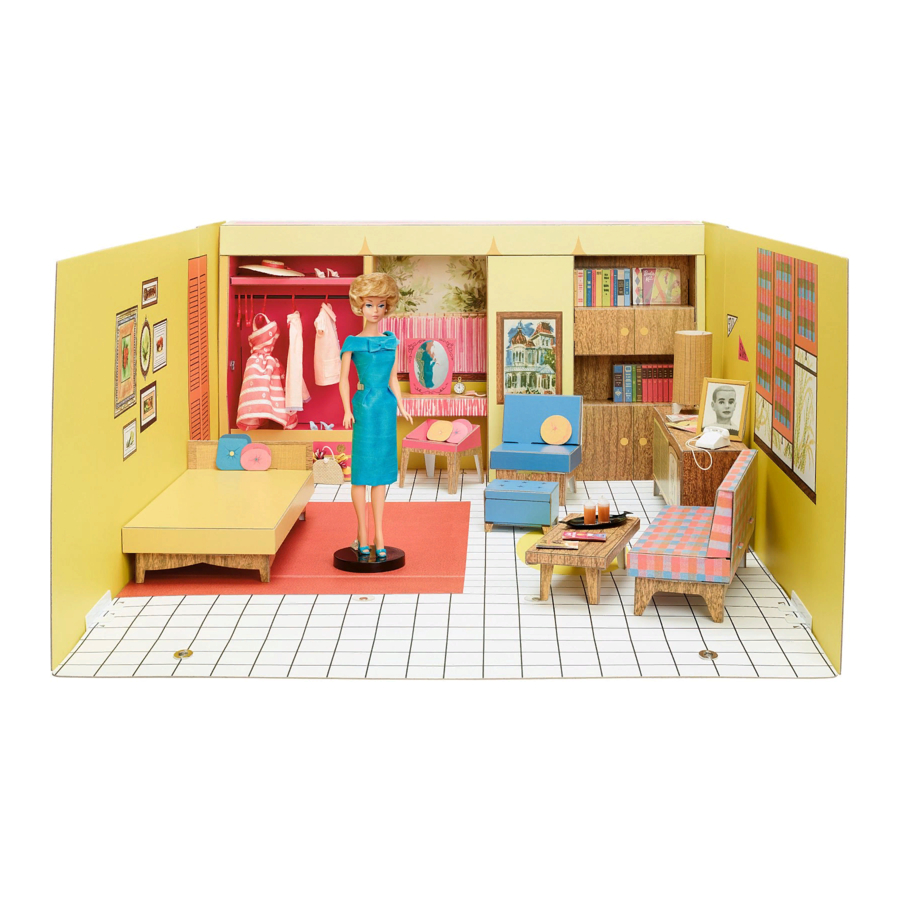
- Page 2 CONTENTS Doll cannot stand alone. PAGE 2...
- Page 3 ASSEMBLE THE OTTOMAN STEP 1 OTTOMAN Place "OTTOMAN" printed side down. PART Now shape the side panel as shown. Repeat with the other side panel so that the tabs No. 1 meet. STEP 2 Complete assembly by folding down the panel with the slot so that the tabs No.
- Page 4 ASSEMBLE THE TABLE TABLE A TABLE B TABLE PARTS TABLE C STEP 1 Take "TABLE B" and shape as shown. Fold in XX ap rst and the X at on top of it. Repeat above with "TABLE C". STEP 2 Lay "TABLE A"...
- Page 5 ASSEMBLE THE HIFI HIFI A HIFI B HIFI D HIFI C HIFI PARTS STEP 1 Place "HIFI A"- printed side down. Take "HIFI B" and insert tab 1 thru slot 1 of "HIFI A". STEP 2 Fold over the panels with notches 2 and 4 and insert into notches 2 and 4 of "HIFI B".
- Page 6 ASSEMBLE THE CHAIR CHAIR B CHAIR C CHAIR A CHAIR PARTS CHAIR D CHAIR E STEP 1 STEP 2 STEP 3 Place "CHAIR A" Now fold down the panel Take "CHAIR B" and insert printed side down. with the slot marked No. tabs 1,2,3 into the slots 1 on top of the other panel .
- Page 7 ASSEMBLE THE COUCH COUCH A COUCH D COUCH E COUCH B COUCH C COUCH PARTS STEP 1 Place "COUCH A" printed side down. Fold over panel marked "X"as shown. STEP 2 Repeat same with "XX" panel. Now fold over the back panel on top of the "X"...
- Page 8 ASSEMBLE THE COUCH STEP 4 Take "COUCH C", form in "U" shape and place in position as shown. Fold over the panel with slot 8 so that it snaps on to tab 8 of "COUCH C". Now repeat with other panel with numbers 6 and 7. STEP 5 Fold over the end aps as shown.
- Page 9 ASSEMBLE THE BED BED B BED C BED D BED A BED E BED PARTS STEP 2 STEP 1 Insert tab 3 into wide part of slot 3 of "BED C". Lay "BED A" printed side down. Place "BED B" in center of panel as shown. Fold over panel, with slot 1 so that it snaps into tab 1 of "BED B".
- Page 10 ASSEMBLE THE WARDROBE WARDROBE PARTS WARDROBE A WARDROBE B WARDROBE C WARDROBE D WARDROBE E WARDROBE F WARDROBE G WARDROBE J WARDROBE H WARDROBE I WARDROBE K WARDROBE L WARDROBE M WARDROBE N MIRROR DOWEL WARDROBE O PAGE 10...
- Page 11 ASSEMBLE THE WARDROBE STEP 1 Take"WARDROBE B", fold on the two crease lines and shape as shown. Put aside temporarily. STEP 2 Fold "WARDROBE C" on the two crease lines and shape as shown. Put aside temporarily. DOWEL STEP 3 Place "WARDROBE A"...
- Page 12 STEP 4 (Repeat previous step with "WARDROBE E"). Insert tabs 9,10,11,12,13,14,15 and 16 through the same numbered slots of "WARDROBE E". Make certain that all the tabs are snapped into the slots. STEP 5 Push down "WARDROBE F" unprinted side up so that tabs 17,18 and 19 go through the same numbered slots.
- Page 13 STEP 6 Fold over the narrow "X" panel of "WARDROBE A" and insert tabs 24,25,26 and 27 of "WARDROBE F" so they go through same numbered slots. Repeat previous step with other tabs and slots 20,21,22 and 23 of "WARDROBE E and F". STEP 7 Take "WARDROBE G"...
- Page 14 STEP 9 Now insert tabs 32,33 and 34 of "WARDROBE H" through slots 32,33 and 34 of "WARDROBE E". Put aside for later use. STEP 10 Place "WARDROBE I" printed side down, fold up the “XX” panel as shown. Shape "WARDROBE J" as shown and insert tabs 35,36,37 through same numbered slots of "WARDROBE I".
- Page 15 STEP 11 Take "WARDROBE L" and place printed side down, fold up panel as shown. Repeat previous step by inserting tabs 41,42,43,44,45,46 through same numbered slots of "WARDROBE L". STEP 12 Now attach "WARDROBE M" by inserting tabs 50,51,52,53 through same numbered slots of "WARDROBE L".
- Page 16 STEP 14 Shape the panels of "WARDROBE I" into box shape and insert tabs 54,55,56,57 through same numbered slots. STEP 15 Now fold over the "X" panel of "WARDROBE L" twice, so that the slots 50 thru 53 are up as shown.
- Page 17 ASSEMBLE THE WARDROBE STEP 17 Now take other assembled sections and attach by inserting tabs 63,64,65 of the Vanity Table through the same numbered slots of "WARDROBE I". Push in as far as they will go. “X” TABS STEP 18 Insert tabs of Mirror through the slots of the Vanity Table Top.
- Page 18 ASSEMBLE THE WARDROBE STEP 19 Before attaching WARDROBE complete step 20. Place the nearly completed WARDROBE in position as shown- with the back of the WARDROBE facing the inside back of the Dream House. (You are going to fasten the WARDROBE to the dream house with key locks and retainers.) Make certain the holes of the WARDROBE line up with the holes of the Dream House at the points shown in the drawing.
- Page 19 ASSEMBLE THE WARDROBE STEP 20 Now fold in 4 "X" aps as shown. Complete by inserting the notches of the long panel into the notches of tabs 66 thru 71. Repeat with other long panel to complete assembly. Make certain that the long panels are down as far as they will go. STEP 21 To form picture, insert tab thru slot as shown.
- Page 20 Ltd., Vanwall Business Park, Maidenhead SL6 4UB. Helpline 01628 500303. Mattel Australia Pty., Ltd., Richmond, Need Assistance? Visit service.mattel.com or call 1-800-524-8697 Victoria. 3121.Consumer Advisory Service - 1300 135 312. Mattel South Africa (PTY) LTD, O ce 102 I3, 30 (US and Canada only).
Need help?
Do you have a question about the Barbie Dream House and is the answer not in the manual?
Questions and answers