
Subscribe to Our Youtube Channel
Related Manuals for Aurora TeamStream TS-100


Summary of Contents for Aurora TeamStream TS-100
- Page 1 USER GUIDE TeamStream Wireless Huddle Room System User Manual TS-100 www.auroramm.com Manual Number: 20200911 | Release: 1.2...
-
Page 2: Safety Instructions
Ensure that there is adequate ventilation if the product is placed in a stand or cabinet. Put the product in a properly ventilated area, away from direct sunlight or any source of heat. Overheating: Avoid stacking the Aurora product on top of a hot component such as a power amplifier. -
Page 3: Table Of Contents
TS-100 TABLE OF CONTENTS Safety Instructions ......................i Features ......................... 5 Introduction ........................6 Components and Accesories ..................6 Specifications ..............Error! Bookmark not defined. Panel Layout ........................ 13 Software Interface ....................... 18 Installation ........................22 Mirroring ........................36 Whiteboard and Annotation..................42 Ethernet ........................ - Page 4 USERS GUIDE www.auroramm.com...
-
Page 5: Features
USERS GUIDE Features Automatically detects supported VESA resolutions over VGA and HDMI Supports mirrored and extended siplay on Windows Supports mirrored display on macOS Can transmit smart devices’ screen, photos, videos, music and more Supports mirroring device output to WirelessMedia mobile apps ... -
Page 6: Introduction
INTRODUCTION About The TeamStream TS-100 is Aurora’s new 4K wireless and wired huddle room collaboration system which not only supports 4K wireless presenting from Windows, macOS, Android and iOS devices, but also adds 3 HDMI and 1 VGA input for your local display sources. - Page 7 USERS GUIDE Components Name Description TeamStream base unit TeamStream primary hub Key fob with TeamStream software for Windows TeamStream key fob and macOS Android app for screen sharing, transmitting WMedia for Android photos/music/video/files, exchanging files, remote viewing of the display, and remote mouse iOS app for screen sharing, transmitting WMedia for iOS photos/music/video/files, exchanging files, remote...
- Page 8 USERS GUIDE TeamStream Key Fob and TS-100 System www.auroramm.com...
-
Page 9: Specifications
USERS GUIDE Specifications: Specifications of TeamStream key fob on Windows Features SW format TS-100.exe for Windows Security WPA/WPA2 Required Windows OS Windows XP/Vista/7/8/8.1/10 and above, 32 & 64 bit Video Capacity Wireless Transmission 1080P@ < 30Hz 35m without obstacle between laptop WiFi module Distance and AS-100 Control... - Page 10 USERS GUIDE Wireless Input WiFi 11n/ac Outputs Connectors HDMI Output 1x HDMI 19-pin female connector Analog Audio Output 1x 3.5mm PC audio female connectors Features Number of window simultaneous on screen Number of simultaneous < 14 connections Up to 300Mbps, depending on the WiFi module of Data rate wireless the laptop Video Playback Frame...
- Page 11 USERS GUIDE Segmented Dual Network, staying both Guest network and Corp network Security Levels, enables three different security Firmware 3.0 level Win10 Extended Desktop, enables presenter mode White Board & Annotation Control Configuration Visual Button, by HID mouse, or On-Screen Setting remote control on APP Ethernet Telnet...
-
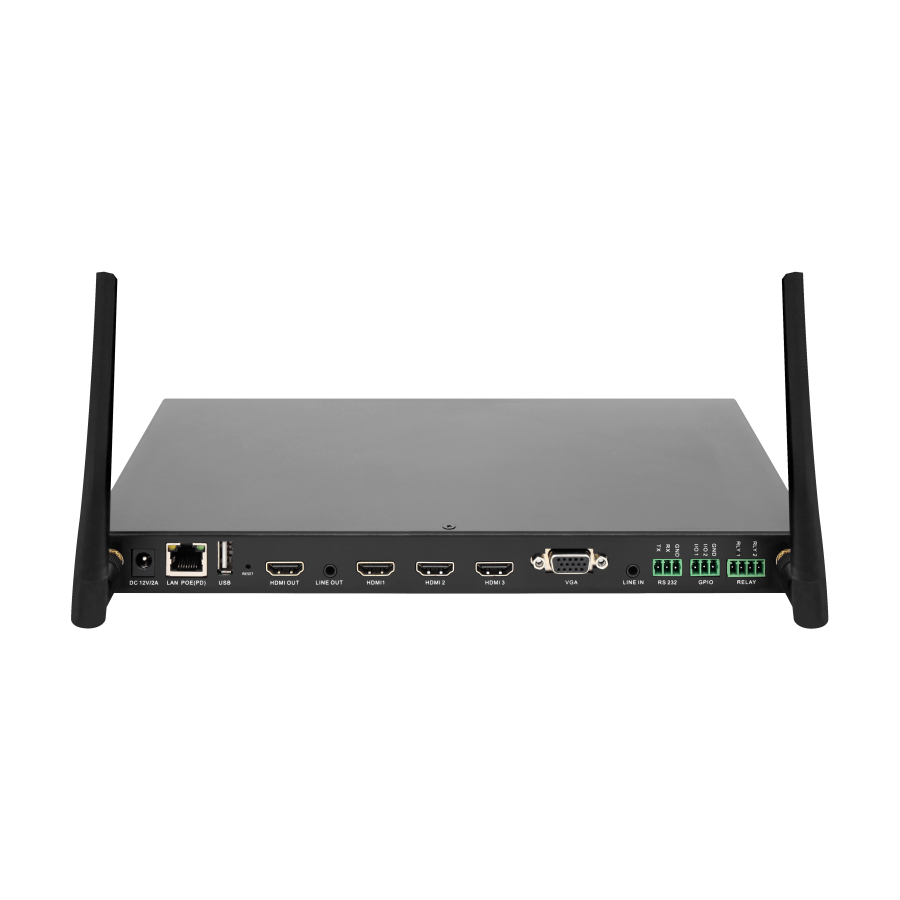
Page 12: Panel Layout
USERS GUIDE Panel Layout Name Description USB port is for updating via plugging USB disk USB 2.0 with firmware LEDs To indicate the signal available and power on/off Buttons To switch the input signal and power on/off USB Port The USB port is used to update the software of the TS-100. - Page 13 USERS GUIDE Rear Panel Name Description Antenna fixture Screw on the included two antennas to these two ports points Connect the included power adapter to this socket, and DC power socket connect the plug to an available electrical outlet LAN Ethernet Connect an Ethernet cable between this jack and a LAN to port connect TS-100 to LAN.
- Page 14 USERS GUIDE device toggle action Relay Ports Connect to the third-party device, to power on/off the device Default Configuration Ethernet: IP address Ethernet MAC Address Proxy: None IP setting: DHCP PPPOE setting: Disconnected Wireless network ...
- Page 15 USERS GUIDE Security level: Level 1 LAN discovery & connection: Devices can see and connect to the TeamStream device via LAN and toggle WiFi connectivity Remote view lock: Disable viewing of the screen by mobile device Show PCs user status when mirroring: ON ...
- Page 16 USERS GUIDE Attention: The LAN connection is set to “disabled” when restored to the default configuration. If you want to have corporate LAN connection, you should turn it on. To understand how to turn on the device, please refer to the page Security Setting. www.auroramm.com...
- Page 17 USERS GUIDE TeamStream Key Fob Panel The TeamStream key fob is used for toggling the mirroring from personal PC or MAC desktop on the main screen. Name Description The USB connector can be plugged into a Windows USB connector PC/Laptop (for sharing your screen) or the base unit (for pairing the button to the base unit or updating its software) The USB connector can be plugged into a MAC book (for Type-C...
-
Page 18: Software Interface
USERS GUIDE Software Interface Home Page Name Description SSID (Service Set Connect the WIFI namely SSID name to connect the TS- Identifier) Name 100 hotspot. Enter the password when connect the WIFI SSID of TS- PASS (Password) 100. Hotspot IP address of TS-100. Refresh button Corporate LAN IP address of TS-100. - Page 19 USERS GUIDE Connect a mouse to either USB port and click to open Settings the Settings menu. Help documents for quick installation, operation and Help support. Guest and Staff The name of the Guest and staff network. SSID PC and key fob Steps to instruct how to transmit PC/Lap-top onto the quick-to-start main screen.
- Page 20 USERS GUIDE Refresh button: Click the Refresh button on home page to change the password. WiFi IP & LAN IP: Wifi IP: It shows the Hotspot IP address of TS-100. Lan IP: It shows the TS-100’s IP address in the corporate LAN (Local Area Network). Attention: When LAN IP shows “N/A”, it means the TS-100 is not connected to the LAN (Local Area Network) by CAT cable or it failed to get an available IP address by the corporation router.
- Page 21 USERS GUIDE External Control Setup Language System Update Date & Time About Device Help User Manual TeamStream Quick start steps for key fob with PC / laptop Method 1 Step 1: Copy TeamStream.exe/app from the users’ own USB stick or download the file by connecting to WiFi using the SSID &...
-
Page 22: Installation
USERS GUIDE Installation About this chapter: The installation chapter gives an overview of the different ways to install and connect the TS-100 base unit. Overview of this section: Installation methods for the Base unit Table mounting Wall mounting ... - Page 23 USERS GUIDE Necessary parts • 2 mounting screws • 2 plugs • Mounting bracket (included in the box) How to install 1. Drill two holes in the wall as indicated on the drawing. Horizontal distance: 177 mm ± 0.15 2. At the bottom of the base unit, place the bracket on the 4 holes and screw in the 4 screws until fastened. 3.
- Page 24 USERS GUIDE to install antennas at least 15 cm (6 inches) from concrete walls for optimal signal strength. The most favorable situation is a direct line of sight between antennas and any wirelessly connected devices. Any obstruction will cause the signal to follow a longer propagation path, which can result in performance degradation.
- Page 25 USERS GUIDE TS-100 Video Connection Screw the two Antennas to the TS-100. Use an HDMI cable to connect the TS-100’s HDMI output to a 4k or HD display. Connect the power adapter to the TS-100’s DC power socket and an available electrical outlet. After the device is powered on, it will show the homepage as illustrated below.
- Page 26 USERS GUIDE Audio via HDMI output If your devices have an HDMI connection, then a separate audio connection is not necessary. The audio signal is sent together with the video signal to the display. The system is illustrated below: How to connect separate audio 1.
- Page 27 USERS GUIDE Troubleshooting audio The TeamStream key fob will keep capturing and sending the audio of the device you are streaming from, as long as the display is mirrored. 1. Ensure that the laptop is being shared on screen. 2. Check the Settings configuration, to adjust the volume set in TeamStream settings tab. PC / laptop sound By default, TeamStream will mute the internal speaker of the PC or laptop and route the audio to the base unit, after the PC or laptop is successfully mirroring its desktop to the main screen, in order to avoid repeated audio.
- Page 28 USERS GUIDE TS-100 LAN connection The base unit can be connected to a local network or directly to a PC or laptop. For normal operation, a LAN connection is not necessary. The LAN connection can be used for network integration of the TeamStream base unit ...
- Page 29 USERS GUIDE LAN Indicator When connected to LAN, an OSD “Ethernet Connected” is shown on the home page, as shown below: www.auroramm.com...
- Page 30 USERS GUIDE About USB Connections How to connect mouse or touch screen Plug the USB connector of a mouse or touch-screen device to either USB input of the TS-100. How to use USB control For a USB mouse: Single click to select ...
- Page 31 USERS GUIDE Wiring Diagram TeamStream Wireless Connection Using your laptop or mobile device, download the application named “TS-100” in Android Google Play market or Apple App Store. The TS-100 provides two ways to be discovered: 1) Tethering & a portable hotspot, to connect the hotspot & 2) a LAN connection, to connect to the TS-100 or mobile device both in the LAN network www.auroramm.com...
- Page 32 USERS GUIDE Enabling the portable hotspot: Check the SSID and password (PASS) as shown on the homepage: If it shows SSID: N/A and PASS: N/A, please refer to Wireless & network settings, to select the first mode, wireless direct mode, by clicking step-by-step. www.auroramm.com...
- Page 33 USERS GUIDE Enable LAN connection: Be sure the TS-100 is connected to the network. When Local IP shows an active IP address, such as 192.168.3.82, it indicates the TS-100 is successfully connected to LAN and received an appointed IP address. When it shows “N/A”, it means that the TS-100 is not connected to the LAN (Local Area Attention: Network) by CAT cable, or it failed to get an available IP address by the router.
- Page 34 USERS GUIDE TeamStream Key Fob Pairing Connect the USB of the TeamStream key fob to either of the 2 USB2.0 ports on the TS-100. This will pair the TeamStream key fob and the TS-100. The home page will display as shown below. Pair all TeamStream key fobs in the same way.
- Page 35 USERS GUIDE When you complete the pairing, the message table will show “Succeeded to pair!” on the home page. Then, please plug in the TeamStream key fob. If it shows that the pairing fails, please ensure that the USB connection is stable and try again. www.auroramm.com...
-
Page 36: Mirroring
USERS GUIDE Mirroring For PC or Laptop There are three methods to mirror the TS-100 wirelessly on your PC or laptop. Method 1: via the PC launcher’s software Step 1. Connect your PC or laptop’s Wi-Fi to the hotspot of the TS-100. (The ID and password are showed on the homepage). - Page 37 USERS GUIDE Step 3. You have to copy the “Launcher” (PC client software *.exe program) from your USB driver on your Laptop or PC and run it with the display mirrored. Unconnected UI Connected UI Sharing UI Note: You do not need admin rights for installing the PC client software. Method 2: via the TeamStream key fob Step 1.
- Page 38 USERS GUIDE Step 2. Plug the TeamStream key fob into your PC or laptop via a USB port or type-C port. Then, click the *.exe file or app to run on Windows or iOS. Step 3. Enter the password which showed on the homepage of TS-100. Then click the “Ready to share” to mirror.
- Page 39 USERS GUIDE Method 3: via a mobile device Open the “TS-100” application on your mobile device, and you will see the home page of “TS-100” as shown below. and click the device list button “ ” for Android, or click the device list button “ ”...
- Page 40 USERS GUIDE Click the device that was found to connect the TS-100. Android www.auroramm.com...
- Page 41 USERS GUIDE After the pairing is complete, it will return to the home page. For example, if Samsung Galaxy I9300 is connected, you will see the screen below: For iOS devices, please swipe from bottom on desktop to activate the control center. Click the airplay icon on your Apple device and select the target TS-100 to start mirroring through the TS-100 to the main screen.
-
Page 42: Whiteboard And Annotation
USERS GUIDE Whiteboard & Annotation Whiteboard and Annotation requires an HID compatible device, such as an interactive white board or interactive touch screen. It is easy to use, makes collaboration in your business more productive and effective. Documents can be easily written, edited, captured and shared. Whiteboard: Write all your ideas and share the digital notes with anybody. - Page 43 USERS GUIDE Whiteboard Click on the icon to enter the white Whiteboard page. You can create free drawings with your finger using the touch screen or mouse (with multitouch capability). www.auroramm.com...
- Page 44 USERS GUIDE Use the toolbar to select one of the following functions: Icons Function Tool bar 1 Add an empty page Delete the page you are on Display previous or next page Undo: one step backward in changes Tool bar 2 Redo: one step forward in changes Erase part of a drawing or annotation;...
- Page 45 USERS GUIDE Clear the entire drawing / writing on the screen Pen allows writing / drawing in different colors Draw basic geometric shapes Select the color of the board; the drawing will be kept The toolbar will pop up when “Pen” , “Draw shape”, or “Select Tool bar 3 color of board”...
- Page 46 USERS GUIDE Annotation Click on the pen icon to enter the Annotation function. Use the toolbar to select one of the following functions: Icons Function Undo: one step backward in changes Redo: one step forward in changes Erase part of a drawing or annotation, or change the diameter by a longer tap Tool bar 1 Clear the entire drawing or writing on the screen...
- Page 47 USERS GUIDE Close Whiteboard to go back to the home screen. The actual project can be saved on local storage (.WMN) Close Whiteboard to go back to Home screen Tool bar 1 Save the current screenshot on local storage (PNG Download the drawings to connected users Scan the QR-code with your mobile phone’s camera or enter the given IP-address in a browser.
- Page 48 USERS GUIDE Settings Configuration Connect a mouse to either USB 2.0 of the TS-100, and click the settings button on the top right corner to open the settings menu of TS-100, which is shown as below: www.auroramm.com...
- Page 49 USERS GUIDE The main interface of Setting is shown as below, including Ethernet, Wireless network, Moderator Control, General setting, Security Setting, External Control Setup, Language, System Update, Date & time and About Device. www.auroramm.com...
-
Page 50: Ethernet
USERS GUIDE Ethernet: Includes the IP address, Ethernet MAC address, Proxy & IP settings, and PPPoE Settings. IP Address The local IP address of TS-100. Ethernet MAC address The unique MAC address of TS-100. Proxy & IP settings Click to configure proxy. PPPoE settings Click to configure the PPPoE (Point to Point Power over Ethernet) settings. - Page 51 USERS GUIDE IP settings: Click to select the check box, which includes “Static” or “DHCP”. When set to “Static”, it will open-up an advanced settings page, which includes the set items below. Click on the input field to fill out the number. IP address: Click on the input field to fill out the 4 fields.
- Page 52 USERS GUIDE Then, please click “Connect” to connect and return. www.auroramm.com...
-
Page 53: Wireless Network
USERS GUIDE Wireless network The wireless network settings allow you to view information about the wireless network and make any changes. Wireless network settings: Wireless network configuration wizard Show device name Password when mirroring Auto change password ... - Page 54 USERS GUIDE Wireless network configuration wizard Attention: It’s highly recommended not to select the Wireless direct mode. By doing so, you will lose the hotspot of the base unit TS-100. The default setting is the Wireless direct mode. To take advantage of the full benefits of the TeamStream possibilities, TS-100 should be properly integrated into the organization’s network (company/university/school).
- Page 55 USERS GUIDE Only "a-z","A-Z","0-9","-_" and space are legal characters. Click “Next step”. The following three connection methods are available: 6.2.1.2 Wireless direct mode After a factory reset, the TS-100 base unit starts up in the default Stand-Alone “Wireless direct mode”. The base unit creates its own wireless access point, which all transmitters use to connect.
- Page 56 USERS GUIDE base unit via Wi-Fi or via LAN connection to their corporate network. Stand-Alone Connection The internal Wi-Fi access Point of TS-100 is active . The “TeamStream” key fob is paired directly to it. Guest and Staff use the internal Wi-Fi access point of Base-unit to present with all their units. No Internet access is required.
- Page 57 USERS GUIDE Frequency: Click to select 2.4 GHz or 5 GHz Wi-Fi frequency. The default is 5 GHz. Channel: Click to select the Wi-Fi channel. The default is 5 GHz, Auto. If the Wi-Fi channel is changed, no new pairing of the TeamStream key fob is necessary. 2.4 GHz frequency band: Channels 1, 2, 3, 4, 5, 6, 7, 8, 9, 10 &...
- Page 58 USERS GUIDE Wireless Infrastructure mode The TS-100 can connect to a wired network and a wireless network simultaneously. The basic unit is firmly connected to the company network by LAN. Guest users connect to Wi-Fi "Guest" access. The employees (“Staff”) connect to their usual access point of the corporate network, without having to change the Wi-Fi. This is very useful for organizations which have a wireless “Guest”...
- Page 59 USERS GUIDE normal corporate environment and Internet access. The actual received signal strength from the Guest network is shown on the home screen: Follow the instructions of the configuration wizard for “Wireless infrastructure mode”. When pairing the TeamStream key fobs (by plugging the TeamStream key fob in the USB port of the base unit) it will automatically pair to the associated access point of Guest or Staff Wi-Fi and not to TeamStream.
- Page 60 USERS GUIDE In this configuration the built-in Wi-Fi access point of TeamStream is disabled: The key fob and mobile devices can connect to the secured wireless access point of the company network. The base unit of TeamStream is capable of a hard-wired connected via LAN to the Ethernet of the company network.
- Page 61 USERS GUIDE Auto change password Configure to automatically change the Wi-Fi password to a random number every period of time. Click to set the configuration, including: Never: never change the Wi-Fi password. 5 minutes: change the Wi-Fi password every 5 minutes. ...
-
Page 62: Wi-Fi Analyzer
USERS GUIDE Wi-Fi analyzer The Wi-Fi analyzer is an embedded application tool which provides advice for the deployment and Wi-Fi configuration. The IEEE802.11 a/g/n/ac standard makes use of a part of the 2.4GHz ISM band of the 5GHz U-NII bands. The 2.4GHz ISM band (industrial, scientific and medical) goes from 2.400 GHz to 2.500GHz and can be used freely by any radio device for industrial, scientific and medical application. - Page 63 USERS GUIDE 2416 – 2438 2421 – 2443 2426 – 2448 2431 – 2453 2436 – 2458 2441 – 2463 2446 – 2468 2451 – 2473 2456 – 2478 2461 – 2483 The 5GHz U-NII band covers discontinued parts of the RF spectrum between 5.15GHz and 5.825GHz and allows the use of unlicensed wireless systems.
- Page 64 USERS GUIDE and specify a set of procedures to detect and avoid interference with radar systems operating in the U-NII 2 and U-NII 2 extended sub-bands. Currently, the TS-100 access points do not support DFS and TPC as specified in the IEEE 802.11h standard and the list of the 5 GHz channels enabled for the different regional variants is displayed in the next table.
- Page 65 USERS GUIDE Wi-Fi channel selection Wireless communication signals travel over the air. As a result, two devices transmitting at the same time, on the same frequency, and within range of one another, will disturb each other. When the interference caused by other devices is too strong, the packets transmitted by the Wi-Fi transmitter get so distorted that they are no longer correctly understood by the receiver, and as a result these packets must be retransmitted.
- Page 66 USERS GUIDE located closely to one another, more channels may be required. When installing TS-100 base units, we recommend checking with the local IT department which channels are not used by the corporate WLAN infrastructure. In an ideal setup, overlapping channels should not be used for two TS-100 base units within range of each ...
- Page 67 USERS GUIDE Table 1 Clients sharing video Moderate risk of reduced quality Moderate risk of Strong risk of reduced quality reduced quality Strong risk of Strong risk of reduced quality reduced quality Table 1 represents a connection quality matrix when multiple co-located base units use the same channel at the same time for video streaming.
- Page 68 USERS GUIDE Important remarks about the TS-100 system installation A correct installation of the TS-100 base unit is of critical importance to ensure good performance and a robust communication between the TS-100 buttons and the base unit. When installing the TS-100, please follow the rules below: The most favorable setup is a direct line of sight between base unit and buttons.
- Page 69 USERS GUIDE Hide SSID, Password & IP in Status Bar While this option is ticked, the status bar will be hidden so that users cannot connect the base unit via hotspot. Lock Home Screen Status Bar While this option is ticked, the status bar will remain, showing whether it is mirroring or not. During this time, the user may connect to the base unit.
- Page 70 USERS GUIDE Moderator Control Preview Windows If “Preview Windows” is turned on, the connected TeamStream key fobs will be showed on the right column of display as small windows. www.auroramm.com...
- Page 71 USERS GUIDE General Settings This section includes access to Auto Copy Software, Auto Standby, Airplay Screen Quality, HDMI Output Resolution, Enable HDMI CEC, HDMI Input Auto Switch, Home Screen Background Image and Volumes. Auto Copy Software When a USB stick is plugged in, the launcher will be copied automatically to the USB stick, which includes TS- 100.exe, the program for Windows / MacOS and the user manual of TS-100.
- Page 72 USERS GUIDE 24 hours: The TS-100 will go into standby mode every 24 hours. There are 3 methods to wake up the TS-100: Connect the TeamStream key fob to a PC and it successfully connects to the TS-100. Plug an USB mouse to USB port of TS-100 and move the USB mouse to wake up TS-100. Push the power button of TS-100 to wake up.
- Page 73 USERS GUIDE Note: Different airplay quality will occupy different data rate. Under a certain data rage, lower resolution will get better fluency. HDMI Output Resolution Click to select the output resolution for TS-100 HDMI output port. HDMI output resolution: 3840x2160 @60Hz: Set the HDMI output resolution of TS-100 at 3840x2160 60Hz.
- Page 74 USERS GUIDE HDMI Input Auto Switch There are three mode for the HDMI auto switch: Manual: manually switch to wired input signal source by clicking wired icon on the home page. Last-connect switch: Switch to the last-connected wired input source. ...
- Page 75 USERS GUIDE Volume The volume output of TS-100 can be adjusted under the general settings. Security settings The security settings include Security level, LAN discovery & connection, Remote view lock, Show PC’s user status when mirroring, Clear history after meeting, Change admin password and Connection Password. www.auroramm.com...
- Page 76 USERS GUIDE Security Level Based on user requirements, three different security levels can be set in the menu of TeamStream; this allows the user to satisfy different security requirements, according to different security sensitive environments or security policies. A security level is a predefined set of settings. Click on the corresponding entry in the menu if you want to adjust the respective security features.
- Page 77 USERS GUIDE Level 1: Normal safety; this keeps the security in normal and daily usage for any organization, such as a classroom, regular meeting room, etc. Level 2: Higher security; this provides increased security for companies, organizations, government agencies, etc.,through powerful encryption of audio and video data; other security features include limiting the transmission of AirPlay by introducing a password.
- Page 78 USERS GUIDE Remote View Lock When the “Remote View Lock” is ticked, the mobile device will show message “Screen is not allowed to access” as below: www.auroramm.com...
- Page 79 USERS GUIDE Clear History After Meeting You may set how you would like the clear the history after a meeting as follows: Decide by user Never Always The default setting is Always. Change admin password When entering the Settings menu, please input the password. The default password is admin. You may change the password here.
- Page 80 USERS GUIDE Connection Password You may choose between two formats of password to be displayed on the home screen: 4-digit password, beginning with 0000 8-digit password www.auroramm.com...
- Page 81 USERS GUIDE External Control Setup The External Control Setup section provides information on operating the base unit remotely. Language Your active language will be displayed. Click to select the appropriate language. www.auroramm.com...
- Page 82 USERS GUIDE System Update The System Update menu includes both a local update and a full update. Local Update: Includes only the application software. Full Update: Includes the application software and firmware. Factory Reset: Click to perform a factory reset. ...
- Page 83 USERS GUIDE About Device This section includes the model number and software Version of your device. Updating TeamStream TeamStream includes two methods of updating: “Local Update” and “Full Update”. “Local Update” will only update the OS, which is used by users. “Full Update”...
-
Page 84: About The Firmware
USERS GUIDE ABOUT THE FIRMWARE: Where is the firmware? There are two firmwares in the TeamStream system that need to be upgraded: the TS-100’s firmware and the “Launcher” firmware. They are stored in the base unit, and manually transferred to different devices to run. TS-100’s firmware: This firmware is stored in the receiver / base unit. - Page 85 USERS GUIDE “Launcher” firmware: The TeamStream key fob’s firmware version, i.e. the transmitter version, can be seen in the TeamStream PC program icon in the status bar, by right-clicking the TeamStream icon and selecting “About”, as shown below: 1. After you copy “TeamStream.exe” on windows and run the file, the TeamStream PC program icon will be shown in the status bar.
- Page 86 USERS GUIDE Connect the power adapter to the power socket of the TS-100 base unit and turn it on by pressing the front panel power button. The display device shows the home page after a normal boot of the device. Connect a mouse to either one of USB 2.0 port on TS-100, and click the “Settings”...
- Page 87 USERS GUIDE After clicking the update button, “Reboot to continue update?” will be displayed on the device. Please click “OK”. Attention: The unit can’t be powered off until the upgrading process is finished; otherwise, the unit firmware will be corrupted. The upgrading progress displays as shown below, and the unit will reboot automatically after complete the updating 100%.
- Page 88 USERS GUIDE 11. Please click the settings button to open the menu, and check whether the correct FW version is upgraded. 12. You are now able to use the firmware’s new features. The second firmware update method is available for newer firmware versions. Since firmware version 3.1.9C.A6011 and later firmware versions, the TS-100 base unit can be automatically upgraded by using a USB stick with the firmware inside to connect to the USB port of base unit.
- Page 89 USERS GUIDE Updating the Launcher Attention: The USB driver should be FAT 32 format not NTSC format. After upgrading the TS-100, the launcher must be updated as well. There are 2 methods to update the launcher, by USB or by Wi-Fi. Updating the launcher by USB: Connect the USB drive to either USB port of the TS-100.
- Page 90 USERS GUIDE Updating the launcher over Wi-Fi: 1. Connect your PC’s Wi-Fi to the TS-100’s SSID and enter password on the homepage. 2. Open your internet browser and enter the Wi-Fi IP address: 192.168.43.1:8000. www.auroramm.com...
- Page 91 USERS GUIDE 3. Click to enter the launcher’s download page. 4. Choose and click Windows or MAC launcher to download TeamStream.exe. 5. Click to go to the folder where the “TeamStream” exe. program stores. 6. Run the TeamStream.exe program to start sharing. 7.
- Page 92 USERS GUIDE Cleaning leftover TeamStream files on your computer When there are some old versions of TeamStream files left in the laptop, it may influence the performance of the newer TeamStream program. Currently, it needs to be manually cleared, prior to using the newly updated TeamStream firmware.
-
Page 93: Transmitting The Video Data
USERS GUIDE Transmitting video data Operating system requirement: Windows XP/Vista/7/8/8.1/10 32 & 64 bit For Microsoft Windows PC / Laptop 1) Use a USB stick to create the launcher, which includes the TeamStream.exe app for Windows and Macbook, the WirelessMedia APK and User Manual; or download the launcher by connecting your PC to the SSID & PASS displayed on the homepage of your TeamStream device. - Page 94 USERS GUIDE Transmitting iOS mobile device Airplay: The base unit supports “Airplay” receivers, which enable mirroring the desktop of your Apple device to the Airplay receiver, such as an iPhone or iPad. Please swipe from bottom on desktop to activate the control center. Click the airplay icon on your Apple device and select the receiver device TS-100 to connect the TS-100.
- Page 95 USERS GUIDE How to use Airplay www.auroramm.com...
- Page 96 USERS GUIDE WirelessMedia App for iOS Operating system requirement: iOS 7.0 and later 1) Open the “WirelessMedia” application. 2) The main interface of WirelessMedia is shown below: Main Menu: Local Files: Can transmit the local file, including Photos, Video, Music to the receiver to playback. ...
- Page 97 USERS GUIDE File & Operation Zone: Select the file to transmit and do the control operation when available. 3) Local Files: Select the file stored on your local iPhone / iPad, as shown below: File Sharing / File Exchange: Click the file sharing icon to check the IP address. Close the File Sharing dialog box as shown below, to enter into the File List, which is a new generated file list stored under the WirelessMedia app in iOS mobile.
- Page 98 USERS GUIDE Help: to open up the IP address page. Access menu: to allow or forbid to enter into the IP address page. File List: to select the photo, video, music, file to transmit to the main screen. Other page: Click the other functional icon to return File Sharing/File Exchange. PC / Laptop Page www.auroramm.com...
- Page 99 USERS GUIDE 5) Screen Image / Remote View: Click the Screen Image / Remote View to remotely view what’s showing on the main screen. When there is no connected TS-100, the following screen will display: Red Cross Icon: Return to the main interface of WirelessMedia. Operation Zone: Zone to remotely view the active signal and control it as a mouse.
- Page 100 USERS GUIDE 6) Wireless Mouse: Click the wireless mouse to generate a mouse pointer to control the TS-100. Mouse Pointer: Represents the relative position of the mouse on the main screen. Re-position: Reset the position to be the center of the screen. Back: It sends a “Return”...
- Page 101 USERS GUIDE Transmit Android Device Wirelessly WirelessMedia APK for Android 1) Open the WirelessMedia application. 2) The main interface of WirelessMedia is shown as below. It includes the features from: Android 4.x & Android 5.x Interface: Local Files: Transmit the local files, including photos, videos, and music to the receiver to playback. ...
- Page 102 USERS GUIDE 3) Local Files: select the file stored in local iPhone / iPad, as shown below: www.auroramm.com...
- Page 103 USERS GUIDE 4) File Sharing / File Exchange: Click the File Sharing / File Exchange icon to check the IP address. Then enter the IP address on your PC or laptop’s web browser. 1) Enter the IP address on the web browser. 2)...
- Page 104 USERS GUIDE Help: Open the IP address page. Access menu: Allow or forbid access to the IP address page. File List: Select the photo, video or music file to transmit to the main screen. Other page: Click the other functional icon to return File Sharing/File Exchange. 5) Screen Image / Remote View: Click the Screen Image / Remote View to remotely view the main screen.
- Page 105 USERS GUIDE a mouse. Click the Red Cross icon to return. 6) Wireless Mouse: Click the Wireless Mouse to generate a mouse pointer to control the TS-100. Mouse Pointer: Represents the relative position of the mouse on the main screen. Re-position: Resets the position to be the center of the screen.
- Page 106 USERS GUIDE Back: Send a “Return” command to the TS-100 to go back to the previous directory menu. Red Cross Icon: Return to the main interface of “WirelessMedia”. Wired Input Select When on Home Page, it’s used as TeamStream receiver for receiving PC or Mobile devices. Please connect a mouse to either USB 2.0 of TS-100 or use the TeamStream Wireless Mouse / Remote Mouse to click the local wired input icon, as shown below: When local Wired input, it’s used as HDMI switcher with 3 x HDMI input and 1 x VGA input.
-
Page 107: High Level Description
USERS GUIDE High Level Description This TS-100 will be able to wirelessly transmit the PC/laptop’s desktop, mobile smart devices to the main screen. This TS-100 contains four product components HW transmitter button Mini “TeamStream” key fob TeamStream key fob for Microsoft window PC/Lap-top or OSX system for MacBook, SW “TeamStream for android”... - Page 108 USERS GUIDE The Switcher Block will include all the video routing, scaling components and the rear panel connectors. The Front Panel Controller Block which is vertical to The Switcher Block, will include the power backlit buttons, LED's. The video board shall function as “Stand Alone” (without the Front Panel Controller block). The Base Unit TS-100 BASE shall contain an additional scaler switcher inside, which covers additional inputs, contains 3xHDMI 2.0 inputs, 1xVGA input, which supports the full features of HDMI2.0, including HDCP authentication over the HDMI and one HDMI scaled output.
-
Page 109: Standards
USERS GUIDE HDMI - Video and Audio Standards The TS-100 shall transfer all the video and audio capabilities and standards from HDMI inputs to HDMI outputs, including conversion from input standard to output standard according to the Sink EDID. Table 1 describes the capabilities of TS-100 shall support: Table 1 Video Video Input Formats: 1x HDMI... - Page 110 USERS GUIDE Wireless - Video and Audio Standards Video Video Input Formats: 1x wireless, Video Output Formats: 1x HDMI, Video Output Resolution: 3840x2160@60Hz/30Hz, 1920x1200@60Hz, 1920x1080@60Hz Video Capacity: 1080p @ >60Hz Airplay for IOS device 1080P @ >60Hz "TeamStream" app 1080P @ >30Hz for TeamStream key fob transmitter Data rate wireless: Up to 300Mbps Number of simultaneous connections: 14...
- Page 111 USERS GUIDE Thermal The system shall operate correctly in ambient temperatures ranging from 0 to 40 degrees Celsius as measured at 2000m elevation above sea level. Humidity The System shall operate correctly with humidity ranging from 20% to 90% when tested in non-condensing conditions.
- Page 112 USERS GUIDE TeamStream TS-100 Aurora Multimedia Corp. 205 Commercial Court | Morganville, NJ 07751 Phone: 732-591-5800 | Fax: 732-591-6801 www.auroramm.com...
Need help?
Do you have a question about the TeamStream TS-100 and is the answer not in the manual?
Questions and answers