
Related Manuals for Cosori BM201-CO Series

Summary of Contents for Cosori BM201-CO Series
- Page 1 User Manual Original Bread Maker Model: BM201-CO Series Questions or Concerns? Mon–Fri, 9:00 am–5:00 pm PST/PDT support@cosori.com | (888) 402-1684...
- Page 2 CONTACT OUR CHEFS Our helpful, in-house chefs are ready to assist you with any questions you might have! Email: recipes@cosori.com Toll-Free: (888) 402-1684 M–F, 9:00 am–5:00 pm PST/PDT On behalf of all of us at Cosori, Happy cooking!
-
Page 3: Table Of Contents
Table of Contents Package Contents Package Contents 1 x Bread Maker Specifications 1 x Recipe Book Important Safeguards 1 x Quick Reference Guide Getting to Know Your Bread Maker 1 x User Manual • Bread Maker Diagram 1 x Bread Pan •... -
Page 4: Important Safeguards
READ AND SAVE THESE INSTRUCTIONS IMPORTANT SAFEGUARDS Follow basic safety precautions when using your bread maker. Read all instructions. Key Safety Points • Do not use third-party replacement parts or accessories, as this may cause injuries. • Do not touch hot surfaces. To open, use a heat-resistant glove or oven •... - Page 5 (see page 3). Plug & Cord Electromagnetic Fields (EMF) • Your bread maker has a polarized • The Cosori Bread Maker complies plug (one prong is wider than the with all standards regarding other), which fits into a polarized electromagnetic fields (EMF). If outlet only one way.
-
Page 6: Getting To Know Your Bread Maker
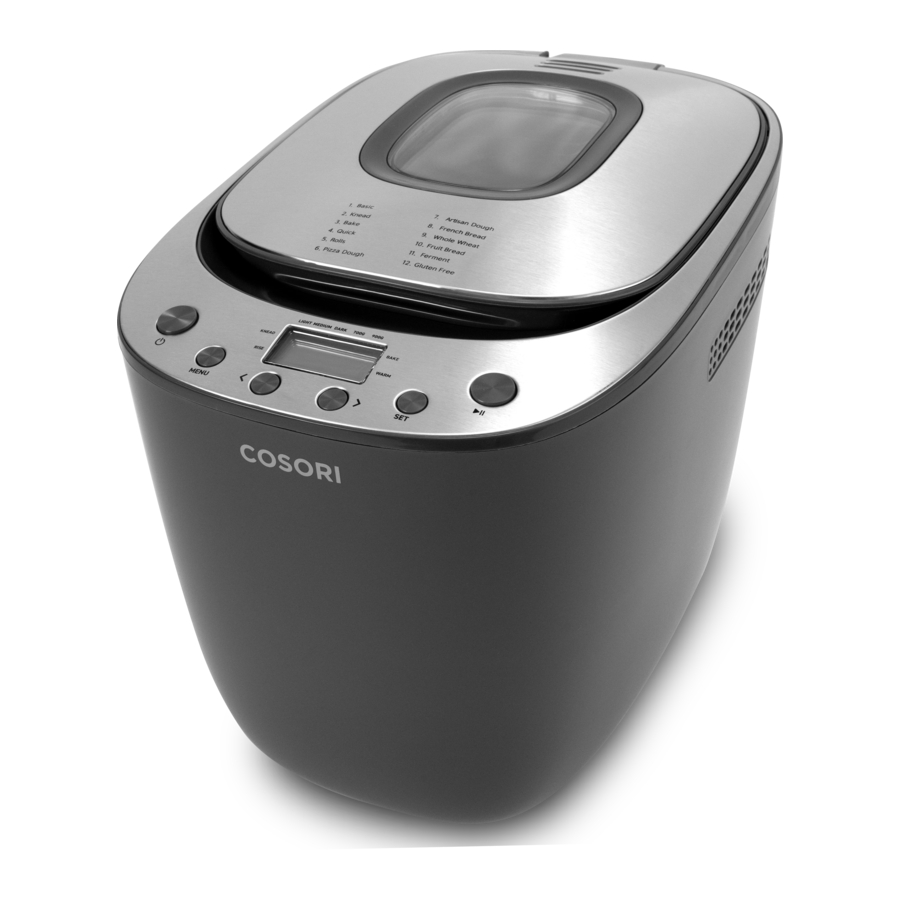
GETTING TO KNOW YOUR BREAD MAKER Your Cosori Bread Maker will help you bake with greater efficiency than ever before. Use 12 presets, customizable controls, and a built-in kneading function to perfect every loaf. Bread Maker Diagram Viewing Window Body... -
Page 7: Presets
Presets Basic Rolls Whole Wheat Knead Pizza Dough Fruit Bread Bake Artisan Dough Ferment Quick French Bread Gluten Free Control Panel On/Off Menu Start/Pause LIGHT MEDIUM DARK 700G 900G KNEAD BAKE RISE WARM MENU Directional Arrows Display Color Weight Kneading Stage Baking Stage Rising Stage Keep Warm... -
Page 8: Display Messages
Display Messages The bread maker is in the kneading stage. Reminder to add any additional ingredients before the second kneading stage. The bread maker is in the rising stage. The bread maker is in the baking stage. Keep Warm is turned on. -
Page 9: Before First Use
BEFORE FIRST USE Setting Up Bread Pan Tips 1. Remove all packaging from the bread • To remove the bread pan, turn it slightly maker, including any temporary stickers. counterclockwise, then lift. 2. Place the bread maker on a stable, level, •... -
Page 10: Using Your Bread Maker
USING YOUR BREAD MAKER Preset Settings Delay Start Presets are programmed with the ideal You can delay the start time of a preset, settings for making different types of bread. unless otherwise noted. To add Delay Start: • You can delay the start of the cooking process, adjust the crust color (Light, •... -
Page 11: Presets
Presets Time Number Name (Hours:Minutes) Adjustable Settings 700g / 900g • Delay Start Basic 3:08 / 3:15 • Color • Weight Knead 0:23 / 0:25 • Weight • Color Bake 1:20 / 1:30 • Weight • Delay Start Quick 2:30 •... -
Page 12: Making Bread
Making Bread 1. Open the lid and remove the bread pan. 12. Wait until the bread maker has cooled, Attach the kneading blade to the bottom then use oven mitts to remove the bread of the pan. [Figure 2.1] pan. Turn the bread pan upside down and shake slightly to release the bread. -
Page 13: Adding Ingredients
Adding Ingredients Quick Breads Quick breads are made with baking powder For select presets, you will be prompted to and baking soda, which are activated by add in any additional ingredients (such as moisture and heat. For best results, all liquids nuts, fruits, seeds, or cheeses) to the bread should be placed in the bottom of the bread maker before the second kneading cycle. -
Page 14: More Functions
Self-Rising Flour Water & Liquids Self-rising flour contains baking powder and Water is an essential ingredient for making salt that add volume. It is typically used in bread, but it can be replaced with milk or cakes. mixed with milk powder to improve flavor and crust color. -
Page 15: Care & Maintenance
CARE & MAINTENANCE Note: Always clean the bread pan and bread maker interior after every use. 1. Turn off and unplug the bread maker. Allow it to cool completely before cleaning. Use oven mitts to pull out the bread pan for faster cooling. 2. -
Page 16: Troubleshooting
TROUBLESHOOTING Problem Possible Solution The bread maker will not Make sure the bread maker is plugged in. turn on. Immediately unplug your bread maker. Wait for smoke to clear before removing the bread pan. Check to see if there are any food particles stuck Smoke is coming out of to the outside of the bread pan or the inside of the bread maker. - Page 17 Problem Possible Solution Reduce liquids in the recipe. The dough rises too much Make sure to add ingredients in the correct order. and spills over the bread pan. If room temperature is above 77°F / 25°C, use refrigerated liquids. If the weather is overly warm, do not use the Delay Start function. If the volume of the dough is too large for the bread pan, reduce all the ingredients by 1/3.
-
Page 18: Warranty Information
If you discover that your product is defective within There is no other express warranty. This warranty the specified warranty period, please contact does not apply: Customer Support via support@cosori.com. DO NOT dispose of your product before contacting us. • If the product has been modified from its Once our Customer Support Team has approved original condition;... -
Page 19: Customer Support
If you have any questions or concerns about your new product, please contact our helpful Customer Support Team. Arovast Corporation Support Hours 1202 N. Miller St., Suite A Mon–Fri, 9:00 am–5:00 pm PST/PDT Anaheim, CA 92806 Email: support@cosori.com Toll-Free: (888) 402-1684 *Please have your order invoice and order ID ready before contacting Customer Support. - Page 20 NOTES...
- Page 21 NOTES...
- Page 22 NOTES...
- Page 23 Cosori community. MORE COSORI PRODUCTS If you’re happy with this bread maker, the line doesn’t stop here. Check out www.cosori.com for a line of all our beautiful and thoughtfully designed cookware. They might be right at home in your kitchen, too!
- Page 24 Questions or Concerns? Mon–Fri, 9:00 am–5:00 pm PST/PDT support@cosori.com | (888) 402-1684 A1-01.01_S_20L08-US...
Need help?
Do you have a question about the BM201-CO Series and is the answer not in the manual?
Questions and answers