
Related Manuals for Amcrest AM-GL300W-4G

Summary of Contents for Amcrest AM-GL300W-4G
- Page 1 Amcrest AM-GL300W-4G 4G GPS Tracker User Manual Version 1.0.2. Revised June 17 , 2020...
-
Page 2: Table Of Contents
2.8 Zones ............................20 2.9. Alerts ............................22 2.9.1. Creating an Alert ........................22 2.9.2. Editing an Alert ........................24 2.9.3. Deleting an Alert ........................25 3. Amcrest GPS iOS Application ......................25 3.1 Map ............................. 27 P a g e... - Page 3 3.2. Trips ............................28 3.3. Reports ............................30 3.4. Zones ............................32 3.5 Alerts ............................36 3.6. Device Settings ........................... 39 3.7. My Profile ........................... 42 3.8. Change Password ........................43 3.9. Logout ............................44 3.10. Contact Us ..........................44 3.11.
-
Page 4: Welcome
Here you can find information about the tracker’s features and functions, as well as information to aid in troubleshooting. To contact Amcrest support, please have your IMEI or ICCID number ready and do one of the following: Visit http://amcrest.com/contacts and use the email form. -
Page 5: Introduction
7. Legal Notice Ensure strict observation of relevant laws to ensure this product cannot be used for any illegal purposes. Amcrest Technologies assumes no liability or risk for misuse of this product and any consequences of said misuse. 1. Introduction This device is recommended for the tracking of assets, vehicles, children, the elderly, etc. -
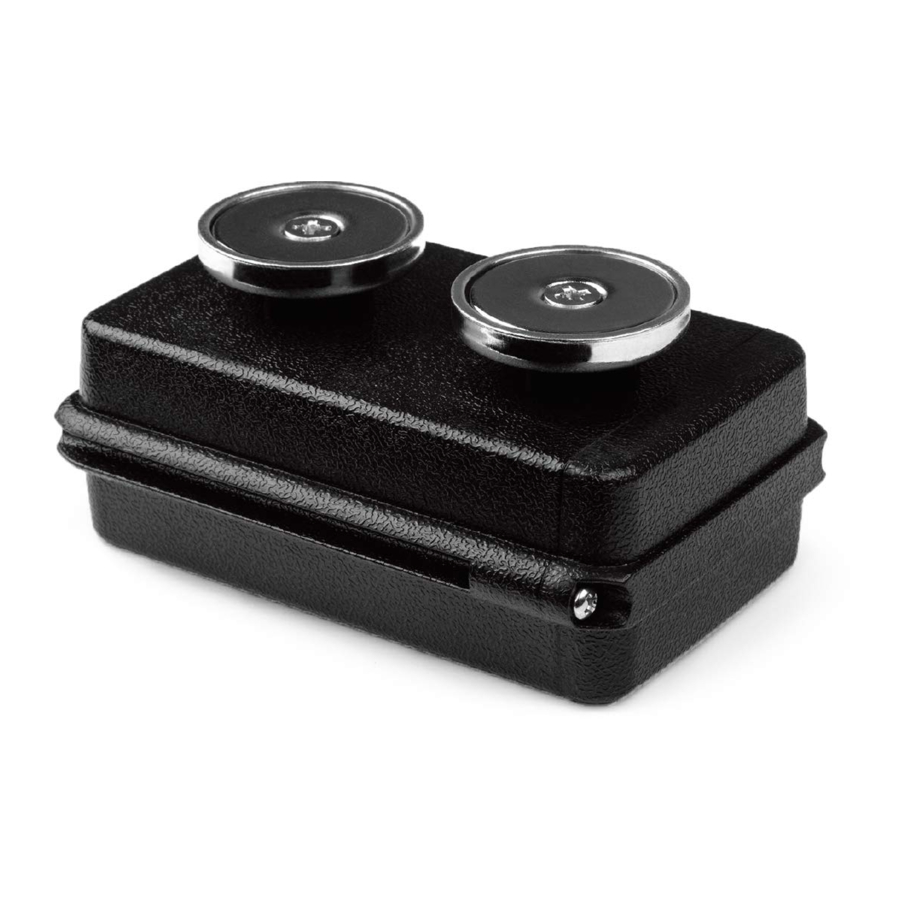
Page 6: Gps Diagram
● SIM card information ● Quick Start Instruction Card 1.3 GPS Diagram Note: The SIM card comes preinstalled in the device. Please do not remove or replace it. If you experience a problem you believe may be related to the preinstalled SIM card, please contact support. 1.4 Charging the Device To charge the device, lift the flap covering the charging post and plug the charger cable end into the unit via the USB port, then plug the charger into a wall outlet. -
Page 7: Activating The Device
GPS tracker. 2.1 Getting Started To log into the Amcrest GPS portal, check your email for your Amcrest GPS activation email containing your username and password. For best security results, please change your password upon logging in for the first time. -
Page 8: Main Menu
The main menu allows the user to view GPS profile information, change passwords, logout, cancel a subscription, purchase new devices, etc. The interface also provides a direct link to download the Amcrest GPS app. The app is available for both iOS and Android via the App Store and Google Play store. P a g e... - Page 9 Access and adjust profile settings on your account. Please note, all information on this form can be updated except for the email address. If an email address will need to be updated on the subscription, please contact Amcrest directly to make the proper changes on the account. Change Password To change the password the user will need access to have access to the old password.
- Page 10 Download the Amcrest GPS app The Amcrest GPS app allows the user to access their device directly via their mobile device. The app is available on both the iOS and Android platforms via the App Store and Google Play store.
-
Page 11: Menu Tabs
2.4 Menu Tabs This section will explore the different menu items in the GPS Portal Interface. See below for an explanation of each menu item: This tab shows the last location of the GPS tracker and map tools. Trips This tab allows the user to see trip history and play trips. Events This tab allows the user to access and manage tracking events. - Page 12 This will populate a full list mapping features that are available for your GPS. Speed: Displays the current speed of the vehicle. Battery: Displays the battery life of the unit. Odometer: Displays the current odometer reading of the vehicle. Last Location: The last reported location of the device. Device Frequency: The current reporting frequency of the device.
-
Page 13: Track
Track: Displays the current position of the device. Street View: Provides a Google Earth image of the last location of the device. Settings: Allows the user to setup or modify alert settings, change skin colors, trip timers, etc. Telemetry Data: Export telemetry data, via an excel file, within a specific date and time range. Get Shareable Tracking Link: This option provides a shareable link in which the user can share the location of the device. -
Page 14: Settings
2.5.4. Settings The settings menu allows the user to enable or disable alert options such as, push notifications, email alerts, trip alerts, speed alerts, power on/off alerts, battery alerts, SOS Emergency alerts, disconnection alerts, tracker skins, etc. 14 | P a g e... -
Page 15: Telemetry Data
2.5.5. Telemetry Data This option allows the user to export a spreadsheet of telemetry data such as, latitude and longitude, speed, odometer, battery percentage, Azimuth, etc. To export telemetry data, click the Telemetry Data option and choose a date and time range. Telemetry data from the last 10 days can only be exported. -
Page 16: Update Interval Frequency / Battery Life
2.5.7. Update Interval Frequency / Battery Life This option provides a quick link to upgrade to a lesser interval GPS tracking plan. For a direct link to this option, visit: https://amcrestgps.net/gps-activation/#/device-plan/update?customer_id=5839121633 2.6. Trips This tab allows the user to see trip history and playback trips. This tab has 5 main areas: 1. - Page 17 3. Trip Metrics – Displays the time of the trip, speed, battery life and odometer (duration) of the trip. 4. Finish Location – Displays here the trip ended for the selected trip of the device. 5. Start Location – Displays the start point of the selected trip of the device. 2.6.1 Playback Trip Data Select the device from the Choose Device drop down menu.
-
Page 18: Reports
Note: Click on the More section to view the Last Trip, Today's Trip, Yesterday's Trip, or Custom Range Trips. Trip data can also be exported as a .pdf or a custom pdf. Click on the Show Last 7 Days or Show Last 30 Days to display either the last 7 or 30 days of data. - Page 19 To generate a custom report, select a device from the Choose Device drop down menu and select a report type from the Select Report Type drop down menu. Choose a date and time of the report to import the option into the interface. Click Custom Reports, then select the report from the interface. To view the location of the report, click on View Location to view the location on the map interface.
-
Page 20: Zones
2.8 Zones The Zones tab allows the user to create a virtual geographic boundary which will alert the user if the device enters or exits a specific zone. To begin creating a custom zone, click on Got it to proceed. Use the mouse to set a custom zone on the map interface. - Page 21 In the custom zone menu, enter the name of the zone, choose the device type, and zone group from the drop-down menu. The zone type can be activated when the vehicle enters a custom zone, exits, or does both. Click Save to save the zone to the interface. The new custom zone will be saved in the interface.
-
Page 22: Alerts
2.9. Alerts The alerts tab allows the user to create alerts based on the custom zones that were previously created. If you wish to proceed with setting up an alert for your newly created zone, you will be automatically directed to the Alarm tab. To set up a new alert for your zone, please select the “Add New Alert” button. - Page 23 Fill out the provided form with the requested information. Enter an alert name, this will be the custom name for your alert. Choose a Device(s), this can be related to individual zones or zone groups. Select your mobile network carrier from the dropdown menu and enter your phone number into the provided field.
-
Page 24: Editing An Alert
2.9.2. Editing an Alert To edit or modify your alert settings, please choose the “View/Edit” option from the alert drop down menu. The form for the selected alert will be displayed. Enter the updated information into the form and click on Update Alert, to update the alert. -
Page 25: Deleting An Alert
To register for an account on the Amcrest GPS app, first, download the app from the App Store. Open the app and log in using your Amcrest GPS account credentials. - Page 26 Once logged in the map interface will be displayed. In the map interface if multiple devices are connected to the account, tap on the device list menu to display all devices. 26 | P a g e...
-
Page 27: Map
Tap on the Info tab to display informaiton about a device such as speed, mileage, location, battery percentage, etc. Tap the settings ( ) icon in the upper left corner of the screen to access in app features for your GPS. -
Page 28: Trips
After you select your device from the device list the app will automatically detect and locate your device on the map. To access information regarding a selected device, click on the Info tab. The Info tab will display the following categories: Speed The current MPH or speed the device is traveling. - Page 29 A representation of the last known trip data will be displayed on the map interface. For details on the current trip, tap on the Trips option. Information such as total miles driven, the date and time, duration, as well as automation options will be provided.
-
Page 30: Reports
3.3. Reports The reports tab allows the user to create custom reports which includes criteria such as, battery, charging, zone alerts, power, SOS/emergency, speed, motion detection, and notifications. Tap on the Reports option to access the interface. 30 | P a g e... - Page 31 Select the GPS device from the interface and select a report type from the Choose Report Type drop down menu. Select all applicable report types and tap Confirm. Tap on the tap on the Select Date option located in the reports interface. A calendar will be displayed which shows applicable dates with reported data.
-
Page 32: Zones
3.4. Zones The Zones tab allows the user to create a virtual geographic boundary which will alert the user if the device enters or exits a specific zone. Tap on the Zones option to access the interface. Tip: To create a zone, start searching locations from the top-left search icon. - Page 33 Enter a name for the zone and choose which type of zone will be reported. This can be an alert when the device enters a zone, exits a zone, or both. A zone group can be applied to the zone, via the Zone Group menu.
- Page 34 Creating a New Zone Group A Zone Group allows multiple zones to be grouped in the interface for a specific device. To create a zone group, tap on the “+ Create New Zone Group”. Note: The zone can be ungrouped in the interface, however, if multiple zones need to be applied to a device it is highly recommended to create a zone group.
- Page 35 Select whether the alert will apply to individual zones or a zone group. Tap on the Select Zone(s) drop down menu and select the applicable zone for the alert from the menu and tap Confirm. Enter all necessary information in the alert menu, select the current mobile carrier for your mobile device from the Mobile Carrier Phone drop down menu, then enter a phone number in which push notifications will be sent.
-
Page 36: Alerts
3.5 Alerts The alerts menu allows the user to add, modify, or remove alerts. Tap the Alerts option to access the interface. Adding an Alert Alerts are used to provide push notification alerts to your mobile device if a device enters or exits a custom zone. - Page 37 Select whether the alert will apply to individual zones or a zone group. Tap on the Select Zone(s) drop down menu and select the applicable zone for the alert from the menu and tap Confirm. Enter all necessary information in the alert menu, select the current mobile carrier for your mobile device from the Mobile Carrier Phone drop down menu, then enter a phone number in which push notifications will be sent.
- Page 38 Editing Alerts To edit an alert, select an alert from the Alert interface and tap on View/Edit. Update the alert information and tap Update Alert. Deleting an Alert To delete an alert, select the alert from the interface and tap Delete. A prompt will ask if you would like to delete the alert, tap Delete to confirm.
-
Page 39: Device Settings
3.6. Device Settings This tab allows the user to adjust general settings associated with a connect GPS device. To access the device settings menu, tap on Device Settings in the main menu. Settings The device can only reboot when the device is not reporting. Device Name: The name of the device being used. - Page 40 All Email Alerts: Enable to allow all email alerts to be sent. All SMS/Text Alerts: Enable to allow all SMS alerts to be sent. Trip Alerts: Enable to allow trip alerts to be sent. Trip Push Notifications: Enable to allow trip push notifications.
- Page 41 Battery Email Alerts: Enable/disable an email to be sent when the battery is too low. Battery SMS/Text Alerts: Enable/disable SMS alerts to be sent if the battery if too low. Low Battery % Alert ≤: Enable/disable alerts if battery percentage is less than or equal to a specified percentage. SOS/Emergency Alerts: Enable/disable all SOS/Emergency alerts.
-
Page 42: My Profile
3.7. My Profile This tab allows users to view and adjust profile settings associated with their GPS account. To access the profile settings, tap on the My Profile option in the main menu. Enter the appropriate information into the form if necessary. Please note, the email address for your profile cannot be updated. -
Page 43: Change Password
3.8. Change Password This tab allows the user to update password information associated with the GPS device. To change the password for your account please tap on the “Change Password” tab located in the main menu of the app. To change the password, enter the old password for your device into the “Old Password” field and then enter a new password into the “New Password”... -
Page 44: Logout
3.10. Contact Us The Contact Us tab provides the user direct access to a contact form which a customer can use to reach Amcrest directly for general support, billing inquiries, or bug reports. To access the form, tap on the Contact Us option located in the main menu. -
Page 45: Important Notice
Enter a brief description of the issue into the “How may we help you?” and tap Send when ready to submit the report. An Amcrest support agent will respond to assist with the issue. 3.11. Important Notice This tab provides users with an important notice regarding their GPS devices. -
Page 46: Android Gps Pro Application Setup
4. Android GPS Pro Application Setup To get started with the Amcrest GPS Pro app make sure you have registered an Amcrest GPS account and activated your GPS. This can be done by going to www.amcrest.com/gps-activation on a laptop or computer, as described in section 1.6 Activating a Device, or via the Amcrest GPS app directly. - Page 47 Tap on the Info tab to display informaiton about a device such as speed, mileage, location, battery percentage, etc. 47 | P a g e...
-
Page 48: Map
Tap the settings ( ) icon in the upper left corner of the screen to access in app features for your GPS. This tab shows the last location of the GPS tracker, as well as allows for use of many different map tools. Trips This tab allows the user to see trip history and play trip data. -
Page 49: Trips
4.2. Trips The tab allows the user to see trip history and playback recorded trip data. To access the trips menu, please select “Trips” from the main menu. A representation of the last known trip data will be displayed on the map interface. For details on the current trip, tap on the Trips option. - Page 50 Information such as total miles driven, the date and time, duration, as well as automation options will be provided. For more information on options provided in this menu, please review the table provided below. Run 24 Hr Runs an automation of all trips recorded in the last 24 hours on the map interface. Note: Tap the Stop button to exit the playback interface.
-
Page 51: Reports
4.3. Reports The reports tab allows the user to create custom reports which includes criteria such as, battery, charging, zone alerts, power, SOS/emergency, speed, motion detection, and notifications. Tap on the Reports option to access the interface. Select the GPS device from the interface and select a report type from the Choose Report Type drop down menu. -
Page 52: Zones
A list of reports for each specific report type will be displayed. Tap on the report type to be viewed to view all data listed in the report. Tap on View Location to view the location of the report. 4.4. Zones The Zones tab allows the user to create a virtual geographic boundary which will alert the user if the device enters or exits a specific zone. - Page 53 To add a custom zone, click on the “+ Add Zone” option. Click “Got it!” in the prompt to begin. Use the search tool in the left-hand corner to select an area to draw the custom zone. Tap on the interface to create a custom zone in a specific area of the map.
- Page 54 Enter a name for the zone and choose which type of zone will be reported. This can be an alert when the device enters a zone, exits a zone, or both. A zone group can be applied to the zone, via the Zone Group menu.
- Page 55 Adding Zone Alerts Once a zone alert has been created the interface will prompt the user to create an alert. Zone alerts are used to provide push notification alerts to your mobile device if a device enters or exits a custom zone. An email can also be used to receive zone alerts if applicable.
- Page 56 Select whether the alert will apply to individual zones or a zone group. Tap on the Select Zone(s) drop down menu and select the applicable zone for the alert from the menu and tap Confirm. Enter all necessary information in the alert menu, select the current mobile carrier for your mobile device from the Mobile Carrier Phone drop down menu, then enter a phone number in which push notifications will be sent.
-
Page 57: Alerts
4.5. Alerts The alerts menu allows the user to add, modify, or remove alerts. Tap the Alerts option to access the interface. Adding an Alert Alerts are used to provide push notification alerts to your mobile device if a device enters or exits a custom zone. - Page 58 Select whether the alert will apply to individual zones or a zone group. Tap on the Select Zone(s) drop down menu and select the applicable zone for the alert from the menu and tap Confirm. Enter all necessary information in the alert menu, select the current mobile carrier for your mobile device from the Mobile Carrier Phone drop down menu, then enter a phone number in which push notifications will be sent.
- Page 59 Editing Alerts To edit an alert, select an alert from the Alert interface and tap on View/Edit. Update the alert information and tap Update Alert. Deleting an Alert To delete an alert, select the alert from the interface and tap Delete. A prompt will ask if you would like to delete the alert, tap Delete to confirm.
-
Page 60: Device Settings
4.6. Device Settings This tab allows the user to adjust general settings associated with a connect GPS device. To access the device settings menu, tap on Device Settings in the main menu. Settings The device can only reboot when the device is not reporting. Device Name: The name of the device being used. - Page 61 All Email Alerts: Enable to allow all email alerts to be sent. All SMS/Text Alerts: Enable to allow all SMS alerts to be sent. Trip Alerts: Enable to allow trip alerts to be sent. Trip Push Notifications: Enable to allow trip push notifications.
- Page 62 Battery Email Alerts: Enable/disable an email to be sent when the battery is too low. Battery SMS/Text Alerts: Enable/disable SMS alerts to be sent if the battery if too low. Low Battery % Alert ≤: Enable/disable alerts if battery percentage is less than or equal to a specified percentage. SOS/Emergency Alerts: Enable/disable all SOS/Emergency alerts.
-
Page 63: My Profile
4.7. My Profile This tab allows users to view and adjust profile settings associated with their GPS account. To access the profile settings, tap on the My Profile option in the main menu. Enter the appropriate information into the form if necessary. Please note, the email address for your profile cannot be updated. -
Page 64: Change Password
4.8. Change Password This tab allows the user to update password information associated with the GPS device. To change the password for your account please tap on the “Change Password” tab located in the main menu of the app. To change the password, enter the old password for your device into the “Old Password” field and then enter a new password into the “New Password”... -
Page 65: Logout
4.10. Contact Us The Contact Us tab provides the user direct access to a contact form which a customer can use to reach Amcrest directly for general support, billing inquiries, or bug reports. To access the form, tap on the Contact Us option located in the main menu. -
Page 66: Important Notice
Enter a brief description of the issue into the “How may we help you?” and tap Send when ready to submit the report. An Amcrest support agent will respond to assist with the issue. 4.11. Important Notice This tab provides users with an important notice regarding their GPS devices. - Page 67 You can view current device battery and other metrics on amcrestgps.com under the Map tab. Q: I just bought an additional Amcrest GPS Tracker. How can I start tracking this device if I already have an amcrestgps.com account? A: First, activate your GPS Tracker on [insert link].
Need help?
Do you have a question about the AM-GL300W-4G and is the answer not in the manual?
Questions and answers