Table of Contents
Advertisement
Quick Links
Advertisement
Table of Contents

Related Manuals for Five12 Vector


Summary of Contents for Five12 Vector
- Page 1 Vector Sequencer v2.0...
-
Page 2: Getting Started
This warranty does not cover damage due to misuse such as: incorrect Take the Vector out of its protective anti-static bag and have a look at power supply voltages, extreme heat or moisture, modified firmware the back. -
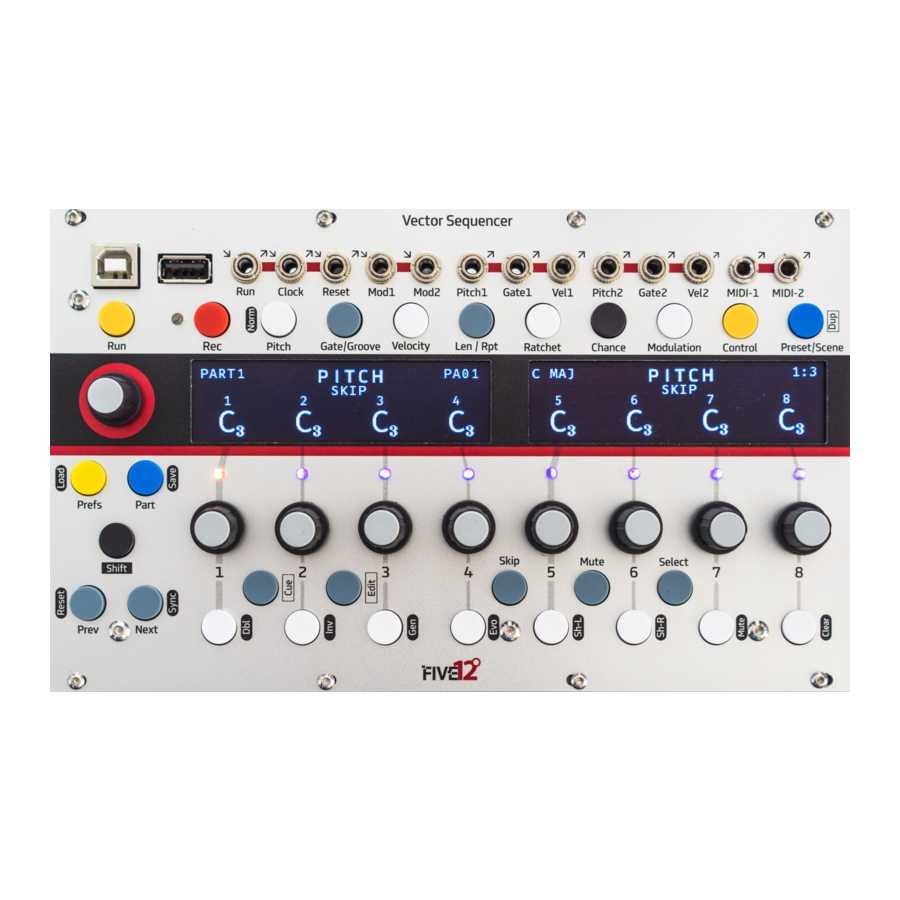
Page 3: Front Panel Tour
Front Panel Tour USB A ‘To Device’ Run, Clock, Reset Mod CV In CV and MIDI Outputs Plug in a MIDI Keyboard for Sync In or Out, Triggers In or Out. -5 to +5V, set mapping Flexible output assignments, entering sequences, or send MIDI setup in Globals. -
Page 4: Sequence Editing
For your first sequence, connect the Pitch1 and Gate1 outputs of the makes it easy to keep track of where you are. Use Next & Prev to edit Vector to other modules in your system, such as an oscillator for pitch steps beyond the first 8. -
Page 5: Rate, Mode
( ). For external reset, see Tips & Tricks on page 25. On the Step Len and Seq Ctl pages, the Vector will calculate the length of the sequence in beats and display it in the top-right corner of... - Page 6 Drum parts. If it is on, MIDI notes from those parts will be spread across 4 TIP: The master tempo for the Vector, and the default key and scale MIDI channels, starting with the one assigned for the MIDI output on the settings for all parts are in Globals.
- Page 7 A Tuning assigns, for Pitch CV outputs, a voltage value to each note, which On the Vector, all pitch values are stored internally as either a note then becomes a frequency when sent to an oscillator. The default tuning is number (similarly to MIDI), or an offset from a default note number.
- Page 8 For more on sync, see External Sync on page 14. : Enable reception of MIDI program change or note MIDI PROG IN number messages to change Presets and Scenes on the Vector. MIDI : You can load up to 2 tunings in MTS format from the SD card. TUNING Channels 1-8 control parts 1-8, channel 16 is for scenes.
- Page 9 Encoder 9 to move between the pages of this section. There output clock divisions by default. Just like the R/C/R jacks, these triggers are 6 pages for the Vector, and 3 more if you have a Jack Expander can also output Part-based triggers. The first 6 triggers can also be connected.
-
Page 10: Rec Mode
Part. by the sequence for this Part. Use this mode to have the Vector act as a MIDI to CV converter. In this mode, the 2nd OLED displays a log of The second parameter sets the for the current Part. - Page 11 Chance Chance Chance operations allow you to add variability to a pattern, such as Jump: Backwards, Anywhere, Forwards randomly skipping or muting a step, jumping to another step, or changing the pitch. For each step in a sequence, you can pick an operation and the probability that it will happen.
- Page 12 Sequence Ops, Generate & Evolve Shift 100%) are added. Sequence Operations ACD2: Acid 2: similar to ACD1, but adds in a few pitch glides. A variety of sequence transformations can be triggered by holding down the Shift key and pushing any of the white keys on the mini keyboard. ACD3, ACD4 : Similar to ACD1 &...
- Page 13 You can also assign any of the Velocity outputs on the the step numbers, of course. The bottom row are the sub-sequence Vector to one of the modulation sequencers for direct output of the sub actual values, which will be offset amounts. The values in the middle row, sequencer's CV values.
- Page 14 PIT5 : Pitch mod, octaves only. POCT is -5 to +5V. Each of the 8 parts of the Vector has two modulation : Pitch mod, octaves and fifths. P712 busses that can listen to either or both of the external modulation : Velocity mod, narrow range.
-
Page 15: Part Setup
Use the Part button to view the names and activity for all 8 Parts on the Presets for that Part! Vector at once. On this page, the white keys of the mini-keyboard can To rename a Part, use encoder 9 to move to the second... - Page 16 Chord & Drum Parts Global Part In addition to the default monophonic sequences, Parts 5-8 can be h7: half-diminished, d7: fully diminished). formatted as four voice Chord or Drum sequencers. This can be done If you want to make a custom chord, which allows much greater flexibility on the 2nd page: Press Global, then Next, the page title will GLOBALS...
-
Page 17: Drum Parts
Chord & Drum Parts Global Part DRUM PARTS As with Chords, Drum Parts have four voices (a.k.a. 'lanes'), but no pitch value, instead each Voice has a velocity level, which you can edit on the page (re-titled on the display). The level values are PITCH DRUM indicated by 4 columns on each sequence step, one per voice. -
Page 18: Disk Mode
DISK MODE The Vector stores Projects on a micro-SD card located on the back of Running the Vector in disk mode allows you to mount the contents of the the module. By default, Projects are auto-loaded when the Vector is SD card onto your computer, which makes it very quick and easy to back powered on, and auto-saved each time the transport is stopped. - Page 19 • Play for x beats/bars then go to an earlier Preset and repeat y times. Each Part on the Vector supports up to 20 Presets, depending on the Use encoders 4-8 to edit the Playlist settings for a Preset. The master maximum length of the sequence.
-
Page 20: External Sync
MIDI Beat Clock, or an external clock pulse. If the clock source in your 1. Connect a MIDI Clock source to the Vector via the USB A or B jacks on modular can generate a run/stop CV and clock ticks at 24PPQN (parts the front panel, or use the 5-pin MIDI Input connector on the Jack per quarter note), you can use the Run &... - Page 21 The Dashboard Part On the Seq Ctl page for any part, you can edit eight parameters at a time for a single Part. The Dashboard is a series of pages that let you edit one parameter for all eight Parts at once. The Dashboard provides an efficient way to modify parameters on the fly during recording or performances.
- Page 22 Mk3. For all models, be sure to first update the firmware on the Launchpad Connect website. Then connect the Launchpad via Part USB to the Vector and after a few seconds it will ‘sync up’ and Selection display the Session page.
- Page 23 The Keys page works as a 4 octave keyboard for use with the Presets for each Part. Active Presets are in amber, all others Vector’s modes. Use the buttons to the right of the main that exist in blue. Use the Up and Down buttons to scroll to grid to set the velocity level On the Launchpad X and Pro, all presets other than the first 8.
- Page 24 Edit Edit The Edit pages allow you to select and edit a Part independently of the Vector’s main UI. For instance, you could be editing a monophonic pitched part on the Vector, while editing a Drum part on the Launchpad.
- Page 25 Launchpad: Edit Drum Edit Page Editing Chord Parts Edit Chord Parts are edited one voice at a time. Use the bottom 4 buttons in the rightmost column to pick the voice. The current voice will be blue, the others will be light pink. Notes that belong to the current voice will show up in the same colors as for a Mono Part, the other notes will be light pink.
-
Page 26: Tips And Tricks
You can copy a preset from one ‘slot’ to another: Hold Edit and press Press and hold Encoder 9 for 5 seconds to restart the Vector. This is very Select, to copy the Preset. Then move to the other Preset using one of handy for getting into and out of disk mode without having to power cycle the white keys on the mini-keyboard. - Page 27 USB Disk mode. External Resets & Triggers • Use a USB ‘A to B’ cable to connect the Vector to your computer. After a The Reset jack and triggers T1 - T6 on the Jack Expander can be used few seconds, the SD Card for the Vector will show up as a new disk.
- Page 28 Vector Sequencer Project - All projects stored on micro-SD Card Preset Part - Eight parts per project Playlist Preset - Up to 20 presets per part depending on sequence length Note Sequence - 16, 32, or 64 steps long Scenes...
Need help?
Do you have a question about the Vector and is the answer not in the manual?
Questions and answers