Table of Contents
Advertisement
Quick Links
Advertisement
Table of Contents

Related Manuals for Avalun LabPad Evolution

Summary of Contents for Avalun LabPad Evolution
- Page 1 User manual avalun.com...
- Page 2 7 Parvis Louis Néel 38000 Grenoble - France T : +33 (0)4 58 00 37 46 welcome@avalun.com avalun.com...
- Page 3 Connected Biology Everywhere Guide d’utilisation LabPad Evolution...
-
Page 4: Table Of Contents
3.1/ First use and initialization 3.2/ Switching on 3.3/ Switching off 3.4/ Reinitialization 4/ Settings 4.1/ Settings menu 4.2/ Adjustable parameters and functionalities of the settings menu 4.3/ Configuration of compatible SmartChip 4.4/ Addition regarding memory management 4.5/ Accessories User manual LabPad Evolution Summary... - Page 5 8.3/ Performing a quality control test: example of the INR 8.4/ Storage of quality control results 9/ Error messages 10/ Troubleshouting 11/ Software updates and online support 12/ Cleaning 13/ Warranty 14/ Technical specifications 15/ List of icons 16/List of symbols User manual LabPad Evolution Summary...
- Page 6 Caution This user guide provides all required information to operate optimally the LabPad ® E volution. Please read it carefully before using the reader for the first time. User manual LabPad Evolution...
-
Page 7: 1/ Introduction
1/ INTRODUCTION... -
Page 8: Intended Use
This user manual only provides instructions of use for the LabPad ® Evolution. Therefore, before using this device, you must imperatively refer to the instructions of use of the compatible SmartChip tests in order to review their specifications, performances and conditions of use. User manual LabPad Evolution Introduction... -
Page 9: Contents Of The Packaging
In the box you will find: The LabPad ® Evolution reader A Charger with a main unit and a micro USB-B cable A Carrying case The User manual Check that all these elements are included; if not, contact your reseller. User manual LabPad Evolution Introduction... -
Page 10: Operating Conditions And Precautions Of Use
Evolution in the carrying bag provided; • Use exclusively the battery charger provided. Do not use a damaged battery charger; • Follow storage and cleaning instruction. In case of improper use, the warranty provided by your reseller will not apply. User manual LabPad Evolution Introduction... -
Page 11: Internal Quality Controls
The expiry date is one of information encoded in the Datamatrix of the SmartShip. CAUTION Appropriate control of the expiry date requires that the date and time of the reader are set properly beforehand (See section 4 “Settings”). User manual LabPad Evolution Introduction... -
Page 12: 2/ Overview
2/ OVERVIEW... -
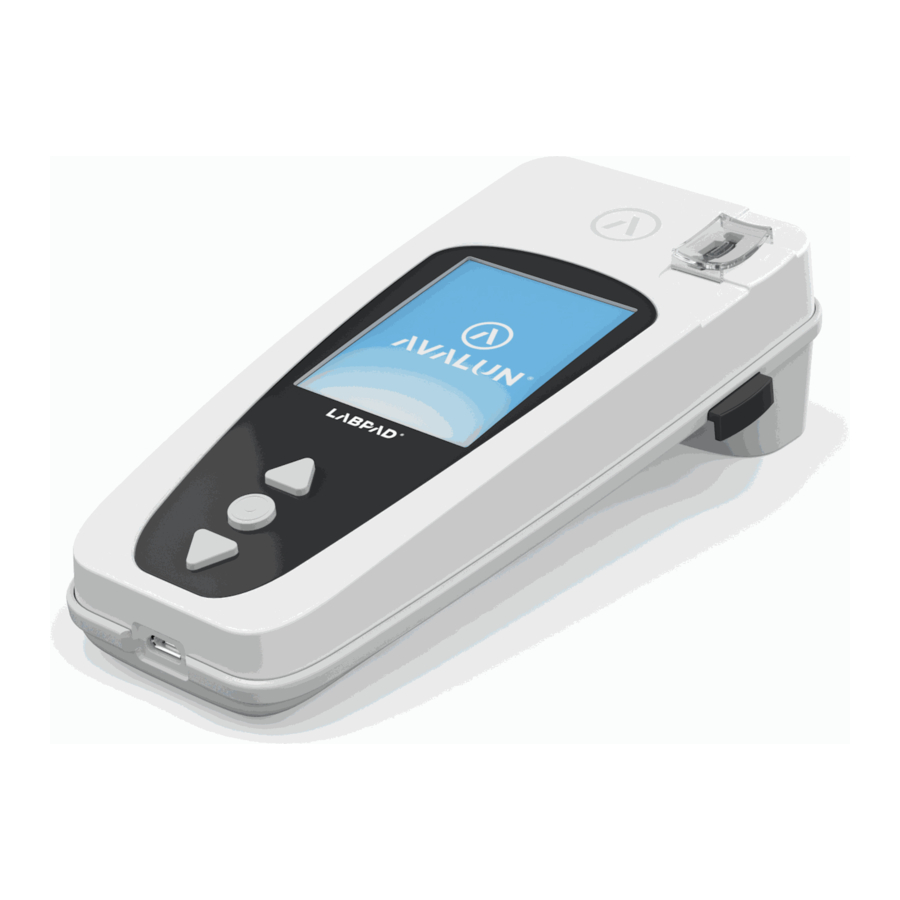
Page 13: Reader
Its design allows for: • Portability (270g weight) • Autonomy (powered by chargeable batteries) • Easy to use (3 buttons interface) • Multi measurements • Connectivity (Bluetooth Low Energy and USB) User manual LabPad Evolution Overview... -
Page 14: User Interface
Pressing the middle power button for 2 seconds NOTE allows to switch on or off the device and to access to the settings menu (See Section 3 « Starting Up»). 2.3/ Color Screen Status bar Connection Time Battery Charge User manual LabPad Evolution Overview... -
Page 15: Power Supply
USB port located on the lower part of the device to the power adaptor using the provided USB cable, then the charger power adapter to a power supply. The provided USB cable complies with CEI 61010 standard. User manual LabPad Evolution Overview... - Page 16 75%, half or 25% white. The indicator is red when the reader does not have enough battery power to perform a test. Quickly plug it in power supply. User manual LabPad Evolution Overview...
-
Page 17: Compatibles Smartchip : Tsmart ® Et Ksmart
Evolution operates with a range of compatible single-use disposable SmartChip tests. Each SmartChip allows for the performance of a specific biology test. Depending on the technology used, there are two SmartChip compatible tests: Tsmart and Ksmart ® ® User manual LabPad Evolution Overview... - Page 18 Broad curved plate on which blood drop is deposited Central micro channel that contains the reagent, where the blood drop is sucked in Datamatrix identifying the test and containing its batch number, expiry date and all information required for testing. User manual LabPad Evolution Overview...
- Page 19 Ksmart format, used for lateral flow testing: ® Sample drop zone Testing zone embedding the reagents Datamatrix identifying the test and containing its batch number, expiry date and all information required for testing. User manual LabPad Evolution Overview...
-
Page 20: Smartchip Insertion
When a new SmartChip is made NOTE available, the software of the reader needs to be updated, this can be done remotely (Cf. Chapitre 11 «Software updates and online support»). 2.6/ SmartChip Insertion «Click» User manual LabPad Evolution Overview... -
Page 21: Contact-Free Smartchip Ejection
To minimize the risk of contamination, this unique ejection system was designed such as user never gets in contact with a used SmartChip. CAUTION Do not manually remove a used SmartChip from the insertion slot of the readers, it may damage its internal mechanics. User manual LabPad Evolution Overview... -
Page 22: 3/ Starting Up
3/ STARTING UP... -
Page 23: First Use And Initialization
This initialization process consists in 4 steps: 1. Language preference 2. Display and acknowledgement of advises concerning the use of the product 3. Date and time format preferences 4. Date and time setup User manual LabPad Evolution Starting up... - Page 24 NOTE it later from the «Settings» menu (Cf. Section 4 « S ettings » Once the initialization steps are complete, the following home screen is displayed: Your LabPad ® Evolution is ready to use. User manual LabPad Evolution Starting up...
-
Page 25: Switching On
Once the initialization process is complete, the reader starts up. You can switch on the reader by: • pressing the middle button for 2 seconds • connecting the reader with the supplied USB cable User manual LabPad Evolution Starting up... -
Page 26: Switching Off
NOTE this duration according to your needs (Cf. Section 4 « S ettings » 3.4/ Reinitialization The reinitialization process allows to restore LabPad ® Evolution status as obtained following its first use and initialization. User manual LabPad Evolution Starting up... - Page 27 , reader must be plugged into an appropriate mains supply using the provided charger. To start the reinitialization process, press simultaneously both triangular buttons for at least 5 seconds. A first confirmation screen appears. User manual LabPad Evolution Starting up...
- Page 28 After validation, a second confirmation screen appears. Once started, reinitialization steps are identical to first use and initiali- zation ones (See Section 3.1 « F irst use and initialization » User manual LabPad Evolution Starting up...
-
Page 29: 4/ Settings
4/ SETTINGS... -
Page 30: Settings Menu
4.1/ Settings menu Press the validation button for 2 seconds to access settings menu: Then use triangular navigation buttons to select option required. User manual LabPad Evolution Settings... -
Page 31: Adjustable Parameters And Functionalities Of The Settings Menu
Accessories: Direct connection setup to a Bluetooth bar code reader or printer USB Connection: this status allows for online support when connected to a PC using the provided USB cable (See Section 11 « S oftware updates and online support») User manual LabPad Evolution Settings... -
Page 32: Configuration Of Compatible Smartchip
SmartChip tests get displayed on the screen. In case of a compatible SmartChip is not appearing in the list, it means that a software update is required NOTE (See Section 11 «Software update and online support») Select required SmartChip for configuration. User manual LabPad Evolution Settings... - Page 33 INR and du SARS-CoV-2 Ag in examples below: The name of the test currently being configurated is displayed in the upper banner preceded by the NOTE following pictogram: . Refer to the instructions for use of the related SmartChip for more information. User manual LabPad Evolution Settings...
-
Page 34: Addition Regarding Memory Management
« R esults deletion » is made available as part of submenu « M easurements » . This option allows to delete older results starting from the oldest one by using the navigation buttons. User manual LabPad Evolution Settings... -
Page 35: Accessories
• A bar code reader for patient identification • A thermal printer for results printing Select the accessory to be paired with the reader and follow its instruction manual for pairing. User manual LabPad Evolution Settings... -
Page 36: 5/ Workflow Integration
5/ WORKFLOW INTEGRATION... -
Page 37: Principle
“Operated by” followed by a specific logo which was downloaded from the information system. ® Example of a LabPad Evolution configured by an imaginary laboratory called “Buenavista Lab”: User Manual LabPad Evolution Workflow integration... - Page 38 • Locking of the meter for missing or expired quality control. CAUTION Configuration inherited when connecting to an information system is not reversible, unless proceeding to a reinitialization (See Section 3.4 « R einitialization » User Manual LabPad Evolution Workflow integration...
-
Page 39: Usb Connection
Bluetooth connection is mostly used to connect to a service running on smartphone or a tablet in the background. Check beforehand with the administrator of your information system that such service is correctly installed and properly launched on the targeted device. User Manual LabPad Evolution Workflow integration... - Page 40 Then proceed as follows to connect your reader via Bluetooth: 1. Select « B luetooth » from the settings menu (See Section 4 « S ettings»). The activated or deactivated Bluetooth status remains unchanged when switching off and on NOTE the reader. User Manual LabPad Evolution Workflow integration...
- Page 41 6 digits PIN code preceded by the mention « w aiting for connection » is displayed on the screen. For example: This means that the LabPad ® Evolution is ready to be paired from the Bluetooth device. User Manual LabPad Evolution Workflow integration...
- Page 42 LabPad Evolution: 0nce paired, the Bluetooth device and the LabPad ® Evolution are supposed to automatically reconnect NOTE whenever they are in their Bluetooth range. User Manual LabPad Evolution Workflow integration...
-
Page 43: 6/ Smartchip Rapid Test Performance
6/ SMARTCHIP RAPID TEST PERFORMANCE... -
Page 44: Getting Ready
Evolution is paired with a bar code reader accessory (See section 4.5 «Accessories») or integrated in a workflow (See Section 5 «workflow integration») patient identification is re- quired prior to performing a test. User manual LabPad Evolution SmartChip rapid test performance... - Page 45 Evolution is switched on and displays the welcome screen; • Depending of the connection type, check that the corresponding indicator is displayed on the left of the upper bar: Bar code reader Bluetooth device USB device Bluetooth accessory User manual LabPad Evolution SmartChip rapid test performance...
- Page 46 (data entry from, bar code or QR code reading, choosing from a list, etc.) and to precise the nature of biologic test to perform. User manual LabPad Evolution SmartChip rapid test performance...
- Page 47 . Operator name on the left side of the info bar at the bottom of the screen • The LabPad ® Evolution is ready for the insertion of the designated SmartChip User manual LabPad Evolution SmartChip rapid test performance...
- Page 48 (See Section 5 « W orkflow integration » information system If there is any doubt contact your administrator. Note that retrospectively reconciliate the result of the test with patient information will not be possible. User manual LabPad Evolution SmartChip rapid test performance...
-
Page 49: Tsmart ® Test Sampling And Reading
Tsmart must be ejected ® (See Section 9 «Error messages») : you will have to repeat the process, using another Tsmart when required. ® User manual LabPad Evolution SmartChip rapid test performance... - Page 50 Prick the side of a fingertip of the patient. A minimum volume of 3µL of blood is required to fill the central micro channel. Do not squeeze the finger, as this may lead to incorrect results. User manual LabPad Evolution SmartChip rapid test performance...
- Page 51 Apply the blood drop in one go. Squeezing the finger or dropping the blood in more than one go may lead to incorrect results. Usage of micropipettes is recommended in order to decouple blood collection and blood dropping. User manual LabPad Evolution SmartChip rapid test performance...
-
Page 52: Ksmart ® Test Sampling And Reading
® within a cellulose strip which is functionalized to capture the target (protein, enzyme, virus, …). Sample must be dropped into the drop zone of the Ksmart prior to Ksmart insertion. ® User manual LabPad Evolution SmartChip rapid test performance... - Page 53 ® must respectively be inserted either whiting 2 minutes following sample dropping (“Standard” reading by default), or after a specific delay ranged from 10 to 30 minutes depending of elected test, which User manual LabPad Evolution SmartChip rapid test performance...
-
Page 54: Result Display And Smartchip Ejection
If an error occurs during the test, a red bar with an error number is displayed. You must eject the SmartChip and NOTE refer to section 9 «Error Messages» for likely causes and possible solutions. User manual LabPad Evolution SmartChip rapid test performance... -
Page 55: 7/ Retrieving Saved Results
7/ RETRIEVING SAVED RESULTS... -
Page 56: Browsing The List Of Results
7.1/ Browsing the list of results Use the triangular navigation buttons to scroll through the results list. Hold down navigation buttons to scroll at a faster pace until you find the desired positioning in the list. Scrolling indicator User manual LabPad Evolution Retrieving saved results... -
Page 57: Selecting One Result For Display
Press again the middle button to display the result which, depending on the test, may be displayed in several screens. When several units are available, use triangular navigation buttons to select the desired one. User manual LabPad Evolution Retrieving saved results... - Page 58 Examples: User manual LabPad Evolution Retrieving saved results...
-
Page 59: 8/ Quality Control
8/ QUALITY CONTROL Guide d’utilisation LabPad Evolution Mémorisation des résultats de mesure... -
Page 60: Usage Of A Liquid Quality Control (Lqc)
Select « S ettings » , then « M easurements » , then « Q uality control » then ® «Continue». Once the LabPad Evolution is ready to start a quality control, t he following screen is displayed: User manual LabPad Evolution Quality control... -
Page 61: Performing A Quality Control Test: Example Of The Inr
After inserting a Tsmart INR, ® the heating screen is displayed on a pink background, while the mention “QC” (for “Quality Control”) is displayed directly next to the name of the measurement in the title bar: User manual LabPad Evolution Quality control... - Page 62 After heating, operator is prompted to drop a couple of drops of LQC on the curved plate of the Tsmart to perform the quality control test: ® Once coagulation occurs, result is displayed in full screen and reader beeps until the Tsmart is ejected. ® User manual LabPad Evolution Quality control...
-
Page 63: Storage Of Quality Control Results
Evolution in the same way as routine results. Hence, only the “QC” mention is displayed directly next to the measurement descriptions allows to differentiate a quality control from a routine test when browsing the list of results: User manual LabPad Evolution Quality control... -
Page 64: 9/ Error Messages
9/ ERROR MESSAGES If an error occurs, an error message such as “Error XX”, where XX is the error number, is displayed on a red background on the screen of the reader. Refer to the below table for likely causes and possible solutions. - Page 65 The SmartChip Eject the SmartChip error is not inserted and insert it again as far properly or as it will go. If an error the Datamatrix occurs again, use another is damaged / SmartChip. absent. User manual LabPad Evolution Error messages...
- Page 66 1 min. Beyond this delay, was in a status inserting it again. using another SmartChip where a new is recommended. test cannot be performed. User manual LabPad Evolution Error messages...
- Page 67 103 Inadequate Eject the microcuvette coagulation and repeat the test with another Tsmart ® INR, making sure you strictly follow the instructions for applying blood. User manual LabPad Evolution Error messages...
- Page 68 Ksmart for sampling insertion of and endpoint reading the Ksmart or defective Ksmart 107 Soiled Ksmart Inappropriate Eject Ksmart and repeat sampling or de- the test with another fective Ksmart Ksmart User manual LabPad Evolution Error messages...
- Page 69 LabPad An error Eject the SmartChip, If the error occurs again, internal error occurred during restart the device contact your reseller. after the test. (See Section 3.3 Power off), and try again. User manual LabPad Evolution Error messages...
-
Page 70: 10/ Troubleshouting
10/ TROUBLESHOUTING... - Page 71 PROBLEM FOUND POSSIBLE SOLUTION ® The LabPad Plug the battery charger in Evolution and check the battery icon: is not working if it is red, leave it to charge for at least 4 hours. User manual LabPad Evolution Troubleshouting...
- Page 72 ® Hold down the middle Evolution power button for more is frozen on than 20 seconds. a display The Tsmart INR is Do not open the device. ® broken inside the Contact your reseller. device User manual LabPad Evolution Troubleshouting...
-
Page 73: 11/ Software Updates And Online Support
11/ SOFTWARE UPDATES AND ONLINE SUPPORT... - Page 74 Such updates as well as certain support services might be performed remotely by connecting via Internet to specific web services made available by Avalun. Whenever a software update or support service is required, your reseller will provide the link to the appropriate web service.
-
Page 75: 12/ Cleaning
12/ CLEANING... - Page 76 Make sure not to drop any liquid in the SmartChip insertion area; if this occurs, do not use the device and immediately contact your reseller. Be especially careful not to use any liquid in spray. User manual LabPad Evolution Cleaning...
-
Page 77: 13/ Warranty
13/ WARRANTY The LabPad® Evolution is under warranty by your reseller. In the event of defect (See Section 10 Troubleshooting) during the warranty period, the device can be repaired or exchanged. Please contact your reseller for more information. -
Page 78: 14/ Technical Specifications
14/ TECHNICAL SPECIFICATIONS... - Page 79 100-240V, 50-60Hz, input 0.2A output 1.0A, 5Vdc When charging, the range of temperature accepted is 5 to 40°C / 41 to 104°F. Can withstand main supply voltage fluctuations up to ±10% of the nominal voltage. User manual LabPad Evolution Technical specifications...
- Page 80 Beep Factory setting for beep frequency is 4,000Hz Dimensions L 17.2cm W 7.4 cm H from 2.0 to 4.6 cm Weight 270g net User manual LabPad Evolution Technical specifications...
- Page 81 15/ LIST OF ICONES USED...
- Page 82 Battery is ¼ full Battery needs charging Battery is charging Bluetooth connection indicator USB connection indicator Barcode reader connection indicator Printer connection indicator Measurement setting in progress Reader is ready for SmartChip insertion User manual LabPad Evolution List of icons used...
-
Page 83: 15/ List Of Icons
Apply a couple of droops of QLC on the Tsmart curved plate ® INR test in progress An error occurred Patient information: Pink background: female Blue background : male Operator Date of first transmission Never transmitted result Current logged user User manual LabPad Evolution List of icons used... -
Page 84: 16/List Of Symbols
16/ LIST OF SYMBOLS USED... - Page 85 Discard in a bin dedicated to electronic waste Serial number Product reference Global Trade Item Number Temperature limits between which the device can be safely exposed Refer to the documents inserted in the box User manual LabPad Evolution List of symbols used...
- Page 86 Symbols of the battery charger: DC voltage AC voltage The protection of the battery charger is ensured by means of double insulation. Symbol of the laser inside the device: Class I laser device User manual LabPad Evolution List of symbols used...
- Page 87 AVALUN SAS 7, Parvis Louis Néel Graphic design : Patrick Delgado / Inooui Design 38000 Grenoble – France welcome@inooui.design...
- Page 88 LabPad ® Evolution_IFU EN V1_202011...
Need help?
Do you have a question about the LabPad Evolution and is the answer not in the manual?
Questions and answers