Table of Contents
Advertisement
Available languages
Available languages
PIRAMID
DETECTEUR BI-TECHNOLOGIE PIRAMID
FR
Notice d'installation -
Pages 1-32
PIRAMID DUAL-TECHNOLOGY SENSOR
EN
Installation instructions -
Pages 33-64
1, rue du Dauphiné – CS 90323 – 69517 VAULX-EN-VELIN CEDEX – FRANCE
Tél. : +33(0) 4.78.03.06.10 - Fax : +33(0) 4.78.68.24.61
Site web :
www.sorhea.fr
Email :
commercial@sorhea.fr
NT396 / V1.3 / 10.19
Advertisement
Chapters
Table of Contents

Summary of Contents for SORHEA PIRAMID
- Page 1 PIRAMID DETECTEUR BI-TECHNOLOGIE PIRAMID Notice d’installation - Pages 1-32 PIRAMID DUAL-TECHNOLOGY SENSOR Installation instructions - Pages 33-64 1, rue du Dauphiné – CS 90323 – 69517 VAULX-EN-VELIN CEDEX – FRANCE Tél. : +33(0) 4.78.03.06.10 - Fax : +33(0) 4.78.68.24.61 Site web : www.sorhea.fr...
-
Page 3: Table Of Contents
MISE EN OEUVRE ..................11 Réglage du PIRAMID ....................... 11 Alarme anti-masquage ..................... 14 Lecture des paramètres du PIRAMID : Mode « READ » ..........15 APPLICATION SMARTPHONE ..............16 Gestion des paramètres système ..................18 Réglages du PIRAMID ..................... 18 Information temps réel ..................... -
Page 4: Generalites
SORHEA PIRAMID GENERALITES PIRAMID est un détecteur composé de 2 types de technologie : • Un infrarouge passif constitué d’un capteur pyroelectric infrared (PIR) qui capte les rayonnements du corps humain émis dans la bande infrarouge. • Une antenne (MW) hyperfréquence constituée d’un émetteur à fréquence 10.510GHz et d’un récepteur à... -
Page 5: Description
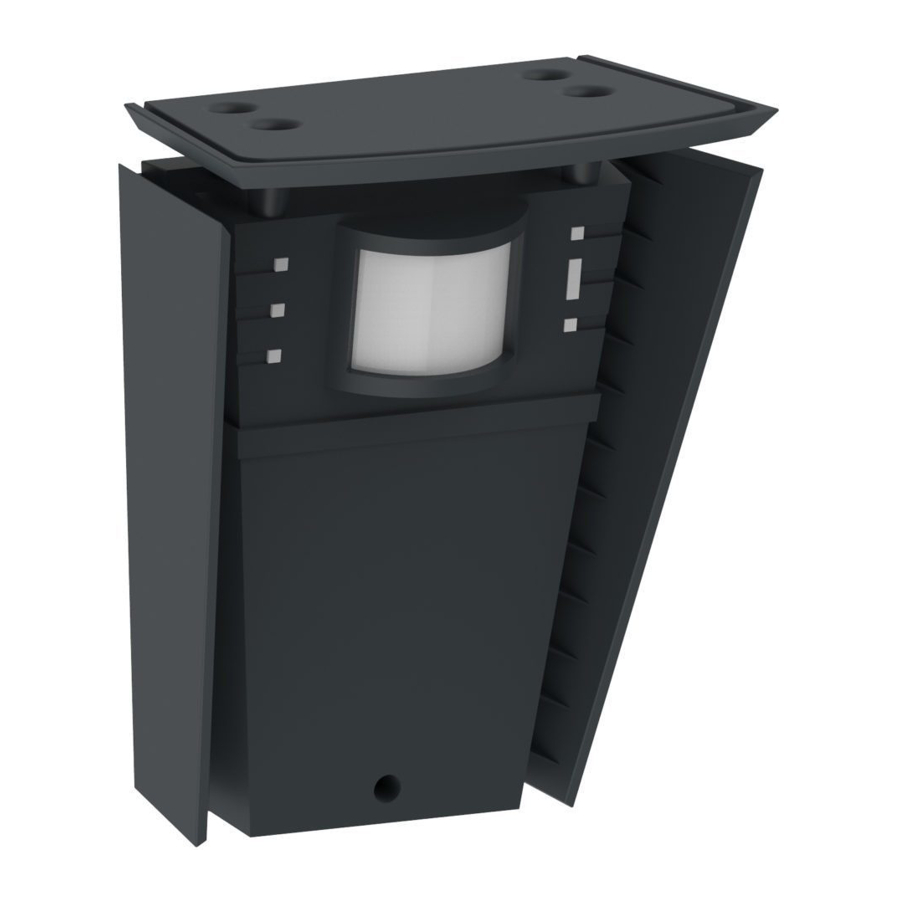
SORHEA PIRAMID DESCRIPTION Lentille PIR Capot antenne MW Vue de face Vue de dos Vue de dessus Vue de côté - 3 -... -
Page 6: Fonctionnement
SORHEA PIRAMID FONCTIONNEMENT • SDI-78XL2-A : caractéristiques de la zone de détection Vue de dessus Vue de côté 30 m • SDI-78XL2-B : caractéristiques de la zone de détection Vue de dessus Vue de côté 30 m • SDI-78XL2-C : caractéristiques de la zone de détection Vue de dessus Vue de côté... -
Page 7: Precautions De Mise En Oeuvre
SORHEA PIRAMID PRECAUTIONS DE MISE EN OEUVRE Afin de bien installer le détecteur, il est important de respecter certaines règles : VERIFIER QU'AUCUNE VEGETATION N’EST DANS LA ZONE DE DETECTION. VERIFIER QUE LA VEGETATION LA PLUS PROCHE NE GENE PAS LA ZONE DE DETECTION EN CAS DE VENT. - Page 8 PERIMETRIQUE NE PAS utiliser le PIRAMID comme détecteur périmétrique. Pour une bonne A FAIRE : Utiliser le PIRAMID comme un détecteur à l’approche (utilisation possible des détection transversale, il faut régler la sensibilité au maximum, ce qui risque d’augmenter le lentilles A, B ou C).
- Page 9 SORHEA PIRAMID ATTENTION AUX DÉCHETS SUSCEPTIBLES D’ATTIRER LES PETITS ANIMAUX ET LES OISEAUX NE PAS laisser de poubelles dans le champ du détecteur qui pourraient attirer les petits animaux et les oiseaux. Lorsque qu’ils se trouvent à proximité du détecteur, ils sont considérés comme des cibles de taille que le...
- Page 10 SORHEA PIRAMID ATTENTION AUX PASSAGES D’ANIMAUX PAR DES TROUS DANS UN GRILLAGE OU CREUSÉS SOUS CELUI-CI NE PAS ignorer les ouvertures pratiquées dans un grillage et offrant un passage facile aux A FAIRE : Réparer les trous du grillage (ou animaux de petite taille (chiens, chats, ratons combler ceux creusés sous celui-ci) afin de...
-
Page 11: Installation
SORHEA PIRAMID INSTALLATION Pour un fonctionnement optimal, le détecteur PIRAMID doit être installé à une hauteur comprise entre 2 et 4m. Gabarit de perçage pour fixation murale : 60mm ACCESSOIRES NECESSAIRES POUR LA FIXATION DU PIRAMID : 4 Vis de fixation 4.8x60 4 Chevilles 4 Rondelles Ø5... -
Page 12: Raccordement
Ouverture du capot Desserrer la vis, soulever le capot vers le haut puis le tirer. RACCORDEMENT 6.1 Raccordement du PIRAMID 1 : 12V DC alimentation 9 : Bus A RS485 2 : 0V DC alimentation 10 : Bus B RS485... -
Page 13: Longueur Maximale Des Câbles De L'alimentation 12Vdc
En cas de mise en parallèle par polarité de plusieurs fils de même section, les distances indiquées sont à multiplier par le nombre de fils couplés. MISE EN OEUVRE 7.1 Réglage du PIRAMID Utilisation du mode réglage : Led ALARM... - Page 14 1. Basculer le switch « Mode Test » en position ON pour passer en mode réglage. 2. Régler la sensibilité au maximum (roue codeuse sur 9). Roue codeuse réglage Sensibilité 3. Régler la distance max au-delà de laquelle le PIRAMID ne doit plus détecter. Valeur Roue codeuse réglage Distance Roue codeuse Distance max.
- Page 15 Led PIR Led MW 5. Déterminer la zone de détection souhaitée du PIRAMID en effectuant des passages dans cette zone. Jouer sur l’orientation du détecteur et la sensibilité. Lorsqu’une des technologies passe en alarme, PIR ou MW, la led associée passe en rouge.
-
Page 16: Alarme Anti-Masquage
SORHEA PIRAMID 7. Fermer le capot. 8. En fonctionnement normal, les Leds sont éteintes. Il est possible de les activer via le concentrateur (cf. §9.3) ou l’application smartphone (cf. §8.2). Nota : les relais « INTRUSION » et « MASQUAGE » restent en alarme lorsque le switch «... -
Page 17: Lecture Des Paramètres Du Piramid : Mode " Read
SORHEA PIRAMID 7.3 Lecture des paramètres du PIRAMID : Mode « READ » Les paramètres de sensibilité et de distance max. de détection peuvent être modifiés : Soit par les roues codeuses sur le détecteur Soit par le concentrateur MAXIBUS UNIVERSEL Soit par l’application smartphone... -
Page 18: Application Smartphone
5. Basculer le switch « Mode test » sur OFF pour sortir du mode « READ ». APPLICATION SMARTPHONE Nota : L’application smartphone est compatible à partir de Android 4.1. 1. Télécharger l’application smartphone « Sorhea Connect ». Sorhea Connect 2. Lancer l’application « Sorhea Connect ». - Page 19 4. Faire une alarme AP pour activer la liaison BLE avec l’application smartphone : laisser le contact AP appuyé pendant 2 secondes, puis relâcher. Nota : la liaison reste active tant que le PIRAMID est connecté à l’application smartphone. Elle se désactive lorsque le capot est fermé (AP fermé) ou après 1min d’inactivité...
-
Page 20: Gestion Des Paramètres Système
SORHEA PIRAMID 8.1 Gestion des paramètres système Mise à l’heure du PIRAMID Nom du PIRAMID : Cliquer sur le nom pour le changer puis sur Sauvegarder. 8.2 Réglages du PIRAMID 1. Cliquer sur Menu Menu 2. Cliquer sur Réglages Réglages... - Page 21 SORHEA PIRAMID Légende : 3. Réglages du PIRAMID Activer Désactiver Détecteur éjecté Détecteur non éjecté Activation / désactivation des Leds Activation / désactivation du buzzer Activation / désactivation sorties relais Activation / désactivation anti-masquage Ejection MW Ejection PIR Sens de détection : Sauvegarde des paramètres au-dessus...
-
Page 22: Information Temps Réel
1. Cliquer sur Menu Menu 2. Cliquer sur Temps réel Temps réel 3. Visualisation des informations en temps réel du PIRAMID Etat du MW et du PIR Etat des relais intrusion et anti-masquage Etat du switch « Mode Test »... -
Page 23: Historique
SORHEA PIRAMID 8.4 Historique 1. Cliquer sur Menu Menu 2. Cliquer sur Historique Historique - 21 -... - Page 24 SORHEA PIRAMID 3. Visualisation de l’historique Date/Heure de l’évènement Type d’évènement Réglages du PIRAMID Liste des évènements : Alarme intrusion Alarme masquage Fin d’alarme masquage Alarme auto-protection Fin d’alarme auto-protection Mise à l’heure Modification configuration ...
-
Page 25: Configuration De L'adresse Réseau
Menu 2. Cliquer sur Paramètres Réseau Paramètres Réseau 3. Changement de l’adresse réseau Pour que le PIRAMID soit reconnu par le MAXIBUS UNIVERSEL, changer l’adresse réseau. (de 1 à 127) Cliquer pour changer l’adresse réseau puis Sauvegarder. - 23 -... -
Page 26: Configuration Filaire
Bornes Bornes 9 (A) 10 (B) Changer l’adresse réseau du PIRAMID, cf. §8.5 Configuration de l’adresse réseau. Nota : se déconnecter de l’application smartphone avant de se connecter sur le concentrateur. Se connecter au concentrateur. Voir NT397 Concentrateur MAXIBUS UNIVERSEL. -
Page 27: Paramétrages Et État Du Piramid
SORHEA PIRAMID 9.3 Paramétrages et état du PIRAMID 1. Activation et éjection Activation LEDs Leds inactives Leds actives Activation sorties relais Sorties relais inactives Sorties relais actives Activation anti-masquage Anti-masquage inactif Anti-masquage actif Activation buzzer Buzzer inactif Buzzer actif Ejection capteur MW Capteur MW non éjecté... -
Page 28: Historique
SORHEA PIRAMID 9.4 Historique Distance Adresse Date Détecteur Alarme limite MW réseau Sensibilité Sens de déplacement : Avant : sens arrivant Arrière : sens partant Liste des « Alarmes » disponible dans l’historique : Alarme intrusion Début défaut carte radio Début alarme masquage... -
Page 29: Configuration Radio
SORHEA PIRAMID 10 CONFIGURATION RADIO 10.1 Activation de la radio du PIRAMID CONNECT 1. Basculer le switch « Mode Test » en position OFF pour passer en mode détection. 2. Mettre hors tension le PIRAMID CONNECT. 3. Mettre les 2 roues codeuses à 0. -
Page 30: Désactivation De La Radio Du Piramid Connect
SORHEA PIRAMID 10.2 Désactivation de la radio du PIRAMID CONNECT 1. Basculer le switch « Mode Test » en position OFF pour passer en mode détection. 2. Mettre hors tension le PIRAMID CONNECT. 3. Mettre les 2 roues codeuses à 0. -
Page 31: Configuration Via Coordinateur Connect
Nota : par défaut, la radio est désactivée. 2. Se reporter à la notice du COORDINATEUR CONNECT NT400 pour lancer la recherche des radios. 3. Se reporter au §9.3 Paramétrages et état du PIRAMID, pour la configuration du PIRAMID CONNECT. 11 ENTRETIEN PERIODIQUE Pour assurer un maintien des performances dans le temps, il est nécessaire de prévoir un... -
Page 32: Maintenance
Se déconnecter de l’application MAXIBUS UNIVERSEL - Produit connecté en BLE sur l’application. Appuyer sur l’AP pendant au moins - La liaison BLE du PIRAMID L’application n’est pas activée. 2 secondes puis relâcher. (cf. §8) smartphone ne détecte Vérifier que les switchs AP soient pas le PIRAMID. -
Page 33: Caracteristiques Techniques
SORHEA PIRAMID 13 CARACTERISTIQUES TECHNIQUES PIRAMID SDI-78XL2-A SDI-78XL2-B SDI-78XL2-C SDI-78XL2-D Distance maximum de protection 30m x 30m 30m x 10m 40m x 6m 40m x 3m Type de détection Capteur PIR et antenne hyperfréquence Fréquence antenne MW 10.510 GHz Alimentation électronique 10VDC à... -
Page 34: References Du Produit
SORHEA PIRAMID 14 REFERENCES DU PRODUIT • SDI-78XL2-A portée 30x30m blanc réf : 60760001 • SDI-78XL2-B portée 30x10m blanc réf : 60760002 • SDI-78XL2-C portée 40x6m blanc réf : 60760003 • SDI-78XL2-D portée 40x3m blanc réf : 60760101 • SDI-78XL2-A portée 30x30m gris anthracite réf : 60760011... - Page 35 Maximum length of 12VDC power supply cables ............. 43 SET-UP ......................43 Settings PIRAMID ......................43 Anti-masking alarm ......................46 Reading the parameters of the PIRAMID: "READ" Mode ..........47 SMARTPHONE APPLICATION ..............48 Managing settings ......................50 PIRAMID settings......................50 Real-time Information .......................
-
Page 36: General
SORHEA PIRAMID GENERAL PIRAMID is a dual-technology sensor: • A passive infrared unit composed of a pyroelectric infrared (PIR) sensor that detects radiation emitted by the human body in the infrared spectrum. • A Microwave antenna using a 10,510 GHz frequency transmitter and a Doppler Effect receiver detect changes in the state of the radiation field caused by passage of an object or body in the lobe created by the antenna. -
Page 37: Description
SORHEA PIRAMID DESCRIPTION PIR Lens MW antenna cover Front view Back view Top view Side view - 35 -... -
Page 38: Operation
SORHEA PIRAMID OPERATION • SDI-78XL2-A: characteristics of detection zone Top view Side view 30 m / 98 ft • SDI-78XL2-B: characteristics of detection zone Top view Side view 30 m / 98 ft • SDI-78XL2-C: characteristics of detection zone Top view... -
Page 39: Installation Precautions
SORHEA PIRAMID INSTALLATION PRECAUTIONS It is important to follow certain rules to ensure proper installation of the detector: ENSURE THAT NO VEGETATION IS FOUND IN THE DETECTION ZONE. CHECK THAT THE CLOSEST VEGETATION DOES NOT OBSTRUCT THE DETECTION ZONE IN CASE OF WIND. - Page 40 Support Structure USE AS A MOTION DETECTOR AND NOT AS A PERIMETER DETECTOR DON’T use the PIRAMID as a perimeter detector. For good transverse detection, the DO: Use the PIRAMID as an approach sensitivity must be set to maximum, which risks detector (use of A, B or C lenses possible).
- Page 41 SORHEA PIRAMID BE CAREFUL OF WASTE WHICH COULD ATTRACT SMALL ANIMALS AND BIRDS DON’T leave any bin in the range of the detector which could attract small animals and birds. When they are near to the detector, they may be identified as larger targets by the DO: Place bins away from the range of the detector.
- Page 42 SORHEA PIRAMID BE CAREFUL OF ANIMALS PASSING THROUGH HOLES IN OR DUG UNDER A FENCE DON’T ignore openings which have been made in a fence and may provide an easy DO: Repair holes in the fence (or fill in passage for small animals (dogs, cats, holes dug underneath) to block access to the raccoons, etc.) in the protected area.
-
Page 43: Installation
SORHEA PIRAMID INSTALLATION For optimum performance, the PIRAMID detector must be installed at a height between 2m / 6.6ft and 4m / 13ft. Drilling template for wall mounting: 60mm / 2.4 in REQUIRED ACCESSORIES TO MOUNT PIRAMID: 4 Screws 4.8x60 4 Screw anchors 4 Washer Ø5... -
Page 44: Wiring
PIRAMID Opening the cover Loosen the screw, raise, and then pull the cover up. WIRING 6.1 Wiring PIRAMID 1 : 12V DC power supply 9 : A Bus RS485 2 : 0V DC power supply 10 : B Bus RS485... -
Page 45: Maximum Length Of 12Vdc Power Supply Cables
When using several wires with the same section in parallel by polarity, the indicated distances should be multiplied by the number of connected wires. SET-UP 7.1 Settings PIRAMID Using the setting mode: ALARM LED PIR LED... - Page 46 1. Turn the “Test Mode” switch to the ON position to change to Settings mode. 2. Set the sensitivity to maximum (code selector set to 9). Code selector sensitivity setting 3. Set the maximum distance beyond which the PIRAMID should not detect. Code selector Code selector setting Distance value Max.
- Page 47 PIR LED MW LED 5. Determine the desired PIRAMID detection range by performing walk test in this area. Adjust detector orientation and sensitivity to the required settings. When one of the technologies, PIR or MW, switches to alarm status, the associated LED will light up red.
-
Page 48: Anti-Masking Alarm
SORHEA PIRAMID 7. Close the cover. 8. In normal operation, the LEDs are off. It is possible to activate them via the MAXIBUS UNIVERSAL HUB (see §9.3) or smartphone application (see §8.2). Note: “INTRUSION” and "MASKING” relays remain in alarm status when the "Test Mode"... -
Page 49: Reading The Parameters Of The Piramid: "Read" Mode
SORHEA PIRAMID 7.3 Reading the parameters of the PIRAMID: "READ" Mode Sensitivity and distance settings max. can be modified: Either via the code selectors on the detector Or via the MAXIBUS UNIVERSAL hub Or via the smartphone application Note: In Settings mode, sensitivity and distance settings are stored in memory by the code selectors. -
Page 50: Smartphone Application
5. Turn the "Test Mode" switch OFF to exit “Read” mode. SMARTPHONE APPLICATION Note: The smartphone application is compatible from Android 4.1 or higher. 1. Download the “Sorhea Connect” smartphone application. Sorhea Connect 2. Launch the “Sorhea Connect” application. Authorize activation of Bluetooth if requested to do so by the application. - Page 51 4. Set a tamper alarm to activate the BLE connection with the smartphone application: leave the tamper contact pressed down for 2 seconds, then release. Note: the connection remains active for as long as the PIRAMID is connected to the smartphone application. It is disconnected when the cover is shut (tamper contact closed) or after 1 minute of inactivity (application closed).
-
Page 52: Managing Settings
SORHEA PIRAMID 8.1 Managing settings Setting the time on the PIRAMID Name of PIRAMID: Click on the name to change it then click on Save. 8.2 PIRAMID settings 1. Click on Menu Menu 2. Click on Settings Settings - 50 -... - Page 53 SORHEA PIRAMID 3. PIRAMID settings Legend: Enable Disable Sensor ejected Sensor not ejected LEDS enabled / disabled Buzzer enabled / disabled Relay outputs enabled / disabled Antimask enabled / disabled MW ejection PIR ejection Moving direction: Settings save above MW Range settings...
-
Page 54: Real-Time Information
PIRAMID 8.3 Real-time Information 1. Click on Menu Menu 2. Click on Real-time Real-time 3. Viewing PIRAMID real-time information MW and PIR sensor status Intrusion and anti-mask relays status “Test mode” switch status : Setting mode : Detection mode Internal temperature of the PIRAMID... -
Page 55: Event Log
SORHEA PIRAMID 8.4 Event log 1. Click on Menu Menu 2. Click on Event log Event log - 53 -... - Page 56 SORHEA PIRAMID 3. View event log Date/Time of the event Type of events PIRAMID setting List of events: Alarm intrusion Alarm mask End alarm mask Alarm tamper End alarm tamper Time setting Configuration ...
-
Page 57: Network Address Settings
Network settings 3. Changing the network address For the PIRAMID to be recognized by the MAXIBUS UNIVERSAL in the case of an RS485 wired connection, change the network address. (Between 1 and 127) Click to change the network address and click Save. -
Page 58: Wiring Configuration
Terminals 9 (A) 10 (B) To change the network address of the PIRAMID, see §8.5 Network address settings. Note: Disconnect from the smartphone application before connecting to the hub. Connect to the hub See NT397 MAXIBUS UNIVERSAL HUB 9.2 Management settings... -
Page 59: Piramid Settings And Status
SORHEA PIRAMID 9.3 PIRAMID settings and status 1. Enable and ejection Enable Leds Leds disabled Led enabled Enable Relays Relays disabled Relays enabled Enable anti-masking Anti-masking disabled Anti-masking enabled Enable Buzzer Buzzer disabled Buzzer enabled Eject MW Sensor MW Sensor not ejected... -
Page 60: Event Log
SORHEA PIRAMID 9.4 Event log MW Distance Network Date Sensor Alarm limit address Sensitivity Direction of movement: Forward: incoming Backward: outgoing List of "Alarms" available in the event log: Intrusion alarm Start radio default Start Masking alarm End of radio default... -
Page 61: Radio Configuration
SORHEA PIRAMID 10 RADIO CONFIGURATION 10.1 Enable the PIRAMID CONNECT radio 1. Move the «Test Mode » switch to the OFF position to activate the detection mode. 2. Turn off the PIRAMID CONNECT. 3. Set the 2 code selection wheels to 4. -
Page 62: Disable The Piramid Connect Radio
SORHEA PIRAMID 10.2 Disable the PIRAMID CONNECT radio 1. Move the «Test Mode » switch to the OFF position to activate the detection mode 2. Turn off the PIRAMID CONNECT. 3. Set the 2 code selection wheels to 4. Check the strap in the established position. -
Page 63: Configuration Via Coordinator Connect
Note: the radio is disactivated by default. 2. Refer to the manual of the NT400 COORDINATEUR CONNECT to begin a search for the radios. 3. Se reporter au §9.3 PIRAMID settings and status, pour la configuration du PIRAMID CONNECT. 11 PERIODIC MAINTENANCE To guarantee performance over time, basic maintenance operations should be performed to confirm the status of the PIR filter. -
Page 64: Maintenance
MAXIBUS UNIVERSAL network - Product connected to the Disconnect from the application application in BLE. - The PIRAMID BLE connection Press on the tamper switch for at The smartphone is not activated. least 2 seconds, then release. application cannot (see §8) -
Page 65: Technical Specifications
SORHEA PIRAMID 13 TECHNICAL SPECIFICATIONS PIRAMID SDI-78XL2-A SDI-78XL2-B SDI-78XL2-C SDI-78XL2-D 30m x 30m 30m x 10m 40m x 6m / 40m x 3m / Maximum outdoor range / 98ft x 98ft / 98ft x 33ft 131ft x 19.7ft 131ft x 9.8ft... -
Page 66: Product References
SORHEA PIRAMID 14 PRODUCT REFERENCES • SDI-78XL2-A range 30x30m / 98x98ft white ref: 60760001 • SDI-78XL2-B range 30x10m / 98x33ft white ref: 60760002 • SDI-78XL2-C range 40x6m / 131x19.7ft white ref: 60760003 • SDI-78XL2-D range 40x3m / 131x9.8ft white ref: 60760101 •...
Need help?
Do you have a question about the PIRAMID and is the answer not in the manual?
Questions and answers