Table of Contents
Advertisement
Quick Links
K33 Demo guide with Microsoft services
1.
Introduction ..................................................................................................................................................2
2.
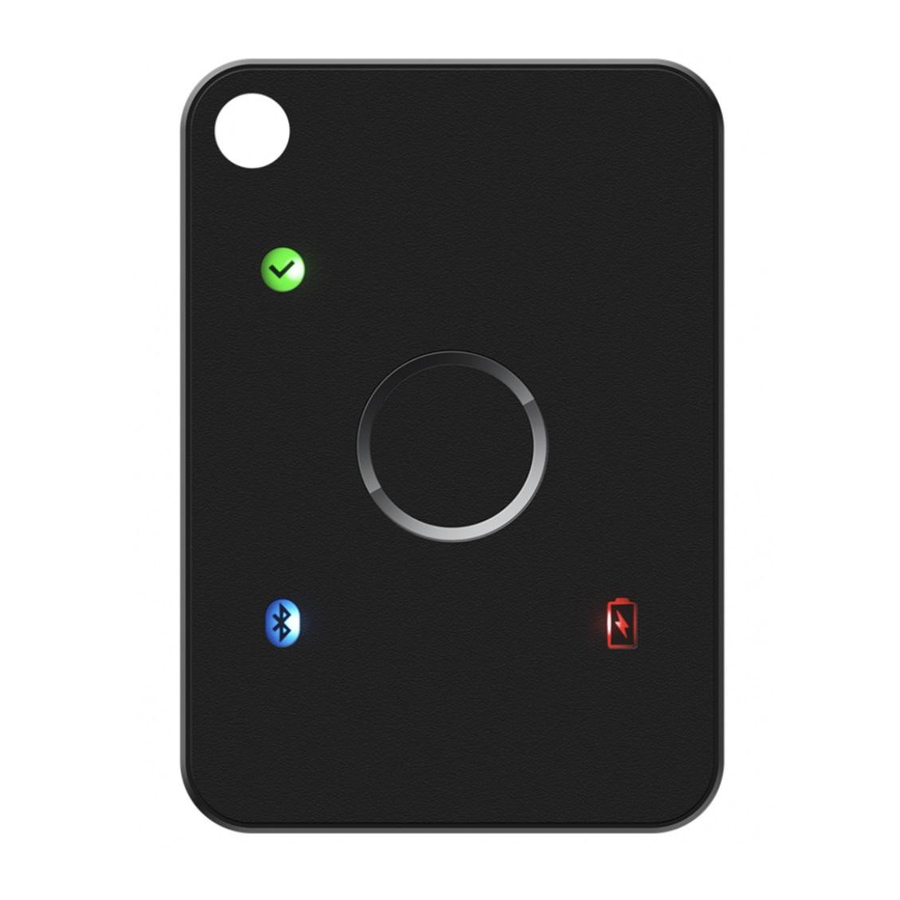
Security key management .......................................................................................................................2
3.
HID interface ................................................................................................................................................6
3.1
Microsoft account ........................................................................................................................6
3.2
Windows Hello for business (Azure Active Directory) .................................................. 10
4.
BLE interface ............................................................................................................................................. 19
4.1
Microsoft account ..................................................................................................................... 21
4.2
Windows Hello for business (Azure Active Directory) .................................................. 21
5.
NFC interface ............................................................................................................................................ 22
Contents
Advertisement
Table of Contents

Related Manuals for FEITIAN K33

Summary of Contents for FEITIAN K33
-
Page 1: Table Of Contents
K33 Demo guide with Microsoft services Contents Introduction ..............................2 Security key management ........................2 HID interface ..............................6 Microsoft account ........................6 Windows Hello for business (Azure Active Directory) ..........10 BLE interface ............................. 19 Microsoft account ........................21 Windows Hello for business (Azure Active Directory) ..........21... -
Page 2: Introduction
Before using the Feitian BioPass FIDO2, users are required to initialize and enroll a fingerprint onto the security key using ‘BioPass FIDO2 Manager’. The application can be downloaded via Microsoft Store. Enroll your first fingerprint. 1) Launch the BioPass FIDO2 Manager and plug in the FEITIAN BioPass FIDO2. Figure 2, see below, will appear. - Page 3 Figure 2 BioPass FIDO2 Manager 2) Click “Add Fingerprint.” You can choose using fingerprint only or set both pin and fingerprint for a verification method as shown in Figure 3. (Once you choose one option, you cannot change to the other option without resetting the device) Figure 3 Verification Settings Page 3) If you choose “PIN and Fingerprint,”...
- Page 4 Figure 4 PIN Setup 4) Add a fingerprint by following the instructions. Figure 5 Fingerprint Enrollment 5) After a fingerprint has been successfully enrolled, a fingerprint will be listed in the text box. Figure 6 BioPass FIDO2 Manager with Fingerprint Enrolled...
- Page 5 6) The BioPass FIDO2 Manager allows you to test your fingerprint, remove your fingerprint and change your pin to enjoy your secure authentication experience. Test Fingerprint This function is for the user to test the fingerprint verification. Note: This testing function will trigger the block device procedure mentioned above. Remove fingerprint 1) Choose the fingerprint you want to delete.
-
Page 6: Hid Interface
3. HID interface K33 security key is plugged into your PC via a USB cable. Microsoft account Requirement: Windows 10 Version 1809 or later and the Microsoft Edge browser Provision a security key to your Microsoft Account Go to the Microsoft account page and sign in as you normally would. - Page 7 Figure 10 Microsoft Account Settings Page More security options Choose Figure 11 Microsoft Account Basic Security Settings Set up a security key. Under Windows Hello and security keys, select...
- Page 8 Figure 12 Microsoft Account Security Page Identify what type of key you have (USB or NFC) and select Next Figure 13 Security Key Setup You will be redirected to the setup experience where you will insert or tap your key.
- Page 9 Figure 14 Security Key Setup Create a PIN (or enter an existing PIN if you have already created one), otherwise if you have already enrolled a fingerprint, you will only need to verify the fingerprint. Figure 15 Security Key Setup Take the follow-up action by touching either the button or gold disk if your key has one (or read the instruction manual to figure out what else it might be).
-
Page 10: Windows Hello For Business (Azure Active Directory)
Windows Hello for business (Azure Active Directory) Set up shared Windows (Joined AAD) This chapter introduces how we FEITIAN setup the joined PC environment and provisioning a security key to your account. Requirement: Windows RS5 or above. - Page 11 ‘Sign in’ Enter your account and passwords, click...
- Page 12 ‘Join’ Click ‘Done’ Click once you finish the procedures.
- Page 13 ‘Access work or school’ ‘Add or remove a provisioning Return the selection of and click package’ ‘Add a package Copy that *.ppkg file to a USB flash disk and click ’.
- Page 14 ‘Add’. Windows will automatically detect the package file and click Once finish, click ‘Yes, add it’.
- Page 15 Register a security key to your Azure AD account. ⚫ Browse to https://myprofile.microsoft.com and sign in if not already using Edge browser. ⚫ Click Security Info a. If the user already has at least one Azure Multi-Factor Authentication method registered, they can immediately register a FIDO2 security key. b.
- Page 16 ⚫ After clicking . Choose USB device or NFC device. ⚫ Insert your key and choose Next ⚫ A box will appear and ask you to create/enter a PIN for your security key, then perform the required gesture for your key either biometric or touch. During this operation, you may be required to touch the key twice depending whether you create or enter a PIN.
- Page 17 ⚫ You will be returned to the combined registration experience and asked to provide a meaningful name for your token so you can identify which one if you have Next multiple. Click ⚫ Click Done to complete the process.
- Page 18 Once all above procedures are done, you can experience logging in your shared PC password-less.
-
Page 19: Ble Interface
Bluetooth or other device’ after you enable the Bluetooth for both PC and K33. Enable the Bluetooth of K33: long-press the button of K33 on the right side for about 5 seconds until Bluetooth LED blinks rapidly. The BLE device paring name should be: 6 digits of characters or FT_6 digits of characters. - Page 20 Once it is done, you can now demo K33 with Microsoft services contactless using Bluetooth.
-
Page 21: Microsoft Account
Microsoft account Refer chapter 3.1 Enable the K33’s Bluetooth interface by long pressing the button for about 5 seconds before setting up your security key Next Click directly. The pop-up window requires you to verify your fingerprint if you have enrolled one. -
Page 22: Nfc Interface
5. NFC interface Communication via NFC requires PC support, otherwise, an NFC reader will be needed. To demo Microsoft account and Windows Hello for business (Azure Active Directory) services via NFC, please refer to the authentication process via HID. No additional steps are required.
Need help?
Do you have a question about the K33 and is the answer not in the manual?
Questions and answers