Advertisement
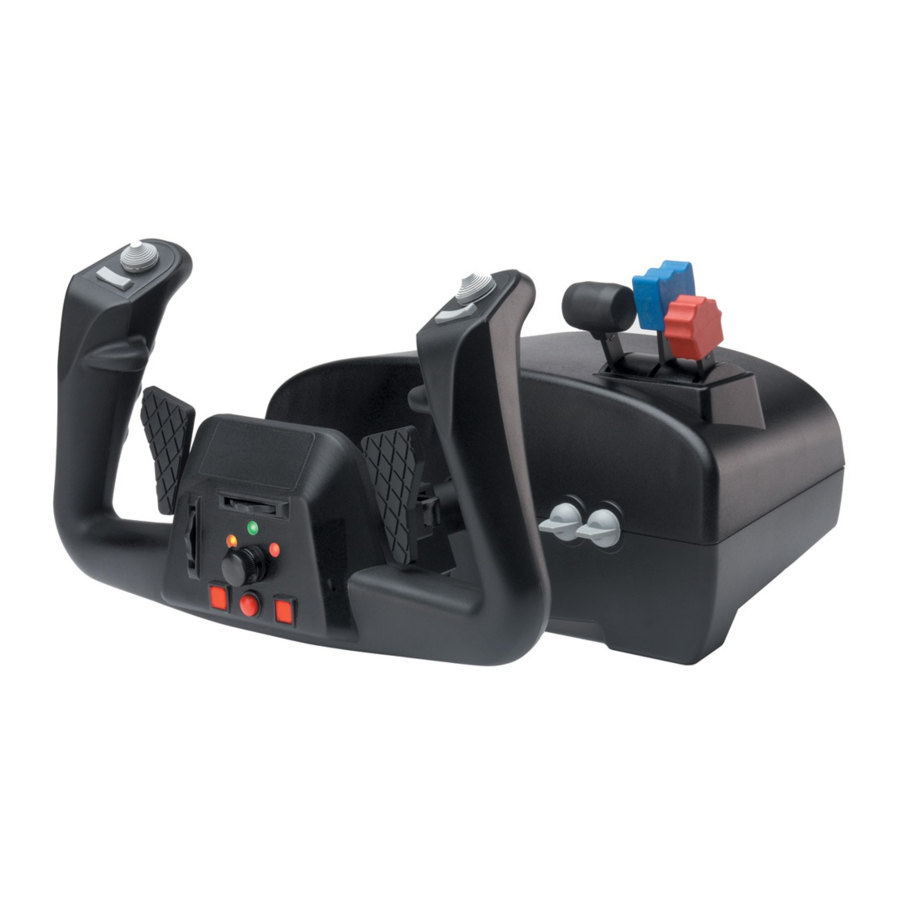
CH ECLIPSE YOKE
Q
S
UICK
TART:
Introduction
Congratulations on your purchase of the
that you'll find it to be one of the most durable and precise yokes you have ever
owned. It was designed and manufactured in the U.S.A. with the same strict
quality standards you have come to expect from CH Products. So get ready
and strap yourself in, for you are about to experience a whole new level of
controller realism.
Requirements
· IBM Compatible PC running Windows 98, 98 SE, ME, 2000, XP, or Vista
· One open USB port (one additional port for each additional USB device)
· USB compatible software
· Direct X 7.0a or later
Windows 98/ME Installation
1. With the computer booted up fully to the Windows Desktop, plug the CH
Eclipse Yoke into an open USB port.
2. A New Hardware Detection window should appear.
3. Select Search for the Best Driver (recommended) then click Next.*
4. Click Next again.*
5. It may now ask for you to insert your Windows CD. Place your Windows CD
in the CD drive and click OK (If it says it can not find a certain file, Click Browse.
Point to the folder on your Windows CD called Win 98 or Win 9X then click OK.)*
6. Now click Finish.*
7. To check if your yoke has been successfully installed click Start, then
Settings, then Control Panel. Inside Control Panel open Gaming Options (may
be called Game Controllers in some versions of Windows.)
8. Your Yoke should be listed under controllers as "CH Eclipse Yoke" and its
connection status should be "OK".
9. Select the yoke by clicking on it. Then click on Properties. You should now
be in a test screen for the yoke. Move the yoke around to make sure the axes
are communicating with the computer. Now press the buttons. They should
also be communicating with the computer.
10. Now leave the yoke neutral. Looking at the test screen a cross hair should
be in the center of a white box. There should also be four red boxes to the
right of this white box. Move the yoke handles, paddles, and levers to check for
full range of movement.
11. Your CH EclipseYoke is now successfully installed.
*These may not appear in Windows ME.
How to in s ta l l t h e CH Ec l i p se Yok e
CH Eclipse Yoke
! We are confident
TM
Advertisement
Table of Contents

Related Manuals for CH Products ECLIPSE YOKE


Summary of Contents for CH Products ECLIPSE YOKE
- Page 1 Settings, then Control Panel. Inside Control Panel open Gaming Options (may be called Game Controllers in some versions of Windows.) 8. Your Yoke should be listed under controllers as "CH Eclipse Yoke" and its connection status should be "OK". 9. Select the yoke by clicking on it. Then click on Properties. You should now be in a test screen for the yoke.
- Page 2 Control Panel. In the Control Panel go to Game Controllers or Gaming Options. 7. In Gaming Options, under Controllers, you should see listed "CH Eclipse Yoke” with a status of "OK". 8. Click on the yoke and select Properties. You should now be in a test screen for the yoke.
- Page 3 9. In the Game Controllers window, in the list of controllers, you should see “CH Eclipse Yoke” with a status of “OK” . 10. Click on the name of the CH Eclipse Yoke in the list, if it is not already highlighted, and then click the Properties button.
- Page 4 Vista, CA 92081 Warranty The CH Eclipse Yoke™ is warranted to the original purchaser to be free from defects in materials and workmanship for a period of two(2) years from date of purchase. During this warranty period CH PRODUCTS will, at its option, repair or replace, at no charge, any component determined to be defective.
Need help?
Do you have a question about the ECLIPSE YOKE and is the answer not in the manual?
Questions and answers