Table of Contents
Advertisement
Available languages
Available languages
Advertisement
Chapters
Table of Contents

Summary of Contents for snuutje PINO SNU 2001
- Page 1 Schlaftrainer PINO | Sleep trainer PINO | Entrenador del PINO | Accompagnateur de sommeil PINO | sueño PINO | Trener snu PINO Allenatore del sonno SNU 2001 Operating instructions | Instrucciones de operación | Mode d‘emploi | Istruzioni per l‘uso | Instrukcja obsługi snuutje.de...
-
Page 2: Allgemeines
Liebe Kundin, lieber Kunde ! Sie haben sich für den Kauf eines qualitativ hochwertigen Produkts der Marke snuutje entschieden – kluge Funktionen und frisches Design für ein Zuhause voller Glücksmomente. Wir wünschen Ihnen viel Freude damit! Ihr snuutje Team ALLGEMEINES ÜBER DIESE ANLEITUNG... -
Page 3: Table Of Contents
ZEICHENERKLÄRUNG Dieses Symbol in Verbindung mit dem Wort GEFAHR warnt vor schweren Verletzungen. Dieses Symbol in Verbindung mit dem Wort WARNUNG warnt vor Verletzungen mittle- ren und leichten Grades. Dieses Symbol in Verbindung mit dem Wort HINWEIS warnt vor Sachschäden. Dieses Symbol kennzeichnet zusätzliche Informationen und allgemeine Hinweise. -
Page 4: Lieferumfang
Grundeinstellungen vornehmen ....13 Gerät sperren/entsperren ......13 Uhrzeit einstellen ........13 Grundfunktionen ........... 14 Gebrauch ............15 Allgemein ..........15 Schlaflicht ..........15 Musik/Einschlafmusik ....... 16 Kurzschlaftimer ........17 Wecken ............19 Schlaftrainer ..........20 USB-Gerät aufladen ........22 Stützbatterie wechseln ....... -
Page 5: Bestimmungsgemäßer Gebrauch
BESTIMMUNGSGEMÄSSER GEBRAUCH Dieses Gerät ist als Schlaftrainer für Kinder konzipiert und ausschließlich für den Privatgebrauch im Innenbe- reich geeignet. Der Schlaftrainer ist kein Kinderspielzeug. Für den gewerblichen Einsatz in Praxen oder bei Thera- pien ist das Gerät nicht geeignet. Der Schlaftrainer ist kein Medizinprodukt. - Page 6 ‚ Verwenden Sie nur den mitgelieferten USB- Netzadapter wenn Sie das Gerät über das Stromnetz betreiben wollen und ersetzen Sie ihn nur durch den gleichen Typ. GEFAHR FÜR KINDER ‚ Halten Sie Kinder von Verpackungsmaterial fern. Bei Verschlucken besteht Erstickungsgefahr. ‚...
- Page 7 ‚ Ziehen Sie den USB-Netzadapter aus der Steckdose: − bevor Sie das Gerät reinigen, − wenn während des Betriebs offensichtlich eine Störung auftritt, − bei Gewitter. − Ziehen Sie dabei immer am USB-Netzadapter, nicht am Kabel. ‚ Nehmen Sie keine Veränderungen am Artikel vor. Lassen Sie Reparaturen nur von einer Fachwerkstatt durchführen, da nicht fachgerecht reparierte Geräte eine Gefährdung für den Benutzer darstellen.
- Page 8 ‚ Nehmen Sie die Batterie aus dem Gerät heraus, wenn diese verbraucht ist oder wenn Sie das Gerät länger nicht benutzen. So vermeiden Sie Schäden, die durch Auslaufen entstehen können. ‚ Setzen Sie Batterien keinen extremen Bedingungen aus, indem Sie diese z. B. auf Heizkörpern oder unter direk- ter Sonneneinstrahlung lagern.
-
Page 9: Über Den Schlaftrainer Pino
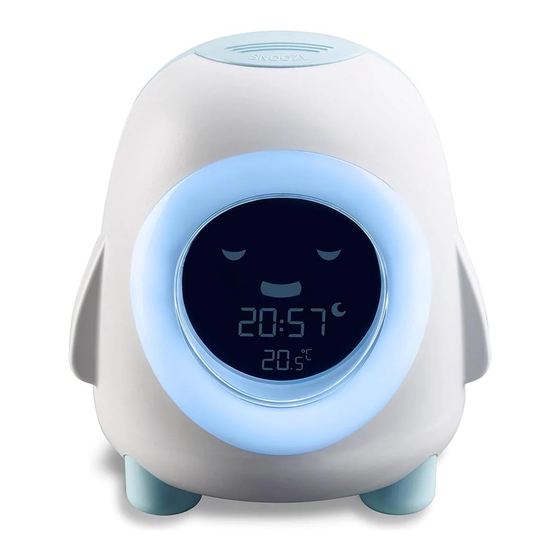
ÜBER DEN SCHLAFTRAINER PINO Pino ist ein Kinderwecker mit einer spielerischer Kombina- tion aus Licht, Musik und Animation. Pinos Funktionen in der Übersicht: ‚ Fünf verschiedenen Alarmtöne beim Wecken in drei Lautstärken ‚ Schlummer-Funktion (Snooze) ‚ Nachtlicht in fünf Farben wählbar ‚... -
Page 10: Auf Einen Blick
AUF EINEN BLICK UNTERSEITE... - Page 11 Taste SNOOZE: Weckwiederholung Display Display-Rahmen mit Beleuchtung Taste LOCK: Gerät sperren/entsperren Taste SET: Geräteeinstellungen vornehmen Taste - : Werte verringern Taste NAP: Kurzschlaftimer ein- und ausschalten Taste LIGHT: Helligkeit/Leuchtdauer einstellen Taste SOUND: Musik/Naturklänge wiedergeben 10 Batteriefach für 1x CR2032, 3 V 2x USB-Anschlussbuchsen: ‚...
-
Page 12: Inbetriebnahme
INBETRIEBNAHME ISO-STREIFEN ENTFERNEN Bei einem Stromausfall sorgt eine Batterie des Typs CR2032, 3 V dafür, dass vorgenommene Einstellungen (z. B. Weckzeiten) mehrere Stunden gespeichert bleiben. Bei Auslieferung ist diese Stützbatterie bereits eingelegt und zum Schutz vor vorzeitiger Entladung mit einem Iso- Streifen versehen. -
Page 13: Grundeinstellungen Vornehmen
GRUNDEINSTELLUNGEN VORNEHMEN ‚ Für alle Einstellungen gilt: Wenn zwi- schen zwei Tastendrücken mehr als ca. 30 Sekunden liegen, wird der Einstellvor- gang automatisch beendet und Sie müssen ihn wiederholen. ‚ Wenn Sie beim Einstellen die Taste - oder + gedrückt halten, erfolgt der Vorlauf der angezeigten Werte schneller. -
Page 14: Grundfunktionen
4. Drücken Sie TIME. Im Display blinkt die Minutenziffer. 5. Stellen Sie mit den Tasten - / + die aktuelle Minutenzeit ein. 6. Drücken Sie TIME. Im Display wird „24 Hr“ oder „12 Hr“ angezeigt. 7. Stellen Sie mit den Tasten - / + das gewünschte Stun- denformat ein. -
Page 15: Gebrauch
Nehmen Sie den Formatwechsel also möglichst in den Nachmittagsstunden vor, da bei den Vormittagsstunden kein Unterschied sichtbar ist. GEBRAUCH ALLGEMEIN Im Display werden im normalen Modus die Uhrzeit und die gemessene Innentemperatur angezeigt. Haben Sie eine Funktion gewählt, werden zusätzlich Symbole angezeigt, z. -
Page 16: Musik/Einschlafmusik
3. Wählen Sie mit der Taste + oder - die gewünschte Leuchtdauer aus: ON-10-20-30-45-1:00-1:30. 4. Drücken Sie abschließend SET. Wenn Sie „ON“ wählen, schaltet sich das Schlaflicht später NICHT automatisch aus, sondern muss durch Drücken von LIGHT ma- nuell beendet werden. EINSCHALTEN −... -
Page 17: Kurzschlaftimer
4. Drücken Sie SOUND. Im Display wird „10“ angezeigt. 5. Wählen Sie mit der Taste + oder - die gewünschte Wie- dergabedauer aus: ON-10-20-30-45-1:00-1:30. 6. Drücken Sie abschließend SET. Wenn Sie „ON“ wählen, schaltet sich der ge- wählte Titel später NICHT automatisch aus, sondern muss durch Drücken von SOUND manuell beendet werden. - Page 18 5. Wählen Sie mit der Taste + oder - die gewünschte Weckmethode aus: Weckmelodie Rotes Licht 6. Drücken Sie abschließend SET. STARTEN Wenn Sie bei laufendem Timer SNOOZE einige Sekunden gedrückt halten, wird im Display die Restzeit bis zum Alarm angezeigt. 1.
-
Page 19: Wecken
WECKEN WECKZEIT EINSTELLEN 1. Drücken Sie SET. Im Display wird „SET“ angezeigt. 2. Drücken Sie ALARM. Im Display blinken das Wecker-Symbol sowie die Ziffer für die Weckstunde. 3. Stellen Sie mit den Tasten - / + die Weckstunde ein. 4. Drücken Sie ALARM. Im Display blinkt Ziffer für die Weckminute. -
Page 20: Schlaftrainer
SNOOZE drücken Weckton verstummt für 10 Minu- ten, danach werden Sie erneut geweckt. Dieser Vorgang kann mehrfach wiederholt werden. Wenn Sie dabei SNOOZE 2 Sekun- den gedrückt halten, wird die Snooze-Funktion beendet. Im Dis- play bleibt das Symbol weiter sichtbar, Sie werden am nächsten Tag zur gleichen Zeit geweckt. - Page 21 ‚ 30 Minuten-Countdown vor der Weckzeit/Aufsteh- zeit: Pino schläft noch, sein Licht leuchtet rot Das Kind wird langsam wach, soll aber nach Möglich- keit noch liegen bleiben. ‚ Weckzeit/Aufstehzeit: Pino öffnet seine Augen, sein Licht leuchtet für eine Stunde grün, im Display erscheint das Sonnen-Symbol Es ist Zeit aufzustehen.
-
Page 22: Usb-Gerät Aufladen
AKTIVIEREN − Drücken Sie SLEEP/WAKE, um die Funktion zu aktivie- ren, im Display wird angezeigt. Zu den eingestellten Zeiten startet der unter „So funk- tioniert der Schlaftrainer“ beschriebene Vorgang. − Um die Funktion zu einem späteren Zeitpunkt wieder zu deaktivieren, drücken Sie erneut SLEEP/WAKE erlischt) USB-GERÄT AUFLADEN Über die USB-Buchse können Sie Geräte wie z. -
Page 23: Reinigen
‚ Entsorgen Sie die alte Batterie umweltgerecht, siehe „Entsorgen“. REINIGEN HINWEIS vor Sachschaden − Tauchen Sie das Gerät nicht in Wasser oder andere Flüssigkeiten. − Verwenden Sie keinesfalls harte, kratzende oder scheuernde Reinigungsmittel o. Ä., um die Waage zu reinigen. Hierbei könnte die Oberfläche zerkratzen. -
Page 24: Technische Daten
1x CR2032, 3 V Inverkehrbringer Waagen-Schmitt GmbH (keine Service-Adresse): Hammer Steindamm 27-29 22089 Hamburg, Germany snuutje@waagen-schmitt.de Unsere Produkte werden ständig weiterentwickelt und verbessert. Aus diesem Grund sind Design- und technische Änderungen jederzeit möglich. GARANTIE Die Firma Waagen-Schmitt GmbH garantiert für 2 Jahre ab Kaufdatum die kostenfreie Behebung von Mängeln auf-... -
Page 25: Konformitätserklärung
KONFORMITÄTSERKLÄRUNG Hiermit erklärt die Waagen-Schmitt GmbH, dass der Schlaftrainer SNU 2001 den Richtlinien 2014/30/EU und 2011/65/EU entspricht. Die Erklärung verliert ihre Gültigkeit, falls an der Waage eine nicht mit uns abgestimmte Änderung vorgenommen wurde. Hamburg, Mai 2020 Waagen-Schmitt GmbH ENTSORGEN VERPACKUNG ENTSORGEN Entsorgen Sie die Verpackung sortenrein. - Page 26 ARTIKEL ENTSORGEN Entsorgen Sie den Artikel entsprechend der Vorschriften, die in Ihrem Land gelten. Geräte dürfen nicht im normalen Hausmüll entsorgt werden Am Ende seiner Lebensdauer ist der Artikel einer geordneten Entsorgung zuzuführen. Dabei werden im Gerät enthaltene Wertstoffe der Wie- derverwertung zugeführt und die Belastung der Umwelt vermieden.
-
Page 28: General Information
Dear Customer! You have chosen to buy a high-quality snuutje brand product - smart functions and fresh design for a home full of happy moments. We wish you much pleasure! Your snuutje team GENERAL INFORMATION ABOUT THIS OPERATING MANUAL This operating manual describes how to operate and maintain your product safely. - Page 29 EXPLANATION OF SYMBOLS This symbol combined with the word DANGER warns of serious injuries. This symbol combined with the word WARNING warns of moderate and mild injuries. This symbol combined with the word NOTE warns of material damage. This symbol indicates additional information and general notes.
-
Page 30: Scope Of Delivery
Locks/unlocks device ......39 Setting the time ........39 Basic functions ..........40 Use ..............41 General ............41 Nightlight ........... 41 Music/bedtime music ....... 42 Nap timer ..........43 Alarm ............44 Sleep trainer..........46 Charging USB device ........48 Replacing the backup battery ..... -
Page 31: Intended Use
INTENDED USE This device is designed as a sleep trainer for children and is only suitable for personal use indoors. The sleep trainer is not a children’s toy. The device is not suitable for commercial use in practices or therapies. The sleep trainer is not a medical device. SAFETY ‚... - Page 32 ‚ Use only the supplied USB power adapter if you want to operate the device from the mains and replace it only with the same type. DANGER FOR CHILDREN ‚ Keep packaging material away from children. There is a risk of choking if swallowed. ‚...
- Page 33 ‚ Disconnect the USB power adapter from the mains outlet: − before cleaning the device, − if, during operation, there appears to be interference, − during a storm. − Always pull on the USB power adapter, not on the cable. ‚...
- Page 34 ‚ Remove the battery from the device when it is flat or when you will not be using the device for a long time. You will thus avoid damage that may result from leakage of battery acid. ‚ Do not expose the batteries to any extreme conditions, e.g.
-
Page 35: About The Pino Sleep Trainer
ABOUT THE PINO SLEEP TRAINER Pino is a children’s alarm clock with a playful combination of light, music and animation. Overview of Pino’s functions: ‚ Five different alarm tones in three volumes ‚ Snooze function ‚ Night light in five different colours ‚... -
Page 36: Overview
OVERVIEW BOTTOM... - Page 37 SNOOZE button: Repeats alarm Display Display frame with lighting LOCK button: Locks/unlocks device SET button: Makes device settings - button: reduces values NAP button: Switches the nap timer on and off LIGHT button: Sets brightness/lighting duration SOUND button: Plays music/natural sounds 10 Battery compartment for 1x CR2032, 3 V 2x USB connection sockets: ‚...
-
Page 38: Start-Up
START-UP REMOVING ISO-STRIPS In the event of a power failure, a CR2032, 3 V battery ensures that the settings made (e.g. wake-up times) are saved for several hours. When delivered, this backup battery is already inserted and provided with an iso-strip to protect it from premature discharge. -
Page 39: Making Basic Settings
MAKING BASIC SETTINGS ‚ The following applies to all settings: If there is more than approx. 30 seconds between two pushes of a button, the setting process automatically ends and you will have to repeat it. ‚ If you hold down the - or + button while making settings, the displayed values advance faster. -
Page 40: Basic Functions
4. Press TIME. The minute digit flashes on the display. 5. Use the - / + buttons to set the current minute time. 6. Press TIME. “24 Hr” or “12 Hr” appears on the display. 7. Use the - / + buttons to set the desired hour format. In the 12-hour format, afternoon hours are indicated with “PM”. -
Page 41: Use
GENERAL In normal mode, the display shows the time and the measured indoor temperature. Symbols are also displayed when you have selected a function, such as when you have activated the nap timer. Pino also “blinks” 3 times at the beginning of every minute. This happens unless Pino is “sleeping”. -
Page 42: Music/Bedtime Music
If you select “ON”, the nightlight will NOT switch off automatically later, but must be switched off manually by pressing LIGHT. SWITCHING ON − Press LIGHT repeatedly to select the desired colour. The nightlight is switched off after the set time. Or press LIGHT before the set time has ended to switch the light off manually. -
Page 43: Nap Timer
If you select “ON”, the selected track will NOT automatically switch off later, but must be ended manually by pressing the SOUND. PLAYBACK − Press SOUND to start playback. The playback stops after the set time has ended. Or press SOUND to stop playback before the set time has ended. -
Page 44: Alarm
START If you hold down SNOOZE for a few seconds while the timer is running, the display shows the time remaining until the alarm. 1. Press NAP to start the nap timer (display indicator When the set time has ended, an alarm melody sounds or the display frame lights up red. - Page 45 3. Use the - / + buttons to set the alarm hour. 4. Press ALARM. The digit for the alarm minute flashes on the display. 5. Use the - / + buttons to set the alarm minute. 6. Press ALARM. A digit appears on the display, e.g.
-
Page 46: Sleep Trainer
Pino wakes you up at the set time. There are now several options: Press SNOOZE The alarm tone stops for 10 minutes, after which it will sound again. This procedure can be repeated multiple times. If you hold down the SNOOZE button for 2 seconds, the snooze function will be ended. - Page 47 ‚ 30 minute countdown before alarm/wake-up time: Pino is still asleep, his light glows red The child slowly wakes up, but should stay in bed if possible. ‚ Alarm/wake-up time: Pino opens his eyes, his light glows green for an hour, the sun symbol appears on the display.
-
Page 48: Charging Usb Device
ENABLING − Press SLEEP/WAKE to activate the function; shown on the display. At the set times, the process described under “How the sleep trainer works” starts. − To deactivate the function again later, press SLEEP/ WAKE again goes out) CHARGING USB DEVICE You can use the USB socket to charge devices such as smartphones or MP3 players. -
Page 49: Cleaning
CLEANING NOTE on material damage − Do not immerse the device in water or other liquids. − Never use harsh, scouring or abrasive cleaning agents or the like to clean the scale. Otherwise, the surface could be scratched. 1. Disconnect the device from the power supply. 2. -
Page 50: Technical Data
1x CR2032, 3 V Distributor (no service Waagen-Schmitt GmbH address): Hammer Steindamm 27-29 22089 Hamburg, Germany snuutje@waagen-schmitt.de Our products are constantly being developed and improved. For this reason, design and technical modifications are possible at any time. WARRANTY Waagen-Schmitt GmbH warrants for 2 years from the purchase date the cost-free rectification of defects in material and workmanship through repair or exchange. -
Page 51: Declaration Of Conformity
DECLARATION OF CONFORMITY Waagen-Schmitt GmbH hereby declares that the SNU 2001 sleep trainer complies with the 2014/30/EU and 2011/65/EU guidelines. This declaration will lose its validity if any modification is made to the scale without our consent. Hamburg, May 2020 Waagen-Schmitt GmbH DISPOSAL DISPOSING OF THE PACKAGING... - Page 52 Standard and rechargeable batteries should not be disposed of along with household waste All batteries and rechargeable batteries must be brought to a local or district collection point or to the retailer. Such batteries and rechargeable batteries can thus be disposed of in an environmentally friendly way.
-
Page 54: Información General
¡Estimada/o clienta/e! Se ha decidido por la compra de un producto de calidad de la marca snuutje: funciones inteligentes y un diseño alegre para unos momentos llenos de diversión en casa. ¡Le deseamos que disfruten con él! El equipo de snuutje INFORMACIÓN GENERAL... - Page 55 EXPLICACIÓN DE SÍMBOLOS Este símbolo unido a la palabra PELIGRO advierte de heridas graves. Este símbolo unido a la palabra ADVERTENCIA advierte de heridas de grado medio o leve. Este símbolo unido a la palabra INDICACIÓN advierte de daños materiales. Este símbolo significa información adicional e indicaciones generales.
-
Page 56: Material Suministrado
bloqueo/desbloqueo del aparato .... 65 Ajustar la hora ......... 65 Funciones básicas ........66 Utilización .............67 Información general .........67 Luz de dormir ..........67 Música/Música adormecedora ....68 Temporizador de sueño corto ....69 Despertador ..........71 Entrenador del sueño .......73 Cargar dispositivo USB .........74 Cambiar la pila de reserva ......75 Limpieza ............75... -
Page 57: Uso Adecuado
USO ADECUADO Este aparato está diseñado como un entrenador del sueño para niños y es apropiado exclusivamente para el uso privado en interiores. El entrenador del sueño no es ningún juguete. No es apropiado para su uso en consultas o en terapias. El entrenador del sueño no es ningún producto médico. - Page 58 ‚ Cuando vaya a utilizar el aparato conectado a red, emplee únicamente el adaptador de red USB suministrado y sustitúyalo por otro del mismo tipo. RIESGOS PARA LOS NIÑOS ‚ Mantenga a los niños alejados del material de embalaje. Existe riesgo de asfixia por ingestión. ‚...
- Page 59 ‚ Saque el adaptador de red USB del enchufe: − antes de limpiar el aparato, − si claramente se produce un fallo durante su funcionamiento, − en caso de tormenta. − Al hacerlo, tire siempre del adaptador de red USB y no del cable.
- Page 60 ‚ Extraiga la pila del aparato si esta se ha gastado o si no va a utilizar el aparato durante mucho tiempo. De este modo evitará los daños que pudieran producirse por una fuga del líquido de las pilas. ‚ No exponga las pilas a condiciones extremas, poniéndolas por ejemplo sobre radiadores o expuestas directamente al sol.
-
Page 61: Acerca Del Entrenador Del Sueño Pino
ACERCA DEL ENTRENADOR DEL SUEÑO PINO Pino es un reloj despertador para niños con una divertida combinación de luz, música y animación. Principales funciones de Pino: ‚ Cinco tonos de alarma distintos disponibles en tres volúmenes ‚ Función de repetición de alarma (Snooze) ‚... -
Page 62: De Un Vistazo
DE UN VISTAZO PARTE INFERIOR... - Page 63 Botón SNOOZE: repetición de alarma Pantalla marco de la pantalla con iluminación Botón LOCK: bloqueo/desbloqueo del aparato Botón SET: ajustes del aparato Tecla -: disminuir los valores Botón NAP: activación y desactivación del temporizador de sueño corto Botón LIGHT: ajuste del brillo/la autonomía Botón SOUND: reproducción de música/sonidos de la naturaleza 10 Compartimento para una pila CR2032, 3 V...
-
Page 64: Puesta En Funcionamiento
PUESTA EN FUNCIONAMIENTO RETIRAR LA BANDA ISO En caso de un fallo de corriente, la pila CR2032, 3 V garantiza que los ajustes realizados (p. ej., las horas de alarma) se almacenen durante varias horas. Esta pila de reserva ya está insertada en el momento de la entrega y está... -
Page 65: Realizar Los Ajustes Básicos
REALIZAR LOS AJUSTES BÁSICOS ‚ Para todo tipo de ajustes se aplica lo siguiente: Cuando pasan más de 30 segundos entre una pulsación de botón y otra, el proceso de ajuste finaliza automáticamente y hay que volver a repetirlo. ‚ Si mantiene pulsado el botón - o + durante la configuración de los ajustes, los valores mostrados avanzarán más rápido. -
Page 66: Funciones Básicas
4. Presione TIME. En la pantalla parpadea la cifra de los minutos. 5. Utilice los botones - / + para ajustar los minutos de la hora actual. 6. Presione TIME. La pantalla mostrará "24 Hr" o "12 Hr". 7. Utilice los botones - / + para ajustar el formato de hora deseado. -
Page 67: Utilización
En la medida de lo posible, realice el cambio de formato en las horas de la tarde, ya que en las horas de la mañana no se aprecia ninguna diferencia. UTILIZACIÓN INFORMACIÓN GENERAL En el modo normal se muestran en la pantalla la hora y la temperatura interior medida. -
Page 68: Música/Música Adormecedora
2. Presione LIGHT. Aparecerá "10" en la pantalla. 3. Utilice el botón + o - para seleccionar la duración de la luz deseada: ON-10-20-30-45-1:00-1:30. 4. Vuelva a presionar SET. Si selecciona "ON", la luz de dormir NO se apagará automáticamente más tarde, sino que se deberá... -
Page 69: Temporizador De Sueño Corto
4. Presione SOUND. Aparecerá "10" en la pantalla. 5. Utilice el botón + o - para seleccionar la duración de la reproducción deseada: ON-10-20-30-45-1:00-1:30. 6. Vuelva a presionar SET. Si selecciona "ON", el título seleccionado NO se apagará automáticamente más tarde, sino que se deberá... - Page 70 5. Utilice el botón + o - para seleccionar el método de despertador deseado: Melodía despertadora Luz roja 6. Vuelva a presionar SET. INICIO Si presiona el botón SNOOZE durante unos segundos mientras que el temporizador está activado, aparecerá en la pantalla el tiempo restante hasta el inicio de la alarma.
-
Page 71: Despertador
Presionar NAP Se apaga la alarma/la luz y se desactiva el temporizador de sueño corto. Esperar 5 minutos Se apaga la alarma/la luz automáticamente y se desactiva el temporizador de sueño corto. DESPERTADOR AJUSTAR HORA DE ALARMA 1. Presione SET. Aparecerá... - Page 72 ACTIVAR FUNCIÓN DESPERTADOR − Presione ALARM para activar la función despertador. Se proyectará en la pantalla. Si mantiene pulsado el botón SNOOZE unos segundos, se mostrará en la pantalla la última hora de alarma establecida. Pino despertará en el tiempo establecido. En este punto, hay varias posibilidades: Presionar SNOOZE El tono de alarma se apagará...
-
Page 73: Entrenador Del Sueño
ENTRENADOR DEL SUEÑO FUNCIONAMIENTO DEL ENTRENADOR DEL SUEÑO El entrenador del sueño funciona con una hora de dormir y una hora de despertarse y de levantarse. Estas horas libremente ajustables están sujetas a sucesos fijos. ‚ Cuenta atrás de 30 minutos antes de la hora de dormir: si Pino está... -
Page 74: Cargar Dispositivo Usb
5. Utilice los botones - / + para ajustar los minutos actuales de la hora de dormir. 6. Presione SLEEP/WAKE. Parpadearán en la pantalla el símbolo del sol y la cifra de la hora de despertarse. 7. Utilice los botones - / + para ajustar la hora de despertarse deseada. -
Page 75: Cambiar La Pila De Reserva
− Conecte la toma USB 5 V 1 A y el dispositivo externo con un cable USB (no suministrado). CAMBIAR LA PILA DE RESERVA 1. Abra el compartimento de la pila en la parte inferior y retire la pila vieja. 2. -
Page 76: Problema/Solución
PROBLEMA/SOLUCIÓN Problema Causa posible El aparato no reacciona ‚ Mantenga LOCK cuando se presionan los pulsado para desbloquear el aparato. botones. Aparecerá la pantalla. En la pantalla se muestra ‚ La pila de reserva no está insertada o debe ser reemplazada. Una función, por ejemplo, la ‚... -
Page 77: Garantía
Waagen-Schmitt GmbH dirección de servicio Hammer Steindamm 27-29 técnico): 22089 Hamburgo, Alemania snuutje@waagen-schmitt.de Nuestros productos se están desarrollando y mejorando continuamente. Por este motivo, cabe la posibilidad de que en cualquier momento pudiera haber cambios en el diseño o modificaciones técnicas. -
Page 78: Declaración De Conformidad
DECLARACIÓN DE CONFORMIDAD Por la presente, Waagen-Schmitt GmbH declara que el entrenador del sueño SNU 2001 cumple con las directivas 2014/30/UE y 2011/65/UE. Esta declaración perderá su validez si en la báscula se realizan modificaciones no autorizadas por el fabricante. Hamburgo, mayo de 2020 Waagen-Schmitt GmbH ELIMINACIÓN... - Page 79 Las pilas y baterías no son residuos domésticos Todas las pilas y baterías deben depositarse en los puntos de recogida del ayuntamiento, del distrito o en los comercios. De este modo, puede realizarse la eliminación de pilas y baterías de una forma respetuosa con el medio ambiente.
-
Page 80: Généralités
Chère cliente, cher client ! Nous sommes ravis que vous ayez choisi un appareil de haute qualité de la marque snuutje, qui allie des fonctions intelligentes à un design attrayant qui égaiera votre foyer. Nous espérons qu'il vous apportera entière satisfaction. - Page 81 LÉGENDE Ce symbole, associé au mot DANGER, prévient de blessures graves. Ce symbole, associé au mot ATTENTION, prévient de blessures moyennes et légères. Ce symbole, associé au mot AVERTISSEMENT, prévient de dommages matériels. Ce symbole désigne des informations supplémentaires ainsi que des indications d’ordre général.
-
Page 82: Contenu De L'emballage
Réglages de base .......... 91 Verrouillage/déverrouillage de l’appareil 91 Régler l’heure ..........91 Fonctions principales ........92 Utilisation ............ 93 Généralités ..........93 Veilleuse ........... 93 Musique/berceuse ........94 Minuterie pour la sieste ......95 Réveil ............97 Activateur de sommeil ......98 Charger un appareil USB ......100 Changer la pile de secours ......100 Nettoyage ............101... -
Page 83: Utilisation Conforme
UTILISATION CONFORME Cet appareil est un activateur de sommeil à utiliser chez l’enfant et est exclusivement destiné à un usage en intérieur dans le cadre privé. L’activateur de sommeil n’est pas un jouet pour enfant. Cet appareil ne convient pas pour une utilisation à des fins thérapeutiques ou dans un environnement professionnel (cabinets etc.). - Page 84 n’utilisez pas l'appareil à proximité de sources d’humidité telles qu’un lavabo. ‚ Utilisez uniquement l’adaptateur secteur USB fourni, lorsque vous souhaitez brancher l’appareil sur le secteur, et ne remplacez celui-ci que par un adaptateur du même type. DANGER POUR LES ENFANTS ‚...
- Page 85 ‚ Débranchez l’adaptateur secteur USB : − avant de nettoyer l’appareil, − si un dysfonctionnent évident survient pendant le branchement, − en cas d’orage. − Faites le débranchement en tirant toujours sur l’adaptateur secteur USB et non pas sur le câble. ‚...
- Page 86 ‚ Retirez la pile de l'appareil lorsque celle-ci est usée ou lorsque vous n’utiliserez pas l'appareil pour une période prolongée. Vous éviterez ainsi les dommages qui pourraient résulter d’une fuite des piles. ‚ N’exposez pas les piles à des conditions extrêmes, en les conservant par exemple sur une source de chaleur ou à...
-
Page 87: Au Sujet De L'activateur De Sommeil Pino
AU SUJET DE L’ACTIVATEUR DE SOMMEIL PINO Pino est un réveil pour enfants avec une association ludique de lumière, de musique et d’animation. Aperçu rapide des fonctions de Pino : ‚ Réveil à cinq sonneries différentes avec trois niveaux d’intensité sonore ‚... -
Page 88: Vue D'ensemble
VUE D’ENSEMBLE SUR LE DESSOUS... - Page 89 Touche SNOOZE : rappel de l’alarme Écran Encadrement de l’écran avec éclairage Touche LOCK : verrouillage/déverrouillage de l’appareil Touche SET : effectuer les réglages de l'appareil Touche - : réduire la valeur Touche NAP : activer et désactiver la minuterie pour la sieste Bouton LIGHT : régler la luminosité/la durée de l’éclairage...
-
Page 90: Mise En Marche Initiale
MISE EN MARCHE INITIALE ENLEVER LA BANDE ISOLANTE En cas de panne de courant, une pile 3 V de type CR2032 assure que les réglages effectués (par ex. les heures de réveil) restent mémorisés pendant plusieurs heures. Cette pile auxiliaire est déjà installée en usine et est dotée d’une bande isolante afin d'éviter un déchargement précoce. -
Page 91: Réglages De Base
RÉGLAGES DE BASE ‚ Indication valable pour tous les réglages : si, pendant le réglage, il s’écoule plus de 30 secondes entre l’actionnement de deux touches ou boutons, le réglage prend automatiquement fin et devra être entrepris de nouveau. ‚ Si, pendant le réglage, vous maintenez la touche - ou + enfoncée, les valeurs affichées évoluent plus rapidement. -
Page 92: Fonctions Principales
3. Régler le chiffre de l’heure actuelle avec les touches - / +. 4. Appuyez sur TIME. Le chiffre des minutes clignote à l'écran. 5. Réglez le chiffre des minutes actuelles avec les touches- et +. 6. Appuyez sur TIME. L’indication «... -
Page 93: Utilisation
Dans le cas du format 12 heures, les heures de l’après-midi sont caractérisées par la mention « PM ». Effectuez si possible le changement de format l’après-midi, car aucune différence n’est visible pendant les heures de la matinée. UTILISATION GÉNÉRALITÉS En mode normal, l’écran affiche l’heure ainsi que la température d’intérieur mesurée. -
Page 94: Musique/Berceuse
2. Appuyez sur LIGHT. L’indication « 10 » s’affiche à l’écran. 3. Sélectionnez la durée souhaitée de l’allumage avec les touches + et - : ON-10-20-30-45-1:00-1:30. 4. Pour finir, appuyez sur SET. Si vous sélectionnez « ON », la veilleuse NE s’éteindra PAS automatiquement mais devra être coupée manuellement en appuyant sur LIGHT. -
Page 95: Minuterie Pour La Sieste
4. Appuyez sur SOUND. L’indication « 10 » s’affiche à l’écran. 5. Sélectionnez la durée souhaitée de la diffusion avec les touches + et - : ON-10-20-30-45-1:00-1:30. 6. Pour finir, appuyez sur SET. Lorsque vous sélectionnez « ON », le titre choisi NE s’éteint PAS automatiquement par la suite, mais doit être arrêté... - Page 96 5. Sélectionnez avec la touche + ou - le mode de réveil souhaité : Mélodie de réveil Lumière rouge 6. Pour finir, appuyez sur SET. MISE EN ROUTE Lorsque vous maintenez la touche SNOOZE enfoncée pendant quelques secondes tandis que la minuterie est active, l’écran affiche le temps restant jusqu’au déclenchement de l’alarme.
-
Page 97: Réveil
RÉVEIL RÉGLER L’HEURE DE RÉVEIL 1. Appuyez sur SET. « SET » s’affiche à l’écran. 2. Appuyez sur ALARM. À l’écran, le symbole du réveil ainsi que le chiffre pour l’heure du réveil clignotent. 3. Réglez l’heure du réveil avec les touches - et +. 4. -
Page 98: Activateur De Sommeil
Appuyer sur Le son du réveil s’éteint SNOOZE 10 minutes, après quoi le réveil se redéclenche. Ce processus peut être répété plusieurs fois. Si, pendant ce temps, vous maintenez la touche SNOOZE enfoncée pendant 2 secondes, la fonction Snooze prend fin. Le symbole reste visible à... - Page 99 ‚ Moment d’aller dormir : Pino ferme les yeux, le symbole de la lune apparait sur l’écran assombri Il est maintenant l’heure d’aller dormir. ‚ Compte à rebours de 30 minutes avant l’heure du réveil/du lever : Pino dort encore, sa lumière brille en rouge.L’enfant se réveille lentement, mais devrait encore si possible rester allongé.
-
Page 100: Charger Un Appareil Usb
9. Avec les touches - et +, réglez les minutes souhaitées du réveil. 10. Pour finir, appuyez sur SET. ACTIVATION − Appuyez sur SLEEP/WAKE pour activer la fonction, s’affiche à l’écran. La procédure décrite sous « Voici comment l’accompagnateur de sommeil fonctionne » démarre aux heures prédéfinies. -
Page 101: Nettoyage
la polarité (+/-). La borne plus (+) doit être orientée vers le haut. Nota : ‚ N’utilisez que le type de pile indiqué dans les « Caractéristiques techniques ». ‚ Éliminez les piles usagées dans le respect de l'environnement, voir « Mise au rebut ». NETTOYAGE AVERTISSEMENT Risque de dommages matériels... -
Page 102: Caractéristiques Techniques
Dysfonctionnement Cause possible ‚ La pile de secours L’écran affiche n’a pas été introduite ou bien elle doit être remplacée. Une fonction, par ‚ Vous avez défini exemple la lumière pour « ON » comme durée l’endormissement, ne s’éteint dans les paramètres pas automatiquement. -
Page 103: Garantie
Distributeur (n’effectuant Waagen-Schmitt GmbH pas les réparations) : Hammer Steindamm 27–29 22089 Hambourg - Allemagne snuutje@waagen-schmitt.de Nos produits font l’objet de développements et d’améliorations continuels. Pour cette raison, des modifications de design et des modifications techniques peuvent survenir à tout moment. -
Page 104: Déclaration De Conformité
DÉCLARATION DE CONFORMITÉ La société Waagen-Schmitt GmbH déclare par la présente que l’accompagnateur de sommeil SNU 2001 répond aux directives 2014/30/UE et 2011/65/UE. La déclaration perd sa validité dans le cas où le produit subirait une modification dont nous n’aurons pas convenu. Hambourg, mai 2020 Waagen-Schmitt GmbH MISE AU REBUT... - Page 105 Ainsi, les matières utiles contenues dans l’appareil pourront être recyclées, avec un moindre impact sur l’environnement. Déposez l’appareil usagé dans un point de collecte pour les déchets électroniques ou dans un centre de recyclage. Pour plus d’informations, adressez-vous à votre service de collecte local ou à votre municipalité.
-
Page 106: Informazioni Generali
Gentile cliente! Avete acquistato un prodotto di alta qualità del brand snuutje che possiede caratteristiche intelligenti e un design moderno per riempire di felicità la vostra casa. Vi auguriamo buon divertimento! Il vostro team snuutje INFORMAZIONI GENERALI INFORMAZIONI SULLE PRESENTI ISTRUZIONI PER... - Page 107 DESCRIZIONE DEI SIMBOLI Questo simbolo accompagnato dalla parola PERICOLO mette in guardia contro il rischio di gravi lesioni. Questo simbolo accompagnato dalla parola AVVERTENZA indica il rischio di lesioni di lieve o media entità. Questo simbolo accompagnato dalla parola ATTENZIONE indica il rischio di danni alle cose. Questo simbolo indica ulteriori informazioni o indicazioni generali.
-
Page 108: Ambito Della Fornitura
Esecuzione delle impostazioni base .... 117 Blocco / sblocco del dispositivo ....117 Impostazione dell'ora....... 117 Funzioni principali ........118 Uso ...............119 Informazioni generali .......119 Luce per la nanna ........119 Musica / Musica per facilitare l’addormentamento ........ 120 Timer sonnellino ........121 Sveglia ............. -
Page 109: Destinazione D'uso
DESTINAZIONE D'USO Il dispositivo è concepito come allenatore del sonno per bambini ed è adatto unicamente per l’uso privato in ambienti interni. L'allenatore del sonno non è un giocattolo per bambini. Il dispositivo non è adatto all’uso commerciale in studi medici o per la terapia del sonno. - Page 110 ‚ Utilizzare solamente l'alimentatore USB in dotazione se si desidera utilizzare il dispositivo mediante la rete elettrica e sostituirlo solo con uno dello stesso tipo. PERICOLO PER I BAMBINI ‚ Tenere lontano dalla portata dei bambini il materiale di imballaggio. In caso di ingestione sussiste il pericolo di soffocamento.
- Page 111 ‚ Scollegare l'adattatore di alimentazione USB dalla presa di corrente: − prima di pulire il dispositivo, − se, durante il funzionamento, il dispositivo mostra di subire interferenze, − durante un temporale. − A tal scopo, afferrare e tirare sempre l'adattatore di alimentazione USB, non il cavo.
- Page 112 ‚ Rimuovere la batteria dal dispositivo quando è scarica o quando si prevede di non utilizzare il dispositivo per un lungo periodo. In tal modo si eviteranno danni causati da eventuali perdite di liquido dalle batterie. ‚ Non sottoporre la batteria a temperature estreme, ad esempio conservandole vicino a termosifoni o alla luce diretta del sole.
-
Page 113: Informazioni Sull'allenatore Del Sonno Pino
INFORMAZIONI SULL'ALLENATORE DEL SONNO PINO Pino è una sveglia per bambini dotata di una divertente combinazione di luce, musica e animazione. Una panoramica delle funzioni di Pino: ‚ Cinque diversi toni di allarme per la sveglia, con tre livelli di volume ‚... -
Page 114: Descrizione
DESCRIZIONE LATO INFERIORE... - Page 115 Pulsante SNOOZE: ripetizione della sveglia Display Cornice del display con illuminazione Pulsante LOCK: blocco / sblocco del dispositivo Pulsante SET: gestione delle impostazioni del dispositivo Pulsante -: Ridurre il valore Pulsante NAP: attivazione e disattivazione del timer per il sonnellino Pulsante LIGHT: impostazione della luminosità...
-
Page 116: Messa In Funzione
MESSA IN FUNZIONE RIMOZIONE DELLA STRISCIA ISOLANTE Nel caso di un’interruzione di corrente, una batteria CR2032 da 3 V preserva le impostazioni effettuate (ad es. gli orari della sveglia), che rimangono memorizzate per diverse ore. Al momento della consegna, tale batteria di riserva è... -
Page 117: Esecuzione Delle Impostazioni Base
ESECUZIONE DELLE IMPOSTAZIONI BASE ‚ Applicabile a tutte le impostazioni: Se si attendono più di 30 secondi circa tra una pressione e l'altra dei tasti, il processo di regolazione termina automaticamente e sarà necessario ripeterlo da capo. ‚ Tenendo premuto il pulsante - o + durante l’impostazione, l'avanzamento dei valori visualizzati è... -
Page 118: Funzioni Principali
4. Premere TIME. Sul display lampeggia la cifra dei minuti. 5. Utilizzare i tasti - / + per impostare i minuti correnti. 6. Premere TIME. Sul display viene visualizzato "24 ore” o "12 ore”. 7. Utilizzare i tasti - /+ per impostare il formato dell'ora desiderato. -
Page 119: Uso
Nel formato 12 ore, le ore pomeridiane vengono contrassegnate con "PM". Si consiglia di modificare tale formato nel corso delle ore pomeridiane, poiché al mattino non si noterebbe alcuna differenza. INFORMAZIONI GENERALI In modalità normale, il display mostra l'ora e la temperatura interna rilevata nell’ambiente. -
Page 120: Musica / Musica Per Facilitare L'addormentamento
DURATA DELLA LUCE 1. Premere SET. Sul display viene visualizzato "SET". 2. Premere LIGHT. Sul display viene visualizzato "10". 3. Utilizzare il pulsante + o - per impostare la durata della luce desiderata: ON-10-20-30-45-1:00-1:30. 4. Infine, premere il pulsante SET. Se viene selezionato "ON", la luce per la nanna NON si spegne automaticamente, ma deve essere spenta manualmente premendo LIGHT. -
Page 121: Timer Sonnellino
Musica Foresta pluviale Giungla 4. Premere SOUND. Sul display viene visualizzato "10". 5. Utilizzare i pulsanti + o - per selezionare la durata desiderata per la riproduzione musicale: ON-10-20-30-45-1:00-1:30. 6. Infine, premere il pulsante SET. Se si seleziona "ON", il brano musicale scelto NON si spegne automaticamente in seguito, ma deve essere interrotto manualmente premendo SOUND. - Page 122 3. Utilizzare i pulsanti + o - per selezionare la durata desiderata: 10-30-45-1:00-1:30-2:00-2:30-3:00. 4. Premere NAP. Sul display viene visualizzato “AL” o “LI”. 5. Utilizzare i pulsanti + o - per selezionare la modalità di risveglio desiderata: Melodia della sveglia Luce rossa 6.
-
Page 123: Sveglia
Premere NAP La melodia / la luce si spengono e il timer viene disattivato. Attendere 5 minuti L'allarme / la luce si spengono automaticamente, il timer sonnellino è disattivato. SVEGLIA IMPOSTAZIONE DELLA SVEGLIA 1. Premere SET. Sul display viene visualizzato "SET". 2. - Page 124 ATTIVAZIONE DELLA FUNZIONE DI SVEGLIA − Premere ALARM, per attivare la funzione della sveglia. Sul display appare . Premendo e tenendo premuto il pulsante SNOOZE per alcuni secondi, sul display viene visualizzato l'ultimo orario impostato per la sveglia. Pino attiva la sveglia all’ora impostata. A questo punto sono disponibili diverse opzioni: Premere SNOOZE Il tono della sveglia si interrompe per 10 minuti, dopodiché...
-
Page 125: Allenatore Del Sonno
ALLENATORE DEL SONNO FUNZIONAMENTO DELL’ALLENATORE DEL SONNO L'allenatore del sonno lavora sulla base di un orario per la nanna e un orario per il risveglio. A questi orari, impostabili liberamente, sono associati degli eventi fissi. ‚ Conto alla rovescia di 30 minuti prima dell’orario della nanna: Pino è... -
Page 126: Ricarica Dei Dispositivi Usb
4. Premere SLEEP / WAKE. Sul display lampeggia la cifra relativa ai minuti da impostare per l’orario della nanna. 5. Utilizzare i pulsanti - /+ per impostare i minuti per l’orario della nanna. 6. Premere SLEEP / WAKE. Sul display lampeggiano il simbolo del sole e la cifra corrispondente all'ora del risveglio. -
Page 127: Sostituzione Dell Batteria Di Riserva
Attenersi alle istruzioni del produttore del dispositivo da caricare. − Collegare la porta USB 5 V 1 A e il dispositivo esterno tramite un cavo USB (non incluso nella fornitura). SOSTITUZIONE DELL BATTERIA DI RISERVA 1. Aprire il vano batterie sul lato inferiore e rimuovere la vecchia batteria. -
Page 128: Risoluzione Dei Problemi
1. Scollegare il dispositivo dalla rete di alimentazione. 2. Se necessario, pulire il dispositivo con un panno leggermente inumidito. RISOLUZIONE DEI PROBLEMI Problema Possibile causa Il dispositivo non reagisce ‚ Premere e tenere quando i pulsanti vengono premuto LOCK per premuti, sul display appare sbloccare il dispositivo. -
Page 129: Garanzia
1x CR2032, 3 V Distributore (nessun Waagen-Schmitt GmbH servizio di assistenza): Hammer Steindamm 27-29 22089 Amburgo, Germania snuutje@waagen-schmitt.de I nostri prodotti sono costantemente sviluppati e perfezionati. Pertanto, modifiche tecniche e nel design sono possibili in qualsiasi momento. GARANZIA La ditta Waagen-Schmitt GmbH garantisce la riparazione o la sostituzione gratuita dell'unità... -
Page 130: Smaltimento
SMALTIMENTO SMALTIMENTO DELL'IMBALLAGGIO Smaltire l'imballaggio nella raccolta differenziata. Conferire il cartone nella raccolta della carta e la pellicola in quella del materiale riciclabile. SMALTIMENTO DEL PRODOTTO Smaltire il prodotto secondo le norme vigenti nel proprio paese. Il dispositivo non deve essere smaltito con i normali rifiuti domestici Al termine della sua vita utile, l'apparecchio deve essere smaltito in modo appropriato. -
Page 132: Spis Treści Informacje Ogólne
Szanowny Kliencie! Zdecydowałeś się na ten wysokiej jakości produkt marki snuutje — inteligentne funkcje i świeże wzornictwo do domu pełnego szczęśliwych chwil. Życzymy dużo przyjemności! Zespół snuutje INFORMACJE OGÓLNE O NINIEJSZEJ INSTRUKCJI Niniejsza instrukcja obsługi zawiera opis bezpiecznej obsługi i pielęgnacji artykułu. - Page 133 OBJAŚNIENIE ZNAKÓW Ten symbol w połączeniu ze słowem NIEBEZPIECZEŃSTWO ostrzega przed poważnymi obrażeniami ciała. Ten symbol w połączeniu ze słowem OSTRZEŻENIE ostrzega przed obrażeniami ciała średniego i lekkiego stopnia. Ten symbol w połączeniu ze słowem WSKAZÓWKA ostrzega przed stratami materialnymi. Ten symbol oznacza dodatkowe informacje i ogólne wskazówki.
-
Page 134: Zakres Dostawy
Zablokowanie/odblokowanie urządzenia 143 Ustawienie godziny ......... 143 Funkcje podstawowe ........144 Użytkowanie ..........145 Informacje ogólne ........145 Lampka nocna ......... 145 Muzyka / muzyka usypiająca ....146 Timer krótkiej drzemki......147 Budzenie ..........149 Trener snu ..........150 Ładowanie urządzenia USB ......152 Wymiana baterii podtrzymującej .... -
Page 135: Użycie Zgodne Z Przeznaczeniem
UŻYCIE ZGODNE Z PRZEZNACZENIEM Trener snu jest przeznaczony dla dzieci i nadaje się wyłącznie do użytku prywatnego w pomieszczeniach. Trener snu nie jest zabawką. Nie nadaje się do wykorzystania komercyjnego w praktykach lub terapiach. Trener snu nie jest produktem medycznym. BEZPIECZEŃSTWO ‚... - Page 136 zasilacza sieciowego USB dostarczonego z urządzeniem lub zastąpić go zasilaczem tego samego typu. NIEBEZPIECZEŃSTWO DLA DZIECI ‚ Materiały opakowaniowe należy przechowywać z dala od dzieci. Połknięcie grozi uduszeniem. ‚ Przechowywać kabel USB z dala od dzieci. Niebezpieczeństwo uduszenia! NIEBEZPIECZEŃSTWO SPOWODOWANE ELEKTRYCZNOŚCIĄ...
- Page 137 ‚ Wyjąć zasilacz sieciowy USB z gniazdka: − przed czyszczeniem urządzenia, − jeżeli podczas eksploatacji wystąpi widoczna usterka, − podczas burzy. − Chwytać zawsze za zasilacz sieciowy USB, nie ciągnąć za kabel. ‚ Nie modyfikować produktu. Naprawy zlecać tylko specjalistycznym zakładom, ponieważ niewłaściwie naprawiane urządzenia stanowią...
- Page 138 ‚ Wyjąć baterię z urządzenia, jeżeli są wyczerpane lub urządzenie nie będzie użytkowane przez dłuższy czas. W ten sposób unika się uszkodzeń, jakie mogą powstać na skutek wycieku. ‚ Nie narażać baterii na oddziaływanie skrajnych warunków np. poprzez składowanie ich na grzejnikach lub bezpośrednio w miejscach nasłonecznionych.
-
Page 139: Informacje Dot. Trenera Snu Pino
INFORMACJE DOT. TRENERA SNU PINO Pino jest budzikiem dla dzieci z zabawnym połączeniem światła, muzyki i animacji. Przegląd funkcji Pino: ‚ Pięć różnych dźwięków alarmu budzenia w trzech głośnościach ‚ Funkcja drzemki (snooze) ‚ Możliwość wyboru pięciu kolorów lampki nocnej ‚... -
Page 140: W Skrócie
W SKRÓCIE SPÓD... - Page 141 Przycisk SNOOZE: Powtarzanie budzenia Wyświetlacz Ramka wyświetlacza z oświetleniem Przycisk LOCK: Zablokowanie/odblokowanie urządzenia Przycisk SET: Ustawienia urządzenia Przycisk -: zmniejszenie wartości Przycisk NAP: Włączanie i wyłączanie timera krótkiej drzemki Przycisk LIGHT: Ustawianie jasności/czasu świecenia Przycisk SOUND: Odtwarzanie muzyki / dźwięków natury 10 Komora na baterię, 1 x CR2032, 3 V 2 x gniazdko przyłączeniowe USB: ‚...
-
Page 142: Uruchomienie
URUCHOMIENIE ZDEJMOWANIE PASKA IZOLACYJNEGO W przypadku awarii zasilania energią elektryczną bateria typu CR2032, 3 V zapewnia podtrzymanie zapisanych ustawień (np. pór budzenia) przez kilka godzin. Bateria podtrzymująca znajduje się już w urządzeniu przy dostawie i jest zabezpieczona paskiem izolacyjnym przed przedwczesnym rozładowaniem. -
Page 143: Wykonywanie Podstawowych Ustawień
WYKONYWANIE PODSTAWOWYCH USTAWIEŃ ‚ W odniesieniu do wszystkich ustawień obowiązuje poniższe: Jeżeli między dwoma naciśnięciami przycisku minie ok. 30 sekund, proces ustawiania zostanie automatycznie zakończony i trzeba będzie go powtórzyć. ‚ W przypadku naciśnięcia i przytrzymania podczas ustawiania przycisku - lub + wyświetlane wartości będą... -
Page 144: Funkcje Podstawowe
2. Nacisnąć TIME. Na wyświetlaczu zacznie migać cyfra godzin. 3. Przyciskami - / + ustawić aktualną godzinę. 4. Nacisnąć TIME. Na wyświetlaczu zacznie migać cyfra minut. 5. Przyciskami - / + ustawić aktualną minutę. 6. Nacisnąć TIME. Na wyświetlaczu pojawi się „24 Hr” lub „12 Hr”. 7. -
Page 145: Użytkowanie
W przypadku formatu 12-godzinnego godziny popołudniowe będą oznaczone symbolem „PM”. Zmiany formatu godziny należy dokonywać w miarę możliwości w godzinach popołudniowych, ponieważ w przypadku godzin dopołudniowych różnica nie jest widoczna. UŻYTKOWANIE INFORMACJE OGÓLNE W trybie standardowym na wyświetlaczu wyświetlają się godzina oraz zmierzona wartość... -
Page 146: Muzyka / Muzyka Usypiająca
2. Nacisnąć LIGHT. Na wyświetlaczu pojawi się „10”. 3. Przyciskiem + lub - wybrać żądany czas świecenia: ON-10-20-30-45-1:00-1:30. 4. Na zakończenie nacisnąć SET. W przypadku wybrania „ON” lampka nocna NIE wyłączy się później automatycznie, lecz należy ją wyłączyć ręcznie, naciskając przycisk LIGHT. WŁĄCZANIE −... -
Page 147: Timer Krótkiej Drzemki
4. Nacisnąć SOUND. Na wyświetlaczu pojawi się „10”. 5. Przyciskiem + lub - wybrać żądany czas odtwarzania: ON-10-20-30-45-1:00-1:30. 6. Na zakończenie nacisnąć SET. W przypadku wybrania „ON” odtwarzanie wybranego dźwięku NIE zakończy się później automatycznie, lecz należy je zakończyć ręcznie, naciskając przycisk SOUND. ODTWARZANIE −... - Page 148 5. Przyciskiem + lub - wybrać żądaną metodę budzenia: Melodia budzenia Czerwone światło 6. Na zakończenie nacisnąć SET. URUCHAMIANIE W przypadku naciśnięcia i przytrzymania przez kilka sekund przycisku SNOOZE podczas działania timera na wyświetlaczu wyświetli się czas pozostały do aktywacji alarmu. 1.
-
Page 149: Budzenie
BUDZENIE USTAWIANIE CZASU BUDZENIA 1. Nacisnąć SET. Na wyświetlaczu pojawi się „SET”. 2. Nacisnąć przycisk ALARM. Na wyświetlaczu będą migać symbol budzika oraz cyfra godziny budzenia. 3. Przyciskami - / + ustawić godzinę budzenia. 4. Nacisnąć przycisk ALARM. Na wyświetlaczu zacznie migać cyfra minuty budzenia. 5. -
Page 150: Trener Snu
Nacisnąć SNOOZE Dźwięk budzenia zostanie wyciszony na 10 minut, a następnie aktywuje się ponownie. Proces ten można powtarzać wielokrotnie. W przypadku naciśnięcia i przytrzymania w tym momencie przez 2 sekundy przycisku SNOOZE funkcja drzemki (snooze) wyłączy się. Na wyświetlaczu będzie nadal widoczny symbol , budzenie zostanie aktywowane następnego... - Page 151 ‚ Pora spania: Pino zamyka oczy, na przyciemnionym wyświetlaczu pojawia się symbol księżyca . Teraz jest pora spania. ‚ 30-minutowe odliczanie przed porą budzenia/ wstawania: Pino jeszcze śpi, świeci światłem w kolorze czerwonym. Dziecko powoli się budzi, ale w miarę możliwości powinno pozostać...
-
Page 152: Ładowanie Urządzenia Usb
WŁĄCZANIE − Nacisnąć SLEEP/WAKE, aby aktywować funkcję, na wyświetlaczu pojawi się W ustawionych czasach uruchomi się proces opisany w punkcie „Sposób funkcjonowania trenera snu”. − Aby dezaktywować funkcję w późniejszym czasie, nacisnąć ponownie SLEEP/WAKE zgaśnie) ŁADOWANIE URZĄDZENIA USB Poprzez gniazdko USB można ładować urządzenia, takie jak smartfony lub odtwarzacze MP3. -
Page 153: Czyszczenie
Należy pamiętać: ‚ Używać tylko typu baterii podanego w rozdziale „Dane techniczne”. ‚ Utylizować stare baterie w sposób ekologiczny, patrz „Utylizacja”. CZYSZCZENIE WSKAZÓWKA dotycząca strat materialnych − Nie zanurzać urządzenia w wodzie ani w innych płynach. − Do czyszczenia wagi nigdy nie używać twardych, zarysowujących lub trących środków czyszczących itp. -
Page 154: Dane Techniczne
5 W Bateria: 1x CR2032, 3 V Dystrybutor Waagen-Schmitt GmbH (nie adres serwisu): Hammer Steindamm 27-29 22089 Hamburg, Niemcy snuutje@waagen-schmitt.de Nasze produkty są stale rozwijane i usprawniane. Z tego powodu zawsze możliwe są zmiany w wyglądzie i zmiany techniczne. -
Page 155: Gwarancja
GWARANCJA Firma Waagen-Schmitt GmbH udziela 2-letniej gwarancji od daty zakupu na bezpłatne usuwanie usterek spowodowanych błędami materiałowymi lub produkcyjnymi poprzez naprawę lub wymianę. W przypadku korzystania z gwarancji prosimy o zwrócenie sprzedawcy artykułu wraz z dowodem zakupu (podając również powód reklamacji). DEKLARACJA ZGODNOŚCI Waagen-Schmitt GmbH oświadcza niniejszym, że trener snu SNU 2001 jest zgodny z dyrektywami 2014/30/UE i... - Page 156 UTYLIZACJA PRODUKTU Produkt należy utylizować zgodnie z przepisami obowiązującymi w danym kraju. Urządzeń nie wolno wyrzucać razem ze zwykłymi odpadami domowymi Po zakończeniu okresu użytkowania produkt należy przekazać do odpowiedniej utylizacji. Surowce wtórne znajdujące się w urządzeniu zostaną przekazane do recyklingu, co zmniejszy zanieczyszczenie środowiska.
Need help?
Do you have a question about the PINO SNU 2001 and is the answer not in the manual?
Questions and answers