Table of Contents
Advertisement
Quick Links
User Instructions for the Mini Audio Lab V3
Congratulations to your new Mini Audio LabV3!
No time for reading manuals?
We know, it´s the same to us... But please read at least this manual to get to know all the functions of the
Mini Audio Lab V3 and what it can for you!
The Mini Audio Lab V3 is made for the most common test applications on stage without the need to
spend time to search for the right tool. Just plug your Mini Audio Lab V3 and check whether there is a
correct signal or not. With the integrated measuring options you are able to find out faults in the Signal-
flow including Cables, Speakers, Batteries and so on.
Before you use the Mini Audio Lab V3, you should acquaint yourself with the different functions and how
you can use them, to make sure that you are choosing the right menu item.
This manual will guide you through the functions and possibilities of the Mini Audio Lab V3. But in your
own interest, educate yourself in Audio measuring techniques also used in different systems. You will find
happiness in working with the Mini Audio Lab V3 when you know, what it can do for you. It´ll be easy!
Now, let´s start working with the Mini Audio Lab V3!
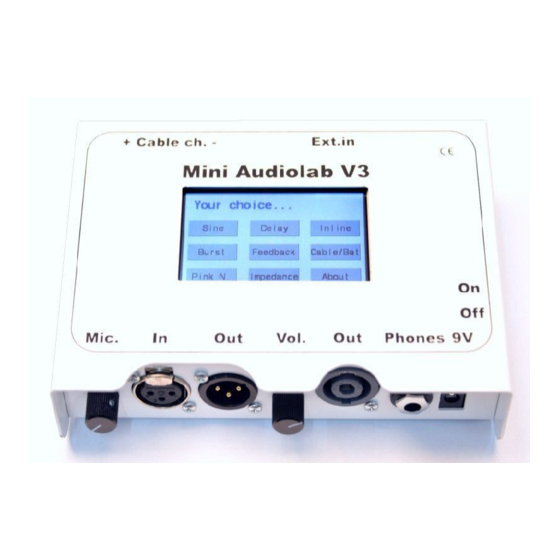
The following functions are integrated:
Precision sine wave generator from 16 Hz. up to 20 kHz in 1/3 Octave ISO steps,
plus 440 hz,
Burst Signal, works also with the Precision sine wave generator
Pink noise generator
Internal 1 Watt amplifier for the impedance test of loudspeaker boxes between 1
Ohm up to 20 Ohm at the different iso frequencies.
Internal measuring microphone with the signal level indicated at the display for the
level control with different frequencies for a rough eqalizer pre setting.
Detection and indication of feedback frequencies that need to be cut
with an Equalizer.
Delay Measurement
Polarity measurement
Inline check
Cable/Bat Check
Installation:
Mini Audiolab V3 manual
1/6
Advertisement
Table of Contents

Summary of Contents for OPTOGATE Mini Audio Lab V3
- Page 1 The Mini Audio Lab V3 is made for the most common test applications on stage without the need to spend time to search for the right tool. Just plug your Mini Audio Lab V3 and check whether there is a correct signal or not.
- Page 2 Decide whether the Mini Audio Lab V3 is to be powered by batteries or an external 9V DC power supply: Battery Power: The Mini Audio Lab V3 is powered by a 9V Block Battery. When changing the Battery, ensure the correct Polarity! Please keep looking after your Battery! The Mini Audio Lab V3 can do some malfunctions if the 9V Block Battery doesn´t give enough power to...
- Page 3 Speaker response is different at low frequency speakers compare to mid or high frequency speakers. A correct polarity check is only possible if the Mini Audio Lab V3 is close enough to the speaker that needs to be checked. Polarity checks should always be done with the lowest possible level, just above “Low sig.”...
- Page 4 We know, if there´s no signal, everyone will first change the cable and sometime´s in okay after changing. With the Mini Audio Lab V3 you have an easy way to check your cables „on the road“. So if your cables are okay, your smart enough to tell your stagehands arrogantly that it has been their fault, not yours...
- Page 5 That´s all folks! Now you know what your Mini Audio Lab V3 can do for you. And as you see, that´s quite a lot. Just „play“ with it! The more you use the Mini Audio Lab V3, the more you don´t want to...
- Page 6 Elektronik explained further that these devices are made under the applicable CE- standards and ROHS regulations, as well as the registration as b2b equipment under the number DE54933725 WEEE. Please feel free to contact us at info@optogate.com you have further questions. Mini Audiolab V3 manual...
Need help?
Do you have a question about the Mini Audio Lab V3 and is the answer not in the manual?
Questions and answers