Table of Contents
Advertisement
Advertisement
Table of Contents

Summary of Contents for BRIGHT BLUE COLIBRI
- Page 1 “COLIBRI / PLUMA CC” SALT CHLORINATOR...
-
Page 3: Table Of Contents
Index Safety Instructions..............................3 Warnings ................................3 EC Conformity ................................. 3 System Contents ..............................4 Installation ................................4 Hydraulic Installation ........................... 4 4.1.1 Electrolysis Cell ............................4 4.1.2 Temperature probe installation ......................5 Electrical Installation ............................ 5 4.2.1 Installation of Electrolysis Cell ......................5 4.2.2 Installation of Temperature Probe .................... -
Page 4: Safety Instructions
1 Safety Instructions This product is a combination of an electronic controller and the respective accessories. It has been assembled and tested according to the safety measures applied to electronic devices in the EC. It has been cleared by the quality department within the factory. To preserve status and guarantee operation safety, the following instructions must be observed. -
Page 5: System Contents
3 System Contents This equipment is supplied in a box containing the electronic controller, the electrolysis cell, 2 reductions 63/50mm, 1 cover for the cell cables, 1 fixing bracket and its screws, a clamp saddle and a temperature probe. Before any installation, make sure that all components are in the original box. 4 Installation This controller includes a front display, a main control button and two side switches. -
Page 6: Temperature Probe Installation
The cell entry must be connected after the sand filter as shown in Fig 1. When possible, it is recommended to screw the cell tubing to a wall or a strong panel to prevent it from disruption due to the mechanical effort caused by the cell’s body. 4.1.2 Temperature probe installation The installation of the temperature probe should be performed with a clamp saddle with ½"... -
Page 7: Automatic Coverage Detector Installation (Optional)
4.2.4 Automatic Coverage Detector Installation (optional) If the pool has an automatic cover system, it can be connected to the equipment, so it detects if the cover is open or closed. The automatic Cover must emit a potential-free signal that must be transmitted to the equipment via specific cable (consult the manufacturer), which is connected to the inside the equipment (view Fig. -
Page 8: Control Of Chlorine Production
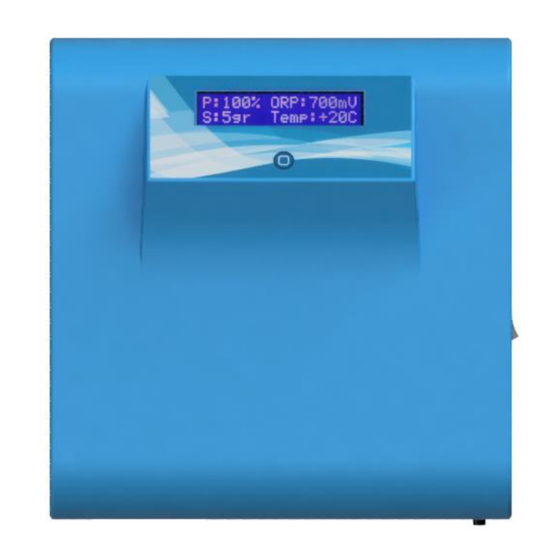
The display allows you to view the system status and obtain information about the active alarms. Chlorine Production Chlorine Concentration Salt Concentration Water Temperature Figure 8 – Display Information 5.1 Control of Chlorine Production Pressing the control button selects the period of electrolysis (as a percentage of filtering time) in order to increase or decrease production, and always choose the best reality of the swimming pool in which the equipment is installed. -
Page 9: Operation With Chlorine Probe (Orp)
It is recommended that electrolysis is not frequently activated and deactivated because it reduces cell life. Bright Blue is not responsible for errors or faults of the external equipment that have a direct effect on the quality and disinfection of the pool water. -
Page 10: Disinfection Recommendations
(*) - In this case a cell cleaning may be needed. To clean it, insert the electrodes into a 10% hydrochloric acid solution until it stops reacting, typically no more than 10 minutes. This operation reduces the life expectancy of the electrolyses cell, it should only be performed if it has visible mineral accumulation. -
Page 11: Orp Calibration
6.1 ORP Calibration The calibration of the ORP probe is done with 2 buffers (240mV and 470mV). Before proceeding, confirm that you have all the necessary material including a glass of water and absorbent paper order clean probe before introducing buffers. -
Page 12: Polarity Inversion Setting
To change the saved ORP limit, first, check if the digit you want to change is flashing. When the digit to change is flashing, briefly press the Main Command Button and the digit will be increased till 9 and going back to 0 for every brief press on the Main Control Button To move to the next digit, do not press any buttons and wait for 5 seconds, next digit will start flashing. -
Page 13: Swimming Pool Volume Configuration
To change the value, briefly press the Command Button to set the desired time. To record press the Command Button for 5 seconds. The "Test Inv" option is used to run a diagnostic test to verify that both polarities work. When you choose this option, the system will start one of the polarities for a few seconds, then stop to reverse and starts again on the other polarity. -
Page 14: Alarm 4 - Relay
• The equipment is correctly regulated Once the problem has been corrected, you must restart the machine to disable the alarm. 7.3 Alarm 4 – Relay This alarm (ALARM 4) turns on when the mainboard fails. Contact technical service. 7.4 Alarm 5 – Source This alarm (ALARM 5) turns on when the power supply fails. -
Page 15: Terms And Conditions
The Bright Blue Ltd guarantees the product manufactured in accordance with the conditions and responsibilities of these terms for a period of: COLIBRI: 4 years or 12.500h of operation for the electrolysis cell; 5 years for the electronic • equipment; Twelve months for temperature probes, except ware out. - Page 16 In this case, Bright Blue or its representative will send the customer an estimate of the diagnosis, repair and transportation costs. The customer can order the return of the goods, without repair, in which case Bright Blue will issue an invoice of the diagnosis fee and dispatch costs.
Need help?
Do you have a question about the COLIBRI and is the answer not in the manual?
Questions and answers
Alarme 2B na eletrolise bright blue modelo colibri
alarme 2B no colibri bright blue