Table of Contents
Advertisement
Available languages
Available languages
Quick Links
BEDIENUNGSANLEITUNG
USER MANUAL
MODE D'EMPLOI
MANUAL DEL USUARIO
©
Für weiteren Gebrauch aufbewahren!
Copyright
Keep this manual for future needs!
Nachdruck verboten!
Gardez ce mode d'emploi pour des
Reproduction prohibited!
utilisations ultérieures!
Réproduction interdit!
Guarde este manual para posteriores usos.
Prohibida toda reproducción.
Advertisement
Table of Contents

Summary of Contents for Future light 51837620
- Page 1 BEDIENUNGSANLEITUNG USER MANUAL MODE D'EMPLOI MANUAL DEL USUARIO © Für weiteren Gebrauch aufbewahren! Copyright Keep this manual for future needs! Nachdruck verboten! Gardez ce mode d’emploi pour des Reproduction prohibited! utilisations ultérieures! Réproduction interdit! Guarde este manual para posteriores usos. Prohibida toda reproducción.
-
Page 2: Table Of Contents
MULTI-LANGUAGE-INSTRUCTIONS Inhaltsverzeichnis Table of contents Sommaire Contenido EINFÜHRUNG ..............................5 Lieferumfang ..............................5 SICHERHEITSHINWEISE..........................6 BESTIMMUNGSGEMÄßE VERWENDUNG..................... 7 GERÄTEBESCHREIBUNG..........................9 Features ................................. 9 Geräteübersicht............................10 INSTALLATION .............................. 12 Gerätemontage ............................13 Anschluss an den DMX-512 Controller / Verbindung Gerät – Gerät ............15 Anschluss ans Netz............................ - Page 3 Function Mode ............................. 42 Information ..............................42 Switch Control .............................. 43 Personality..............................43 Reset function .............................. 44 Edit program..............................45 Error Messages............................47 CLEANING AND MAINTENANCE ......................... 47 Replacing the fuse ............................48 TECHNICAL SPECIFICATIONS........................48 INTRODUCTION ............................. 49 Inclus dans la livraison ..........................49 INSTRUCTIONS DE SÉCURITÉ...
- Page 4 ESPECIFICACIONES TÉCNICAS ........................90 Diese Bedienungsanleitung gilt für die Artikelnummer 51837620 This user manual is valid for the article number 51837620 Ce mode d'emploi est concu pour le n° d'art. 51837620 Este manual del usuario es válido para la referencia 51837620...
-
Page 5: Einführung
BEDIENUNGSANLEITUNG PRH-Digital für LCD/Plasma Pro-Rotating-Holder Lesen Sie vor der ersten Inbetriebnahme zur eigenen Sicherheit diese Bedienungsanleitung sorgfältig durch! Alle Personen, die mit der Aufstellung, Inbetriebnahme, Bedienung, Wartung und Instandhaltung dieses Gerätes zu tun haben, müssen - entsprechend qualifiziert sein - diese Bedienungsanleitung genau beachten - die Bedienungsanleitung als Teil des Produkts betrachten - die Bedienungsanleitung während der Lebensdauer des Produkts behalten - die Bedienungsanleitung an jeden nachfolgenden Besitzer oder Benutzer des Produkts weitergeben... -
Page 6: Sicherheitshinweise
SICHERHEITSHINWEISE ACHTUNG! Seien Sie besonders vorsichtig beim Umgang mit gefährlicher Netzspannung. Bei die- ser Spannung können Sie einen lebensgefährlichen elektrischen Schlag erhalten! Dieses Gerät hat das Werk in sicherheitstechnisch einwandfreiem Zustand verlassen. Um diesen Zustand zu erhalten und einen gefahrlosen Betrieb sicherzustellen, muss der Anwender die Sicherheitshinweise und die Warnvermerke unbedingt beachten, die in dieser Bedienungsanleitung enthalten sind. -
Page 7: Bestimmungsgemäße Verwendung
Es dürfen unter keinen Umständen Flüssigkeiten aller Art in Steckdosen, Steckverbindungen oder in irgendwelche Geräteöffnungen oder Geräteritzen eindringen. Besteht der Verdacht, dass - auch nur minimale - Flüssigkeit in das Gerät eingedrungen sein könnte, muss das Gerät sofort allpolig vom Netz getrennt werden. - Page 8 Das Gerät darf nicht in einer Umgebung eingesetzt oder gelagert werden, in der mit Spritzwasser, Regen, Feuchtigkeit oder Nebel zu rechnen ist. Feuchtigkeit oder sehr hohe Luftfeuchtigkeit kann die Isolation reduzieren und zu tödlichen Stromschlägen führen. Die Umgebungstemperatur muss zwischen -5° C und +45° C liegen. Halten Sie das Gerät von direkter Sonneneinstrahlung (auch beim Transport in geschlossenen Wägen) und Heizkörpern fern.
-
Page 9: Gerätebeschreibung
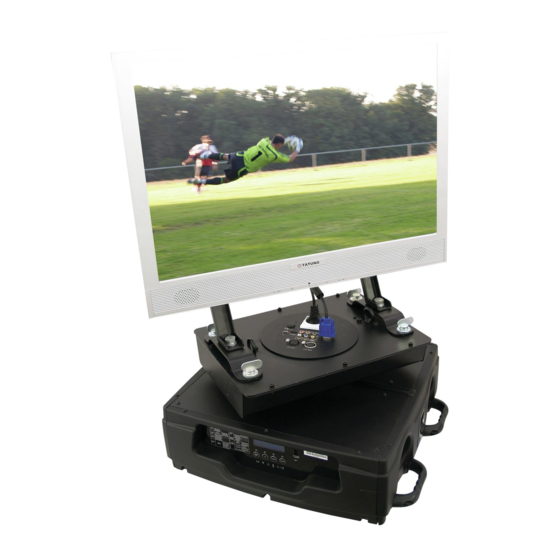
GERÄTEBESCHREIBUNG Features Hier dreht sich alles um Ihre Bildschirm-Präsentation! • Verfügt über alle erforderlichen Anschlussterminals für Audio und Video, eine separate Schutzkontakt- Steckdose und 3- bzw. 5-polige XLR-Anschlüsse. Dies ermöglicht die Montage unterschiedlicher, auch DMX-gesteuerter Geräte • Optimal geeignet zur Positionierung von LCD- und Plasmabildschirmen, Lautsprechern, Nebelgeräten, Scheinwerfern etc. -
Page 10: Geräteübersicht
Geräteübersicht (1) Bildschirmhalterung/Ein- stellung des Neigungswinkels (2) Fangseilöse (3) Omega-Halter (4) RotierenderTeller (5) Base (6) 5-polige DMX- Ausgangsbuchse (7) 3-polige DMX- Ausgangsbuchse (8) VGA 15-pol. Ausgangsbuchse (9) Video Ausgang: S- Video/YPbPr Cinch (10) Audio Ausgang: Cinch L/R (11) DVI Ausgangsbuchse (12) Koaxial Ausgangsbuchse (13) Sicherungshalter (14) Schutzkontakt-... - Page 11 (28) Bildschirm (nicht im Lieferumfang enthalten) (29) Steuereinheit (30) Taste Linksdrehung (31) Stop-Taste (32) Taste Rechtsdrehung (33) LCD-Display (34) Mode/Esc-Taste (35) Up-Taste (36) Down-Taste (37) Enter-Taste (38) Mikrofon 11/90 00029992.DOC, Version 1.3...
-
Page 12: Installation
INSTALLATION Montage der Bildschirmhalter Beachten Sie vor der Montage der Bildschirmhalter immer die Bedienungsanleitung des Bildschirmes! Die Anzahl der Befestigungsschrauben kann von Modell zu Modell variieren. Bitte beachten Sie, dass einige Geräte aus thermischen Gründen nicht über ein bestimmtes Maß geneigt werden dürfen. -
Page 13: Gerätemontage
Gerätemontage LEBENSGEFAHR! Bei der Installation sind insbesondere die Bestimmungen der BGV C1 (vormals VBG 70) und DIN VDE 0711-217 zu beachten! Die Installation darf nur vom autorisierten Fachhan- del ausgeführt werden! ACHTUNG! Vergewissern Sie sich vor der Montage eines Gerätes auf dem FUTURELIGHT PRH-Digital für LCD/Plasma, dass es für die gewünschte Montageart überhaupt geeignet ist! Beachten Sie unbedingt die Bedienungsanleitung des Gerätes und sichern Sie es immer zusätzlich über die Befestigungspunkte des... - Page 14 sondern beauftragen Sie einen professionellen Installateur. Unsachgemäße Installationen können zu Verletzungen und/oder zur Beschädigung von Eigentum führen. Das Gerät muss außerhalb des Handbereichs von Personen installiert werden. Wenn das Gerät von der Decke oder hochliegenden Trägern etc. abgehängt werden soll, muss immer mit Traversensystemen gearbeitet werden.
-
Page 15: Anschluss An Den Dmx-512 Controller / Verbindung Gerät - Gerät
(1) Omega-Halter (2) Haken (3) Sicherheitsfangseil (4) Schnellverschluss Verschrauben Sie je einen Haken über eine M12 Schraube und Mutter mit den Omega-Haltern. Führen Sie die beiden Schnellverschlüsse des ersten Omega-Halters in die dafür vorgesehenen Öffnungen an der Geräteunterseite ein. Drehen Sie die Schnellverschlüsse im Uhrzeigersinn bis zum Anschlag fest. Installieren Sie den zweiten Omega-Halter. -
Page 16: Anschluss Ans Netz
Beachten Sie, dass die Startadresse abhängig vom verwendeten Controller ist. Unbedingt Bedienungsanleitung des verwendeten Controllers beachten. Die Verbindung zwischen Controller und Gerät sowie zwischen den einzelnen Geräten muss mit einem zweipoligen geschirmten Kabel erfolgen. Die Steckverbindung geht über 3- bzw. 5-polige XLR-Stecker und -Kupplungen. -
Page 17: Bedienung
BEDIENUNG Wenn Sie das Gerät an die Spannungsversorgung angeschlossen haben, nimmt der PRH-Digital für LCD/Plasma den Betrieb auf. Während des Reset justieren sich die Motoren aus und das Gerät ist danach betriebsbereit. Stand Alone-Betrieb Der PRH-Digital für LCD/Plasma lässt sich im Stand Alone-Betrieb ohne Controller einsetzen. Trennen Sie dazu den PRH-Digital für LCD/Plasma vom Controller und rufen Sie das vorprogrammierte Programm auf. -
Page 18: Dmx-Protokoll
DMX-Protokoll Steuerkanal 1 - Horizontale Bewegung (Pan) (360°) Wenn Sie den Regler verschieben, bewegen Sie den Teller horizontal (Pan). Allmähliches Einstellen des Tellers bei langsamen Schieben des Reglers (0-255, 128-Mitte). Der Teller kann an jeder gewünschten Einstellung angehalten werden. Steuerkanal 2 - Pan-Bewegung mit 16 Bit-Auflösung Steuerkanal 3 - Geschwindigkeit Pan-Bewegung Decimal Hexad. -
Page 19: Control Board
Control Board Das Control Board bietet mehrere Möglichkeiten: so lassen sich z. B. die DMX-Startadresse eingeben, die Schutzkontakt-Steckose ein- und ausschalten, das vorprogrammierte Programm abspielen oder ein Reset durchführen. Drücken Sie die Mode/Esc-Taste, so dass sich das Display einschaltet. Durch Drücken der Up/Down-Tasten können Sie sich im Hauptmenü... -
Page 20: Function Mode
Auto Pro Part 1 Progr. 1- 10 Program 1 Programmwahl für Auto Select programs Auto Pro Part 2 Progr. 1- 10 Program 2 Programm Progr. 1- 10 Program 3 Auto Pro Part 3 Program Test Program 1 Testprogramm Step 01 = (“Step XX”) Edit program Programm Auto Run... -
Page 21: Switch Control
Betriebsstunden des Gerätes zurücksetzen Mit dieser Funktion lassen sich die Betriebsstunden des Gerätes zurücksetzen. • Wählen Sie “Clear total time” durch Drücken der Up/Down-Tasten. • Drücken Sie die Enter-Taste zur Bestätigung. • Drücken Sie die Up/Down-Taste, auf dem Display erscheint “ON” oder “OFF”. •... - Page 22 Startadresse 420 einstellen möchten, stellen Sie Kanal 1 auf "7", Kanal 2 auf "8" und Kanal 3 auf "164" (256+164=420). • Warten Sie ca. 20 Sekunden und das Gerät führt einen Reset durch. Danach ist die neue Startadresse eingestellt. Auto-Modus wenn kein DMX Mit der Funktion "No DMX status“...
-
Page 23: Reset Function
Reset function Mit dieser Funktion lässt sich über das Control Board ein Reset durchführen. Dabei können Sie über die Up/Down-Tasten die verschiedenen Reset-Funktionen auswählen. Zurücksetzen auf Werkseinstellungen Mit dieser Funktion lässt sich das Gerät auf die Werkseinstellungen zurück setzen. Alle Einstellungen werden auf Ihren Vorgabewert (grau unterlegt) zurück gesetzt. - Page 24 3. Programmwahl für Auto Pro Part • Wählen Sie “Edit program” durch Drücken der Up/Down-Tasten. • Drücken Sie die Enter-Taste zur Bestätigung. • Wählen Sie “Select programs” durch Drücken der Up/Down-Tasten. • Drücken Sie die Enter-Taste zur Bestätigung. • Drücken Sie die Up/Down-Taste, um “Auto Pro Part 1” oder “Auto Pro Part 2” oder “Auto Pro Part 3” einzustellen, und somit die Auswahl welches Slave Programm gesendet werden soll.
-
Page 25: Fehlermeldungen
Fehlermeldungen Wenn Sie das Gerät einschalten, wird zuerst ein Reset durchgeführt. Wenn auf dem Display eine Fehlermeldung erscheint, gibt es Fehler an einem oder mehreren Kanälen. Die Fehlermeldung steht für den entsprechenden Kanal mit einem Testsensor für die korrekte Position. Wenn auf dem Display “PAN”... -
Page 26: Sicherungswechsel
Sicherungswechsel Wenn die Feinsicherung des Gerätes defekt ist, darf diese nur durch eine Sicherung gleichen Typs ersetzt werden. Vor dem Sicherungswechsel ist das Gerät allpolig von der Netzspannung zu trennen (Netzstecker ziehen). Vorgehensweise: Schritt 1: Drehen Sie den Sicherungshalter an der Geräterückseite mit einem passenden Schraubendre- her aus dem Gehäuse (gegen den Uhrzeigersinn). -
Page 27: Introduction
USER MANUAL PRH-Digital for LCD/Plasma Pro-Rotating-Holder CAUTION! Keep this device away from rain and moisture! Unplug mains lead before opening the housing! For your own safety, please read this user manual carefully before you initially start-up. Every person involved with the installation, operation and maintenance of this device has to - be qualified - follow the instructions of this manual - consider this manual to be part of the total product... -
Page 28: Safety Instructions
SAFETY INSTRUCTIONS CAUTION! Be careful with your operations. With a dangerous voltage you can suffer a dangerous electric shock when touching the wires! This device has left our premises in absolutely perfect condition. In order to maintain this condition and to ensure a safe operation, it is absolutely necessary for the user to follow the safety instructions and warning notes written in this user manual. -
Page 29: Operating Determinations
running, the device must be checked by a specialist if the liquid has reduced any insulation. Reduced insulation can cause mortal electrical shock. There must never be any objects entering into the device. This is especially valid for metal parts. If any metal parts like staples or coarse metal chips enter into the device, the device must be taken out of operation and disconnected immediately. - Page 30 This device must only be operated in an altitude between -20 and 2000 m over NN. Never use the device during thunderstorms. Over voltage could destroy the device. Always disconnect the device during thunderstorms. In order to safeguard sufficient ventilation, leave 50 cm of free space around the device. Make sure that the area below the installation place is blocked when rigging, derigging or servicing the device.
-
Page 31: Description Of The Device
DESCRIPTION OF THE DEVICE Features It's all about your screen presentations here! • Has all necessary connections for audio and video, a separate safety power outlet and 3- or 5-pin XLR. Thus mounting of different devices possible, including DMX. • Ideal for the positioning of LCD and plasma screens, speakers, fog machines, spotlights, etc. •... -
Page 32: Overview
Overview (1) Screen mounting/ adjustable angle of inclination (2) Safety eyelet (3) Omega-clamp (4) Rotary plate (5) Base (6) 5-PIN DMX output socket (7) 3-PIN DMX output socket (8) VGA 15 pins output socket (9) Video output: S- video/YPbPr RCA (10) Audio output: RCA l/r (11) DVI output socket (12) Coaxial output socket... - Page 33 (28) Screen (not included in the delivery) (29) Control Board (30) Button left rotation (31) Button Stop (32) Button right rotation (33) LCD-Display (34) Mode/Esc-button (35) Up-button (36) Down-button (37) Enter-button (38) Microphone 33/90 00029992.DOC, Version 1.3...
-
Page 34: Installation
INSTALLATION Attaching the screen brackets Always refer to the screen user manual before attaching the screen brackets! The number of fasteners used will vary, depending upon the type of screen. Please note that some screens must not be inclined over a certain degree due to thermal reasons. Procedure: Place the two adjustable screen brackets against the back of the screen. -
Page 35: Rigging
Rigging DANGER TO LIFE! Please consider the EN 60598-2-17 and the respective national norms during the installation! The installation must only be carried out by an authorized dealer! CAUTION! Before installing a device on the FUTURELIGHT PRH-Digital for LCD/Plasma, make sure it is applicable for the desired mounting method! Always follow the instructions in the user manual and secure the device via the FUTURELIGHT PRH-Digital for LCD/Plasma‘s fixation points! The installation of the rotating holder has to be built and constructed in a way that it can hold 10 times the... - Page 36 If the rotating holder shall be lowered from the ceiling or high joists, professional trussing systems have to be used. The rotating holder must never be fixed swinging freely in the room. Caution: Devices may cause severe injuries when crashing down! If you have doubts concerning the safety of a possible installation, do NOT install the rotating holder! Before rigging make sure that the installation area can hold a minimum point load of 10 times rotating holders weight.
-
Page 37: Dmx-512 Connection / Connection Between Devices
(1) Omega-holders (2) Clamp (3) Safety-rope (4) Quick-lock fastener Screw one clamp each via a M12 screw and nut onto the Omega- clamps. Insert the quick-lock fasteners of the first Omega-clamp into the respective holes on the bottom of the device. -
Page 38: Connection With The Mains
Please note, the starting address depends upon which controller is being used. Only use a stereo shielded cable and 3-pin or 5-pin XLR-plugs and connectors in order to connect the controller with the device or one device with another. Occupation of the XLR-connection: If you are using controllers with this occupation, you can connect the DMX-output of the controller directly with the DMX-input of the first fixture in the DMX-chain. -
Page 39: Operation
OPERATION After you connected the effect to the mains, the PRH-Digital for LCD/Plasma starts running. During the Reset, the motors are trimmed and the device is ready for use afterwards. Stand Alone operation In the Stand Alone mode, the PRH-Digital for LCD/Plasma can be used without controller. Disconnect the PRH-Digital for LCD/Plasma from the controller and call the internal program. -
Page 40: Dmx-Protocol
DMX-protocol Control-channel 1 - Horizontal movement (Pan) (360°) Push slider up in order to move the plate horizontally (Pan). Gradual plate adjustment from one end of the slider to the other (0-255, 128-center). The plate can be stopped at any position you wish. Control-channel 2 - Pan-movement with 16 Bit-resolution Control-channel 3 - Pan-speed Decimal Hexad. -
Page 41: Control Board
Control Board The Control Board offers several features: you can simply set the starting address, switch on and off the safety power outlet, run the pre-programmed program or make a reset. The main menu is accessed by pressing Mode/Esc until the display is lit. Browse through the menu by pressing Up or Down. -
Page 42: Function Mode
Auto Pro Part 1 Progr. 1- 10 Program 1 Select programs to Select Programs Auto Pro Part 2 Progr. 1- 10 Program 2 be run Auto Pro Part 3 Progr. 1- 10 Program 3 Program Test Program 1 Testing program Step 01 = (“Step XX”) Edit program... -
Page 43: Switch Control
Clear total time With this function you can clear the running time of the device • Select “Clear total time” by pressing Up or Down. • Press the Enter-button to confirm. • Press Up or Down, the display shows “ON” or “OFF”. •... -
Page 44: Reset Function
No DMX status With the function "No DMX status", you can set different modes if there is no DMX-signal. • Select "Initial, Hold, Auto or Music" by pressing Up or Down. • Press the Enter-button, the display shows “ON” or “OFF”. •... -
Page 45: Edit Program
Edit program Select program for auto program With this function, you can select the program for the Program Run. Edit program With this function, you can edit the internal programs. Edit scenes With this function, you can edit the scenes of the internal programs. Rec. - Page 46 4. Program selection for Edit Program • Select “Edit program” by pressing Up or Down. • Press the Enter-button to confirm. • Select “Edit program” by pressing Up or Down. • Press the Enter-button to confirm. • Press Up or Down to select the desired program. With this function you can edit specific scenes into a specific program.
-
Page 47: Error Messages
Error Messages When you turn on the fixture, it will make a reset first. The display may show an error message while there are problems with one or more channels. The error message stands for the channels equipped with a testing sensor. When the display shows “PAN”, it means there is some error in the PAN channel. -
Page 48: Replacing The Fuse
Replacing the fuse If the fine-wire fuse of the device fuses, only replace the fuse by a fuse of same type and rating. Before replacing the fuse, unplug mains lead. Procedure: Step 1: Unscrew the fuseholder on the rearpanel with a fitting screwdriver from the housing (anti- clockwise). -
Page 49: Introduction
MODE D'EMPLOI PRH-Digital pour LCD/Plasma Pro-Rotating-Holder ATTENTION! Protéger de l'humidité. Débrancher avant d’ouvrier le boîtier! Pour votre propre sécurité, veuillez lire ce mode d'emploi avec attention avant la première mise en service. Toute personne ayant à faire avec le montage, la mise en marche, le maniement et l’entretien de cet appareil doit - être suffisamment qualifiée - suivre strictement les instructions de service suivantes... -
Page 50: Instructions De Sécurité
INSTRUCTIONS DE SÉCURITÉ ATTENTION! Soyez prudent, lors de manipulations électriques avec une tension dangereuse vous êtes soumis à des risques d'électrocution! Cet appareil a quitté les ateliers dans un état irréprochable. Pour assurer un bon fonctionnement, sans danger, l'utilisateur doit suivre les instructions contenues dans ce mode d'emploi. Attention: Tout dommage occasionné... -
Page 51: Emploi Selon Les Prescriptions
Dans aucun cas des liquides de tout genre doivent pénétrer dans des fiches secteur, des connecteurs ou dans des ouvertures d'appareil ou dans des fentes d'appareil. S'il y a un doute sur le fait que même une quantité minimale de liquide aurait pénétré dans l'appareil, il faut immédiatement séparer l'appareil du secteur avec tous les pôles. - Page 52 L'appareil ne doit pas être utilisé ou stocké dans un environnement humide, dans lequel on doit s'attendre à des projections d'eau, de la pluie, de l'humidité ou du brouillard. L'humidité ou une humidité de l'air très élevée peut réduire l'isolation et mener à des électrocutions mortelles. Il faut que la température ambiante soit comprise entre -5°...
-
Page 53: Description De L'appareil
DESCRIPTION DE L'APPAREIL Features Ici tout tourne autour de votre présentation d'écran! • Avec toutes les connexions nécessaires pour audio et video, prise de courant de sécurité particulière et des connexions XLR à 3 ou à 5 pôles ce qui permet le montage de différents appareils, entre autres des appareils commandés en DMX •... -
Page 54: Aperçue Des Parties
Aperçue des parties (1) Fixation pour écran/ ajusté l'angle d'inclinaison (2) Oeillet de sécurité (3) Fixations Omega (4) Plaque rotative (5) Base (6) Sortie DMX 5-pôle (7) Sortie DMX 3-pôle (8) Sortie VGA 15 pôles (9) Sortie Vidéo: S- vidéo/YPbPr RCA (10) Sortie Audio: RCA g/d (11) Sortie DVI (12) Sortie Coaxiale... - Page 55 (28) Ecran (ne pas inclus dans la livraison) (29) Control Board (30) Touche rotation à gauche (31) Touche Stop (32) Touche rotation à droite (33) L’affichage LCD (34) Touche Mode/Esc (35) Touche Up (36) Touche Down (37) Touce Enter (38) Microphone 55/90 00029992.DOC, Version 1.3...
-
Page 56: Installation
INSTALLATION Montage du support rotatif DANGER DE MORT! Quand installer l'appareil, il faut considerer les instructions de EN 60598-2-17 et des normes nationales réspectives! L'installation est à faire effectuer par un installateur agrée! ATTENTION! Avant de monter un appareil sur le FUTURELIGHT PRH-Digital pour LCD/Plasma, assurez-vous que le mode d’installation est approprié! Respectez le mode d’emploi d’appareil et sauvegardez-le par les points de fixation du FUTURELIGHT PRH-Digital pour LCD/Plasma! - Page 57 Il faut installer le support rotatif en dehors du secteur d’opération à la main de personnes. Si le support rotatif doit être décroché du plafond ou de poutres élevés, il faut toujours utiliser des systèmes de traverses pour les travaux. Ne jamais installez le support rotatif de manière qu’il puisse osciller librement dans l‘espace.
-
Page 58: Connexions Au Contrôleur Dmx-512 / Raccord Appareil - Appareil
(1) Fixations Omega (2) Crochet (3) Élingue de sécurité (4) Cerrage Quick-Lock Visser les crochets avec un vis M12 à la fixation Omega. Insérez les deux cerrages Quick-Lock de la première fixation dans les trous dans la base. Fixez les cerrage Quick-Lock. -
Page 59: Alimentation
Ne pas oublier que l’adresse initiale dépend du contrôleur utilisé. Il est indispensable de consulter le mode d’emploi du contrôleur utilisé Le raccord entre le contrôleur et l´ appareil ainsi qu’entre les appareils doit être effectué avec un câble gainé bipolaire. -
Page 60: Maniement
MANIEMENT Le PRH-Digital pour LCD/Plasma commençera à fonctionner dès que vous le brancherez au secteur. Durant le Reset (réinitialisation), les moteurs s’ajusteront automatiquement et l’appareil sera prêt à fonctionner après. Opération Stand Alone En mode Stand Alone, vous pouvez utiliser le PRH-Digital pour LCD/Plasma sans contrôleur. Débranchez le PRH-Digital pour LCD/Plasma du contrôleur et appelez le programme interne. -
Page 61: Protocôle Dmx
Protocôle DMX Canal de contrôle 1 - Mouvement horizontal (Pan) (360°) Les mouvements horizontaux de la plaque (Pan) sont contrôles par le régulateur. Ajuster la plaque peu à peu en poussant lentement le régulateur (0-255, 128-centre). Vous pouvez arrêter la plaque à la position désirée. Canal de contrôle 2 - Mouvement Pan avec résolution 16 Bit Canal de contrôle 3 - Vitesse du mouvement Pan Decimal Hexad. -
Page 62: Control Board
Control Board L'unité de contrôle offre plusieurs fonctionnalités, comme par exemple, ajuster l’addresse DMX, allumer ou éteindre la prise de courant, commencer le programme integré ou redémarrer. Pressez la touche Mode/Esc pour accéder au menu principal. Pressez la touche Up ou Down pour vous déplacer dans le menu principal. -
Page 63: Function Mode
Auto Pro Part 1 Progr. 1- 10 Program 1 Sélection du programme Select programs Auto Pro Part 2 Progr. 1- 10 Program 2 pour l' Auto Run Auto Pro Part 3 Progr. 1- 10 Program 3 Program Test Test des programmes Program 1 Step 01 = Déroulement du... -
Page 64: Switch Control
Retablir les heures de fonctionnement d'appareil Cette fonction permet de retablir les heures de fonctionnement d'appareil. • Choississez “Clear total time” en pressant la touche Up ou Down. • Pressez la touche Enter pour confirmer la séléction. • Pressez la touche Up ou Down, l'affichage indique “ON” ou “OFF”. •... - Page 65 Auto mode quand pas de DMX La fonction "No DMX status" permet d’appeler des modes differents quand il n’y a pas de signal DMX. • Choisissez "Initial, Hold, Auto ou Music" en pressant la touche Up ou Down. • Pressez la touche Enter; l’affichage indique“ON” ou “OFF”. •...
-
Page 66: Reset Function
Reset function Cette fonction permet d'effectuer un Reset grâce à l'unité de contrôle. Choississez les différents fonctions Reset en pressant la touche Up ou Down. Retablir à la configuration initiale Cette fonction permet de retablir l'appareil à la configuration initiale. Tous les ajustements soient retablis sur la valeur prédéterminée à... - Page 67 3. Le choix du programme pour l‘Auto Pro Part • Choisissez “Edit program” en pressez la touche Up ou Down. • Pressez la touche Enter pour confirmer la séléction. • Choisissez “Select programs” en pressez la touche Up ou Down. •...
-
Page 68: Avis D'erreur Et D'information
Avis d'erreur et d'information Quand vous mettre l'appareil en service, il fait un Reset. Quand l'affichage indique un avis d’erreur, il y a un erreur sur un ou plusieures canaux. L’avis d’erreur signifique le canal réspectif. Quand l'affichage indique “PAN”, ça signifique un erreur au mouvement PAN des plaque rotatives. Quand il y a autres erreurs sur canaux différents, les avis d'erreur clignote 5 fois dans l'affichage, après l'appareil fait un Reset. -
Page 69: Remplacer Le Fusible
Remplacer le fusible Toujours remplacer un fusible par un autre de modèle identique. Avant le remplacement du fusible débrancher l'appareil. Procédure: Pas 1: Dévissez le porte-fusible (dans le sens inverse des aiguilles d'une montre) au dos de l'appareil avec un tournevis et le retirer du boîtier. Pas 2: Retirez le fusible défectueux du porte-fusible. -
Page 70: Introducción
MANUAL DEL USUARIO PRH-Digital para LCD/Plasma Pro-Rotating-Holder ¡PRECAUCIÓN! ¡Evite el contacto de este aparato con la lluvia y la humedad! ¡ Desconectar de la corriente antes de abrir la caja! POR SU PROPIA SEGURIDAD, POR FAVOR LEA ESTE MANUAL DEL USUARIO DETENIDAMENTE ANTES DE LA CONEXIÓN INICIAL! Toda persona implicada en la instalación, manejo y mantenimiento de este aparato tiene que -estar cualificada... -
Page 71: Instrucciones De Seguridad
INSTRUCCIONES DE SEGURIDAD ¡PRECAUCIÓN! ¡Tenga cuidado cuando opere con este aparato. Con un voltaje peligroso puede sufrir una peligrosa descarga eléctrica al tocar los cables! Este aparato ha salido de nuestro establecimiento en absolutas perfectas condiciones. Para mantener esta condición y asegurar un manejo seguro, es absolutamente necesario para el usuario seguir las instrucciones de seguridad y notas de advertencia escritas en este manual del usuario. -
Page 72: Instrucciones De Manejo
INSTRUCCIONES DE MANEJO Este aparato es un detentor de giratorio por example fijar y operar para pantallas LCD y plasma, máquinas de humo y efectos luminosos. El aparato sólo es permitido para una conexión con una tensión alternativa de 230 V, 50 Hz y ha sido diseñado para ser usado en interiores. Este aparato ha sido diseñado para usos profesionales, por ejemplo en escenas, discotecas, teatros etc. - Page 73 los tornillos necesitados están atornillados. La máxima temperatura ambiente T = 45° C nunca debe ser excedido. Maneje el aparato sólo después de familiarizarse con sus funciones. No permita el manejo a personas que no conocen el aparato lo suficientemente bien. La mayoría de los daños son causados por manejo inadecuado de inexpertos.
-
Page 74: Descripción Del Aparato
DESCRIPCIÓN DEL APARATO Features Aquí todo versa sobre su presentacíon pantalla • Tiene todas las conexiones necesarias para audio y video, un enchufe de seguridad separado y XLR conexiónes de 3 o 5 alfileres. Eso permite el montaje de diferentes aparatos, controlado de DMX 512 también •... -
Page 75: Descripción De Las Partes
Descripción de las partes (1) Fijación pantalla/el ángulo de inclinación (2) Oeillet de sécurité (3) Soportes Omega (4) Placa giratoria (5) Base (6) Salida DMX 5 polos (7) Salida DMX 3 polos (8) Salida VGA 15 polos (9) Salida Video: S- video/YpbPr RCA (10) Salida Audio: RCA d/i (11) Salida DVI... - Page 76 (28) Pantalla (no es incluído en la entraga) (29) Control Board (30) Tecla rotación a la izquierda (31) Tecla Stop (32) Tecla rotación a la derecha (33) Pantalla LCD (34) Tecla Mode/Escape (35) Tecla Up (36) Tecla Down (37) Tecla Enter (38) Micrófono 76/90 00029992.DOC, Version 1.3...
-
Page 77: Instalación
INSTALACIÓN Montaje del aparato ¡PELIGRO DE MUERTE! Cuando instalar el aparato, Vd. debe considerar las instrucciones de EN 60598-2-17 y de las normas nacionales respectivas. ¡La instalación sólo debe ser efectuada por un distribuidor autorisado! ¡PRECAUTIÓN! Antes de montar un aparato en el FUTURELIGHT PRH-Digital para LCD/Plasma, asegurese que la modo de instalación es apropriado en general! Siga Vd. - Page 78 tiene estas qualificaciones pero llame un instalador profesional. Instalaciones inadecuadas pueden causar daños de hombres y/o de propiedad. El detentor giratorio debe ser instalado fuera de dónde personas pueden llegarlo con sus manos. Cuando quiere abajar el detentor giratorio del techo o portadores altos, siempre debe utilisar sistemas de trussing.
-
Page 79: Conexión Al Controlador Dmx / Conexión Aparato - Aparato
(1) Soportes Omega (2) Ágrafe (3) Lira de anclaje (4) Sujetador Quick-Lock Atornille el agrafe con un tornillo M12 con los soportes Omega. Insere los sujetadores Quick-Lock del soporte Omega en los orificios de la parte inferior del aparato. Fijar los sujetadores Quick-Lock. -
Page 80: Alimentación
Note por favor que la dirección de comienzo es independiente del controlador usado. Por favor, lee el manual del usuario del controlador usado. Sólo es válido cuando la lámpara está apagado mediante DMX. La conexión entre controlador y aparato y entre aparato y aparato se tiene que efectuar con un cable de dos polos con blindaje. -
Page 81: Operación
OPERACIÓN Tras la conexión del aparato a la red, el PRH-Digital para LCD/Plasma comienza a funcionar. Durante el Reset, los motores se ajustan y el aparato está listo para ser usado después. Operación Stand Alone En el modo Stand Alone, Vd. puede utilizar el PRH-Digital para LCD/Plasma sin controlador. Desconecte el PRH-Digital para LCD/Plasma del controlador y llama el programa integrado. -
Page 82: Protócolo Dmx
Protócolo DMX Canal de control 1 - Movimiento horizontal (Pan) (360°) Establezca los ajustes para mover la placa horizontalmente (Pan). Los movimientos graduales de la placa mediante el ajuste lento de los valores DMX (0-255; 128 = centro). Vd. puede parar la placa en cada posición. Canal de control 2 - Movimiento Pan con resolución 16 Bit Canal de control 3 - Velocidad del movimiento Pan Decimal Hexad. -
Page 83: Control Board
Control Board La unidad de control ofrece varias posibilidades. Por ejemplo, Vd. puede ajustar la dirección de comienzo, encender y apagar el enchufe, comenzar el programa integrado o un Reset. Pulse la tecla Mode/Esc para entrar en el menú principal. Vd. puede moverse en el menú principal mediante la tecla Up o Down. -
Page 84: Function Mode
Reset todo Reset All Reset function Reset PAN Reset PAN Auto Pro Part 1 Progr. 1- 10 Program 1 Select programs Auto Pro Part 2 Progr. 1- 10 Program 2 Selección de programas Auto Pro Part 3 Progr. 1- 10 Program 3 Program Test Program 1 Test de programa. -
Page 85: Switch Control
Cancelar las horas de servicio del aparato Con esta función, Vd. puede cancelar las horas de servicio del aparato. • Seleccione “Clear total time” mediante la tecla Up o Down. • Pulse la tecla Enter para confirmar. • Pulse la tecla Up o Down, la pantalla indica “ON” u “OFF”. •... -
Page 86: Reset Function
Run si no hay DMX Con la función “No DMX status”, Vd. puede llamar modos diferentes cuando no hay DMX. • Seleccione "Initial, Hold, Auto o Music" mediante la tecla Up o Down. • Pulse la tecla Enter, la pantalla indica “ON” u “OFF”. •... -
Page 87: Edit Program
Edit program Selección de programas para el Program Auto Run Con esta función, Vd. puede seleccionar el programa para el Program Auto Run. Editar un programa Con esta función, Vd. puede editar los programas internas. Editar escenas Con esta función, Vd. puede editar las escenas. Rec. - Page 88 4. Selección para Edit Pogram • Seleccione “Edit program”, mediante la tecla Up o Down. • Pulse la tecla Enter para confirmar. • Seleccione “Edit program” mediante la tecla Up o Down. • Pulse la tecla Enter para confirmar. • Pulse la tecla Up o Down para seleccionar el programa deseado. Con esta función, Vd. puede editar escenas en un programa específico.
-
Page 89: Avisos De Error
Avisos de error Cuando Vd. pone el aparato en servicio, hace un Reset. Cuando la pantalla muestra un aviso de error, hay un error en un o mas canales. El aviso de error respectivo significa el canal correspondiente. Cuando la pantalla muestra “PAN” significa un error del movimiento PAN de los placa. Si hay un error en algunos canales al mismo tiempo, los avisos de error parpadean 5 veces en la pantalla, después el aparato hace un Reset. -
Page 90: Reemplazar El Fusible
Reemplazar el fusible Reemplazar el fusible por un fusible del mismo tipo. Antes de reemplazar el fusible desenchufar el cable de la red. Procedimiento: Paso 1: Desatornillar de la caja el portafusibles del panel trasero con un destornillador adecuado (en dirección contraria a las agujas del reloj).
Need help?
Do you have a question about the 51837620 and is the answer not in the manual?
Questions and answers