
Related Manuals for i-team i-fogger

Summary of Contents for i-team i-fogger
- Page 1 ® i-fogger Effortless 360° disinfection User manual i-team Professional b.v. Hoppenkuil 27b, 5626 DD Eindhoven, The Netherlands Telephone: +31402662400 Email: hello@i-teamglobal.com Internet: www.i-teamglobal.com...
- Page 2 Original user manual, written in the English Language Future Cleaning Technologies B.V. Hoppenkuil 27b, 5626 DD Eindhoven, The Netherlands Telephone: +31402662400 Email: hello@i-teamglobal.com Internet: www.i-teamglobal.com Model: 3.5 Date: 29/09/2020 Product code: IFG.FCT.0000B Version: v.1.0...
-
Page 3: Preface
The purpose of the user manual is to provide the user with information in such a way that during the life of the i-fogger, the machine is used correctly, efficiently and safely, even in the event of reasonably foreseeable misuse, as described in section 1.2 of this manual. -
Page 4: Reading Guide
Reading guide The following symbols and terms are used throughout this manual to alert the reader to safety issues and important information: Symbol Term Explanation WARNING Indicates a hazardous situation which, if the safety instructions are not followed, can lead to injuries of the operator or bystanders, light and/or moderate damage to the product or the environment. -
Page 5: Table Of Contents
Content Preface ..................................3 Purpose of the user manual ............................ 3 Target audience ..............................3 Operators of the i-fogger ............................3 Reading guide ................................4 Content ................................... 5 Introduction ..............................7 Intended use of the product ........................8 Non-intended use of the product ......................8 Lifespan .............................. - Page 6 6.2.2 Removing the disinfectant solution tank ..................24 6.2.3 Removing the spray nozzle ......................24 Cleaning and storage ........................... 25 6.3.1 Flushing the spray nozzle ........................ 25 6.3.2 Flushing the disinfectant solution tank and cleaning the exterior ..........25 6.3.3 Storage ............................
-
Page 7: Introduction
1 Introduction The i-fogger® is an easy and safe machine to use, this manual helps you get started and explains the operation and maintenance procedure. The i-fogger has been designed as a comfortable, ergonomic backpack, allowing complete freedom of movement and easy usability. An ergonomic spray gun is attached to the unit, which ensures fast, reliable and easy operation. -
Page 8: Intended Use Of The Product
Non-intended use can have consequences for the safety of operators and bystanders and will void the warranty on the product. The i-fogger is not intended to be used in moist or wet environments such as saunas and other areas where fog or moisture is already present in the air. -
Page 9: Lifespan
See section 2.1. 1.4 Modifications It is not permitted to make modifications to the design of the i-fogger without consultation and permission from the manufacturer. This affects the warranty, see section 1.6 of this manual. -
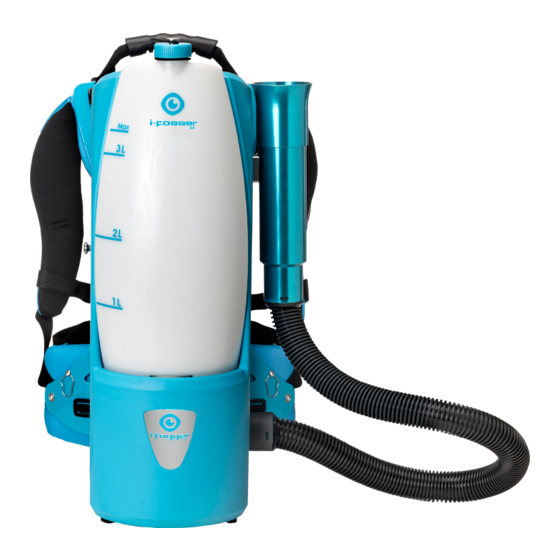
Page 10: Specifications
1.5 Specifications Figure 2 Product size body unit (L x W x H): 230 x 200 x 600 mm Weight including battery: 8.2 kg Weight without battery: 7.9 kg Hose length: 1.2 m Tank capacity: 3.5 L Spray distance: 4 – 5 m Spray volume: 100 –... -
Page 11: Warranty
1.6 Warranty The i-fogger® should only be operated with the materials supplied. Using alternative supplies may cause damage to the i-fogger and may cause a risk to the operator. The use of alternative supplies voids manufacturer's warranty. 1.7 Identification Each i-fogger has a unique identification number that can be found on the bottom of the main body. -
Page 12: Description
2 Description The compact lightweight i-fogger® consists of two main parts: • the body, that contains the disinfectant solution tank, that can be carried as a backpack; • the spray gun, that disperses a disinfectant aerosol (mist) to reduce the number of airborne micro-organisms and viruses. -
Page 13: Control Panel
(Figure 5, pos B). counts in 6 minute cycles. This means that if the display shows a “1”, the i-fogger® has run for 6 minutes. After 10 cycles, the second counter from the right (Figure 5, pos A) will show a “1”, this indicates 1 hour. -
Page 14: Spray Nozzles
2.3 Spray nozzles Spray nozzle diameter and color Intended use 0.3 mm x 1 silver ring Indoor applications, when there is a short time between people occupying the space. For example cinemas, airplanes, trains, common transport. 0.5 mm x 1 golden ring Indoor applications, when there is a long time between people occupying the space. -
Page 15: Safety
DO NOT push the self reset button on the spray gun when it is on your belt; • always keep the body of the i-fogger® in an upright position when the tank is full or the battery is inserted; •... -
Page 16: Personal Protection
3.2.4 Personal protection ATTENTION Disinfectants can be irritating to the eyes. Wear eye protection and use caution when filling the tank. Always keep the spray gun pointed away from your face. ATTENTION Clean your hands immediately after filling or draining the disinfectant solution tank. -
Page 17: Transport And Storage
• in case the i-fogger is stored for a longer period, remove the battery. See section 6.2.1; • before you ship the i-fogger, remove the battery. See section 6.2.1;... -
Page 18: Assembly And Installation
5 Assembly and installation The i-fogger® does not require much assembly, the harness is already attached. You only need to attach the tank, and insert a battery. A battery and a battery charger can be ordered separately. 5.1 Unboxing The i-fogger is packed in 1 box. -
Page 19: Assembly
Figure 8 4. Open the hatch (Figure 9, pos 4) in the body of the i-fogger. 5. Ensure that the i-fogger is turned off. To do this check the ON/OFF switch on the i-fogger body (Figure 9, pos 1). 6. Insert the battery (Figure 9, pos 3) in the battery slot (Figure 9, pos 2), until you hear a "click". -
Page 20: Attaching The Right Spray Nozzle For The Job
5.2.1 Attaching the right spray nozzle for the job ATTENTION • there are 4 different spray nozzles, with each its specific application. Choose the right spray nozzle for the specific job. Please see section 2.3; • use the nut driver from the accessory bag. 1. -
Page 21: Operation
9 or i-charge® 14, depending on which type of battery you use. FIRST TIME USE If you use the i-fogger® for the first time, please allow the disinfectant solution to work its way through the system. This might take some time. -
Page 22: Operation Procedure
6.2 Operation procedure 1. Place the i-fogger® on a level surface. 2. Ensure that the i-fogger is turned off. To do this check the ON/OFF switch on the i-fogger body (Figure 13, pos 1). Insert the battery in the battery slot (Figure 13, pos 3) until you hear a “click”. - Page 23 9. Remove the spray gun from the main body of the i-fogger®, and place it on the harness (Figure 15, pos 4). 10. Place the i-fogger on your back (Figure 15, pos 5). 11. Tighten the Velcro closures until they fit comfortably (Figure 15, pos 2).
-
Page 24: After Operation
(Figure 16, pos 1) to turn off the i-fogger. 7. Place the nozzle back in its upright position Figure 16 on the side of the i-fogger. This is to avoid leakage as there can still be liquid left in the hose. -
Page 25: Cleaning And Storage
6.3.2 Flushing the disinfectant solution tank and cleaning the exterior It is recommended to flush the disinfectant solution tank of the i-fogger® daily, to prevent it from being clogged. It is also recommended to clean the outside of the i-fogger as certain chemicals from the disinfectant solution may discolor parts of it. -
Page 26: Storage
6. Wipe the magnet (Figure 19, pos 1) and the magnetic fixing plate (Figure 19, pos 2). 7. Place the disinfectant solution tank back on the i-fogger. 8. Wipe down the i-fogger with a damp cloth. Figure 19 6.3.3 Storage See section 4. -
Page 27: Maintenance
7 Maintenance To ensure proper and safe operation throughout the life of the i-fogger® 1.0, it is recommended to have an authorised i-team partner check the machine after the first 50 hours of use and then every 125 hours afterwards. -
Page 28: Troubleshooting
Disinfectant solution is low Turn-off the i-fogger. Fill the tank with disinfectant solution. Fluid leakage Filler cap is not put back correctly Check and replace the filler cap correctly. -
Page 29: Decommissioning And Disposal
It is the responsibility of the i-fogger® owner to dispose of the product responsibly. At the end-of-life, the i-fogger still contains valuable resources and needs to be disposed of according to your local laws and regulations regarding recycling of electrical equipment. -
Page 30: Attachments
10 Attachments 10.1 CE Certificate... - Page 31 This document is part of the technical file of the i-fogger® and will be available upon request.
Need help?
Do you have a question about the i-fogger and is the answer not in the manual?
Questions and answers