Table of Contents
Advertisement
Quick Links
Advertisement
Table of Contents

Related Manuals for Smart Witness CP4-NA-LTE


Summary of Contents for Smart Witness CP4-NA-LTE
- Page 1 CP4-NA-LTE 4 Channel HD Recorder Version 1.2 smartwitness.com...
-
Page 2: Table Of Contents
CP4-NA-LTE -Table of Contents Warning: Introduction: Recording Playback and Analysis Package Contents: Hardware Overview: Dimensions Rear View Installation Accessory Camera Types Restrictions Acceptable Configurations Unacceptable Configurations GPS Reception: Power Cable and Wiring: Power Connection Video Output Cable & I/O Harness... -
Page 3: Warning
T H I S I S V I D E O T E L E M AT I C S 4 Channel HD Recorder Installation Guide MODEL: CP4 - NA - LTE Version: 1.2 Warning SmartWitness installations should be performed by a qualified individual or installation professional only. -
Page 4: Introduction
Introduction The SmartWitness CP4 is the world’s smallest 4 channel LTE-enabled vehicle recorder. CP4 is small, lightweight, easy to use, and simple to install. CP4 can be easily installed inside a glove box or purchased with a locking case to prevent unauthorized access to the recorded data. An LCD monitor is not required for use, but can be added to provide added visibility in and around the vehicle for added security and safer operation. -
Page 5: Package Contents
T H I S I S V I D E O T E L E M AT I C S Package Contents Product Name Image CP4-NA-LTE Vehicle Recorder SD and SIM cards pre-inserted (if applicable) Power Cable BAT(+), IGN+, BAT(-) -
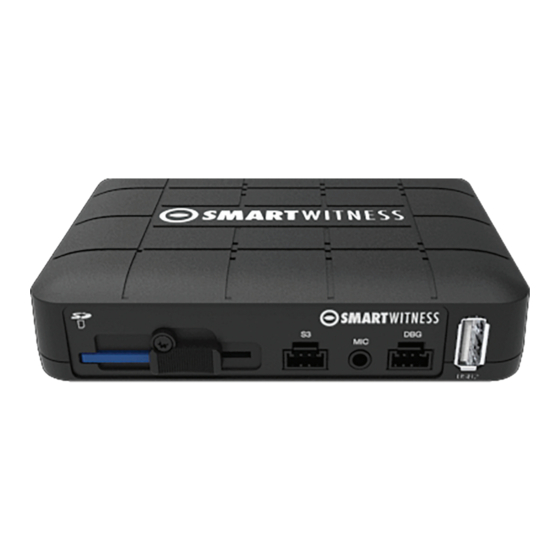
Page 6: Hardware Overview
Hardware Overview Watch the CP4-NA-LTE 360° Hardware Overview Video here: Dimensions 3.55” Built in Microphone 4.75” Front View Torx Screw Serial Port Debug Port SD Card Slot Slide Lock Microphone Input USB Input 2 smartwitness.com | 1016 Lunt Ave. Schaumburg, Illinois U.S.A. | Tel: 312.981.8774 |... -
Page 7: Rear View
T H I S I S V I D E O T E L E M AT I C S Rear View LTE Antenna Video Output & Connectors Alarm I/O Harness Camera Input Remote Control USB1 Power Input Harness (CH 1~4) Input Input Input... -
Page 8: Accessory Camera Types
Accessory Camera Types The CP4 has various accessory camera models available which should be installed in the appropriate location. In the table below is a reference guide for the common camera models. Model Image Installation Location Notes IP68 Weatherproof rated. L SVA032-A Road facing on Windshield bracket included for various... -
Page 9: Restrictions
T H I S I S V I D E O T E L E M AT I C S 7. Connect all cables to CP4 Recorder. Secure the windshield mounted camera cables into the headliner and down the A-Pillar. Required Camera Channel Inputs The CP4 has some restrictions on which cameras can be connected to which channel... -
Page 10: Unacceptable Configurations
Unacceptable Configurations The table below shows unacceptable camera configurations: Channel 1 Channel 2 Channel 3 Channel 4 3. Route the GPS cable and LTE Antenna cable (if applicable) up the side panel and on the dashboard, in view of the windshield (so it can have a view of the sky to acquire GPS signal). •... -
Page 11: Gps Reception
T H I S I S V I D E O T E L E M AT I C S GPS Reception GPS reception may be impaired under the following circumstances: 1. If there is an object at the end of the GPS antenna. 2. -
Page 12: Power Cable And Wiring
Power Cable and Wiring Lay out the power cable roughly where it will run once hidden behind the vehicle’s interior panels. This gives you an idea of where to route the cable and how much slack to leave on the way down to the vehicle’s power source. -
Page 13: Locking Enclosure
T H I S I S V I D E O T E L E M AT I C S Locking Enclosure (Optional) Front View (open) Rear View (closed) Wifi Modem Connection (Optional) 1. Connect external modem to only the USB1 input on the back of the CP4 unit. 2. -
Page 14: Lcd Monitor Connection
LCD Monitor Connection (Optional) The LCD Monitor enable live display of up to four cameras. 1. Connect the 8-pin LCD monitor connector to the LCD monitor harness 2. Connect the 4pin female aviation connector to the video input cable on the LCD monitor 3. -
Page 15: Completion & Power-Up
T H I S I S V I D E O T E L E M AT I C S Completion & Power-up After installation of the CP4 and accessories into the vehicle you can turn on the ignition and CP4 recorder will power on. -
Page 16: Troubleshooting
Troubleshooting 1. The CP4 has a solid red light on as well as solid green and blue. • Solid red LED indicates that one of the connected cameras is not receiving video signal. Please check the camera’s connection. » 2. The CP4 red LED is blinking •... -
Page 17: Led Status
T H I S I S V I D E O T E L E M AT I C S LED Status Status / Step Buzzer Voice Warning Record Network [Remark] to hear Blue Green the voice, audio output cable to speaker Booting step1(0~20) Booting step 2 (20~30) - Page 18 Notes smartwitness.com | 1016 Lunt Ave. Schaumburg, Illinois U.S.A. | Tel: 312.981.8774 | sales.usa@smartwitness.com...
- Page 19 SmartWitness is a world leading designer, manufacturer, and supplier of in-vehicle cameras, recorders, and software. Our lineup of IOT dash cameras and accompanying REST API have allowed SmartWitness’ video and data to be seamlessly integrated with GPS tracking, telematics and fleet management software, ushering in the new era of Video Telematics.
Need help?
Do you have a question about the CP4-NA-LTE and is the answer not in the manual?
Questions and answers